Children's cribs are presented in a wide range. They differ in design, construction and additional features. Due to the large number of offers, the selection process often becomes difficult. In this article we will take a closer look at beds with a pendulum - the most popular option.
What it is?
A crib with a pendulum is a piece of furniture that is made of wood and equipped with a swinging mechanism - a pendulum. If the baby has not yet been born, it is difficult to determine whether this model should be preferred. Medical experts disagree, so making a final choice is not easy.
Transformable bed with pendulum and drawers:
The principle of operation of the pendulum mechanism is simple: the rocking chair is set in motion by touching the body with your hand. The baby, moving in the crib, is also able to launch it himself. The main requirements are that it should not stand close to the wall with its moving sides and should be equipped with a lock:
Varieties
All beds with a pendulum allow you to rock your baby directly in the cradle. However, they are divided into different types and are longitudinal, transverse and universal. You can choose the right model by determining your needs and familiarizing yourself with each type in detail.
1) Longitudinal pendulum . Its main advantage is a good imitation of the natural rocking of a child in the mother’s arms. With longitudinal rocking, the baby will calm down and fall asleep much faster.
2) Transverse pendulum . Such cribs are compact in size, so they are suitable for installation in rooms with a small area. They have been used for many years, but previously they tended to turn over to one side. In modern conditions, children's beds are equipped with special devices that prevent them from tipping over. All pendulum products have a locking mechanism, but this does not mean that it will perform its functions properly. Some manufacturers install low-quality parts on their products, so inspection and testing should be carried out during the selection process. It is also important to carry out the installation process correctly.
3) Universal pendulum . Beds of this type provide users with the ability to transform the mechanism. This is convenient if you may need to change the position of a piece of furniture in the future. In this case, parents will be able to convert the bed in a short time. Such models also have the ability to remove side rails and install additional accessories.
The choice depends on the preferences of buyers. It is better to choose universal beds with a pendulum when the room area and budget allow.
Stages of work
The main reference point is the manufacturers' guidelines. With the right approach, work begins with studying it. It will also be useful to watch video instructions for assembling a bed with a lifting mechanism. For each specific model, the algorithm of actions may differ slightly.
Assembling the base and box
Work on the formation of the base box is carried out according to a simple scheme:
- The front and 2 sides are connected first.
- The central crossbar is fixed to the U-shaped structure (it also serves as the main support of the body).
- The backrest is attached to the sides.
- The bottom is fixed to the box.
For models with an additional drawstring belt, the bed assembly scheme is a little more complicated. In such cases, the drawers are connected separately and mounted on the inside of the body. The same applies to products with additional power elements, fixed with screws after assembly and checking the evenness of the body.
Assembly of the base is completed by fastening the bottom, checking or adjusting the angles and carefully tightening the screws without pressing.
Installation of legs and installation of corner ties
Not every model has free-standing supports; in a number of modern beds, these functions are performed by solid sidewalls. In other cases, the legs are connected to the base with screws and nuts. Experienced furniture makers carry out this stage, following the manufacturers' recommendations, namely, before installing corner ties (the most common option) or, conversely, as a last resort. The exact sequence of actions depends on the model and is specified in advance.
Corner ties that strengthen the bed structure are fixed with nuts with external and internal threads and countersunk bolts. In addition to screwdrivers, you will need an Allen wrench to assemble the bed. As a rule, these elements are mounted on 2 fasteners on each side; in order to avoid distortions of the ties, their installation is carried out after checking the evenness of the markings.
How to choose the right corner bed for children and adults
Installation of the lifting mechanism
Lifting mechanisms are usually supplied assembled, requiring only proper fastening - with the cylinder facing up, taking into account the asymmetrical design of the parts and the inadmissibility of errors. For most models, they are first mounted on the bottom of the frame with screws, then the lower part of the lifting mechanism is screwed to the inside of the base body. To simplify this work, most manufacturers make special marks or pins on the boxes.
After this, the gas shock absorbers are inserted into the lifting mechanism and tightened with nuts. These elements are fixed using fluoroplastic washers and nuts with a locking mechanism. At this stage, any risk of backlash is eliminated - the fasteners are tightened all the way, loosening at the end by half a turn, no more.
The operation of the lifting mechanism is checked several times; the presence of gaps or distortions between the body and the bed frame is not allowed.
Attaching the frame and mattress supports
At the final stage of assembling a bed with a lifting mechanism, a central leg is attached to the correctly installed frame, which acts as a limiter, and handles that simplify the lifting process. Installing lamellas requires care and a considerable amount of time. The plates are driven into the holders with a hammer or by hand with sufficient flexibility. It is impossible to hammer both ends at the same time; with the correct approach, one edge of the plank is tightly inserted into the holders, after which the lamella is slightly bent upward and inserted with the other end (if necessary, knocking it out with a hammer). The process ends with laying the mattress, re-checking the work, and tightening the cover. Furniture may be put into operation if there are no distortions, creaks, wobbles or any similar defects.
For a bed with an orthopedic bottom or a large number of slats, it is worth purchasing a hard or semi-rigid mattress.
Main design details
The simplest models of children's beds with a pendulum consist of the following structural elements:
- back;
- longitudinal boards-sidewalls;
- frame cross members;
- frame cross beam;
- longitudinal beam of the frame;
- a tube;
- legs;
- base board for mattress arrangement;
- connection unit between the tube and the back;
- fencing cord termination;
- pendulums.
Crib frame:
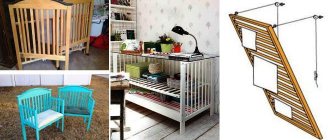
Additional components may be included in the kit. Simple models may include wheels, a small side, etc. Transformers can combine a crib, drawers for essentials, a chest of drawers and a changing table. This is due to the large number of additional elements. They can also be extended and transformed into a table with cabinets. The use of such models allows you to save space and make the process of caring for a child easier. If the child is very small, you can protect him from injury with a fabric bumper.
Dimensions and main elements of the transformable crib:
Drawings and instructions
Buyers should check for instructions included with the kit. But if it is missing, do not be upset, as you can use diagrams of similar models.
Instructions for assembling simple crib models:
You can also download detailed manuals: option No. 1, option No. 2.
The manufacturer's drawings allow you to understand what the final bed will look like and how to assemble it correctly. They should contain a list of components with their images, several step-by-step installation diagrams and recommendations. The instructions must be provided in a language understandable to the user.
The use of drawings and instructions is relevant, as it can significantly simplify the installation process and ensure comfortable operation. Assembly can be done either with an assistant or independently.
Common problems and errors
Possible problems or violations of the assembly technology include:
- Errors in marking or the need to drill holes. Some models come with pre-made holes, but in most cases you prepare them yourself. The backrest requires special attention; the slightest mistakes when attaching it lead to distortion of the entire structure.
- Errors when installing gas lift. Replacing the right side with the left or lack of symmetry makes the load on the lifting mechanism uneven, which ultimately leads to its rapid breakdown.
- Excessive pressure on the slats during installation.
- Strong tightening of fasteners.
- Assembling a bed on an uneven place or fluffy carpet.
- Using fasteners of the wrong length. The supplied kit may contain hardware of different sizes similar in appearance or purpose. Accidentally replacing long fasteners with short ones is considered a mistake; as a rule, assembling a bed with a lifting mechanism will not work in such cases.
The process of assembling a bed on your own, step-by-step guide, difficulties
Most of the above errors are typical, appearing both when connecting parts of a bed without a lifting mechanism, and when assembling models with a gas lift. Separate problems arise when it is necessary to use special tools to tighten countersunk bolts, the initial laying of the lifting mechanism in disassembled form (low, but not zero probability), or the presence of blind holes in the design. The latter are indicated in the drawing, but are actually absent in order to preserve the integrity of the panel during transportation. Such holes are drilled independently at the initial stages of installation.
Necessary tools and components
It is advisable to assemble the bed in the room where it will always be located - this way you will avoid additional inconvenience and loss of time. First of all, you need to carry out preparatory work, which involves preparing the required tools and components.
Remove the packaging that the product came in. Large elements are removed. It is advisable to lay out fasteners and additional devices on a sheet of paper or light cloth. It is better to assemble the crib without the presence of a child, as he may take one of the small parts. It is necessary to check which spare parts are included in the kit - not all components may be included during its assembly. In this case, you will have to buy them yourself. You can check the presence of fasteners by checking the instructions. The absence of drawings and spare parts indicates the purchase of a piece of furniture from an unscrupulous service provider.
To work, you need to prepare the following tools: a reversible wrench, screwdrivers, a hammer, pliers and a screwdriver. Every owner has them, so there is no need to purchase them. The required components vary depending on the model. As a rule, there are more of them in transformers than in traditional versions.
Installation diagram of components:
Build process
Usually even a person without experience can handle the process - the instructions for assembling the bed contain a detailed sequence of steps with illustrations. It is advisable to read it first, and only then move through the stages. This will allow you to roughly understand the scope of work, correctly arrange the elements, and check the meanings of unclear terms.
Classification of beds, photos of adult and children's models in the interior
There are several main difficulties that may arise:
- Requires drilling (some models have blind holes for screws).
- If the bed is lifting, you will have to additionally assemble the mechanism, and this is not an easy task.
- Lack of markings.
Because of the last point, distortions may appear, so a level and a tape measure will come in handy. For tightening furniture euroscrews, use a hex screwdriver. Confirmats can be dealt with with a screwdriver or an ordinary screwdriver.
It’s easier to assemble a bed with your own hands with an assistant so that he can hold the side elements and help with heavy parts.
Base
They begin to work on the base when the box (frame) is ready. Slats are fixed along its perimeter - from 15 for a bed for one and from 30 for two. The longitudinal bars are attached to the walls of the headboard with screws or self-tapping screws. Next, the transverse parts are installed.
The slats provide orthopedic properties and undergo additional strength testing. Their curved shape allows them to take the weight of the mattress along with the person lying on it without creaking or cracking. In the standard base, instead of them there is a continuous flat surface.
Thanks to their curved shape, the slats provide orthopedic properties of the bed
Some bed models have a solid base
Frame
The assembly of the box on which the mattress is located occurs first. These are usually laminated particle boards, which will require screws for fastening. However, if you have the opportunity to choose a model made of wood, it is better to do so - in addition to lower strength, chipboard has another serious drawback: the boards crumble, so it will not be possible to re-fasten the elements.
To strengthen the frame, you can fasten sheets of chipboard or MDF panels at the bottom.
If it is possible to choose a model made of wood, then it is better to give preference to it than beds made of chipboard
Headboard
Behind the base with slats comes the headboard with drawers (that’s what the side walls are called). In some bed assembly schemes, it is recommended to assemble this element first, since the base takes up a lot of space, and the backrest can be placed against the wall. Usually the mounting points are marked with holes; if not, you will have to drill them yourself.
Tips for making a headboard with your own hands, installation nuances
The drawers and the headboard are connected at right angles, fixed with euroscrews or other fasteners. In rare cases, wooden pins are used, coated with PVA at the fastening points (this is more reliable). Remains of glue must be immediately removed with a dry cloth, then proceed to further work. Now you can connect the drawers and the back.
The drawers are connected at right angles, fixed with euroscrews or other fasteners
Lifting mechanism
Assembling a bed with a lifting mechanism begins with the headboard. Then a central beam is installed to support the base, legs are attached (if any), and slats are laid. Only after all these stages comes the turn of the lifting mechanism.
For a high mattress, the device needs to be lowered slightly, for a low one - vice versa. The lower bar is connected to the drawers with self-tapping screws or euroscrews. Next, guide holes are drilled and the lifts are fixed. Now you can return to installing the base and attach the upper part of the mechanism to the longitudinal parts of the mattress pad.
The process is determined by the type of device:
- mechanical;
- spring;
- on gas cylinders.
In the case of a gas mechanism, the bolts are tightened so that the stock can smoothly lower and fold without tension. For spring mechanisms, the springs are also adjustable so that it is convenient to lift the bed. The last step is to stretch the fabric over the grid and place the mattress.
Features and options for placing a bed in a niche, furniture sizes
Spring
Gas
Additional equipment
Sometimes the bed has additional elements - shelves at the head or drawers for bedding. There are other options - for example, instead of legs, you can install wheels to move the structure to the side for cleaning. Plus, it looks more airy this way. In cribs you can often find an adjustable frame that allows you to fit mattresses of different sizes. And cradles usually have a pendulum for swinging.
It is better to install drawers only when it is clear that the bed is assembled smoothly. Otherwise, a distortion will form.
It is better to install drawers after the bed has been assembled and installed
Final stage
When everything is ready, the final assembly stage begins. A base is placed on the box and secured with fittings. The process is best done from the bottom up. It is important to ensure the symmetry of the lifting elements in the assembled bed - this way it will last longer.
The last stage is checking the quality of fastening, final tightening of self-tapping screws. The accuracy of horizontals and angles and the correctness of proportions are assessed. If all is well, you can move on to decorative parts and fittings.
After the purchase, the owners are faced with the question of how to assemble the bed. Contrary to fears, simple steps are enough for this: study the instructions in advance, prepare the necessary tools and space, follow the plan. The main thing is to double-check at the end that all parts are installed smoothly, and that the fastenings are securely tightened and will not come apart under pressure.
After the bed is assembled, all that remains is to tighten the fasteners and check the correct proportions