DIY comfortable chair made from plastic bottles
28.05.2017
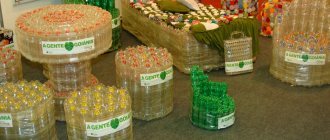
When purchasing juices or water in plastic bottles, craftsmen and craftsmen recommend not throwing them away. Plastic material is excellently used in crafts and designs that can be used to diversify children's dollhouses, decorate local areas, and also to create useful and functional pieces of furniture.
From a large number of containers you can make practical products, for example, you can make an armchair, table, stool and other pieces of furniture from plastic bottles with your own hands. If you are interested in the question of how to make a comfortable, stylish chair from plastic bottles, we suggest you read the step-by-step instructions for one of the product options.
1 Manufacturing instructions
Manufacturing instructions
To create a comfortable seat, chair or stool, you first need to collect plastic containers in the right quantity and store them in a secluded place. To make a comfortable chair you will need:
- collect 200-250 plastic two-liter containers of one shape;
- tape (wide);
- stationery knife or scissors.
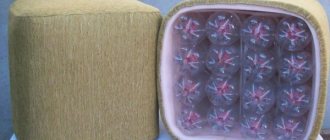
According to the scheme shown in the figure, whole bottles and cut parts are used, which are necessary to strengthen the building blocks. All parts are separated by symbols, where A is the whole bottle, B is the lower cut part, C is the upper part, D is the second lower part. We assemble the chair step by step:
- Cut the bottle in half and place C in bowl B.
- The whole bottle A is inserted with the bottom side into parts B, C.
- The lower part D is put on the structure in the upper part where the lid is.
- As a result of the work done, a block was created from which the seat will be made. 16 elements are made in the same way.
- The 2 parts are connected with tape. Assemble small and large blocks on a hard, flat surface with tight fastening to create a stable, strong structure.
- In the future, you need to connect 2 by 2 parts with tape, then 4 by 4.
- The chair seat made from plastic bottles, made by hand, represents a block of 16 bottles.
- The back is made from leftover plastic. To do this, three parts C+B are installed on the block (inside each other) similar to the parts for the seat. You will need two, which form a high tube-shaped part as the outermost element of the backrest.
- A reliable back will be obtained if the block is fastened at 3 levels with tape.
- Connect the seat and back with three strips of tape, after which the product is ready.
With the correct step-by-step implementation, you can get a reliable chair, which is often covered with plywood and a fabric cover, foam rubber at the seat and back. With the help of chairs you make yourself, you can complement the territory of your dacha or country house.
Here are step-by-step instructions for making a stool:
Algorithm for working with plastic 1. Cut plastic bottles 2. Put the cut part on the whole bottle 3. Secure with tape 4. Collect 12 pieces of parts 5. Take a wooden box 6. Insert tightly into the wooden box 7. All bottles are in place 8. Fasten with tape 9 Cutting up an unnecessary sweater 10. Putting on an old sweater 11. Cutting a rectangle from a piece of foam rubber 12. Cutting out a flap of fur 13. Sewing a flap of fur 14. Putting the cover on the foam rubber 15. Sewing it together 16. This is what we got: Finished stool
Advice from the experts
Craftsmen have many interesting solutions for creating a chair, table, sofa and other furniture elements from plastic bottles.
When planning to make a chair, table, or ottoman yourself, first, for example, leave the bottles open overnight in the cold during the cold season, then close them in the morning and put them in a warm place.
The thermal hardening procedure gives the material strength, and the products will be reliable and denser.
To impart high strength to plastic products, it is recommended to use solid blocks, as in the described instructions. This gives the product, in addition to strength, high shock-absorbing properties.
Lightweight plastic, ideal for creating furniture frames, allows you to make products of any shape and size with your own hands. Structures made from plastic can be used in the yard, on the playground, in the country house and loggia.
Durable material decomposes over several hundred years, which will provide products with a long service life.
Comfortable seat made of plastic raw materials
Do not throw away plastic containers from sweet water, beer, and other drinks. Rinse them thoroughly and store them in the pantry or garage. We recommend making a chair from plastic bottles with your own hands.
To make it you will need
- from 200 to 250 empty two-liter containers, preferably of the same shape;
- wide tape;
- stationery knife or scissors.
Description of work
- In the design we will use both whole bottles (A) and cut bottles (B, C, D, E). We will need the cut parts to make strong building blocks. Please take a look at the image below.
- Now you should place part C in bowl B.
- Insert the closed whole bottle A with the bottom part into the part from B and C
- Now place the lower part of the bottle D onto the structure from the lid side. We received a sample block, copies of which will be used to make the seat of our chair. A total of 16 such elements should be made.
Bottle shelves
The easiest way is to make shelves; this process is accessible even to a child. Although you can combine business with pleasure and, together with your child, make a mini-shelf for the children's room. These shelves can be placed in the home and garden, pantry, left transparent or painted in bright colors.
To make this item, all you need is scissors, a ruler, a stapler, screws and a screwdriver. So, the manufacturing process is simple:
- The shape and size of the product is determined.
- Using a ruler, a mark is drawn on the bottle. Thus, every detail is marked.
- Bottles are cut off from the neck side. The resulting glasses are the same height.
- If it is planned that the shelf will be colored, then each part is painted separately. It is better to use acrylic paints or varnish.
- Connect the parts together after the paint has completely dried. Fasten them with a stapler in the required order.
- To make the shelf have a decorative look, you can add decorative elements.
- The finished shelf is screwed to the wall with self-tapping screws.
Crafts from plastic bottle caps
Plastic bottle caps are a universal material for decoration. Some people use the lids to create panels and paintings. It all depends on the person’s imagination and his creative abilities.
There are many options for crafts made from plastic bottle caps. This material is often used for decorating rooms and garden paths. However, it will take a long time to collect them. Think in advance what color the product is planned for, and ask your friends to help you.
Such painstaking work requires considerable endurance. If a person does not have such a quality as perseverance, or he does not like monotonous work, this decor option is not for him.
Laying paths in the country and designing flower beds. Typically, plastic caps are collected to decorate paths or rugs in the country. At home, most often the caps are laid out in a special mosaic on a cement base that has not yet hardened, and if it is necessary to decorate a flowerbed or approaches to it, the caps are placed directly on the ground. This is done in order not to disrupt the access of oxygen to the soil.
Decor of house walls and individual elements. This design of a country house or estate will never go unnoticed by guests. Spectacular photographs against the backdrop of a “canvas” will delight household members from generation to generation.
In order for such an artistic panel to last as long as possible, it is necessary to adhere to certain rules:
- The lids should be attached with the bottom up. Otherwise, such a panel will quickly become clogged and lose its color.
- It is better to attach the caps not one after another with glue (although this option is also possible), but with the help of thin and long nails either on a plywood base or on wood. In this case, decorating a private house made from timber will be much easier than from brick.
- You need to draw a pattern in advance (as for embroidery) and decide on the amount of material and color.
Cork paintings are also created using the same technology.
Plastic caps are often used as decorative curtains.
And corks glued together can easily turn into a hot stand.
The only option when bottle caps are allowed to be attached “to the bottom” is when creating massage mats.
Here's how traffic jams can be used as a developmental tool. The baby needs to correctly place the colors in certain areas.
Children love to make crafts from plastic bottle caps themselves - from the simplest to quite labor-intensive models. This is understandable, because corks are a universal building material; you can use the elements separately, for example, lay out a mosaic or assemble a real robot or cobra.
Popular articles When is Forgiveness Day 2021 - March 14
In this case, the main thing is to support the child’s desire for creativity and not leave him alone with dangerous tools. The awl or glue must be immediately removed away from children. It is better to “perforate” the caps in advance, and use a safe fishing line to “assemble” the product.
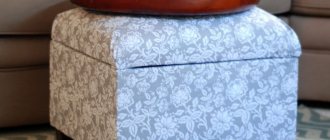
Ottoman made from plastic bottles: master class with photos and videos
Products made from scrap materials are becoming more and more popular. For example, you can assemble an ottoman from plastic bottles. The cost of the product will be approximately 5 times less than the cost of the purchase. Every needlewoman has most of the required materials at home. In addition, nature will say: “Thank you” if, instead of throwing away the container, you use it by turning it into recyclable materials.
Bottle preparation
Before you begin, you need to prepare the basic material. Bottles should be rinsed thoroughly inside so that no odor remains. On the outside, you need to soak all the labels and scrape them and any remaining adhesive off. Leave to dry.
Plastic bottles seem like a rather fragile material, but there is a way to give them extra strength. To do this, unscrew the caps and take the container out to the balcony or put it in the refrigerator. After a night in a cold place, tighten the caps and bring the bottles into a warm room. Place them under the battery. Air in closed containers will heat up and expand. Due to this heat treatment, the plastic will become stronger.
Necessary materials
What else is needed to create an ottoman? To understand the process, take a look
So, to start the master class, prepare:
- 14 bottles of the same size (colors may vary);
- marker;
- jigsaw;
- Double-sided tape;
- strong threads;
- thick needle;
- stationery knife;
- foam rubber for upholstery (it is better to take at least three cm thick);
- two scraps of plywood or other durable material;
- fabric for the cover;
- ruler.
That's it, the materials are prepared, you can start working. The result will be something like in the photo:
Let's get started
It is best to work on the floor or on a table with a flat top, since for the stability of the product it is necessary to assemble all parts in the same plane.
Wrap two bottles with tape, pressing them tightly together.
Make two such blanks. There is no point in sparing yourself with adhesive tape, since the quality of the ottoman depends on the quality of the winding. Take three bottles, place them in a row, align them and wrap them with tape. Make two such blanks from three bottles.
Connect the remaining four bottles using the same principle. Make sure that the bottoms stand in the same plane and do not wobble.
Collect all the elements. The middle of the product is a row of four bottles. Next, blanks of three bottles are placed parallel to this row on both sides. Blanks of two bottles are secured in the same way. It turns out to be a hexagon.
Connect all the parts without sparing adhesive tape
Pay special attention to tying the base of the ottoman around the perimeter
It is important to fasten the workpieces on a flat surface to maintain flatness
Place the workpiece on the plywood and mark the boundaries of the circle with a marker. Use a jigsaw to cut out the top and bottom of the ottoman from plywood. Make small notches around the perimeter.
Cover the bottom with thick fabric on one side - this way there will be no marks or scratches when moving across the floor.
Glue the plywood to the bottles on both sides. For a strong connection, wrap the resulting structure with a strong thread. It is convenient to thread the thread through the notches on the plywood.
Take the foam rubber and cut a rectangular piece from it. The width of the piece should be equal to the height of the ottoman plus seam allowance. The length of the foam rubber should be equal to the circumference of the plywood elements. Sew the foam to form a cylinder.
Cover the seat of the ottoman with foam rubber too. For softness, you can make several layers. Sew the foam of the seat with the foam of the sides.
Separately, it is worth sewing a removable cover. It can be easily removed for washing or replaced when you update the interior.
Now you know how to make an ottoman from plastic bottles yourself. The instructions are shown step by step so that you can create your own products based on them. You can experiment with the shape - make a rectangular place for the seat. You can experiment with height by making a second row of bottles.
For children's room
Due to the lightness and strength of the bottles, as well as their low cost, it is recommended to create an ottoman for the nursery together with your child. For the little ones, only five bottles are enough. Even a child can easily carry such an ottoman. He can also decorate the pouf on his own, since paints, brushes and pencils are always at hand.
Many people believe that bottles are waste from which nothing good can be created. However, with imagination and skillful hands, you can make products that will serve you for years. Due to the low cost of materials, it would not be a shame to take such an ottoman out onto the balcony or use it in the garden. Judging by the reviews of those who already use furniture made from bottles in everyday life, it is quite durable and can withstand the weight of an adult.
Crafts made from plastic bottles - a do-it-yourself highchair. Step-by-step master class with photos
From unnecessary plastic bottles or old hemp, plaster, and also add the desire to decorate your garden and a little imagination... and you get a nice craft - a do-it- yourself children’s chair “Kolobok on a stump”
.
Like in the good old fairy tale: “Granny baked a bun...”?
Below are detailed instructions with photos of crafts made from plastic bottles.
To make this craft we will need:
- Plastic bottles of the same volume (1 l) or stumps;
- Scotch;
- Starting plaster;
- Putty knife;
- Wire;
- Vegetable net;
- Newspaper;
- Bandage;
- Brush;
- Multi-colored paints.
Detailed master class
Let's start with making a hemp, although you can also take a real stump from a tree and thereby simplify your work in making a bun. But I didn’t have a suitable stump, so I had to make it myself, and this has its own twist... Secure 6 plastic bottles with a capacity of 1 liter together with tape. and fill the depressions with starting plaster using a spatula. Let the plaster set a little.
Crafts from plastic bottles for the garden
Apply a second layer of starting plaster, covering the bottles completely, seal the top of the bottles and attach legs to our hemp...
Let the plaster set well. To imitate bark, take the finishing plaster (knead in small portions!) and apply a layer around the entire circumference of the hemp...
Use your hands to make furrows in the bark... use your finger to outline the eyes and mouth of the hemp?
Take a little starting plaster and make a nose...
Crafts from plastic bottles for the garden
Lightly support the nostrils of the stump with the fingers of one hand and smooth the entire nose with a wet brush with the other hand. Let the hemp dry thoroughly, at least for a day.
Use newspapers to “bake” a bun of the desired size...
For reliability, I sewed a newspaper bun into a vegetable net...
Master classes from simple to complex: ottoman made from plastic bottles
Option 1. The simplest
Necessary materials and tools: plastic containers from 9 pieces or more depending on the size of the ottoman, wide tape, scissors, glue, foam rubber, upholstery fabric, a piece of thick cardboard.
We fasten containers with tightly screwed lids with tape in pairs. Then we connect everything into a single frame, additionally tightening it with wide tape on all sides. We place this structure on a piece of cardboard with its bottoms down and outline the contours of the seat. Cut it out, glue it to the bottoms or use double-sided tape. The lids act as legs and are located at the bottom.
We make a cover from upholstery fabric and put it on the frame. You need to make an elastic band at the bottom to gently tighten the fabric. If you want to sit comfortably, do not forget to glue a piece of foam rubber to the cardboard seat.
Option 2. Medium difficulty level
Necessary materials and tools: plastic bottles (for a medium-sized ottoman you will need 40 pieces), wide tape, foam rubber, scissors, wide tape, thick cardboard, upholstery fabric, threads, needles, etc.
We connect plastic bottles in several pieces, usually for square ottomans, containers are first tied together in 4 pieces, and then tied and wrapped with tape. Now you need to put the frame on sheets of cardboard and cut out two parts for the bottom and seat. They also need to be glued with tape to the frame of bottles. You've already created a stable structure on which you can sit, but it won't be enjoyable. You need to add a foam lining, which is cut separately for the side and top. The foam rubber is sewn together, and the bottom is covered with black fabric (for example, non-woven fabric). It is better to sew the cover from knitted fabric, then it is possible to stretch the fabric a little if you make a slight mistake in the calculations and allowances. And on top of such an ottoman you can decorate with beautiful embroidery or knitting; on the side surface you can sew pockets for newspapers and other small items.
Option 3. The most difficult
The difference from all previous options is increased stability and strength. This is achieved thanks to the special formation of the frame. The neck of each bottle is cut off and placed inside the bottle, neck down. The second bottle is placed in the same container until it stops, also with the neck down. The bottoms here will be on both sides. The result is a more rigid structure, reinforced with additional layers of plastic (you need to put half of the bottles with their necks up, and the rest down). All other stages are identical. You need to fasten all the bottles, cover the frame with cardboard bottom and top, as well as foam rubber and felt fabric.
Afterwards, you need to sew a cover from the selected upholstery material and baste the upper part. Make sure that the upholstery does not sag, otherwise an ottoman made from plastic bottles will look sloppy.
Furniture from scrap materials: recycling plastic bottles
Not only can you make a house and a fence from plastic bottles, they are also used as the basis for upholstered furniture. The idea is to use plastic containers rather than wood for the frame. With the lids tightly screwed on, they have a high load-bearing capacity, and when assembled into blocks, they are quite capable of withstanding loads of up to 100 kg or more.
A bed made of plastic bottles... you need a good mattress, and the base is not too difficult to make
Although the furniture is made differently, the general algorithm of actions is the same:
- Select “building material” that is the same height and tighten the lids well.
- Assemble blocks of the required size, securing them with tape.
- Having assembled the base of the required shape, sew the cover. For softness, adding furniture foam.
The trick is to ensure that the bottles fit very tightly against each other and do not move. The slightest play can lead to destruction of the structure. Therefore, assemble the blocks slowly, carefully securing them. You can stack bottles in layers, securing each layer in several places. For the inner layers, it is better to use double-sided tape - the fixation will be more reliable.
Ottomans/banquettes
The easiest way is to make an ottoman or banquette from plastic bottles. We proceed in the order described above. You need to find bottles of the same height. It’s better if they are the same shape - it’s easier to assemble. From plastic containers with tightly screwed lids we assemble a base in the form of a cylinder. It is advisable that the radius of the base be greater than the height of the bottles - this way the bench will not tip over.
Next, you need to cut out two circles from fiberboard, which will be slightly larger than the resulting radius of the base - this is the “bottom” and the base of the seat. We secure them with tape. We take furniture foam rubber and, according to the obtained dimensions, cut out the necessary parts. We sew the cover from furniture fabric in a color that matches the interior.
Such a banquette can be not only round. It is quite possible to make it square. And so that this furniture is not too light, it can be made heavier by pouring water. But water is not very reliable. It's better to pour sand. Both heavier and more reliable.
Sofas, chairs, armchairs
If you need furniture higher than one bottle, proceed as when creating walls for a house. Find “material” of the same shape and height. Leave the first bottle intact, screw the cap tightly (you can add sand to prevent it from turning over). The bottom of the other is cut off and one is placed on top of the other. The bottle goes a certain distance and does not move further, no matter how much effort you make. If the resulting height is enough, great; if not, put on the next one. This is how you assemble rows of the required height, then fasten them into blocks.
There is another way. It is more reliable in the sense that the bottles are held not by compressed air, but by a mechanical stop. And they have double walls, which is also important. The downside is more work, more raw materials are needed. The whole process is illustrated step by step.
- Take the bottle and cut it approximately in the middle of the height (the upper part with the neck is smaller).
- We insert the upper part of the neck (the lid is screwed on) until it stops into the lower part.
- We take a whole one, the same size and shape, and insert it bottom down into the prepared structure.
- We cut the third approximately in half and put the lower part on the top (with a lid).
From such modules we assemble blocks of the required configuration, fastening them with tape. Don't skimp on scotch tape. You can first fasten two bottles together, then assemble larger blocks from the double ones.
As you understand, with this technology there are a lot of bottle tops left (half of the third bottle). They can be used to make other crafts from plastic bottles: flowers, more practical things for the household.
Soft chair made of plastic bottles
To make a soft chair from plastic bottles you will need:• 1.5 liter plastic bottles - 24 pieces;• tape;• scissors;
The required number of plastic bottles is divided in half, the top part with the cork is cut off from half of them and thrown away. The remaining lower blank is put on the whole bottle. There are 12 such parts assembled. Now three parts are fastened to each other with adhesive tape, you should get 4 rectangular blanks.
Popular articles Cat - pillowThe prepared bottles are inserted into a wooden box, pressed tightly and secured with adhesive tape in this state. If bottles of the specified capacity are selected, they will fit firmly into the box and no additional securing will be required.
Next, prepare a cover for the high chair from any disused sweater. The upper part with sleeves is cut off, and the lower part is put on the chair. A rectangle with sides of 30 and 40 cm is cut out of a piece of foam rubber of any desired thickness. To cover the seat, a piece of fur measuring 46 * 56 cm is cut out. At the corners, the fur is cut out at right angles and sewn together as shown in the photo. The prepared cover is put on the foam rubber and placed on the chair. At the corners, the pad is attached to the sweater fabric with a thread and a needle.
The soft chair for the garden is ready and can withstand a weight of up to 100 kg.
Main stages of creation
Despite the different sizes and shapes of manufactured banquettes for the home, all products of this type are always made by analogy and according to the same principle. Therefore, this exciting process includes only a few basic steps. So, how to properly make a pouf from plastic bottles. Master class from professionals:
- First, you should prepare all plastic containers: remove labels, wash and dry well.
- Then you need to take two bottles and firmly fasten them together using prepared tape. You should never skimp on adhesive tape, since the bottles should fit very tightly to each other and not move. This approach will help ensure the structure’s strength and reliability.
- It is best to make the structure in separate sections, and then connect everything together. Therefore, the next two bottles are connected using the same principle and put aside for a while. As a result, you should get two blanks of two glued bottles at once.
- At the next stage, you will need to take not two, but three bottles at once, which should be well connected to each other using adhesive tape. You need to connect the bottles like this: put them in one straight line and cover them with tape. You need to do this one more time to get two separate sections of three bottles each.
- Then you should take four bottles at once and connect them in exactly the same way as in the previous case. There should be one section of four bottles.
- After this, all the resulting blanks should be connected to each other. To do this, take a section of four bottles and place it vertically in the center. Place two sections of three bottles each on the sides, and install the remaining blanks of two bottles each along the edges.
- The result should be a hexagonal design that resembles a circle.
- The next step is to connect all the parts of the future ottoman. To do this, you need to take the same tape and tightly wrap all parts of the structure. The bottles should be wrapped in a circle.
- Now you can put the workpiece aside for a while and take cardboard - you need to make two identical even circles from it, which should have the same diameter as the structure. The cut circles must be installed below and above the workpiece. If cardboard is not at hand, you can use plywood. However, to cut it you will have to use a jigsaw. You need to make several notches along the edges of the circles, along which you should tie the upper and lower parts of the seat with thick rope or nylon thread.
- Next, foam rubber is taken and three parts are cut out at once: two circles, which should be exactly the same diameter as the surface of the pouf, and a rectangular shape for the upholstery of the side part. After this, all the parts are sewn together using thick thread and a long needle.
- When all the parts of the banquette are connected, all that remains is to trim the finished product with upholstery fabric. Patterns should be made according to the same principle as foam blanks. After this, all parts are sewn from the wrong side manually or using a sewing machine. A large zipper can be sewn into the cover in a horizontal direction on the side, which makes it easy to remove the cover if the need arises.
- If there is no possibility or desire to sew in a zipper, you can use a regular long cord, which must be threaded into a special drawstring for the tie. It is best to place the drawstring at the bottom of the pouf so that it is not so conspicuous.
- You can complement the finished product with any additional details, for example, pockets where you can place glasses or a TV remote control. You can also decorate with ruffles or beautiful embroidery - it all depends on the imagination and creative thinking of the master.
In the process of creating a cover, you need to remember that the fabric for it must be durable and practical. Moreover, there is no need to tightly sew the cover, because in this case, it will no longer be possible to simply remove and wash it. The upholstery for the pouf should be made so that it can be easily removed and washed.
As you can see, there is nothing complicated in making an exclusive banquette. The main thing is to consistently follow all the steps described above and be a little patient.
Manufacturing stages
Having decided on the desired type of furniture, you can proceed to its manufacture. It is necessary to calculate the required number of bottles in advance and prepare them. Some fans of recycling things collect basic material gradually. After waiting until a certain amount of empty containers is collected, they combine the bottles into a block. The resulting modules are stored in a suitable place - a garage, closet, basement. After a sufficient number of plastic bottles have been collected, they proceed to the formation of the furniture itself.
Drawing creation and preparatory work
When preparing a drawing, it is desirable to estimate as accurately as possible the space that the piece of furniture being manufactured will occupy. This way you will be able to correctly determine the height of the chair and its width, the depth of the seat, and the dimensions of the armrests. Then compare the obtained dimensions with the dimensions of the materials available. In this case, it is necessary to take into account the thickness of the auxiliary elements - tape, film, covers. After creating a frame from plastic, the structure is supplemented with soft foam rubber, the seat is given rigidity through the use of plywood or chipboard, the furniture is decorated with fabric, although this does not significantly affect the occupied space.
To make a chair, you will need to create several sketches that, to scale, depict the desired piece of furniture from different angles. The drawing can be done schematically. Having previously indicated the length, width, height of all elements and plotting these parameters on the drawings, you can calculate how much material will be needed to bring the idea to life. When making a chair, you need to periodically (after creating each individual element) check the drawing.
When preparing for work, all plastic must be washed, cleared of stickers and dried naturally.
Making blocks from bottles
Once all the necessary materials for making the chair have been collected, the preparatory work has been completed, you can proceed to the first stage. To make the blocks from which the frame is then made, you will need several bottles and tape. The whole procedure looks like this step by step:
- Two thirds of all plastic bottles should be cut in half. The part with the neck is directed with the lid down and inserted into the other half with the bottom. Then a whole bottle is installed into the resulting structure, onto the top of which the lower part of another cut container must be placed. The neck of the second bottle goes to waste. The result is a rather hard plastic element, reminiscent of a loaf.
- Having made a sufficient (according to calculations) number of such blanks, they should be connected into a single module using tape. For better stability, all bottles should be placed with their necks down.
- It is necessary to wrap the structure with adhesive film as tightly as possible. This way it will be possible to obtain an element that does not deform during subsequent use.
At the end of the work, you should have several finished blocks: a base, two armrests, a backrest. At this stage, it is necessary to measure all parts of the future chair and check the parameters reflected in the drawing. If some parts turn out to be smaller or larger in size, the block structure is unwound, adjustments are made, and everything is reassembled.
Cut off the neck of the bottle Connect the whole bottle and the cut part, fasten with tape Connect the prepared elements with tape For the base you need 4 blocks of 6 elements
Assembly
You need to start assembling a chair from bottles by installing blocks in the form of a rectangle or square on the floor. Referring to the diagram, you need to fasten them with wire. This will create the foundation for the future product. The same blocks should be laid on top of it, but they should be placed across. If it is necessary to assemble in several rows, you can stack the elements in a checkerboard pattern. Next, you need to raise the rows to the height at which the seat is supposed to be built.
In order to make the structure stronger, it is recommended to install “risers” one or two bottles high in the corners of the base. They are formed from rounded blocks 10–12 elements thick. To fasten all modules, tape or cling film is used. The same round blocks are used to decorate the armrests. The back is created last - it can be made round or square, as desired.
Glue blocks with two elements to the base
Starting from level 4-5, add only backrest and armrest blocks
Ready product
Upholstery and soft seat
To upholster a chair made from plastic bottles, you will need foam rubber, which, if necessary, can be folded in several layers. You can make an additional cushion on the seat, similar to those chairs that are sold in stores. The same can be done for the back of the product.
The chair is covered with a suitable fabric over the foam pads. If you don’t have time to create a full-fledged cover, you can simply throw a blanket over the product. If possible and desired, furniture can be decorated with flock, nubuck, chintz, artificial leather, jacquard. If the product is intended for a cottage or garage, you should not use expensive materials - the cover can be sewn, for example, from old blankets. But at this stage, every craftsman who assembles a chair from plastic bottles with his own hands is free to let his imagination fly.
Make a cover and put foam in it
Bottle chair
An ottoman is a miniature product with which you should start making furniture from bottles. A more complex design is a chair, but if desired, you can quickly build it with your own hands.
You must first prepare a large number of bottles; it is better if there are a supply of them. Otherwise, you will need all the same materials as in the previous case.
You can easily assemble even a large chair from bottles
Step-by-step instruction
Step 1. First you need to cut the plastic bottle, after which the upper part will need to be turned over and placed in the lower one. Then a whole bottle is inserted there and closed with a lid, and the top is closed with the lower part of another container. The result is a very strong and stable structure, which is what is required in the case of a chair. Using the same principle, a fairly large number of preparations should be made, so all family members can be involved in such work. If you wish and have a lot of bottles, you can even build a small sofa.
The process of connecting bottles is shown in a detailed diagram
Step 2. You need to connect the resulting modules in four pieces using tape. As in the previous case, it is better to use more of it, especially when creating massive structures. Next, the modules from the bottles must be connected again, wrapping them with tape on all sides.
Connecting the bottles together
Step 3. Using the same principle, constantly wrapping new layers of tape, you should make the back and armrests of the chair. By the way, instead of adhesive tape, cling film in rolls is perfect for such purposes - you can find it in any supermarket. The advantage of the film is that it connects the modules more tightly than any adhesive tape, and it is much easier to work with.
Assembling the back and armrests
Step 4. In this case, you should also make a soft base from foam rubber or padding polyester - then the product will be more comfortable. The parts are cut out to the shape of the chair and sewn together. Next, you just need to make a cover for the chair and you can use it for its intended purpose.
We cover the chair with a fabric cover
What else can be made from bottles
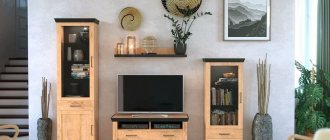
You can construct a lot of useful and interesting things from plastic containers. They are great not only for making various furniture. New master classes and technologies for creating crafts, interior elements (vases, curtains, stands, boxes) and products for the garden and country house are constantly appearing: bird feeders, gutters, flower beds, garden figurines, lampshades, watering devices, washbasins.
In households, plastic bottles are also used to create greenhouses and country greenhouses. Small summer buildings can be built by first collecting the required amount of material. Experienced craftsmen can even make a boat that will be no worse than an inflatable rubber or wooden one.
Furniture made from plastic containers is cheap, convenient and lightweight; it can be moved from one place to another without any problems. She is not afraid of heat, cold, or rain. That is why more and more new product options are appearing: shelves, cabinets, cabinets, poufs, chairs, stools, tables, sofas, beds.
Flowerbed Boat
Greenhouse
Original stool
You can make a comfortable stool from bottles that will appeal to both adults and children. The creation process is also understandable for novice craftsmen. To work, you need identical 2-liter plastic bottles (5-7 of them will be needed), tape or film, plywood or thick cardboard, and universal glue. If you want to make the stool more stable, you need to first pour water into the containers or pour sand into them. The creation of an original product is carried out according to a step-by-step algorithm:
- The prepared elements are placed on the floor with their necks up so that the end result is a round block.
- The entire bundle is fixed with tape or film.
- A round or square seat is cut out of plywood or a piece of thick cardboard according to the width of the resulting stool leg and attached to the bottles using glue.
If the seat turns out to be hard, it can be covered with foam rubber. The finished structure is decorated with fabric, self-adhesive wallpaper, and plain white paper. When using the latter option, it is worth allowing the child to paint the stool with funny faces or some other figures.
Connect plastic bottles with tape
Cut two circles from plywood. Secure them to the bottles with self-tapping screws. Wrap the structure with synthetic padding. Add soft filling for the seat.
Cut out the parts for the case
Stitch Secure on the stool
Comfortable chair with backrest
To make a chair out of plastic bottles, you need to proceed in much the same way as when making a chair. From three containers - a whole one and two cut ones - you need to assemble 16 blanks. Then connect them into blocks, first fastening 2 bottles together, then 4. So until all 16 elements form a single module.
Then the back is formed. It would be better to make it two bottles thick, the length is at the discretion of the master. Each row is held together with tape; the latter can be arranged in one container for beauty. The plastic backrest is attached to the seat.
You shouldn’t skimp on adhesive tape: the more of it, the more reliable the design.
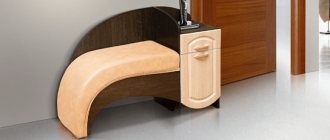
Table made of plastic bottles
If you want to furnish your entire dacha with plastic furniture, the next product after an armchair, stool and chair can be a table. It will require 1.5 liter bottles, identical in shape and color. For the countertop, you need to prepare a piece of plywood or use a ready-made version left over from old furniture. From the prepared plastic elements you need to assemble a block of the required thickness, give it the shape of a circle, rectangle or square.
Next, you need to turn the cover over and mark the points where it will be attached to the screws. It is better to arrange them in a circle - the tabletop will be located, as it were, on a plastic palisade. Fasteners should be selected in length so that their sharp ends do not peek out from under the table cover. Or screw them in from the front side, and then cover the caps with putty. Paint the work surface or decorate it with wallpaper.
The bottles are glued together in pairs at the bottoms. The upper part of the pair will be without a lid, the lower one will be closed. Then each of the legs is screwed into a lid fixed to the tabletop. To strengthen the structure, you can tie the necks of the upper and lower elements with wire. The plastic table is ready.
Prepare a wooden tabletop, glue corks, screw in bottles
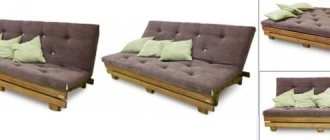
Homemade soft chair from plastic bottles
Often meeting with a large group, they are constantly faced with the problem of a lack of chairs. In order not to spend money on purchasing them, craftsmen suggest making several chairs from inexpensive scrap materials and using them when necessary. Moreover, they can not only perform the main function, but also complement the existing interior.
Plastic bottles, which are found in any home, are well suited for solving this problem. They are required 1.5-liter, in the amount of 24 pieces. To make the craft, you also stock up on: tape; scissors; a wooden box in which vegetables are kept; with a knife; foam; a piece of fur; threads; needles. You will need an old sweater that is no longer used for its intended purpose.
Popular articles Mobile table from an ordinary one
First, the top part of half the PET bottles is cut off with a knife. The blanks formed from the lower parts are placed on whole bottles from the neck side until it touches the cap. One blank is put on one bottle.
The resulting parts are placed three in a row and secured together with tape. As a result, four rectangular blanks are obtained. They are placed vertically and tightly at the bottom of a wooden box, wrapped with tape, fastening them together. PET bottles are pre-selected by volume so that they fit tightly with their bases into the box - in this case, connecting the elements is not required.
The resulting high chair blank is turned over with the drawer facing up. They make a cover for it - they use an old sweater: they cut off the part on which the sleeves are; the remaining part is put on top of the chair. In this case: they tighten the lower part, for example, with a cord threaded through the knitting, so that it is fixed at the bottom of the bottles; the upper part of the sweater is placed on the seat - the bottom of the drawer; the parts of the sweater located on the sides of the high chair should be easily stretched.
Measure the size of the bottom of the wooden box located at the top of the high chair. Cut out a rectangle of foam rubber along them (the thickness is as desired). Then they place the blank on the back side of the piece of fur and cut out a rectangle from the latter, making an allowance on all sides of at least the thickness of the foam rubber.
The fur blank is placed fur side down; place a foam rubber plate on it so that the protruding edges of the fur are the same on all sides. They cut it at the corners, focusing on the edges of the foam rubber. Remove the foam.
Sew the edges of the cuts at the corners of the fur blank together with threads. A kind of “trough” is formed, into which a foam rubber plate is placed. The resulting “pie” is placed with the fur facing up on the top of the chair - on the bottom of the box. The fur at the corners is sewn with threads to the sweater fabric.
The chair turns out soft. It can withstand a load of 100 kg.
How to make a chair from plastic bottles with your own hands for your home, loggia or cottage
In a big, cheerful company there are never any extra chairs. Therefore, hospitable hosts often think about how to make new inexpensive sofas, poufs, stools or chairs.
The idea of recycling plastic bottles is useful from any point of view. Firstly, plastic is a durable material that takes several hundred years to decompose and therefore pollutes the environment. And secondly, it is lightweight, durable, ideal for creating furniture frames of almost any size and shape. There is a place for furniture made from plastic raw materials in the country house and on a large loggia, on the beach or playground.
To learn how to create such products, you only need to understand the main idea - how to turn a container with a lid into a hard and elastic material. Each craftsman offers his own original way:
- For example, you can leave open bottles in the cold overnight, and in the morning close the containers with lids and place them in a warm place. After such thermal hardening, the material becomes more durable, and products made from it retain this property for a long time.
- In another case, it is recommended to use whole blocks in the work. To do this, one bottle is tightly closed with a lid. For the other, approximately a third or a quarter is cut off at the top. The remaining bottom one is put on the first container from the side of the lid. The location of the cut is wrapped with tape. Thus, the material will not only be strong, but will acquire good shock-absorbing properties.
Materials and tools
Making a regular chair is a long and labor-intensive process, and in addition, it is financially expensive. You need to cut out parts from wood or plywood and assemble them, which requires at least a jigsaw, wood glue, nails, a hammer, self-tapping screws, and screws. To make a simple chair from plastic containers yourself, you will need to stock up on a minimum amount of necessary materials, most of which are literally at hand:
- directly bottles of the same color, design and size (from 90 to 200 pieces, depending on the desired dimensions of the finished product);
- strong tape, cling film or stretch film;
- knife and scissors;
- fabric for creating covers;
- foam rubber for softness;
- sheets of cardboard and wire for the frame (if necessary).
All the above materials and tools are intended for making a simple chair. Depending on the design of the intended product, various additional elements may be required. For example, to make the body of a rocking chair you will need parts cut from chipboard or fiberboard.
Foam rubber
Cardboard
Bottles
Requirements and materials
Original room with fencing and furniture made from plastic bottles
Before you make furniture from plastic bottles with your own hands, you need to decide on its structure and design. There are many options; if you wish, you can create the following unique things:
- bed;
- sofa;
- ottoman;
- table;
- chair.
Each item has its own design features, and the design is selected according to your own taste. Creating furniture from plastic bottles begins with preparing the required materials and tools. You will need to have:
New plastic bottles of different colors for creating furniture and crafts
- plastic bottles, each design will require a certain amount;
- sufficiently thick cardboard;
- foam rubber to create a soft seat;
- finishing materials (this can be the fabric from which the upholstery is formed);
- scissors and tape.
Tools and materials for creating unusual masterpieces
In some cases, additional tools may be needed; this fact depends on the type of product being manufactured.
Original table made from plastic bottles
An excellent budget solution for a room partition made from transparent plastic bottles
Furniture made from plastic bottles
This is a separate subject of discussion. On the Internet you can find entire rooms decorated in “bottle style”. It's amazing how painstakingly the creators of eco-projects pay attention to every detail.
Sofas, tables, chairs and ottomans
There are sofas, beds, armchairs and even tables assembled from seemingly unnecessary containers.
In terms of its properties, a sofa made of a plastic base is in no way inferior to a regular one; sleeping on it is much healthier than on a soft bed. Such sofas are a good solution for a country house. If necessary, it can be disassembled and reassembled.
To make furniture you need to prepare the following tools and materials:
- A large number of plastic bottles.
- Thick cardboard for creating “rows”.
- Foam rubber.
- Fabric or felt.
- Scotch.
The main thing is to understand that such material, although accessible and convenient, is extremely dangerous. When heated, it melts and releases an unpleasant odor that can be toxic. Although the plastic itself does not burn, when heated it can severely “scald” the owner.
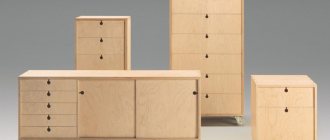
Shelves and cabinets made of plastic bottles
They will not take time to manufacture, however, they will serve conscientiously for many years.
Sometimes plastic bottles are used to store shoes or small items.
Such shelves will not take up much space, however, they will save a lot of time searching for the right pair of shoes.
Instructions for implementation
Let's take a closer look at how to make common furniture options from plastic bottles.
Lightweight and comfortable pouf made from bottles, covered with fabric
Ottoman
How to make an ottoman
The easiest piece of furniture to make, as well as the most useful piece of furniture for home use, is a pouffe or banquette. Such an item can be placed both in the hallway and on the balcony, in the nursery or in the bedroom. Or you can place it in the living room, where there are always not enough seats when a large company gathers.
A DIY bottle ottoman, skillfully decorated to match the interior, will surely impress your guests. And if they also find out what such a useful item is made of, their surprise will know no bounds, because from the outside the ottoman looks like ordinary furniture.
Necessary materials
For products that will serve as furniture, it is better to use dense, durable materials. It can be denim, thick linen or special furniture fabric. A pouf covered in faux fur looks very nice. This product immediately adds luxury and style to the room.
To create a handmade product from recycled materials, you will need some materials other than plastic containers. To make an ottoman from plastic bottles, you need:
- plastic containers with a volume of 2 l - 16 pcs.;
- Double-sided tape;
- thick cardboard or plywood;
- stationery knife;
- scissors;
- furniture fabric;
- foam rubber or synthetic winterizer 3-4 cm thick;
- lightning;
- sewing machine.
It is worth saying that if you do not have the skills to sew on a machine or if you do not have the machine itself, a reasonable solution would be to cut out the parts from the fabric and take them to a sewing workshop for stitching. Such an operation will take a few minutes and will not require large financial investments, but will guarantee that the cover will be sewn with high quality and accuracy.
https://youtube.com/watch?v=OAWBzHP6JLc
DIY soft chair
To make the craft presentable, you can cover it with foam rubber or synthetic padding. The easiest way to make an upholstered chair is in two stages: first make a seat that looks like an ottoman, and then design the backrest.
- For the seat, take the required number of bottles, which are installed on a cardboard template. Another similar template is used to cover the part from above. The entire structure is fixed with tape.
- Then a part is cut out of foam rubber or padding polyester that will soften the upper part of the seat. It is identical to the cardboard template covering the bottle structure.
- The seat element is wrapped on the sides with rectangular softener parts. This design can be fixed with a needle and thread.
- The second stage is to assemble the back and armrests from bottles. You can use “loaves” for them (how to make them was described above).
- The top of the chair can be covered with fabric. Tapestry, coat fabric, velor, suede, and leatherette are suitable for this purpose.
An interesting option is to cover the chair with wicker from old jeans. To do this, the trousers need to be cut into strips 3-5 cm wide. They are ground into longer ones that are suitable in size (compare by pattern). The edges of the strips are hemmed by machine.
Following the rules of checkerboard weaving, they make an original material for covering upholstered furniture.