What is decoupage
Decoupage is a word that came to us from the French language and is literally translated as “cut”. This very simple technique involves applying a ready-made paper design to any surface. Most often it is either glass, less often metal and plastic.
Absolutely anyone can do this type of needlework without spending a lot of time and effort on it.
Pictures for decoupage
Not all of us have the opportunity to buy special pictures or decoupage cards for decoration. But many people have the opportunity to make a photocopy of the picture. We make a photocopier on a photo or plain office paper.
(4 votes. 4.00 out of 5)
Tools and Supplies
Decoupage is a type of decorative and applied art that allows every person to create something truly beautiful using the simplest and most affordable materials. You may not believe it, but most of the tools you need are already in your home!
The decoupage technique for decorating products and decoupage furniture is again at the peak of popularity.
Let's figure out what is needed before starting work.
Tools
- Sharp manicure or medical scissors of a size convenient for cutting out small parts.
- You may also need a utility knife.
- Several types of brushes. If you plan to work with small details, you will need small flat brushes with thin artificial bristles. To apply acrylic paint or primer, a regular dishwashing sponge can be useful, but keep in mind that it creates a rough texture, which is not necessary for every job. To create a smooth surface, a large synthetic brush is required. Thin brushes made of synthetic bristles are suitable for drawing small details on the finished work. It is worth remembering that separate brushes are needed to apply glue, paint and varnish.
- Sandpaper for sanding surfaces during preparatory work or for correcting minor mistakes. Choose paper with fine and medium grain in several gradations.
It all depends on the goals you are pursuing.
Consumables
- Acrylic lacquer. There are many varieties of it on the market. There are both water-based and adhesive-based, with different effects (antique, with glitter, cracks) and finishes (matte, glossy, semi-matte, semi-gloss). Choose a water-based varnish, but the effect and finish should be chosen based on the desired result. Both regular construction varnish and a special one for decoupage are suitable for the job, but this is a more expensive option for advanced craftsmen.
- Acrylic paints, watercolors and pastels for drawing small details or creating additional effects.
- Glue. Craft stores sell jars of special glue for decoupage, but again, it is of no use to beginning craftsmen who just want to try themselves in a new technique. PVA glue from the middle price category (do not take the simplest one for children) diluted with water in equal proportions is suitable.
- Priming. Serves to improve adhesion between layers of glue and napkins.
- Printouts. Thin paper on which a pattern is printed using a laser printer is also suitable for decoupage.
- Napkins. Their varieties are described in more detail in the next section.
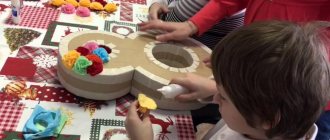
Decoupage of a wooden comb, master class with photos
Inspiration is a great power! The power that helps create the most incredible things. Every needlewoman is capable of decorating absolutely any thing that falls into her hands. For example, an ordinary, unremarkable wooden comb, decorated using the decoupage technique, easily turns into a wonderful, individual item in a few hours.
To work you will need:
- wooden comb;
- a napkin with your favorite design or motifs;
- PVA glue;
- medium-sized soft brush;
- acrylic paints;
- small sponge for washing dishes.
Work process
It is advisable to choose a bright, comfortable place for creativity. It is advisable to cover the working surface with oilcloth or file. First of all, remove the part with teeth from the comb. The surface of the comb can be degreased using pharmaceutical alcohol, but this is not necessary.
Then we proceed to prepare the napkin elements with which we will work. They need to be cut out carefully. For decoupage, only the top layer with a pattern is needed.
Then the most interesting thing happens. We place the element on the surface of the comb and very slowly, gently begin to coat it with glue from top to bottom. This must be done extremely carefully and accurately. The pattern should lie flat, without air bubbles or tears, and without stretching too much.
Glue the remaining parts in the same way. The smaller the piece, the easier it is to apply. For beginners and those who do decoupage for the first time, it is better to work with small motifs. It is difficult to glue a napkin in full size, and even more so on such a figured surface.
Then leave the comb to dry thoroughly in a dry, ventilated, but draft-free place. Once it dries, it will become faded.
Now you can start painting. We apply acrylic paint to the entire surface, painting a little on the edges of the motifs.
Don't forget to paint the other side as well.
The finishing touch is the application of gold and silver glitter. Apply acrylic paint to a piece of sponge and lightly blot all surfaces.
We repeat the procedure on the other side. Acrylic dries instantly. We put back the part with the teeth and – that’s it, the decoupage is ready!
So easily and quickly anyone can make a wonderful thing for themselves or as a gift to a friend. This is the final decoupage of a wooden comb:
Napkins for decoupage: what are they?
If we talk about the popularity of materials for decoupage, then napkins are the undisputed leader. Napkins are the basis of all equipment, which is why it is so important to take into account all the nuances when choosing napkins.
All you need is a top layer with a pattern.
Of course, at the first creative stage, a novice master can use simple serving napkins, but with the help of such napkins it is not always possible to achieve the desired result, because some napkins are too thin and are not of good quality, while others, on the contrary, are too thick. Don’t chase cheap materials; buy special napkins for decoupage in a specialized store.
They differ from dining rooms not only in their bright color and good print quality, but also in their texture and density suitable for decoupage.
Decoupage napkins differ from each other in the number of layers (but only the top layer on which the design is depicted will still be used in the work), size (21X21cm, 25X25cm, 33X33cm, 40X40cm) and shape (square, round, rectangular). Also, the arrangement of motifs can vary from napkin to napkin. There are five main arrangements: four identical motifs, two identical motifs arranged in pairs on the napkin, four different motifs, two different motifs and, finally, one motif occupying the entire area of the napkin.
The surface of the base must be light.
When choosing napkins, you should also pay great attention to their properties.
- Most often, the top working layer of the napkin is very thin and translucent. Working with it can be difficult, but it is thanks to this property that the finished work will resemble a watercolor painting, due to the merging of the picture and the surface.
- The ability of paper to stretch and form wrinkles. To prevent this from happening, you should prepare for decoupage carefully.
- Also, due to the transparency of the napkin, you should be more careful when choosing a color for the background.
When applying varnish, the napkin becomes more transparent, and against a dark background the design will lose its contrast.
Materials and tools needed for wood decoupage
For decoupage on wood, you need to prepare several tools that will help you decorate the desired element. All of them are presented in stationery stores or handicraft stores, which are found in every city.
- The first thing that is required is a wooden blank or a prepared wooden surface of a table or other thing.
- You also need paper napkins with a design you like, which will be transferred to the tree. In specialized craft stores you can find blanks on rice paper. They undergo special processing and are easier to work with.
- Brushes are needed to smooth and adhere the napkins. It is recommended to choose wide options with artificial pile.
- A special primer for wooden surfaces is also required.
- The obtained result is fixed with varnish intended for decoupage. There are several options with a glossy or matte effect.
You should also prepare:
- wood putty;
- rags;
- PVA glue;
- sponges;
- containers for glue, varnish;
- scissors;
- sandpaper.
Pros and cons of napkins for decoupage
Like any creative material, napkins have their advantages and disadvantages.
Let's consider the main advantages of this material.
- There are many different types of wipes on the market. Each master will find a color, texture, and ornament suitable for his work.
- Availability. Napkins for decoupage can be bought at almost any craft store or ordered online.
- Cheap material.
Mistakes made when fixing a drawing can be easily corrected - remove the crumpled napkin and wash the surface.
One of the disadvantages is the limited size of the finished work. But this drawback can be easily eliminated if you use your imagination.
Compared to other materials for decoupage, a napkin is the best solution, taking into account all its positive aspects and minor disadvantages.
For decoupage, you can use postcards that are pre-soaked in water, after which the top layer is removed.
Children's decoupage
Decoupage with napkins on cardboard is suitable for children. A figure is cut out using the template and decorated with an applique of napkins. This creative activity will help develop a child’s imagination, and handmade crafts will be useful to mother and grandmother.
You will need shoe boxes, which make wonderful boxes, large cardboard boxes, from which you can build a house for dolls with beautiful patterns and ornaments.
How to make decoupage from napkins: master class
The main idea of decoupage is to decorate the surface of an object with a pattern or ornament. The process is creative, and, as in any creativity, there are no concepts of “right” or “wrong.”
The main thing in the work is how closely you managed to approach the original idea.
If you want your work to be smooth, without cracks, scuffs, or bubbles, then this step-by-step instructions for beginners will help you avoid such mistakes.
Decoupage technique
Decoupage itself involves gluing a selected pattern onto a prepared surface. Of course, not everything is so simple, and decoupage is only partially reminiscent of appliqué.
But the technique is not as complicated as it might seem when looking at photos of decorated objects.
Decorative and applied arts originated in the 17th century, and for a long time this method of decoration was considered accessible only to rich people.
Today, anyone, regardless of income, can purchase materials or use available materials.
Methods for gluing napkins
For all methods and techniques for gluing napkins, there is a single rule: use only the top layer of the napkin, which can be easily separated from the other layers. This article presents the three simplest and most common methods of decoupage. Each of them is effective in its own way and is suitable for decorating different items. This section will tell you how to properly make decoupage from napkins. The choice of method is up to you.
Think about what exactly you want to decorate and choose the method that suits you best.
Using a file
Before starting work, prepare:
- water;
- plastic file for storing documents;
- glue;
- varnish
Select the image you want to transfer to the surface.
Algorithm of actions:
- pour water into the center of the file;
- place the desired ornament in the water, face down;
- straighten the pattern and drain the water;
- We apply the file with the glued pattern to the surface to be decorated and smoothly remove the film;
- Fix the still wet fragment of the napkin with glue;
- After the adhesive layer has dried, apply a layer of varnish.
This method is very simple.
It is suitable for transferring a fragment of a napkin to a surface of any shape. For example, a round, flat, shape with adjacent edges.
Using an iron
Here we will need the same materials as in the previous method, the only additions are an iron.
Algorithm of actions:
- liberally apply glue on top of the primed surface;
- using a hairdryer or air drying the workpiece thoroughly;
- carefully lay out the design on a dry surface, leveling it and avoiding folds;
- iron the workpiece through a cloth or baking paper, moving from the edges to the center;
- coat everything with glue again, and after it dries, coat it with varnish.
This method is only suitable for decorating flat surfaces.
The method is quite simple, even a beginner can do it.
Using a fan brush
Necessary materials:
- glue;
- ornament;
- brush;
- water.
This method of implanting paper into the base is suitable for experienced craftswomen who want to decorate concave or, conversely, convex objects.
Algorithm of actions:
- attach the selected ornament to the working surface;
- pour water on it;
- Using a fan-shaped brush, carefully smooth out the wrinkles using water;
- Cover the dried ornament with glue and secure the result with varnish.
Working with Images
When the table surface is ready, you need to lay out the pictures on it, as they should look like in the end. All images should be outlined in pencil. If you plan to have some kind of repeating pattern of identical pictures, they should be printed or photocopied on a printer.
It is important to pay enough attention to the formation of the image on the table surface. It is necessary to carefully consider the placement of pictures and clearly structure the composition. Otherwise, you may not like the result.
Next, the process of preparing images yourself begins:
- Pour warm water into a basin or other container.
- Take the picture and immerse it face down in water for 30-40 seconds.
- You need to spread the file on the table and place the marked picture face down on it.
- You should ensure that the image becomes very thin. To do this, you need to carefully remove layers of paper until only the top one with the printed design remains. The paper layers should be rolled up with your finger, but this should be done slowly so as not to damage the picture.
- The remaining last layer must be covered with PVA glue, and then, together with the file, applied with the wrong side to the table surface in the place previously outlined with a pencil. Wrinkles that appear on the paper can be removed by smoothing them out with your finger through a file. After which the file can be deleted.
The remaining images should be glued in the same way.
We eliminate flaws
Even experienced craftswomen have misfires, but don’t worry, they can be easily corrected or prevented. If you are decorating a product with small fragments of torn napkins, then smooth the still damp paper with your fingers or a wet brush, this will help prevent creases when drying. Noticed uneven color in the background? No problem! Feel free to dilute the paint with water to the desired shade and correct this error. Do any bumps or unevenness appear on the dried work? Gently sand the work with a fine abrasive and cover with several layers of varnish.
File method
We will decorate a smooth surface with curves using a file. The method has proven itself when working with thin materials, the top layer of napkins does not tear, it is convenient and easy to use, and the ability to decorate uneven surfaces. For this we need:
- Container with water;
- Stationery plastic file;
- Glue;
- Varnish.
Varnishing
When the product is completely dry, it should be coated with water-based acrylic varnish in several layers. Some works are covered with varnish in 100 layers! But when decorating small areas of the work, you can use three or four layers until you are sure that there is no step between the background and the design.
It is very important to sand each layer of varnish before applying a new one using soft sandpaper.
This will help avoid detachments, air bubbles and cracks. The varnish should be applied with a wide synthetic brush that does not leave obvious marks. Also, protect your health from the varnishing process by working in a well-ventilated area!
Depending on the decoupage technique and the style of the future product, you may need additional materials and tools.
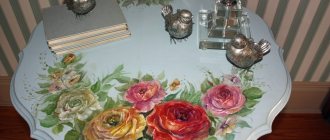
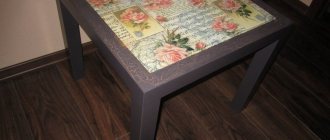
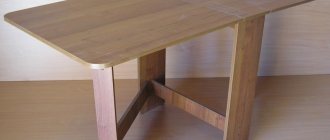
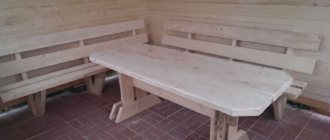
Preparing an old table for decoupage
Pictures for table decoupage can be glued not only to wood, but also to plastic and glass. If you are working with a plastic countertop, you first need to degrease the surface. Alcohol or an alcohol-containing liquid is best suited for these purposes. Be aware that solvent can damage the plastic. Then, if the surface is slippery, you need to sand it with sandpaper. Next, apply a layer of gypsum primer to the sanded surface, dry, and sand. Now you can do decoupage on the prepared surface. If the surface is not fully prepared, the decoupage will be sloppy.
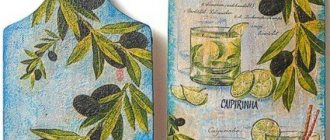
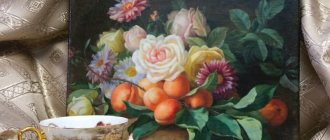
Where does any decorating work begin? By cleaning the surface from grease, dirt, and old paint. The surface is wiped with a cloth with alcohol. Next, pictures are selected and the overall composition is made from them. Any pictures will do: flowers, fruits, postcard motifs, birds, and so on. Pictures can be of several options: ready for decoupage (napkins, pictures, cards) and cut out from magazines or printed on a printer.
If you use ready-made pictures for decoupage, you do not need to prepare them for work; you can immediately cut them out and use them, without water. If the napkin is thick, then it needs to be layered. Pictures from magazines are pre-soaked, just like decoupage cards. We make a printout on photo paper or on a simple office sheet. We first cover the resulting printout with a layer of varnish on the front side; you can use any hairspray. Dry it and coat it a couple more times with varnish or decoupage glue, dry it again, and so on 4-5 times. Next, place in warm water for 4-5 minutes, remove and remove excess moisture with a towel. Then we remove the entire top layer of paper in one movement or roll it up in “pellets” from the center to the edges.
After all our efforts, a very thin drawing remains; we need to work with it carefully so that it does not tear. Carefully clean the back side of the design from pellets; you can carefully hold it under running water.
Nuances and secrets of technology
Here are some additional tips that will make decoupage with napkins easier for beginner craftsmen.
Before starting work, moisten the cut out fragments of the design with water from a spray bottle.
This will make the decoupage napkin softer and more pliable, and it will be easier to stick it onto the base.
If you still get wrinkles, don’t despair. Try spraying a dry cloth with acrylic varnish in aerosol form. But remember that then the design will not allow glue to pass through itself, so you should apply the ornament to a workpiece already coated with glue.
Preparing the creative process
Decoupage is a simple technique of simulating artistic painting on any surface by gluing an image and fixing it with varnish. Marie Antoinette and Lord Byron and even the artists Picasso and Matisse loved to do this needlework, and today it is available to everyone.
Choosing a style and idea
The home life of any family centers around the table, so it is very important to make it beautiful and original, so that both residents of the house and guests want to sit down at it and get aesthetic pleasure. Before you decorate a dining table whose appearance is pretty boring, you need to choose a new style for it. Usually choose from the following popular options:
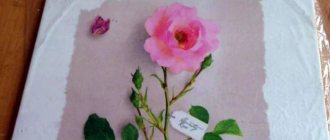
- French Provence - conveys the warmth and comfort of the southern regions of France. An image of lavender fields, antique wine bottles, vegetables and fruits is applied to a light surface, deliberately aged;
- Victorian - got its name from Queen Victoria, who adored rich scarlet, gold and emerald shades. English roses, deer, groups of nobles in hats with lush feathers hunting in the forest are the main elements of this style, pompous and luxurious;
- urban modern - simple, but with a claim to originality. Old newspapers, photographs of celebrities in black and white or bright color, music paper and printouts of views of major cities are used;
- second-hand chic - the deliberate carelessness of the images is conveyed by the blurred contours of flowers, birds, angels and village houses, executed in cheerful pastel colors.
Having chosen a style, you need to prepare materials for the application: kitchen paper napkins with suitable pictures, magazine clippings, reproductions of famous paintings. Their number should be suitable for the area of the surface to be pasted. In addition, it is important that:
- the pictures had a smooth surface, without convex patterns;
- a table made of plastic or glass must be degreased with alcohol and leveled with putty;
- relief images for decoration should be purchased in special handicraft stores to avoid material mismatch with the appliqué technique.
Decoupage: implanting a napkin into wood
There is a decoupage technique called “implanting a napkin” into wood. This technique is slightly different from simply covering a wooden product with napkins. It requires more serious preparation and elaboration of details. To “implant” the napkin you will need a fairly large amount of materials.
This technique involves the use of wax, acrylic primer, acrylic paint, varnish, glue, brushes, napkins, tape, wax polishing cloth, sandpaper.
Before starting the main work, the tree must be carefully prepared. For this purpose, the technique of burning and brushing is used. You can find instructions for this technique on the Internet.
The technique of “implanting a napkin” into wood allows you to make a beautiful, original and unique product
How to perform “implantation” step by step:
- Rub dark wax into the wood.
- Sand the wooden surface.
- Apply the napkins and let them dry.
- Rub the surface of the product with dark wax.
- Coat the product with varnish.
This technique requires careful execution of the work. The appearance of the surface to be decorated depends on this. Master classes on “implanting” napkins into wood can be found on specialized websites.