How to make a garden bench from a profile pipe with your own hands: step-by-step guide
Why profile pipe? The fact is that it has a number of advantages:
- The carbon steel from which they are made is durable and easy to process.
- Ease of welding parts if it is necessary to make changes to the design of the bench.
- The material is lightweight, which makes it easy to carry it from place to place.
- The optimal price is perhaps the most favorable.
Drawings of benches for a summer house from a profile pipe
If you already have experience in this area, then you can probably choose the required sizes yourself. Since benches are often selected according to the customer’s personal preferences, only you can choose the most convenient combination of sizes to create a comfortable and convenient bench. In this article, we propose a general plan for most standard country benches, without taking into account the peculiarities of a person’s build. These benches are suitable for almost everyone; they are designed for average body proportions.
Step-by-step creation of a drawing:
- The supporting part of the bench should be in the range from 40 to 60 cm.
- It is better to make the backrest up to 0.5 meters higher than the seat.
- The seat must be raised above the level of the lower supports from the ground by 40–50 cm.
What you need to create a bench from a profile
- main material (profile metal pipe and wooden boards);
- hammer;
- Bulgarian;
- drill with drills for wood and metal of different diameters;
- self-tapping screws;
- metal corners for connecting parts together and creating a frame;
- tape measure and other tools as needed.
Preparing the components of the bench
You can do this in two ways:
- Make the component parts and then connect them.
- Prepare all parts separately and begin assembly.
The second method looks like this:
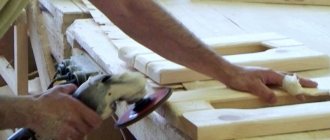
- Prepare boards of the same size, polish and sand them if necessary so that they become smooth and can be varnished in the future.
- Cut pipes of different sizes for the support and backrest.
- Make corners on the pipes, which we will then connect.
Assembly diagram for a garden bench from a profile
The materials and tools have been selected, all the blanks have been made, we begin assembly. The general build plan is as follows:
- The metal supports are pre-connected into a frame. It is easier and more convenient to use a right angle for this.
- Weld the parts together.
- Attach the legs to the base, also securing them with welding. The bottom of the bench is ready. For the back, attach a longer pipe to the back of the bench, the upper part of which will serve as the back.
- Clean the parts where the parts are welded.
- Prepare the wooden boards according to the drawing plan.
- Make holes with a drill in the designated areas for attaching the boards. Keep holes free of burrs and nicks.
- Screw the wooden base for the seat and backrest.
Congratulations, the bench is ready, decorate it, remove cosmetic imperfections and enjoy a well-deserved rest.
How to properly install a bench from a profile pipe in the garden
- Your feet should touch the ground during a normal landing.
- The angle of inclination on uneven ground should be such that the bench does not fall and creates comfortable conditions for the person sitting.
- The soil under the bench must be made level and stable.
- It is best to place the bench in the shade of a tree or behind a building.
- You can place ornamental plants nearby.
Additional functionality – awnings over benches
If there are no shady areas on the site, then an additional canopy can be provided for protection from the sun. Let's look at several options for its implementation.
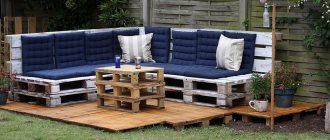
The canopy can be installed separately or made part of the structure, as in the presented photo. Here we see 4 racks made of timber, on which the top trim is made. The roof is formed by boards installed on edge - the classic form of a pergola. Lath trellises were added to the sides of the structure. All this will become a reliable basis for climbing plants, which after a while will provide beautiful and cool shade.
Pergola canopy
Installing a large canopy can be made from a simple bench into a swing. This functionality will be appreciated by both adults and children.
Bench with a wooden canopy in the form of a swing
How to make benches, tables and benches with your own hands
To implement the task, three conditions are necessary: accurate drawings, pre-prepared materials and tools. First of all, you need to decide on the model of future furniture and draw a drawing of a bench, table or swing on paper indicating the dimensions of each component (profile supports, vertical and horizontal jumpers, wooden slats, etc.) Based on the drawing, the required amount of material is determined.
Blueprints
There are a huge number of different drawings, diagrams and drawings on the Internet for making benches and tables from profile pipes, and they all differ in complexity: some have a simple linear shape based on a rectangle, others include radial elements and even fragments of artistic forging.
If you have no experience in handling a welding machine and other tools, it is better to focus first on the simplest drawing of a bench without a back or with a low back.
What you need
For manufacturing you will need the following materials:
- profile pipe of any shape measuring 30*30 mm (approximately) for the manufacture of a load-bearing frame;
- wooden planks 30 mm thick and 100 mm wide;
- fasteners - galvanized or phosphated bolts and nuts.
The exact amount of materials can be determined based on the developed drawing. For example, to make a simple bench without a back, 2.3 x 0.6 x 0.45 m, you will need about 10 m of pipe profile, 5 wooden boards and 10 sets of hardware.
Tools:
- angle grinder (grinder) for cutting metal profiles and wooden boards;
- welding machine for welding profiles;
- electric drill with a metal drill;
- a pipe bender for bending a profile if it is intended to use curved elements as part of furniture.
You should also prepare measuring instruments - a building level, a tape measure, a ruler - to check the symmetry, verticality and horizontality of the location of the main elements of the product.
Additionally, you should take care of protective coatings for metal and wood. To prevent corrosion of the profile pipe, special powder paint is used. Wooden planks are treated with ordinary stain with antiseptic properties. Paint or clear wood varnish is used as a finishing treatment.
Sequence of work
The design for making a simple bench without a back in the shape of a rectangle can be used as the basis for making any type of garden furniture. For the bench, in addition to these works, you will need to do the backrest. The table will differ in height and width.
It is recommended to first mark the profiles and wooden planks to avoid mistakes.
- Using a grinder, pipe fragments of the required length are cut in accordance with the dimensions of the workpieces in the drawing.
- The supporting elements of the bench are lightly welded together, forming a rectangle.
- After checking the alignment of opposite supports, the workpieces are finally welded.
- Jumpers from the profile are successively welded to the supports, and the welds are cleaned with a grinding disc of an angle grinder.
- Wooden boards are re-measured with a tape measure, and marks are placed on them for future cutting.
- Blanks of appropriate length are cut from the boards for the base of the bench.
- Marks are placed for holes for fasteners.
- Using a drill, holes are made.
- Wooden planks are attached to the metal structure with bolts and nuts.
When cutting profile pipes, it is very important to adhere to the correct cutting angle to ensure a clear fit of the fragments when connecting. The most convenient and practical cutting method is diagonally, when the profile is cut with a grinder at an angle of 45 degrees.
As fasteners, experts recommend using bolts with an invisible head or a round shape that is safe for use of furniture.
If desired, you can weld another jumper at the bottom to the load-bearing structure of the bench, connecting two rectangular supports. It will act as a stiffener, providing additional resistance to loads.
Making a bench with a back
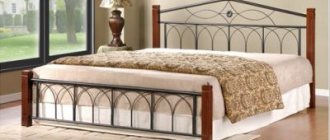
The most convenient and practical are benches that have a backrest in their design. It is more comfortable to sit on them, because the user can completely relax thanks to the support under his back. This type of bench can also be built with your own hands. Often designs with a back are displayed on the veranda or in the garden. In addition, they can find an excellent place in the house, especially if we are talking about a more complex option with a seat that folds down on the wall.
If you are an experienced craftsman, you can build a quality bench with a reclining back that will be used and look like a cozy sofa. If you don’t have a lot of experience, it’s better to start with a simpler option. Below we will look at how it can be done.
- The first step is to prepare all the necessary parts for the future bench with a backrest. After this, they will definitely need to be treated with an antiseptic composition to protect them from negative external influences.
- The next step is to assemble the supporting parts of the bench from the prepared parts. First you will need to thoroughly round all sharp corners and chamfer them. The components must be connected to each other with a bolt in the following order: A and B, then B, C, D.
- The inclination of the backrest will be determined by part D of the design. After this, it will need to be attached to part A. In the same way, as if in a mirror image, you will need to build a second supporting part.
- Next you need to assemble the back and seat of the bench. To do this, the supporting bases will need to be positioned so that there is a gap of 1 m 20 cm between them. First, the front and rear planks will need to be screwed to the supports, and then all the others. Then the technician will need to screw the stops securely.
- At the final stage of bench assembly, the backrest is installed.
Metal for making garden furniture
Garden furniture is made from different metals, each of which is good in certain situations.
Steel
Steel pipes are the most versatile solution, since this material allows you to construct products in many styles. Plus, it has good strength characteristics and elasticity.
Simple, reliable frame for wooden cladding
Steel is useful in creating large structures. They mainly use rolled pipes and rods. In forged products, the main material is plates. Steel is suitable for furniture in the dining area. The material is elastic, so it can be forged.
Work of art – forged products
The appearance of steel depends entirely on its grade and processing method. For example, stainless steel shines brightly in the sun - such surfaces are desirable for many modern styles, including hi-tech or minimalism.
This garden furniture is made of steel round tubes and strips
- Black iron is suitable for classic landscapes. When creating openwork forging, special alloys with minimal carbon content are used.
- This material is inexpensive. It is almost the only one that you can work with yourself, without specific equipment.
Cast iron
Cast iron is known for its heavy weight and brittleness. Manufacturers are steel foundries.
The products smell like an old English garden
- Cast iron is not at all afraid of corrosion, so products made from it will last for decades outdoors. This alloy, saturated with carbon, is very resistant to static loads, but it can be damaged by shock - although it takes a lot of effort to break it.
- After casting, it is treated with special coloring compounds that stick to the metal for a very long time.
Painted cast iron products - table, chairs
Cast iron furniture looks luxurious. With it you can easily highlight the status of the owner of the house - every guest will appreciate such decorations in the garden.
Melting cast iron is a complex technological process
It combines well with wooden surfaces.
Cast iron furniture is distinguished by its highly complex design. To build something like this using the forging method, you need to be a master craftsman, and also devote a lot of time to this process. The solution is suitable for many styles - a lot depends on the shape of the product.
Aluminum
This material is well suited for modern gardens. It looks futuristic and is characterized by simplicity of lines.
Only modern materials
This metal is much lighter than the previous ones. It can be used to make compact, functional products. A large selection of such solutions in IKEA stores, for example, folding tables, chairs, deck chairs and more.
Folding Aluminum Chairs
Also, pieces of aluminum furniture can be cast.
Cast aluminum table and chairs
Aluminum is combined externally with modern artificial materials, the same plastic or wood-polymer composite.
Aluminum frame and soft seat
- Like cast iron, it is not afraid of corrosion, but oxidation processes occur on it. This is expressed in the appearance of a dark coating on the surface of the material. This significantly spoils its appearance, so the metal is additionally painted.
- In terms of strength, it is in many ways inferior to both steel and cast iron. When buying furniture, be sure to look at the permissible loads on it.
You can also find products made from other non-ferrous metals and alloys - copper, brass, and bronze are used for production. Such solutions are very expensive, but in appearance they resemble cast iron or steel.
Bronze furniture setScheme
The diagrams show various options for making a sofa:
Sofa assembly drawing
Accordion sofa assembly drawing
Click-clack sofa diagram
Measuring circuit
Assembling a Eurobook sofa
Source
DIY furniture made from profile pipes
Profile pipes are a universal material for use in private households. The variety of products and price in retail chains determines the popularity of corrugated pipes among builders of dachas and individual buildings.
Profile pipes have amazingly high strength indicators.
The strength and quality of the materials used in the manufacture of pipes, the possibility of using anti-corrosion protection and other attractive factors determine the breadth of their use.
Finished structures will be able to withstand enormous loads, while avoiding even the slightest deformation.
Profile pipes are widely used in the manufacture of household items, the construction of small forms in areas adjacent to houses, installation of the base of barriers, house frames, staircase, balcony and window grilles, do-it-yourself metal furniture for indoors and outdoors, tables, chairs, beds.
If corrosion does not affect the steel, it will serve you for tens or even hundreds of years.
Useful tips
Experienced craftsmen use some techniques to speed up the assembly or finishing of finished products. Let's look at some of them:
- Assembling metal benches with bolts allows, if necessary, to disassemble the structure and reuse the resulting material. At the same time, the nuts must be reliably protected from rust so that they do not have to be cut off.
- To make finishing easier, it is recommended to paint the parts before assembly. This applies to wood backs and seats attached to a metal frame, or other components that do not require welding. At a minimum, a first coat of coating is applied, although a full finishing can be done.
- When manufacturing heavy parts (concrete castings, massive welded supports for long structures), it is recommended to carry out work as close as possible to the installation site so that you do not have to carry the finished product over a long distance.
Pros of using plastic in design
Despite the fact that some craftsmen make furniture from metal pipes with their own hands, it is still better to use plastic for this. In this case, polyvinyl chloride or PVC is usually used for such crafts as the cheapest type of plastic. Sewer pipes are mainly made from it because, having all the advantages of polymers, it is quite inexpensive.
Plastic pipes are resistant to rot and rust
If we mention the advantages of plastic products that allow you to make furniture from propylene pipes with your own hands, then these include:
- high strength;
- durability;
- resistance to rot and rust;
- ease of installation.
At the same time, it is always worth remembering that this type of pipe is afraid of exposure to high temperatures, under the influence of which the plastic is deformed. In this regard, in the case when you are going to assemble furniture from water pipes with your own hands and install it in a room where a high temperature will be maintained, for example, in a bathhouse, you should use polypropylene products for this rather than polyvinyl chloride .
Service life of polypropylene pipes
Polypropylene can withstand temperatures up to +60°C and is much stronger than polyvinyl chloride, but products made from it are more expensive.
PVC pipe bone lamp
The fact is that any product can be assembled from them quite easily using fittings and gluing. At the same time, you can not only make furniture from a profile pipe with your own hands, but also make many other products from them:
- stands;
- decorative elements;
- portable structures;
- small architectural forms.
For example, in the garden you can make original gazebos or benches from plastic pipes. By the way, if necessary, they can be disassembled quite easily. It is also worth noting that some owners of personal plots build completely functional structures from pipes, for example, greenhouses.
Scheme of a gazebo made of PVC pipes
In any case, in order to make various products from plastic pipes, it is enough to know the basic principles of their installation and have a healthy imagination. There is no need to meet any other requirements for this. Therefore, collect the remains of plastic pipes, and also study how you can make furniture from a profile pipe with your own hands in the photo. You can get such educational material on the Internet on specialized sites dedicated to interior design.
What you need to have for work
Of course, desire comes first, but in addition to it, you need to prepare tools and equipment. We will give practical advice on nomenclature, while we will try to use the minimum and most budget-friendly set.
Table 2. Tools for making a bench.
| Tool name | Technical characteristics and purpose |
| angle grinder | A very popular tool in any household, it is used for grinding hard-to-reach places, cleaning and grinding various materials and products made from them. Popularly called a grinder. For an angle grinder, you need to have a set of accessories: diamond discs for cutting, abrasive wheels of various thicknesses for grinding metal, brushes for cleaning rust, special rubber wheels with a set of emery cloths. This tool is mandatory, without it it is impossible to make metal benches. |
Drill | Also available in all tool sets. For this you need to have several sets of high-quality drills for metal, concrete and wood. If you do handicrafts often, then you need to buy special drills for drilling complex holes with different diameters and depths in one pass. |
Bending machine | If almost everyone has the first two tools, then only real masters have this machine. You can buy it ready-made, which will be quite expensive, or make it yourself. The first option is suitable for professional craftsmen, for whom making various objects with their own hands is not a hobby, but a full-time job. For amateurs, it is enough to have a simple homemade device; if desired, it can be done within one day. |
Welding machine | Today there are quite cheap, reliable and economical semiconductor devices available. They are easy and safe to work with and produce excellent quality seams. Many people have such a unit; it is not worth buying it to make one bench. You can borrow from friends or rent. If you plan to increase the volume of welding work, you will have to purchase your own equipment. |
There is no need to list measuring tools, screwdrivers, pliers and other small items.
Materials: profile pipe, corners, chipboard, etc.
The best option for selecting materials will certainly be a drawing. About 20% should be added to the dimensions in the drawing for technological losses required during the manufacturing process.
In many ways, everything depends on the available materials and financial capabilities. However, if you put together all the material used, you get the following.
- A metal sheet. For self-production, it will not be thick, but should provide sufficient rigidity and strength to the tabletop. To reduce costs, you can use chipboard; some prefer to assemble products on a table to which welding spatter does not stick.
- Profile material. Select rectangular and square pipes, angles, channels and others according to standard sizes equal to or close to the drawings.
- You can replace the metal profile with water or gas pipes. This will create additional difficulties when fixing them during assembly and welding, but such a replacement will be cheaper.
- A metal mesh made of small cells, about 1.5 mm thick, which will collect fallen tools, slag, scale and other similar things.
- A set of hardware (bolts, nuts, washers, studs, screws and others).
- Paints and varnishes for painting non-working surfaces.
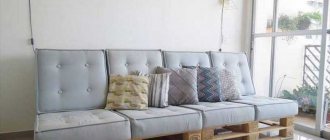
Upholstery
Upholstery fabric
Proceed with upholstery in the following order:
- cut two pieces of foam rubber corresponding in size to the sofa backrest and at least 15 cm thick;
- cover the cut out elements with material, for example, tapestry, connecting them with a zipper;
- Using decorative tape, attach the mattresses to the supporting structure. You will get the tape from upholstery material and Velcro. Secure one end of the tape to the frame with small nails, and the other to the tapestry cover;
- Having sewn three covers from the same upholstery material and equipped them with zippers, fill them with the rest of the foam rubber. You should get three pillows.
Manufacturing stages
The following are instructions on how to make a rocking chair.
Step 1: Template
First of all, you will need a template to form the legs of the rocking chair. There are various drawings of a rocking chair, there is one for every taste. You can simply take a piece of wood 15 x 5.0 x 90 cm and cut a bend on one side. As long as the cut is symmetrical, it doesn't matter how big the curve is.
To make the legs you will need 6 pieces of wood that are 3.0 cm wide, 0.8 cm high and 85 cm long. Wood glue is applied to all the pieces, and then they are placed in a jig.
Step 2: Holes
After the blanks have appeared, you need to make grooves into which the tenons from the chair legs will be placed. The grooves should be 5.0 cm from the edge of each leg.
You can use a machine designed for this job. If it is not there, then a chisel and a hammer will do - the result will be the same. With the help of a machine, this is simply done faster and more accurately, but otherwise there is no difference.
Step 3: Spikes
According to the drawings and dimensions, it is necessary to cut 4 pieces of wood 80 x 2.5 x 7 cm for four legs. Using a band saw, one tenon is made for each leg. This tenon should fit into the groove on the legs.
Step 4: Seat Support
Now it's time to add the seat support. Again, mortise and tenon jointing technology will be used to assemble the pieces together.
The seat support is another piece of wood, like the legs. It is necessary to note where the inserts need to be made.
Step 5: Front and Rear Support Rails
You need to add support rails to assemble the two sides of the chair. For the front and rear rails, two pieces of wood measuring 60 x 2.5 x 7 cm are used. The front part is assembled using a mortise and tenon, and 10 mm dowels are used for the rear.
Step 6: Back Slats
For the rear part, an 80 x 60 cm frame is used. Several slots are drilled into it on the top and bottom to accommodate the slats. The planks are made from 0.8 x 4.0 73 cm pieces of wood with all edges rounded using a router bit and round chisel.
Use 10mm dowels and a 10mm drill bit to attach the back to the sides.
Step 8: Seat
A square piece of wood with a thickness of 30 mm is used for the seat. If there is a similar detail from some tabletop, then it will also work quite well. It is advisable that it be made of the same type of wood as the rest of the rocking chair.
The dimensions of the seat are 55 x 60 cm (if the dimensions of the rocking chair are different, then the seat should be proportional to it). Several screws are then used to secure the seat.
Step 9: Armrest
A curved armrest looks more interesting than a straight one. However, the direct one will be much more convenient. To make it you will need two pieces of wood 50 x 7.0 x 2.5 cm. After they are cut on a band saw, you need to make two grooves to hold the back of the chair.
By making these grooves, there was no longer a need to add support rails at the back. All edges are rounded with a router, then wood glue is applied and secured with dowels. In general, the design of the armrests is simple.
Step 10: You're done
That's all! Now it’s clear how to make a rocking chair with your own hands.
You can use any type of finish that you like best. It also makes sense to varnish or paint the chair.
Armor mesh
In the third step of the work, you will make a support grid on the sofa frame, necessary to support the seat cushions. This is done using a metal armored mesh from an old bed. By fixing the mesh on a wooden base with metal brackets, you will get the desired result. For greater reliability, glue several transverse ones onto the longitudinal frame beams.
Final finishing
The assembled table with your own hands must be treated with protective agents. Antiseptics are used to prevent the negative effects of moisture. As for finishing materials, safe water-based acrylic varnishes are most widely used today. The tabletop is made from a variety of materials: wood, metal, plastic, glass. By themselves, these options look quite attractive, but require special processing. Wooden countertops are carefully sanded and at least 3 layers of paint or varnish are applied to obtain a mirror-smooth surface. Glass and plastic usually do not require additional processing; metal products look great in tandem with forged elements.
A table made of metal with a tabletop decorated with mosaics, paintings, and glazing looks attractive. Increasingly, furniture is decorated using decoupage techniques. To apply a neat design to the surface, all kinds of stencils are used.
A table made of metal and wood is characterized by strength, reliability, and durability. The stylish design will decorate residential premises or summer cottages. The models are successfully used for plumbing work, friendly gatherings, and family dinners.
Corner sofa
Corner design
To make a corner sofa, it is not necessary to use complex connections, for example, tenon products, or expensive materials. For work, we suggest using the following material, the volume and quantity of which depends on the size:
- timber 30×50 mm;
- chipboard;
- Fiberboard;
- plywood, thickness 5 and 15 mm;
- self-tapping screws and wood screws;
- nails;
- synthetic winterizer, with a density of 140–170 g/day;
- batting;
- foam rubber, 20 and 40 mm thick with a density of at least 30 kg/m 3 ;
- glue for foam rubber and wood glue;
- foam crumbs;
- furniture fabric;
- lifting mechanism;
- furniture legs 5 cm high.
It is not recommended to use nails when connecting parts. They will quickly become loose, and the sofa will creak and, as a result, fall apart. Therefore, it is best to use self-tapping screws for connections.
As for the tool, for work you will need:
- wood hacksaw;
- miter box;
- screwdriver;
- stapler;
- sewing machine;
- knife.
Types and technological features of metal gazebos
Garden houses can be built from various materials - brick, stone, wood, metal. Each of these materials has its own advantages and disadvantages.
Let's take a closer look at the technological features of metal gazebos. The main advantages of metal structures over products made from other materials:
- high strength (the strong frame of the metal gazebo can withstand mechanical loads and does not deform when the soil subsides);
- durability (metal structures can last several decades);
- fire safety;
- combination with other materials: corrugated sheets, slate, polycarbonate can be used as a roof for a metal frame.
The combination of iron and polycarbonate - metal gazebos, photo
Unlike wood, metal does not burn; it will last much longer, does not fade in the sun and does not crack. It will not be damaged by insects and will not collapse under the influence of weather factors. The only drawback of metal is its higher price compared to wood (by about 15%), as well as certain difficulties in assembly (welding).
Advice: you can extend the service life of a metal product with regular maintenance - timely identification and elimination of traces of corrosion.
Options
Sofa frame
The first method involves using beams left over after the construction of large buildings as a material. In addition to timber, you will need the following materials:
- foam rubber, which can be bought in a special store;
- a zipper 21 cm long, which will be required when sewing a cover;
- three 7 cm zippers used on pillows;
- upholstery material, such as tapestry;
- corner and metal mesh.