Types of cabinets and placement methods
The choice of a specific cabinet for a washing machine depends on several parameters.
First of all, the type of washing machine is taken into account. Top-loading models, the lid of which opens upward, cannot be hidden under a solid, solid countertop or sink. Floor and wall-mounted furniture options are suitable for these products. Front-loading appliances can be located in wall-mounted, floor-mounted, or built-in cabinets. You can purchase ready-made furniture along with a washing machine, but it is better to make it to order, which will take into account the dimensions of the room, the dimensions of the product, and include the necessary additional sections and shelves.
Mounted
Wall cabinets can be included in a furniture set or act as a separate element. In terms of their structure, they are practically no different from floor-standing models; they have rear and side walls, an open or closed facade. The main feature is the method of mounting the module, which should not come into contact with the floor. The cabinets are fixed directly to the wall using special fasteners.
When choosing a suitable model, special attention should be paid to its dimensions. The width of the furniture must correspond to household appliances
At the same time, wall cabinets can be placed above top-loading and front-loading machines. Inside there can be shelves, rods, drawers where personal hygiene items, bath accessories, and household chemicals are stored.
Among the main advantages of this type of cabinets are their small dimensions, limited access for children to objects located inside, and they also allow rational use of the usable wall area. This is an ideal option for small spaces; however, due to their design features, these models do not allow storing heavy items.
Floor-standing
Floor cabinets are the most popular among buyers. They are reliable, easy to use, and can have many additional sections. For small bathrooms, pencil cases are used, the minimum width of which is 60 cm, and the height is limited only by the ceilings. However, narrow, tall cabinets should not be overloaded, as vibration may cause them to tip over.
An alternative to tall pencil cases are cabinets. You can install a washbasin in the lid of the most compact of them, and place a washing machine underneath it. Also on sale are models with a countertop into which a sink is embedded. The height of such furniture is only 90-95 cm, depending on the size of the built-in equipment.
Finished products differ in color, shape, material, and size. In spacious rooms, you can build in durable large cabinets, which consist of drawers, sections for a washing machine and dryer, and upper shelves. Based on the way the furniture is positioned relative to the wall, linear and corner models are distinguished, and based on the type of door opening - hinged and sliding.
Built-in
Built-in wardrobes do not have a back wall, and some models do not have side walls. Their function is performed by the walls of the room itself. There are panel and frame structures. The first type is usually installed in a niche or in one of the free corners. The second type is most often placed along the wall and can be used as a separate type of furniture.
The height of the products is usually limited by the ceiling, which allows for the most efficient use of free space. The main advantage is its stability, which allows you to place household appliances even on the top shelves. The main disadvantage is stationarity. In case of repair work, dismantling the compartment is quite problematic.
The designs look very modern and attractive, but experts recommend installing such a cabinet only after careful planning and accurate completion of all measurements. The durability of the furniture makes it possible to place 2 cars in it at once. But to prevent them from loosening it during operation, it is best to choose silent models with minimal vibration.
Options and installation location
You can install the equipment in almost any area: under the work area, window sill, bar counter, in a cabinet, closet, niche, corner. Depending on the chosen model, it is placed in the following ways:
- separate from kitchen furniture;
- partially built under the countertop;
- completely hidden in the headset.
When choosing the optimal location, experts recommend adhering to certain rules:
- It is advisable to install the product near utilities, next to the riser and water supply, where the sink is usually located.
- If the kitchen has a dishwasher, it is better to place them on opposite sides of the sink.
- The refrigerator, oven, and dishwashing unit should be located as far away as possible, since the vibration created has a negative impact on the operation of compressors and built-in fans.
- When using front-facing models, allow for free space to open the door.
- Access to hoses and pipes that supply and discharge water must be free.
Full embedding
Built-in washing machines allow you to rationally use the kitchen space; they are not visible, so they do not affect the design of the room. This type of technology is characterized by convenience and practicality. This is the best option for small rooms. However, when choosing a product, you will have to focus on the parameters of the kitchen furniture, so the width and depth indicators are critical. You should also maintain a distance from the cabinet door to the device; it should be 5-10 cm. When choosing this option, you need to decide on the installation location:
- Under the sink. This is very convenient, because in most cases the cabinet under the sink is not occupied by anything, while the plumbing connections are nearby. The downside is that when replacing hoses, clogged sewers, or in other unpleasant situations, you will have to pull out the equipment every time.
- In a separate closet. The unit can not be installed on the floor, but occupy the middle compartment, under which another bedside table can be located. Some experts manage to hide standard models in a cabinet.
- Under the bar counter. If in previous cases it was possible to install only front-type machines, then this method is suitable for vertical models. The main thing is to provide for the presence of a folding tabletop. The only drawback of this placement is the distance from the riser and pipes with cold water.
Partial embedding
For partial installation, technology that matches the existing interior is suitable. For example, a refrigerator, automatic machine, gas oven, furniture facade have the same color. If the device does not match the design of the room, then it is hidden behind a decorative door. You can also install a stationary product, taking into account its dimensions. There are two ways to locate the unit under the countertop: with an open facade or a hidden door. Let's consider each of the options in detail.
Installation in a niche
The location of the device under the countertop is convenient. It can occupy a corner place near the wall next to the sink. The equipment will be hidden on three sides, but the front will remain open. But do not forget that it must be removed from other equipment. If this is not possible, there is an oven nearby, good thermal insulation between objects should be provided.
This installation method is very simple. All you need to do is select a product that is appropriate in size and connect it to the communications. However, the machine may not fit into the interior of the room or match its color; in this case, a special film is used to cover the facade.
Installation in a niche under a table top with a door
Various items can be located under the countertop: dishwasher, freezer, oven. These elements do not always correspond to the chosen direction of room design, especially when the floor, walls, and furniture façade are designed in the same style. Therefore, devices are often hidden behind the door. The washing machine is no exception.
When choosing a suitable model, measure its depth not by the body, but by its door and the most protruding parts. This arrangement is convenient because, if necessary, to protect the product from children, it can be locked. If there is other built-in equipment, vibration is taken into account; to reduce it, a gap is made between the side walls and the device on each side of at least 2 cm.
Stationary accommodation
For stationary placement, a regular freestanding machine is suitable. This is the easiest installation method. If desired, it can be placed in any free area in the kitchen, removed from the work area, or hidden behind a screen or curtain. It is enough to find a suitable place and connect the device to the plumbing communications.
The equipment is not covered by anything on the sides or front, so with this arrangement you can use frontal and vertical options. These models are usually purchased either to save money, or when the kitchen is renovated, there is simply nowhere to install the unit.
The fixed method is the most budget-friendly, in which there is no need to equip a special place in the closet or engage in its manufacture. However, when determining the optimal point, it is worth considering general recommendations, not to remove the object from the riser and pipes with cold water. The best option remains the area around the kitchen sink.
Nuances of self-assembly
You will choose what to make the cabinet above the washing machine from and what design decisions to follow. I'll just give you just a few recommendations.
Be sure to draw up preliminary drawings and assemble the cabinet strictly according to them. You shouldn’t do everything by eye or simply copy other people’s designs that you like. Everyone has different bathrooms, different free space and the corresponding dimensions of the washing machine itself.
But according to generally accepted rules, the width of the cabinet should be 3-4 centimeters greater than the width of the machine.
As for height, there are no strict restrictions. You can make it at least 1.5, at least 3 meters. But keep in mind the fact that tall structures are less stable. But this way you will be able to get more shelves and drawers. Look for a reasonable middle ground. Most often, cabinets up to 2.5 meters high are used.
Make a cabinet based on the size of the bathroom. If you assemble a huge cabinet and insert it into a small bathroom, it will look ridiculous. Plus it will require a lot of space.
I think that after considering all these nuances and features, you can safely go to a furniture store, or write a list to visit the construction market, where you will purchase all the necessary materials.
I’ll add on my own behalf that the cabinet above the washing machine is really a good solution, which I personally and my family have been using for several years. And no one is going to give it up.
Thanks to everyone who visits and reads us! Don't forget to subscribe, leave comments and ask relevant questions! We are always happy to communicate with our readers!
Watch this video on YouTube
Advantages and disadvantages of a washing machine in the kitchen
Let's look at the advantages of installing a washing machine in the kitchen.
- Freeing up space in a cramped bathroom.
- If the family is large and the bathroom is constantly occupied, after installing it in the kitchen, you can use the washing machine at any time.
Placing a washing machine in the kitchen has its disadvantages:
- A noisy machine prevents normal conversation during dinner or drowns out the sounds of the TV installed in the kitchen.
- The smell of household chemicals is not very appropriate where food is prepared and food is stored.
- Before washing, you still need to go to the bathroom to pick up dirty clothes. Everything you need is sorted and put into a basin; you will have to take the powder with you all the time if the detergent is not stored in the kitchen.
To get rid of the inconvenience, you can use several tips:
- Washing at night helps get rid of odors. You can load laundry when no one is in the kitchen.
- The powder is stored in tightly closed containers; it is better to place it in the next room.
- To prevent detergent from spilling, you can use liquid laundry mixtures.
- To reduce the noise level, you need to adjust the legs of the machine.
When arranging a kitchen from scratch, ceramic tiles are laid on the floor. It is not recommended to use parquet or laminate if there is a washing machine in the kitchen, since such flooring is susceptible to leaks.
When the bathroom has a large area
The area of the combined small-sized bathroom is increased due to the missing partition, so it is not difficult to find a place for large household appliances.
Let's consider several options for placing a washing machine:
- under the sink
- next to the sink under the common countertop
- in place of the bathtub, when replacing it with a shower cabin
The compactness of all furnishings is the main requirement when planning small-sized bathrooms.
In order for the machine to fit under the sink without any problems, you must:
Purchase a narrow (36–40 cm deep) and low (up to 70 cm) front-loading model. Today, many well-known manufacturers produce special units “under the washbasin”. And some offer ready-made kits: a machine plus a sink, which is especially convenient.
Important: When purchasing a compact washing machine, pay attention to the capacity of the drum. At least 6 kg of items must be loaded into the machine at a time, otherwise its use will be irrational
You will also need a water lily sink with a horizontal drain. It needs to be mounted on brackets. It is highly undesirable to rest the washbasin directly on the equipment.
Tip: To protect the washing machine from splashes, you should choose a sink that protrudes 5–10 cm beyond its boundaries.
It is recommended to install the machine directly under the sink only as a last resort. This method has several disadvantages:
- Due to the specific design of the sink, the drain and siphon become clogged more often.
- Mini-machine machines with a capacious drum can be more expensive than their full-size counterparts.
- There is always a risk of water getting on the electronics of the washing machine.
But it is best to allocate a special space for a mini-laundry. Here you can additionally install a drying machine, ironing board and hanger for freshly washed clothes.
Instead of a bathtub, you can install a shower stall and a washing machine nearby.
If there is very little space, then it is better to purchase a top-loading washing machine.
If you remove the bathtub, you will be able to install a machine even in the smallest bathroom.
This option will be possible if you decide to replace the bathtub with a shower stall. If you get rid of such a large part, you will have space not only for installing a washing machine, but also for additional cabinets or chests of drawers, and you can even add a basket for dirty laundry. At the same time, there will still be living space for freer movement.
After you have managed to place everything necessary and important in a tiny bathroom, you must try to create comfort so that it turns into a zone of complete relaxation in the evening, and in the morning - a zone of vigor. To do this, you need to love your tiny bathroom and add a few important details to its design that will turn it into a comfortable and beautiful corner.
We invite you to familiarize yourself with the Dimensions of interior doors to the toilet
If a bathtub 150 cm long is enough for owners, it can be placed on the short side. In this case, it becomes possible to use either the side opposite the bathtub by installing a narrow model of household appliances and a sink with a cabinet up to 90 cm (as in the photo below), or a wall adjacent to the bathtub and a top-loading washing machine (see below). In this case, the cabinet with washbasin can be up to 60 cm.
Please repost
1
Features of placing a washing machine in a 6 sq.m. kitchen. m
Every housewife dreams of a large, bright kitchen. Many residents living in Khrushchev-era buildings have to be content with a small room, the area of which is 6 m². But even with its small dimensions, I want to make this little thing functional and place most household appliances in it.
It is difficult to fulfill your plan; after arranging everything you want on a small square, there should be enough free space where all family members could gather at the table. The best option in the kitchen would be to use built-in appliances; they can be installed:
- in the nightstand under the sink, behind the door of the kitchen cabinet;
- under the countertop with an open facade and a closed door;
- hide in a niche under the window.
If you have a choice, it is better to install an automatic machine in the bathroom. But if there is no way out, then it is quite possible to place it in a small room. The main thing is to follow the basic recommendations for choosing a place.
Composition and technical characteristics
The basis of the glue is natural gypsum. Polymer materials are added to it, which determine the color of the mixture. Tinting does not affect the installation qualities of the mixture in any way. Glue consumption per 1 m2 does not depend on color. The adhesive composition has certificates confirming high quality standards. Perlfix gypsum adhesive produced by the Knauf production company has the following technical characteristics:
- Increased adhesion – a high degree of adhesion of various materials.
- Eco-friendly and hypoallergenic. There is not a single toxic substance among the ingredients.
- The only purpose is interior decoration of residential and industrial premises.
- Used in the temperature range: +5-30 degrees Celsius.
- Can be used for puttying small cracks and potholes.
- The shelf life of the finish is several decades.
- Allows adjustment of fixed materials. The composition is elastic and gives stretch.
- Setting time: 10 minutes.
- The period of complete fixation is 7 days.
- Neutral to mechanical stress. Withstands static, vibration and shock loads.
When using glue, there is no need for additional fixation with other fasteners. The adhesive composition retains its qualities for many years.
Sink cabinet
It’s difficult to choose a separate bedside table for each room, but you can make one for your bathroom with your own hands. With some effort, you can get a beautiful cabinet with shelves made of glass.
To do this, you will need plywood with a sufficiently thick thickness or chipboard. For the shelves you will need to select glass sheets. Their thickness must be at least 6 mm. Additional accessories include screws for furniture and wood, corners to fasten furniture in the bathroom, and hinges for doors in case they need to be closed. It is necessary to select varnish or paint, putty and double-sided tape.
The entire process of creating a bathroom cabinet takes place in several stages. First you need to draw all the details with a pencil on the selected material. We must not forget about the cut for the siphon, which is necessary for the washbasin. Calculate all dimensions in advance.
Installation diagram of glass shelves.
Then you need to cut out the walls and bottom for the bathroom cabinet. All parts are fastened with self-tapping screws so that the heads of the screws do not protrude above the surface of the parts, so that they can be carefully hidden with putty. There is no need to hang doors on bathroom furniture yet. You need to cut out all the parts one by one and fasten them together. First of all, only three main walls are cut out and assembled for a bathroom vanity, and then other parts are added to them. Each new cut part must first be tried on at the fastening location.
The assembled bathroom furniture must be tried on in its intended place. The workpiece should not wobble. The cabinet should be level, without oblique corners. Since the bedside table is adjacent to the bathroom sink, and a siphon will be attached to the back of it, there is no need to make a back wall. Instead, you can use furniture corners. Most often, it will be enough to use two corners under the tabletop. They are attached with short self-tapping screws.
The next step is to putty the structure. To make bathroom furniture look beautiful, you need to make the surface as smooth as possible, especially if chipboard was used. In the case when old bathroom furniture is used to create new furniture, you can only putty the edges and joints.
Sandpaper is used to sand areas where putty was not used. Sanding is performed for the purpose of better quality further painting of furniture. After sanding, you can begin the painting process. You can use a spray bottle or a soft brush. If the putty was applied to large areas, then it is necessary to apply an additional primer to the surface and only then paint. You can use pigmented varnish, then the furniture will have the beautiful, noble appearance of real wood. Once the paint is dry, you can attach the cabinet doors and move the furniture back into place.
Making shelves
Installation diagram of aluminum strips for countertops.
Next, all that remains is to build the glass shelves. You can buy them ready-made or order them according to your own sizes in workshops. You can build this piece of furniture yourself. First, all measurements are taken, after which they are applied to the glass. Using a glass cutter, the shelf and glass sheets are cut out. Using a special sharpening wheel, the edges are processed so that they become semicircular. Now you need to make the shelves matte. To do this, the desired surface is sprinkled with sand, and then it is rubbed with other glass. Sand is added if necessary. The procedure must be performed until the surface has the same matte finish without any scratches. To make this action faster, you can use a drill attachment. At low speeds, the nozzle needs to grind the sand. It is necessary to ensure that the glass does not overheat due to friction, because... If the temperature rises significantly, it may crack.
After the glass is prepared, the shelves from it need to be fixed in the bedside table using special fasteners. The top glass can become a tabletop, and therefore it is additionally secured with tape. In the future, you can further decorate the bedside table as you wish.
The nuances of installing a washing machine in a closet
To install a washing machine in a closet or cabinet, you need to carefully study the page with instructions for placement and connection in the data sheet of a specific model. Based on this information, we can conclude what height, width and depth is required for a niche to be built in with the necessary clearances.
Of the main nuances of designing cabinets for washing machines of different configurations, several key ones can be identified.
Best of all – floor placement
There are a lot of photos online where a cabinet is made with the washing machine raised onto a shelf or podium, and this is not the best solution.
The weight of the unit during operation is about 100-120 kg with constant vibration, which has a destructive effect on any furniture joints. If you want to make an additional storage compartment or drawer under the washing machine, use special metal shelves with fastenings for this.
Don't forget about moisture. In the event of a leak (and during long-term operation it will happen sooner or later, for various reasons), the steel structure will not suffer in any way. But a frame made of wood, MDF or laminated chipboard will need to be completely replaced.
Washing machine in the closet
If you want to make a cabinet for a washing machine with sliding sliding doors, be sure to take into account the width of the door so that it does not block the extension of the tray and the opening of the drum. Ideally, the width of the sliding door should be sufficient so that the unit itself can be freely “grabbed” and pulled out of the niche without removing the cabinet door from the rails.
About closing the washing machine doors
To make a cabinet for a washing machine with closing hinged doors, you need to take into account the actual dimensions of the unit, with a protruding drum relief and adjustment buttons. It is often necessary to increase the depth of the sidewalls by 50-70mm.
You should also choose the right furniture hinges for attaching doors to the body of a cabinet or cabinet. Conventional four-hinged hinges “stick out” by 15-20mm and extend to the depth of the sidewall up to 50-70mm. To ensure that the washing machine can be easily inserted and removed from the niche without removing the door from its hinges, it is necessary to take this fact into account.
Often, standard four-hinged hinges are replaced with mini hinges (with a 26mm bowl) - they are more compact. Or they even attach the doors to mortise hinges. You can read more about the types of loops here.
Other nuances of installing a washing machine in a closet or cabinet
When building a washing machine into a niche, cabinet or cabinet with a countertop, you should take into account its external design. For example, there are often situations when the top tray becomes inaccessible due to the lid hanging on top. And the design of the lower part does not allow the installation of a plinth.
You should not attach pieces of furniture to the washing machine - be it the countertop or the sides of the add-on. The only exception is the facades of the built-in model - they are rigidly attached to the front part.
How to install a top loading washing machine
A car with a top hatch can easily be called a practical device. Its design is thought out to the smallest detail; it has a number of significant advantages over front-facing models. If there is a power outage, a breakdown of the system or motor, the laundry can be obtained without problems, and water does not end up on the floor, threatening financial costs associated with replacing the flooring or renovating the kitchen of the neighbor below.
The main disadvantage of a vertical machine is its high cost; it is difficult and sometimes impossible to install it into furniture. Most often it is placed separately, less often installed under a folding tabletop. The second method proceeds as follows:
- Determine a place for the device.
- A section of the countertop is sawed off over a specific area.
- Open edges are covered with plastic or metal strips;
- The cut piece is processed and connected to the main furniture fittings. The result is a lid that opens 180 degrees.
- Fix the unit.
- Sewer lines are being installed.
- Perform the first launch.
What materials can be used?
The cabinet can be made from:
You should choose materials that are resistant to high humidity. Every furniture maker can cope with this task.
Doors are made from:
- furniture board,
- wood,
- glass,
- plastic,
- may look like blinds made of plastic or metal.
The following idea will ensure proper ventilation of the machine. Experts recommend opening the door at night after finishing washing, but people often forget to do this, and an open door can cause injury. To solve these problems, you can install special doors that allow air to pass through, providing round-the-clock ventilation.
Which curtain rods are best to hang tulle on?
Ceiling cornice
Ceiling cornice has considerable popularity. It got its name because of the installation method, since it is fixed to the ceiling using self-tapping screws. This type of cornice allows you to hang even the longest tulle.
The main feature of this type is that it comes in a flexible design; it can also be single or multi-level, making it possible to create a multi-layer composition.
Rod cornice
A rod cornice is the simplest design, which involves installing brackets along the edges of the window opening, followed by the installation of a special rod in them. The bar itself can be metal, plastic or wood.
Advice! To increase space, such a cornice should be placed as high as possible.
Rod cornice
Baguette cornices
Baguette cornice is the most interesting option. It consists of a hidden profile, additional fastening and a decorative strip that acts as a damper. It can be made of metal, plastic or wood.
This design is mostly decorative, so the plank can have different finishes
Profile cornices
To be able to hang several layers of tulle, you can install a profile cornice. Its advantage is that it is made of aluminum profile and can withstand high loads. In addition, such a cornice is universal and can be given absolutely any shape. If desired, you can automate the profile cornice, which will allow you to control the movement of the hinges, opening or closing the window with tulle.
Profile cornice
Telescopic cornice
The telescopic cornice is designed for hanging light tulle. This design is mainly used for small or narrow windows. At the same time, such a cornice does not require installation; it is installed using sliding modules.
Roman curtain rod
A curtain rod for Roman blinds is a structure that can be installed on the ceiling, in an opening on a window profile, or on a wall. Fastening curtains or tulle is done by gluing the fabric to the adhesive tape, which is located on the front side of the cornice. The structure is also equipped with a special lifting mechanism that assembles the curtain. The mechanism can be manual or automated. The curtains are assembled by hand using a system of cords or a chain. But the automated one assumes the presence of a wall unit controlled from a remote control.
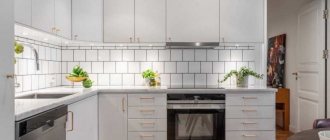
Installing appliances under the countertop
One of the best design solutions is simply installing the appliance in the kitchen under the existing countertop.
In this case, it is easy to maintain any particular style of kitchen set, despite the presence of built-in appliances.
When ordering a headset, you will only need to specify the parameters and the location of the niche where the washing machine will be located after installation.
The peculiarity of this option is that in this case the machines can only be used those that provide a frontal type of loading of clothes.
- Beko NoFrost two-chamber refrigerators: what are their features
Rating of kitchen faucets by quality, manufacturer and price
What types of kitchen dish drainers are there?
Step-by-step instructions for making a cabinet above the washing machine with your own hands
You can assemble the cabinet yourself. Both beginners and experienced home craftsmen can do this. The most important thing is to make the right calculations.
What is needed for making
In addition to manufacturing materials, you will need a minimum set of tools:
- screwdriver;
- drill;
- jigsaw;
- fastenings (corners, screws);
- accessories;
- pencil and tape measure.
Equipment and tools for making a cabinet can be found in every home.
Be sure to purchase and use protective equipment - glasses and gloves.
Preparatory stage
First you need to measure the dimensions of the stylish car and calculate the dimensions of the cabinet.
Important! Furniture should look organic in the bathroom. If it is small, then you should not make a cabinet under the ceiling. In addition, tall models are less stable
Optimal height – 1.7 m
In addition, tall models are less stable. The optimal height is 1.7 m.
It is better to make a cabinet from moisture-resistant laminated MDF boards: this is the most suitable budget material. It consists of pressed chips and natural binding elements that, when heated, do not emit harmful substances into the air.
It is necessary to make a drawing, taking into account the dimensions of the cabinet. It should be 3-4 cm wider than the washing machine.
Necessarily! The board must be covered with PVC, the thickness of the material is at least 19-20 mm. Furniture made from this material can withstand a heavy washing machine weighing up to 80 kg.
The MDF surface must be solid, without scratches or chips. Otherwise, the furniture will quickly deteriorate from moisture.
It is necessary to calculate the parameters of the parts, taking into account the fact that the shelves will be 10-15 cm shorter than the lower and upper walls. Then markings are applied to the MDF sheet and cut.
If you cannot cut out the parts yourself or lack confidence in your abilities, it is better to order them.
You can order ready-made material, which will be cut on a special machine.
Step-by-step description of the manufacturing process
How to assemble a cabinet for a washing machine:
- Screw the legs to the base;
- drill holes and insert shelf holders;
- connect the base and connect it with corners to the side walls;
- fasten the top part to the back bar with corners;
- install internal shelves.
At this stage the cabinet is almost assembled. All that remains is to install the doors with closers and think about the finishing.
Instead of a cabinet, you can hang air hanging shelves above the washing machine. It's much easier and takes minimal time. All you need is a treated board, a drill, a screwdriver and corner fasteners on which the structure will be held. However, it is worth considering the capabilities of the wall: if it is “weak,” then you should not place large, heavy objects on the shelves.
Final finishing and decor
If photo printing is applied to the laminated material, then there is no need for decoration. However, you can do it differently and attach lightweight mirrors to the shelf doors. They will reflect light, making the room seem more spacious.
Mirrors visually increase the space in the room, so many designers take advantage of this advantage.
You can also complete the decoration by installing useful accessories, such as a hook for hanging a laundry basket or a towel holder. These additions will be useful in order to save space and properly arrange the work area.
With the help of such cabinets you can significantly transform your interior.
How to properly plant and care for the Midsummer climbing rose
Floribunda does not tolerate excess moisture and drafts, so the growing area should be located on a hill and protected from winds. The planting area for climbing roses should be illuminated and shaded during hot times of the day so that the sun does not burn the leaves and petals. The flower prefers soil that is nutritious, easily permeable to air, and cannot tolerate drying out. Black soil and loamy soil are well suited for planting.
You can plant a Midsummer rose both in the spring, when the ground has warmed up well, and in the fall, the main thing is to get it at the right time. To plant you should:
- dig a hole 50-60 cm deep;
- pour drainage material onto the bottom;
- put fermented mullein or compost on top;
- Place the roots of the seedling in a clay mash for a few minutes and dry;
- shorten too long roots and remove diseased roots;
- place the seedling in the hole so that the grafting site is located 3-4 cm below the surface of the earth;
- pour 3-5 liters of clean water;
- fill the hole with fertile garden soil;
- mulch the base of the bush with fresh grass, straw or wood shavings;
- Tie the seedling to a support.
After planting, as well as subsequently, the rose needs care, including watering, loosening the soil, removing weeds, fertilizing, and pruning. The plant should be watered 3 to 5 times a week to prevent the soil from drying out, which it does not tolerate well. Water for irrigation should be used warm, well-settled. It is better to water early in the morning or in the evening. Several times a week you need to fluff up the soil so that fresh air can better reach the root system.
In order for a rose to bloom abundantly, it is worth providing it with nutrients. During the entire flowering period, it should be fed with organic and mineral fertilizers. They can be entered either separately or together. The plant needs to be fed twice every 30 days. To prepare an organic-mineral mixture you need:
- mix mullein and water in a ratio of 1:3;
- add 15 g of phosphate-potassium-nitrogen fertilizers to 10 liters of the resulting composition;
- to stir thoroughly;
- leave to ferment for 14 days;
- Dilute 1 part of the resulting solution with 10 liters of water.
The mixture is ready for watering. To increase the frost resistance of the flower, in September the soil around the bush should be fertilized with potassium preparations.
Midsummer should be pruned carefully, removing only damaged and dried stems, as well as wilted and faded buds. If necessary, you can slightly thin out the bush. Due to its high frost resistance, the rose tolerates light frosts well, so you can start covering it at a temperature of -15 degrees. To do this, the bush is hilled up and covered with spruce paws or rags.
The plant is very rarely exposed to disease; if this does happen, the reason for this is improper care. In addition, it is not immune to damage from harmful insects. When they appear, the bush should be treated with insecticides designed to control pests. When infected with bacterial cancer, the plant is treated with copper sulfate or Bordeaux mixture.
With sufficient attention and care, a Midsummer rose bush strewn with gorgeous bright flowers will decorate any garden or the facade of a house and give pleasant emotions not only to its owner, but also to guests.
Rose Midsummer:
Types of cabinets for washing machines
Wall cabinet above the washing machine
Models of cabinets above the washing machine in the bathroom can be of two types:
- Sections with storage shelves are suspended above the washing machine, which is simply installed underneath them. Suitable for very compact spaces;
- The hanging section goes around the washing machine in the shape of the letter L. At the bottom side there is usually a compartment with a basket for dirty laundry. The compartment with shelves is also located at the top. A more practical modification. But she needs more space. Weight increases.
All of them require mounting directly to the wall without resting on the floor. For this purpose, select only durable walls with high-quality finishing. It is advisable to hang it from supporting structures. Overloading a weak wall can cause it to partially collapse.
Cabinets that do not exceed the width of the machine itself look harmonious. The height can be any. When hanging the cabinet, leave enough space between its bottom and the top of the washer. This way you can completely avoid problems with vibration and overheating.
Floor-standing models of cabinets for washing machines for bathrooms
The next popular type is a floor-standing cabinet for a washing machine in the bathroom. They have no bottom and may completely or partially lack a back wall. This is due to the heavy weight of the equipment and the need to remove pipes. A rarer type are models where the equipment is located in the upper part. It looks original, but it will create a lot of problems for you with the need to lift the laundry when loading it into the drum. It is also inconvenient to pour the powder, since you will not see a compartment for it at all.
Compared to wall-mounted ones, floor-mounted ones will require more space. But they will provide you with a complete and spacious storage system. You don't have to rely on the load-bearing wall. Choose any free one.
The height of the cabinet can vary from 1.7 to 2.1 meters. The width depends on whether the cabinet has one or two sections. But, you can be sure that it will not be narrower than 65 cm.
Built-in models
A built-in cabinet for a washing machine in a bathroom is quite rare. This is due to lack of space. But, if you are lucky enough to own a spacious bathroom, then by installing such a cabinet, you will get a lot of advantages. Gives complete freedom in organizing shelves and drawers. You can choose everything strictly to your taste. The absence of a frame will allow you to slightly increase the niche for the car. It’s a pity, but such an economical option in terms of space taken up is very difficult to place where it is really required. Be sure to level the walls and tiles. If there are significant differences in floor level, a concrete screed will help. If the problems are related to old, bumpy and chipped tiles, then it is easier to dismantle them than to level them.
Open location of the washing machine
One of the most common places for installing the device is the free space between the kitchen units.
In this case, the washing machine turns out to be jammed on the sides, and open at the front and top.
This makes it possible to use the equipment with any type of loading of clothes, and preference in this case is usually given to the vertical one.
Indeed, placing the device this way is quite convenient, but it is not always beautiful.
It turns out that it is quite possible to save free space, but at the same time even a minimally aesthetic appearance is lost. Where to hide the device in case of open installation?
No frost - what is it in the refrigerator, how does it work, pros and consWhat temperature should the refrigerator be?
- Rating of washing machines with the largest number of washing programs. Who to give preference to?
It is best to try to disguise the washing machine using self-adhesive film, or using paint.
If the device has smooth surfaces, then this will not be difficult at all. After this type of decor, the equipment will no longer be conspicuous against the general background and will ergonomically fit into the design of the room.