Types of knitted covers for chairs and stools
Crocheting furniture covers takes a lot of time. Knitted chair covers are made much faster, but do not look as attractive and airy. The finished product will help restore the attractive appearance of outdated furniture, fit it into the rest of the interior, increase its service life and make it comfortable. Before you start creating, you need to study what types of capes there are, as well as their features.
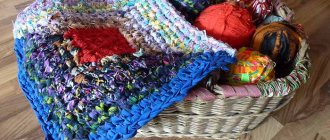
- Crocheted round rugs for the seat of a stool. This is the most popular option for upholstered furniture decoration. While working, it is possible to change the color scheme.
- One-piece chair covers. Manufacturing will take a little longer than the first option. If the shape of the seat is round, then the work is made several times easier - tying the corners is painstaking work. The creation process begins with a set of air loops. There are more than ten options for the patterns used. The work ends with the creation of an elastic sidewall that will adhere to the furniture, holding the product.
- Crochet square stool cover. This product will help save the needlewoman’s time. The easiest way is to crochet stripes; for this you can use the remaining threads from other balls and make the parts multi-colored. Most often, a square chair cover is created tightly, but you can also use the lace technique.
- Separate case. This product has two parts: a back and a seat. Each element can be made in its own color, choosing a successful combination. The knitting technique is also chosen by the craftswoman.
Crochet stool seats: review of models
Let's get started and start with the stool. So, the venerable stools come in round and square shapes. Accordingly, capes can be in the shape of a circle or square. And there are so many patterns for these capes. From the usual “granny square” to the fabulous openwork. Additionally, there may be sides that secure the product.
Review of knitted chair covers
The abundance of new models of chairs, the presence of clear frames, magnificent wood carvings and other delights of civilization do not exclude the need for an accessory. Remember the best English films - there is not a single event where the chairs are not dressed up. And how cozy a cafe in your city would be if you were greeted by such elegant chairs.
Of all the existing models of crocheted chairs, only two types can be distinguished:
- solid;
- separate.
Required materials and tools
Before making covers for stools, you need to clarify what yarn and tools will be needed during the work process. Usually, ready-made schemes contain detailed recommendations that will be useful for beginners. When choosing, it is important to take into account the characteristics of the threads and the frequency of use of the cover, then the product will be durable and practical.
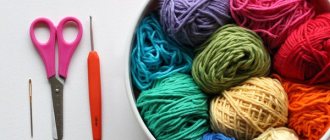
The best yarns for making a cape are wool, acrylic and knitted yarn. Be sure to take into account the recommendations of specialists:
- There is no need to use threads with a high wool content, the only exception is insulating capes.
- The optimal thread width is 120–230 m per 100 g.
- Different colored yarns should have the same thickness.
Many needlewomen prefer Iris brand threads. The material is easy to clean from dirt and does not shrink after washing.
There are no special requirements for the tools, but it is better to use a hook of at least 3 mm. The thinnest part of the device should be 2 times thicker than the yarn. It is better to knit a cape in several threads, then the fabric will be stronger, more resistant to abrasion and deformation.
Woolen
Acrylic
Knitted
Hooks
Purpose of bedspreads
Many people will find it inconvenient to cover a corner with a cape, especially in the kitchen. In a small space, additional details seem unnecessary. However, the case is guaranteed to preserve the appearance of the products. Neat furniture is the first sign of cleanliness and order in the house.
The cover is a mobile device that is easy to take off and put on. Removable models will protect sofas, chairs, and armchairs from grease and soot. Dirt can cause inconvenience because the upholstery is extremely difficult to wash. With a cape such problems will not arise. You can take it off and throw it in the washing machine in no time.
In addition to its usual purpose, a furniture cover refreshes the interior. He will update the old kitchen corner and transform the room.
Important ! When choosing a case, pay attention to its material. The most practical options are vinyl, eco-leather and other washable materials. Natural fabric will be pleasant to the touch, but it gets dirty quickly.
Operating procedure
To create rugs, crochet a chain of 5 VPs. Connect it into a ring. Now perform 3 VPs for lifting and move on to the next line. Which is made with twisted columns. Each of them has 10-12 turns.
Twisted posts are the basis of such beautiful rugs, so they must be mastered. This can be done with a special hook using a needle or pen. How many such elements are needed? For this you need a stool, or rather the size of its seat, which will be equal to the seat. And since the flowers will be voluminous, you need 2 pieces for 1 motif.
Crochet the finished flowers together and fill them with filler, for example padding polyester. It is not recommended to use cotton wool for these purposes, as it clumps and makes the surface uneven and unattractive. To assemble individual flowers, you will also have to work with crochet, making a CC. A beautiful and soft rug for the stool is ready. You can leave it as is, or decorate it at your discretion. It is recommended to make rugs in the same color scheme for chairs in one room, then they will create a beautiful ensemble.
Tips for beginners
In order for a knitted product to serve for many years and delight its owners, you should take care of the yarn. For work, it is better to choose synthetic yarn, for example, acrylic or cotton with the addition of synthetic fibers. For the crocheting process, it is recommended to use thicker threads. This is necessary to ensure that the rug fabric is dense and warm. Accordingly, you need to choose a larger hook. Before starting work, you need to knit a sample, a small square, wash and iron it. This technique will help with determining the size of the finished product. When the sample has dried, you need to measure it and, using a simple arithmetic proportion, calculate the number of loops that are needed to obtain a rug of the required size.
You can choose any knitting pattern. The main criterion is its attractiveness. You can even use a diagram for a napkin, or any other one you like, as well as use the diagrams and descriptions presented below.
Small scraps of yarn of different colors will make a rather attractive and interesting rug. This technique will allow you to use the accumulated remnants of threads that are a pity to throw away, but you won’t be able to knit anything from them. But it is worth remembering that the thickness of the thread should be the same over the entire surface of the product.
Related article: DIY credit card wallet
In order for the product to serve longer and maintain its appearance, you need to make a base for the future rug from dense fabric. If the rug is of insufficient size, the situation can be quite easily corrected with the help of a border. The rug must be tied around the perimeter with the required number of additional rows.
In order not to have to unravel the knitted rug and redo part of it, you need to carefully follow the icons in the diagram.
Knitting methods and deciphering the pattern
Knitting covers and covers for chairs seems difficult. If you decide on the basic designations in the diagrams and analyze the types of loops, then it is not so difficult. There are reading rules that you should remember:
- The regular knitting pattern is read from bottom to top, while circular knitting is read from the center to the edges.
- Odd rows are counted from right to left, even rows are counted from left to right.
- When knitting round capes for stools, the draping begins from the center. To prevent the radius from increasing, lifting loops are used. The number of columns that are added to the next row is equal to their number in the previous one.
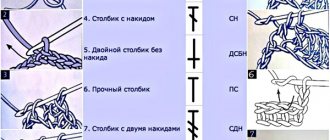
When crocheting with patterns, it is important to understand the conventions:
- Oval - air loops.
- Cross - single crochet (used to increase density).
- The letter “T” is a half double crochet.
- The crossed out letter “T” is a double crochet stitch.
- The letter “T” crossed out twice is a double crochet stitch.
- The “T” symbol crossed out three times means three double crochets.
- The letter "X" with a loop on top means a twisted column. Used at the end of knitting.
- “X” with a dash on top – knitting with a connecting loop, used for circular knitting.
In simple patterns for crocheting rugs and chair covers, only the main types of loops are used: air stitches, stitches with or without crochets, connecting stitches, lush stitches. This limitation does not prevent you from creating a beautiful and original cape with a pattern.
Stages of manufacturing various models
The process of crocheting covers for chairs and stools usually consists of several stages. The simplest are round and square-shaped seats, and products for decorating the backrest. One-piece models require more skill and attention.
Square crochet seats using weaving technique
Square rugs are suitable for chairs and stools with square-shaped seats. The simplest seats are most often knitted using a granny square.
But today we have original ideas.
There is no need for a pattern here; you need to tie several strips together with regular posts of any width, with a length equal to the width of the stool, and then weave them together using the darning method. I already told you that I once tried to weave a seat like this, but in the end it turned out to be a bag)).
See how you can decorate your interior with different things using this weaving technique.
Square for stool
Square capes are attractive, easy to use and easy to make. To work you will need black, gray, blue yarn (2 skeins of 100 g each), hook No. 3.5, scissors. The manufacturing process consists of several stages:
- Knitting begins with blue threads, in accordance with the pattern.
- The third row starts with a gray color; the square element is not knitted completely, but only on both sides.
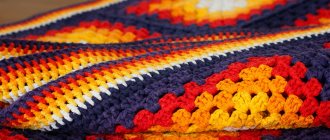
- Rows 5–9 are performed with black yarn using the same technique. Colors and stripes alternate according to the scheme.
- On rows 23–24, you need to switch to blue yarn for knitting the sides.
- The edges of the capes are tied with arches consisting of air loops in 2 rows.
Features of the “growing” Kidfix chair, tips on selection and assembly
The finished case is decorated with tassels of blue thread. To do this, you need to cut small pieces of equal length from the skein. In the same way, you can make a cape on any surface; you just need to calculate the optimal number of loops.
Knitting pattern Knitting begins with blue threads, in accordance with the pattern
The third row starts with a gray color; the square element should not be knitted completely, but only on both sides
Work rows 5–9 with black yarn using the same technique, alternating colors and stripes according to the pattern
On rows 23–24 you should switch to blue yarn for knitting borders
Tie the edges of the capes with arches consisting of air loops in 2 rows, and decorate the finished cover with tassels of blue threads
Crocheted stool cover with pompoms
A simple square knitted with single crochets will be decorated with a border of pompoms. They can be made in three ways: twisted and cut from yarn, crocheted pompoms, and also crocheted ordinary cones - popcorns, as suggested by the diagram.
Round seat cover with sides
A round cape made using the popcorn technique will be the perfect complement to a stool of the same shape. The soft surface is easy to use, and to create it you will need white, black, green yarn, or a combination of other 3 shades is possible. The work is carried out using hook No. 3, 3.5, using step-by-step instructions:
- Cast on 5 chain stitches and connect them with a ring.
- Next, 2 lifting loops are cast on, and 7 single crochets are knitted in the ring.
- Above each column you need to crochet 1 blind loop. Between the stripes an arch is made from a pair of air loops.
- On the next row, 2 half-columns are knitted in each arch, 5 chain stitches are cast on, then a yarn over is made and a long loop is pulled through.
- The remaining stripes are created in the same way, the number of rows depends on the diameter of the stool. To create a border, you need to knit single crochets in each half-column, and 2 stitches in each arch.
- Knitting continues until the length of the sides reaches 10 cm.
To make round stool covers practical and comfortable, an elastic band is threaded into the edge of the sides. With its help, the product will fit perfectly on the furniture. If desired, the edge can be decorated with the main pattern, then the model will acquire volume and an unusual appearance.
The diameter of the cape should be 1 cm less than the seat.
Round seat with an interesting border
We knit similarly to the square model - the top is popcorn according to a round pattern, and the eyes are according to the pattern located above.
Knitting a round seat with a spikelet pattern
Round seats can be used on both round and square stools, and a variety of patterns will allow you to choose a model to your liking.
This simple round crochet seat is decorated with voluminous spikelets.
The diagram is in front of you.
We have already discussed how to knit this pattern in the article about round pillows, there is also a video there.
Oval rug
Rug in the shape of a flower
A chair rug can be easily crocheted in the shape of a flower, such as a sunflower. You will need yellow and brown threads. The work is divided into several stages: creating a center from roses, knitting petals, tying parts.
Steps on how to crochet a sunflower:
- Make brown roses from Iris thread. They can be easily tied with a lace ribbon, which should then be twisted into a spiral. Pattern: 1 stitch + 1 air loop. In the third row, work double crochets into each hole.
- Start the petals with a chain of chain stitches, tying a single crochet on one and the other side. Next, make three rows of tying the petal around the edges.
- At the end, attach the petals to the center with a thread. Rugs in the shape of a sunflower will serve as decoration.
Tie brown roses and yellow petals
Connect the finished product together
Seat with leaves
This beautiful square stool cover is knitted with a leaf pattern, and separately knitted leaves are attached to the corners for decoration.
Beautiful seats on chairs with a relief flower
Many people have probably already seen this pattern - we have an idea for a knitted blanket with such large squares with a diagram, detailed description and video master class.
You can also tie square chair seats to the bedspread.
Chair back cover
For work you will need threads with medium thickness, hook No. 3. Bright colors are preferred. Diagrams and descriptions will help you go through all the stages correctly:
- Cast on 56 chain stitches.
- The second row consists of 6 half-columns, 2 air loops, as well as a pair of half-columns with one base.
- The third row includes 2 chain loops, 2 half-columns with one base, again 2 chain stitches.
- In the fourth row, knit a stitch, a chain stitch, another stitch, a chain stitch, then 11 stitches and repeat the pattern.
- The next five strips are knitted in the same way, but with each repetition the number of half-columns is reduced by 1.
- After this, the columns begin to increase, the drawing is performed in a mirror image.
- Two heights are knitted, the product is connected along the side seams.
Generally accepted standards for bar stool height, rules for its selection
A knitted cape can consist of a simple fabric or a flower-shaped pattern. The edges of the product are decorated with lace, in accordance with the diagram.
Base diagram
Flower diagram
Lace pattern
One-piece chair cover with backrest
A beautiful chair cover made in dark blue will become a universal interior decoration. To work you will need yarn, hook No. 3. The work is carried out according to the instructions:
- Initially, it is worth clarifying the parameters of the back and seat. In the presented model these dimensions will be the same.
- Cast on the number of chain stitches that corresponds to the width of the chair.
- According to the pattern, simple double crochets are knitted.
- Knit the length from the hem along the seat, then through the back. The finished cape will completely cover the entire chair.
- Separately, cast on air loops in accordance with the width of the hem, knit three rows according to the same pattern.
The resulting element is sewn on the sides and back. The base of a knitted chair cover consists of a couple of parts and one long seam. For decoration, you can use any pattern you like.
Knitting pattern Ornament
Ready product
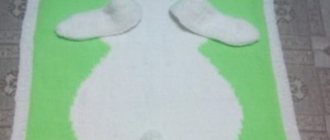
Children's rug with a frog is crocheted
A frog carpet will be the most striking decoration for a child's room. Your children will be grateful and happy. The carpet is knitted with double crochets. You will need yarn: 5 skeins of aqua color, 3 skeins of white, 2 skeins of red and green, 1 skein of dark green, yellow.
Crocheting a rug for the hallway
The crocheted rug for the hallway is the work of Anna Ratova. Mat size: 30*50 cm.
Hook: No. 2. Threads: approximately 50 g. sand, dark brown, beige, black.
Description: cast on 84 chain stitches in beige plus 2 lifting stitches and knit according to the pattern, not forgetting to alternate colors. Repeat the pattern 4 times in height and finish with two rows of beige.
Tie the rug around the edges with one row of single crochets. Make fringe (cut threads 15 cm long, group them into 8 threads).
Sizing
In order to take the correct measurements, you should choose the style of the cape. It could be:
- a cover that follows all the contours of the furniture, covering or not covering the legs;
- product in the form of a cross covering the back, seat, armrests;
- a rectangular cape covering only the back and seat;
- covers for the seat and back, knitted separately;
- a cover for chairs that covers part of the back only in the place where the head of the seated person is located.
The most difficult thing to take measurements for is a one-piece cover. You will need to measure all the parts of the chair and repeat their outlines. Start knitting from the bottom, measuring the girth of the place to which the cover will hang. Knit the fabric up to the level of the seat, then form the back. Lastly, the armrests and the inside of the furniture are taken care of.
If the chair is at hand, it is easier to adjust the size of the product directly to it. You should take into account the properties of the threads from which the cape is made. If they can shrink, then you need to add a few centimeters to all parameters.
For the cross cape you will need the dimensions of the back, seat and armrests. We must not forget that the product should hang down at all ends. Exactly how much depends on the desire of the craftswoman. The hanging part along the back should be of such length that the cape does not slip off, the same applies to the armrests. If desired, you can attach it with buttons or Velcro to further secure the product.
The length of the overhang is equal to the thickness of the seat, approximately 10 cm, but this parameter may vary depending on the knitter’s idea.
The cover for just the seat or just the back is made exactly according to measurements, taking into account the shrinkage of the fabric. The product must tightly cover part of the furniture and be fixed on the back side with an elastic band, Velcro, or other means. A knitted cape for the headrest of a chair can be of any shape and size. It rather serves a decorative function and is made using the same technique as other products, for example, a pillow lying on a furniture seat.
Correct size determination A cover that completely covers the furniture
Product in the form of a cross
Rectangle cape
Cape for the head of the chair
How to decorate: types of decor
Knitting is a process that is impossible without the work of imagination and imagination. Since crocheting patterns for a stool cover mostly involve simple shapes, why not decorate them:
- Lace and tassels. This element looks good around the edges. Especially on a square shape.
- Embroidery. Both classic beads or rhinestones and top processing with threads are used.
- Bows. They look good made from ribbons or fabric, and also knitted.
- Pompoms. Like tassels, they will perfectly decorate a cape, except that this is more suitable for children’s furniture.
To create it, you need to knit a sufficient number of individual colors and then connect them, guided by the diagram.
You can also use various patterns or unusual combinations of all kinds of circles, squares, lines and zigzags as decorations. For more experienced ones, it makes sense to “play around” with the form.
Tight knit
A very bright and interesting option that can be used to decorate a nursery. Of course, if you choose calmer colors, then such a seat will look beautiful in the kitchen or living room.
Please note that the yarn should be thick - from 5 mm. If you don’t find one, then knit in two threads.
First, make a chain the length of the desired finished product. Knit all rows in half-columns without crochets. You need to finish knitting when the length is equal to the width. The edges can be decorated with matching or contrasting ribbons.
Decoding the scheme
The process of creating covers for stools and chairs may seem difficult for beginning craftswomen. First of all, you need to use detailed crochet tutorials with patterns. The latter consist of symbols that should be carefully studied:
- Oval - air loops (VP).
- Crosses - single crochets (SC).
- T - half double crochet.
- T crossed out - single crochet.
- T crossed out twice - with two double crochets.
- T crossed out three times - with three double crochets.
- X with a loop on top - a twisted column.
- X with a line on top is a connecting loop.
Drawings and procedures for assembling a step stool with your own hands
Crocheting for beginners requires following some rules. Schemes are always viewed only from bottom to top; circular options are read in the direction from the central part to the edges. Odd rows are determined from right to left, even rows, on the contrary, from left to right. The creation of round capes begins from the middle; thanks to the lifting loops, the optimal parameters of the product are maintained.
A square or round cape for beginners usually consists of 3 types of loops: chain stitches, double crochets and single crochets, and connecting stitches. Despite this, the products turn out to be attractive and interesting.
Decoration options
If a cover for a stool is knitted to insulate the furniture or increase the level of comfort, you need to decorate the finished product. Original decor will refresh the interior and help you place the right accents. The following design options are popular:
- Drawing of the canvas. Unusual ornaments, patterns, and weaving patterns look attractive without additional elements.
- Lace edge, tassels, strong border. Optimal for square models.
- Pompoms. They create a playful atmosphere and look great in the interior of a children's room.
- Embroidery. Cases with such decor will become bright and expressive. Experts do not recommend using voluminous patterns or beads.
- Fabric bows. It is important that the details match the color of the cape; decorations are usually placed on the backs of chairs.
- Rhinestones, beads, beads. Used on one-piece capes and backrest products. A prerequisite is that the decor should not interfere with the full use of the furniture.
Knitted leg warmers are trending and are worn on the legs of stools. Accessories are easy to create with your own hands and serve as a harmonious addition to the cases.
Covers crocheted on a stool should organically fit into the interior of the room in color and texture. Stylish handmade models allow you to realize interesting creative ideas. Thanks to the wide variety of patterns, unusual patterns, and decorative methods, any craftswoman will be able to choose an option that is ideal for her skill level.
Little tricks
The basis of our work is the chosen scheme. We start crocheting the cover for the stool from the center, picking up several circular rows. This type of knitting is great for recycling waste yarn that any knitter inevitably accumulates. The density of the fabric of the cover should be high, so it is worth using yarn with a thread thickness of at least 100 m/100 g. Sometimes you can use even coarser and more voluminous material - about 50 m/100 g. Of course, you will not find the remains of such yarn during the day, so it’s worth thinking about combining several thin threads into one thick one. However, you need to ensure that the thickness of the thread does not change and is the same throughout the knitting of the entire product. The hook is selected for the yarn used: for raw materials with the specified parameters, use tool No. 6.
Photo of chair rugs
Crochet a square rug for a chair with diagrams and descriptions
Square-shaped stools are often found in our everyday life, so such a rug will certainly be useful to many.
For knitting you will need several colors of yarn: from white to dark shades of any color and a hook.
- We form the first circular row. To do this, we make a ring from the working thread and knit three chain stitches. Next we make a square: 2 columns s/neck, 3 v.p., 3 columns s/n., v.p., 3 columns s/n., 3 v.p., 3 columns s/ nak., 3 v.p., conn.st. into the third lifting loop.
- The next row is 3 vp, then from each arch of the bottom row we knit 3 sts/s, 3 chs, 3 sts/s. In the last arch we make 2 pillars. and conn. column in the third point of the rise.
- Then again 3 ch, and knit the elongated loops two rows below (now this is the center): yarn over, hook the thread through the center, pull it out and knit a stitch.
Then another 1 column.s/nak.
From the corner 3 columns with / on, 3 v.p., 3 columns with / on.
The next side is from the middle of a group of 3 pillars. we knit 3 stitches, the middle one with an elongated loop. Then we repeat from the corner arch to the end of the circle.
- The fourth row repeats the same as in the third, only we make the elongated loop correctly, because the two rows below are now between the first and second rows.
- In each subsequent row, the number of column corner groups increases, and on the sides - the number of elongated groups. loops. At the same time, we change the color of the yarn, creating a contrast of elongated loops against a background of a different color.
Another tip: you don’t need to tighten the loops so that the sides don’t pull towards the center.
Having reached the required size, we knit 4 rows without stretching. loops, and in the corners only columns. - these are the sides of the rug.
You get such interesting touches.
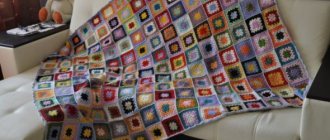
DIY chair covers. Crocheting squares for beginners
Working on them is not difficult and moves easily and quite quickly. To create crocheted chair covers with your own hands, we used yarn - Karachay acrylic (115 m/50 g) of different colors, a hook No. 4.5, scissors and a large needle for sewing the elements together.
The main knitting pattern is the well-known motif called “granny square”.
We start knitting with yellow yarn. We cast on 4 chain loops (ch), close them into a ring and inside it we knit 4 groups of double crochets (dc), separated by 3 ch. We attach at the end of the row in 3 ch with a connecting stitch (ss).
In the second row, the outlines of the sides of the future square appear - they form groups of 3 dc, separated by 1 ch. In the corners you should always knit 3 ch.
Now we change the color of the yarn. Leave the end of the yellow thread at the required length and hide it in the knitting using a needle.
Attach blue yarn. We tie the remaining tip under the sleep in the corner of the square.
We knit 2 rows, cut the thread and hide it too.
The next color is raspberry. We also attach the thread in the corner of the motif.
And we knit 2 more rows.
Next is the turn of green yarn.
We finish knitting the square - we knit the last row with yellow yarn. The motif turned out to be quite large - about 27 cm. Depending on the size of the chair (or armchair), you can increase or decrease both the number of rows and the alternation of colors as you wish.
My chair requires 4 squares of this size.
We sew them together - first in pairs.
And then we put it together.
To give the product an even more attractive look, you can tie it around the perimeter. We attach a thread in the space between the dcs (where the ch is knitted) and begin to knit fans consisting of 4 dcs, divided in the middle by 1 ch. Next ch 2 and attach to the next gap with a single crochet (st).
We knit fans of 8 sc into the corners, separated by 2 ch.
You can sew a regular circle knitted from 20 stitches into the center of the product.
The case is ready - you can arrange a fitting!
Another good thing about the “granny square” is that you can use a huge variety of color combinations and change the size as you wish!
And here is a cape in a different color scheme.
Even more design options can be created using the off-center granny square pattern.
The first 2 rows in it are knitted similarly to a regular square (purple yarn). I have 3 rows connected this way (and 1 yellow row). Then we will knit only on two sides. In the corner we make 3 ch, 2 dc and knit one side.
Then the second one. We cut the thread and hide it.
Attach blue yarn, make 4 ch and knit 2 sides according to the pattern.
Now the knitting should be turned, and the second row is knitted from the wrong side.
Next we attach white yarn.
When knitting with pink yarn, we tie around the perimeter.
And we finish creating the motif with one row of purple yarn.
How you arrange the resulting squares depends on your imagination and creative design!
Using such elements, you get very beautiful and cozy blankets, bedspreads, pillows, coasters and potholders.