Handmade is always creative, modern and innovative. The beauty of a homemade product is that no matter how you look at it, you can repeat your unique design will not work. Whether it's a rug made from old T-shirts or a rug made from unused terry towels. Have you ever wanted to diversify your interior? stylish rug handmade, but don’t know how to make a rug with your own hands?
In this article we will tell you 15 original ways to do it yourself quickly and beautifully.
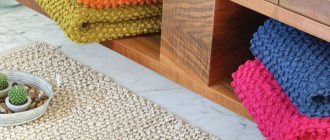
Idea 1 – Braided carpet from old T-shirts “Pigtail”
The simplest method of creating a rug from unnecessary things is braiding . Suitable even for those who have never done needlework.
You can decorate your living room or bedroom with this knitted decoration. The beauty of wicker is that you can create a product of any shape. Circle, square, whatever your heart desires.
Also read: top 15 best and most expensive jeans brands
Materials for creating a rug:
- old T-shirts;
- dense threads;
- scissors;
- sewing machine (can be sewn by hand);
Step by step instructions:
- Cut off the neck and sleeves of the T-shirt to create an even fabric.
- Start cutting strips along the entire length of the fabric. Choose elastic fabrics for braids. The thicker the fabric, the narrower the stripes. Stretch the resulting strips.
- Gather all the strips into a ball for convenience. Then the strips from different T-shirts need to be connected. There are two options: stitch using a sewing machine or join it yourself. To do this, make small holes at both ends of the ribbons and thread one into the other.
- At this stage we braid the braids. Secure the beginning of the braid with threads. Then start braiding a regular braid as you would with your hair.
- When the braid ends, carefully sew on the next one. For a square or rectangular carpet, you need to weave many identical braids.
This ball is made from 30 t-shirts!
Shaping the braid
Then there are two options for weaving : a circle and a rectangle.
How to weave an oval shaped :
- Roll the T-shirt braid into a spiral with your hands, pressing each circle tightly together.
- Sew the circles on the inside.
Square shaped rug:
For a square product, you will need a piece of fabric to attach the braids.
- Fold the fabric in half and stitch along the seams.
- Carefully sew each pigtail (with a machine or with your own hands) as shown in the photo.
Related material: How to make a table with your own hands
Fabric-based products
You can use fabric as a backing: burlap. Prepare 2 by 10 scraps and get to work. Thread each piece into the cell evenly across the entire width of the base, the tighter the better. This way the rug will be fluffy and soft.
Before creating a rug from old T-shirts turned into yarn, trim the ends of the fabric and select the shape.
This rug is perfect for both the hallway and the bathroom.
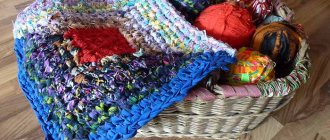
Idea 2 – Rug made from scraps of fabric without a sewing machine
A bedside rug made from scraps of fabric using the patchwork is far from being an old-fashioned “grandmother’s” product. Modern craftswomen skillfully decorate their homes with patchwork blankets, rugs and other decorations. Many complex methods require a sewing machine. But not everyone has this unit.
Materials for a rug made from fabric scraps:
- clean uniform pieces of fabric or remnants of rags;
- fabric base (piece of fabric the size of the desired rug ) or construction mesh;
- thick multi-colored threads, needle;
- pins for basting;
How to make a rug:
- Place all the pieces of fabric on the base, secure with pins (see photo below).
- Carefully quilt all the patches, starting from the edges. The closer the stitches, the stronger the rug will hold.
That's all! A simple but very beautiful carpet for the floor is ready!
There are a lot of ideas for creating rugs with your own hands from scraps!
Rug with rolled mat backing
It takes a little time to create a shaggy rug with your own hands, but the result is a designer creation. During the crafting process, a rolled bath rug is used instead of a mesh.
Bathroom rugs
To work you need:
- Crochet hook.
- Colored threads, cut into pieces of the required length.
- Scissors.
Remains of yarn are used as threads and old knitted sweaters are unraveled. Threads are crocheted along the base according to the pattern on the bath rug and the result is a designer item that will easily fit into the bathroom interior.
Bathroom product options
Idea 3 – Carpet made from old wine corks
An original rug will be made from old wine corks.
This is an ideal option for a bathroom, as the material is moisture-resistant and long-lasting. There is no need to wash such a product, and it is very easy to care for.
Materials for making a rug:
- about 150-200 plugs (depending on the desired sizes);
- base (old rubber mat , rubberized fabric, thin layer of plastic);
- sandpaper or knife;
- waterproof glue;
- kitchen board (thick);
Technique:
- Wash the plugs with detergent. If wine stains remain, leave the corks in a container of bleach overnight, then dry.
- Cut the corks lengthwise. It is better to cut the cork vertically rather than on its side.
- Come up with a pattern. Various pattern options.
- Start gluing the corks to the base. Remove any remaining glue immediately.
To make the product waterproof, its surface must be treated with a sealant!
The product is ready! Perfect for a bathroom or patio.
Idea 4 – Soft pompom rug
Many housewives still have a stock of woolen threads from Soviet times. Why should they gather dust in the closet if you can create excellent decor for a child’s room - delicate rugs made of multi-colored pompoms.
Kids especially like this product: it is soft and interesting , and mom can safely let her children play on the floor.
Materials for production:
- wool threads;
- construction mesh or rubber carpet with holes;
- scissors;
Technique:
- Wind the thread tightly around your palm or a toilet paper roll. Create several layers so that your fingers are not visible. The more layers, the more magnificent the pompom will be.
- Prepare a long thread for dressing. Then carefully remove the threads from your hand so that they retain their shape. Tie them with prepared thread. Make a strong knot so that the threads do not come apart.
- Cut the ends of the skein on both sides.
- When the pompoms are ready, start attaching them to the holes in the base.
- Trim off any excess threads when the design is complete. For strength, you can glue it with glue from below.
The new toy is ready, start your fidget!
Idea 5 – Do-it-yourself crocheted rug from old things
Don't know what to do with old T-shirts? The entire closet is littered with rags, and at the dacha the closet is torn from clothes that it’s a pity to throw away? There is a more original way to breathe life into unnecessary things: weave them into a bright rug !
Materials for the rug:
- remnants of T-shirts (from which we will braid our own hair);
- Crochet hook;
- fabric glue.
Technique:
- Cut strips 1.5-2.5 cm wide from old clothes.
- Prepare yarn from the resulting scraps (see idea 1), roll into a ball.
- Crochet a circular piece using a crochet hook. Cast on a chain of chain stitches of the desired size, and then double crochets until you create a semicircle. Then tie the second chain, etc.
Don't despair if you don't know how to knit. Check out other homemade rug designs.
Let's make a new rug out of an old sweater
And quite unusual. This is the handmade miracle that Claire Armstrong created.
or this creative reproduction of a tree cut that fascinates
All this is made from felted (washed in the washing machine in hot water) woolen knitted jackets and sweaters. Of course, it turns out especially artistically when all the knitwear is of a similar color scheme. But... using our imagination, we will make something out of what we have. And we will have a warm felt rug.
For inspiration - connection options of different colors
Another cozy rug
And now about the process of creating a felt masterpiece
This is what getting started looks like. Here are knitted motifs, I show them so that it is clear how to assemble a rug, where to start - that is, with some kind of pattern, size - we need to know how much we need and what IT will look like. But this is important for those who like to do everything according to diagrams and drawings. And you can do without them.
And we will do the one in the first picture. Master class from Claire Armstrong. She made her rug from 5 woolen sweaters that matched perfectly in color.
You must first stock up on: desire and patience, scissors, a rotating wheel for cutting (although you can limit yourself to scissors), and a metal ruler. Plus fabric glue and a hot gun.
In other words, the author glued her own rug. Many of us would prefer to sew it. Which, I think, is also possible, but it will take longer
We make felt sweaters from wool. We put them in the washing machine and wash them with hot water. Here you need to keep in mind that felted sweaters will become much smaller in size and dense.
Now we have to cut the felt sweaters into strips. It is important here that all strips are even and equal in width. The author's strip width is about 7 mm. Equal stripes are very important. They (strips) can be of different widths, but the height = thickness of the rug depends on the width.
We'll arrange the felt strips by color, so it's easier to work with them.
Apply glue to one side of the fabric strip and roll the strip into a spiral. We attach the next strip, etc. Important: the glue makes the fabric rigid, but you still want to have a soft rug. Therefore, we apply glue to the strip so that in the upper part (it will be the top of the rug) there remains 2-3 mm of felt without glue. We roll the spirals to the size we want (larger or smaller), just in case we pin them with needles until our spiral sticks together well.
We continue to add strips of felt to the spiral, which will become larger. The size depends only on our desire and design. Okay, make the rings in different sizes.
These felt spiral rings are the basis of the felt mat. The more x we do, the larger our rug will be. Or you can make one very large spiral circle and you will get a large round rug.
This designer rug is a fantasy on the theme of circles, large and small. Which she connected into a canvas, turning a circle into an ellipse, for example. Everything is visible in the picture. In addition, in the process all the spaces between the circles are filled.
When connecting all the circles into a large carpet, it is better to use a glue gun.
Basically it's all about technology. The rug can be enlarged if desired by adding new circles to it.
Most of us are much easier with a needle than with glue. Here is some advice with a needle: stitch in several places every two layers and periodically stitch through (as I understand it) with a very long needle. This is advice, but we’ll definitely come up with something.
And further. I think it would be nice to put the entire rug on some kind of base. So that it is more reliable and lasts longer.
And a bonus from me - a plan. Maybe for a rug, maybe useful for something else.
According to inf. sam.mirtesen.ru
- Interesting? Healthy? Do you want to help the editors?
- Tell your friends about it!
- A fungus that can destroy roses
Black spot, or rose marssonina, is most common on rose hips and roses (in open and protected ground conditions). - Bird cherry in the country: varieties and cultivation
Until recently, bird cherry was considered exclusively an ornamental plant that adorned our parks and squares. However, recently more and more gardeners give preference to the fruits of bird cherry, although they never cease to admire the beauty of its flowering. - Knitting pattern “Openwork paths”
The knitting pattern “Olacework paths” is perfect for knitting women's and children's autumn-spring clothes. Blouses, cardigans, light sweaters - everything will look great. - Have you eaten pumpkin?
Don't throw away the seeds! Pumpkin is a versatile vegetable. Everything is used: the juicy pulp, the dense skin of the fruit, flowers and young tops, but the most valuable thing is the seeds. We will talk about the properties of pumpkin seeds and the varieties of pumpkin for seeds. - Six signs that shock absorbers need to be replaced urgently
Shock absorbers are a very important component of any car. They not only make movement comfortable, but also serve as one of the safety elements: they increase braking efficiency and vehicle controllability. And their service life is very short - several tens of thousands of kilometers, so it is important to regularly inspect this unit and, if necessary, replace it. - Choosing a pea variety
What varieties of peas are best to sow, and why are they useful? I. Surzhikova - Garden path with imitation of the surface of wild stone
In this article we will tell you how to make an original garden path with your own hands. And not simple, but with an imitation of the surface of wild stone. - Spots on the leaves are not good.
Light spots appeared on the leaves of the cucumber seedlings, and some leaves began to wither. What is this disease and how to fight it? Yu. Ganina, Dzerzhinsk - How to make a reusable floor cloth with your own hands
Surely you have long encountered this problem - for special modern mops with a flat base, buying a new cloth every time is quite expensive, but you also cannot use the old one for too long. We decided to show you how to make one from microfiber to save up to 500 rubles at a time. - Peas can also get sick.
As a result of violation of crop rotation, diet, and untimely implementation of plant care measures, peas suffer from many pests and diseases. The latter are especially common when growing peas in waterlogged soil in damp, cool weather. - DIY beach sundress without a pattern
Weightless, delicate silk chiffon with a shimmering print - ideal for a beach sundress with thin straps. It won’t be difficult to sew, and, most importantly, you won’t need a pattern! - Not all flies are harmless; there are also pests
. Flies that are pests of fruit crops belong to two families - gall midges and variegated flies. Adult insects feed on flower nectar or plant sap flowing out in places of mechanical damage. The larvae live in stems, fruits and leaves. - Basket made from old jeans without sewing
There is nothing easier than making this basket without sewing and hassle! Just arm yourself with hot glue, old jeans and cardboard. - Who spoils the berries?
In my garden, someone is eating the berries; they are all covered with cobwebs. What kind of pest is this that also eats seeds? Y. Vetyakova - How to drive pests away from currants?
In July, the garden is filled with berries and fruits, and at the same time various diseases and pests begin to appear. It’s impossible to spray berry fields with chemicals now, but it’s a pity for the harvest! - Wrap-around trousers and skirts in an hour
Spectacular and stylish wrap-around trousers and skirts can be sewn from scratch in just an hour. All you need to do is stock up on suitable fabric. In fact, you will have to work with a piece of material folded in four. - A relative of aloe is Gasteria
Gasteria (Gasteria) is a perennial succulent plant with thick, fleshy, tongue-shaped leaves strewn with characteristic tubercles. Gasteria, like its close relatives aloe and haworthia, belongs to the Asphodelaceae family. - Another way to propagate violets:
Propagation of Saintpaulias by peduncles is used if it is necessary to preserve and pass on to the offspring the complex (fantasy) color of the flower. These are, first of all, chimera varieties that do not transmit varietal color when propagated by leaf cuttings. - Original flower pots made from a plastic bucket
Plastic buckets are a real find for creative craftsmen; with simple alterations they can be turned into stylish things for the home. So, in just an hour you can make original flower pots with a minimalist pattern from plastic buckets. - Cyber Polygon 2021 will discuss the topics of cybersecurity and the development of digital ecosystems.
The international online training Cyber Polygon 2021 starts on July 9 at 12:00 Moscow time. This was reported by the press service of Sberbank.
Idea 6 – Door mat made from old belts
Do you have a huge amount of leather belts in your house that your grandfather wore? If they're not family heirlooms, feel free to turn them into stylish hallway decor .
Material for creating rectangular leather rug:
- 10-15 belts;
- awl;
- thick rope or twine;
Manufacturing technique:
- Remove all buckles from the belts. If necessary, cut it off. Make sure that all straps are the same length.
- Make holes along the edges of each belt at a distance of 2-3 cm.
- Sew them together using an awl and twine.
Here's an easy-to-make rug for the hallway with your own hands. Surprise all your guests with a fashionable item and display your handicrafts by the front door.
Idea 7 – Terry rug made from old towels
Unused towels will make a soft bedding on the bathroom floor. An excellent alternative to cork carpet, because the material from which towels are made also absorbs moisture first-class. Place this sheet next to the shower stall and forget about a wet floor forever!
Carpet material:
- several large towels (an old robe or blanket will do);
- ruler and scissors;
- thread and needle;
- sewing machine (optional);
Scheme on how to make a soft shower mat step by step:
- Cut strips 3 cm wide;
- Attach 3 strips of different colors to each other and sew them at the beginning (to better hold the braid).
- Make a braid. As soon as the strips come to an end, sew the product further. The end result should be a long braid.
- Wrap the fake in a spiral (like a snail’s house), sew each circle tightly.
Animals really like these rugs - they are very comfortable to lie on! Your pet will be happy too!
Enjoy your work!
DIY pillow made from scraps: master class
Among the most popular products made using various types of patchwork techniques are pillows for many years: large and small, made using various types of techniques, but always beautiful and eye-catching.
In order to decide on the palette and other attributes, it is very important to imagine in advance where our brainchild will “settle”.
Many beginning craftswomen believe that making a patchwork pillow is difficult, but once you master even small skills, with some effort and patience, it turns out that it can be made quite simply.
Necessary materials
To work you will need:
- fabric for the base and for making the ornament;
- measuring and writing instruments;
- scissors;
- sewing machine (if you don’t have one, all work can be done by hand).
For a classic living room, perhaps, a “mosaic” of plain patches of different shades would be better suited.
Procedure:
For sewing you will need fabric cut into squares of the selected size. In this case, there should be an equal number of primary and secondary colors. Usually they cut 64 pieces, after which they are folded with the right sides inward and stitched on a machine.
For the pillow you will need four blocks, each of which will have 16 squares.
When they are ready, they are joined by stitching.
If the product is one-sided, then the back part is made smooth, from a single piece of canvas.
For a double-sided product, you will need another 64 elements, which are connected in the same way as on the front side.
This will look amazing in a modern interior, especially if it is youthful or kitschy.
You can start with a square or rectangular pillow made from multi-colored stripes.
You can fill the pillow with holofiber, foam rubber or other filler, at your discretion.
Idea 8 – Floor mat made from denim pockets
Many people feel sorry for throwing away or giving away branded jeans. It all seems that the moment will come when they will come into fashion again. But for some reason this moment has not come for several decades. It is better to repurpose old things into a new piece of furniture.
Materials to make a rug from old jeans and pockets (you can also cut the jeans into shreds):
- base for bedding (old rug, etc.);
- all the old jeans you can find;
- sewing machine;
Manufacturing process:
- Cut out the back pockets from each pair of jeans. Ideally, if the patch is preserved. This will make our product look even cooler. If you don’t have that many pockets, you can cut shreds from old jeans.
- Place all the pockets on the mat so that there are no gaps between them.
- When you have done everything to your liking, sew the pockets on a sewing machine.
There are hundreds of options for such a product. For example, you can arrange the pockets from darkest to lightest. Or create a chaotic pattern. It all depends on your imagination!
Tips for crocheting a rug on a mesh:
- For knitting, it is advisable to choose thicker threads of yarn. You should knit taking into account the size of the mesh cell, which will serve as the basis for the product. The knitting should cover the entire mesh completely, resulting in the mesh being invisible.
Important! If you use thin yarn, then it is better to fold the threads, for example, in half.
- Products made from different types of yarn will be appropriate for different rooms. For example, it is better to make a rug for the bathroom using synthetic fiber. For a hallway rug, it is best to use a silicone mesh to prevent slipping. It is always available for sale and is very inexpensive. For the bedroom it is better to use natural threads, that is, cotton or wool.
- To give the base stability, it is advisable to use stiffer mesh, and if you need a softer product, then it is better to use a silicone mesh as the basis.
- The crochet method is very simple, even a child can repeat it. The tying of the rug is carried out according to a certain principle: the hook is inserted from above the mesh into one of the cells, the thread is pulled out from the other side, and then pulled into the loop that is on the hook.
- If the outer edge of the mesh is used as the beginning for knitting, then you can continue it by tying the mesh around the perimeter and ending in the center. In this case, you will not need to change the threads too often.
- Another way is to knit in rows. Rows can be made vertically and then horizontally, changing colors. The result should be an interlaced woven fabric with different mixed colors in places where there is an intersection of threads.
Important! The front side is almost completely closed using crocheted loops. It's reminiscent of knitting. The underside looks different because there is only one thread running through it, and the mat will not slip if you step on it.
Idea 9 – Woven doormat from old threads and laces
The easiest rug to make with a unique design. Making such a carpet is a creative process that does not require special skills or effort. It will appeal to all creative and not so creative people.
What materials are needed:
- cardboard circle, waist circle, hula hoop;
- scissors;
- multi-colored balls of yarn/thread and laces, yarn from T-shirts;
Manufacturing process
How to make a bright bedside rug with your own hands:
- Prepare a cardboard base. Make markings as in the photo:
- Alternately thread the threads through the cardboard:
- Once all the threads have been threaded, begin threading circles of thicker threads and laces. And so on until the very end, until the masterpiece is ready:
Such a bright product is suitable not only for the floor. You can decorate a wall with a fake, it will turn out very bright and unusual.
Preparing yarn
Before you start knitting a rug from a variety of T-shirts and knitted rags of different colors with your own hands, you need to prepare the yarn.
Attention! The denser the fabric, the narrower you cut the ribbons for work.
Let's look at the step-by-step process of preparing yarn:
- wash and dry things well;
- cut them into even strips of equal width (about 1.5 -2 cm);
- stretch the ribbons a little so they curl into yarn;
- sew the strips together;
- Carefully roll the stitched ribbons into balls (make sure that they do not twist and have uniform tension).
It will be great if the balls turn out to be multi-colored.
The width of the strips depends on the density of the material. The thinner it is, the wider the cut strips.
Note! Knitwear for work can be cut in two ways: in a circle and in a spiral.
Idea 10 – Round rope rug “Sailor”
A handmade fake will help you decorate your room in a marine style.
A rope rug can be created in half an hour and used to decorate a room in a nautical or rustic style.
Materials needed for counterfeiting:
- rope 10 m or more in length;
- base (piece of linoleum, trimming an old rubber rug);
- scotch;
- sharp knife;
- liquid Nails;
Progress:
- Prepare the base (linoleum or rubber). Start twisting the rope from the center.
- Twist the mat tightly so that each new ring is adjacent to the previous one:
- Trim the outermost turn with a knife;
- Draw a “star” with liquid nails. Direct them from the center of the mat to the edges.
- Press firmly onto the linoleum.
After all the manipulations, you will get a nice “marine” carpet with your own hands.
What are patchwork products?
Although many argue that patchwork originated only in the 18th century in England, the history of Rus' proves that patchwork products were used here even earlier. Homespun clothing, which was worn by the inhabitants of the country since ancient times, was expensive, so it was passed down to younger children from older ones, and newborns were swaddled with the fabric of their mother’s dress.
Handmade rugs have every chance to become a real work of art and a highlight of the home.
An item made using the patchwork technique is a complex fabric structure, usually made of chintz or linen; Before you start sewing, the fabrics need to be washed and ironed to avoid shrinkage. It would be useful to take into account some nuances that will help you learn the secrets of mastery.
They can decorate the interior of a city apartment and give it a touch of rustic coziness.
Idea 11 – Braided rug made from old tights
Every girl wears nylon tights. It's a real disaster when they tear. It's a shame to throw it away, because it's wasted money. So dozens of torn tights accumulate on the shelves.
The recipe is simple, you only need caprons, scissors and thread with a needle.
Step-by-step manufacturing method:
- Wash the tights, cut off the top and socks. Leave only the “legs”.
- Fold the “legs” in half, cut into fragments 3-5 cm thick. Stretch them a little.
- Fold the strip of nylon into a ring. Wrap the number 8 around 4 fingers. Do the same with the second ring. Transfer the loops from the first ring to the back of your palm.
- When the product is ready, twist the braids in the shape of a spiral, pressing them tightly against each other.
- Sew the product with threads.
The result will be a delicate piece of furniture in beige tones. Below you can see how to knit a rug from old things.
Materials and tools
Prepare scissors, a large plastic hook, soap, old knitwear, and a needle and thread.
For a crocheted rug made from old T-shirts, you can use any pattern, for example, similar to the pattern for napkins.
Note! The material for yarn should be taken exclusively from natural materials.
Idea 12 – Circular knitted rug from old T-shirts
Knitting is a hobby of girls with golden hands. Knitted items in the house reveal a hardworking housewife.
To knit a small knitted rug with your own hands, you just need to know how to knit double crochets and crochet chain stitches.
Materials:
- ribbons that we will create from old T-shirts or other things;
- hook;
- scissors;
How to do:
- Prepare the yarn. Cut the t-shirts into long strips and join them together (see idea 1). Tie the resulting yarn into a ball for convenience.
- Take some yarn. Start making the first ring. To do this, wrap the tape around your finger three times (Fig. 1).
- Remove the thread and thread the hook into the hole. Pull out the working thread. Pull the yarn through the loop again to create another “loose loop.”
- Make 11 double crochets.
- In the 2nd row, make twenty-four double crochets (knit two in each bottom stitch). In the 3rd row, increase the number of columns to 36.
- We do the fourth row a little differently: first, 1 double crochet, then 2 chain stitches, then skip the bottom stitch, again a double crochet, and so on in a circle.
- Rows 5 and 6 are like the first 3 rows, and row 7 is like 4. Rows 8, 9 are also double crochets. We do 10 using technique 4. And so on until the 18th row.
- Row 19 can be left as is, or you can make a “cloud” decoration. For this: 1 lifting loop, skipping two stitches (bottom) and 6 double crochets. To finish the wave, weave a half-column into the bottom. s., skipping a couple of columns.
Ready! Now you can put the product in a visible place and show off to your friends!
Rug on a hoop
When the binding is completed, cut the threads at the base of the hoop and tie them tightly.
An interesting knitting option using a hoop. Take the hoop and pull the warp threads onto it in a circle. Starting with tying the frame with yarn. You can think over the pattern yourself, at the stage of preparing the work.
Idea 13 – Bright carpet “To the delight of the baby” from patchwork pom-poms
Another option for a carpet made from scraps of fabric and filling.
The end result will be a soft product that resembles a cloud. Place a carpet on the floor in the nursery, the child will be interested in crushing the pompoms, jumping on them and having fun in every possible way.
Carpet materials:
- old knitted items (preferably colorful or patterned so that the child likes them);
- base (thick fabric, cardboard);
- filler (sintepon, foam rubber or holofiber);
- scissors, needle and thread;
- glue gun;
Filling for pillows can also be taken from things. Old blankets and jackets will make excellent victims.
Technique:
- Cut circles from fabric several times larger than the size of the desired pompoms. Tip: prepare a stencil from paper or cardboard in advance.
- Using a thread, unfasten the workpieces in a circle.
- Place the filling in the middle and tighten the thread. Do the procedure with all the balls.
- When all the pompoms are ready, glue them to the base with a gun. You can sew it on, it will be more reliable.
Place the original rug next to the baby's crib. The child will be delighted!
Idea 14 – Wicker home decoration using a hoop
Skilled needlewomen find another use for gymnastics hoops - they weave colorful decorations for their apartments from it. Do you want to try to create your own?
Materials:
- hoop or large round frame;
- any threads, shreds, laces, etc.;
Technique:
- Stretch the main rings onto the hoop with a web.
- Start weaving from the center to the ends.
- Once the desired size is reached, cut the base and tie the ends into knots.
These are the rugs other craftswomen made with their own hands from scraps:
Rug making techniques
Knitting - narrow strips of fabric are tied together according to the classical pattern.
Patchwork – scraps of fabric are sewn together to create a mosaic.
Weaving - a special base is used on which scraps of fabric are woven or applied.
Stitching - parts of the rug are created, for example balls with padding polyester or braids from scraps of fabric, then all the parts are sewn together to form a rug.
Idea 15 – The lightest carpet made from sea pebbles
If you are lucky enough to live near a beach with river pebbles, decorate your bathroom with a massage path made of sea stones.
Materials:
- beautiful pebbles;
- silicone glue;
- base with a water-repellent effect (rubber);
The technique is elementary:
- Place the pebbles side by side (so that there are no gaps).
- Apply glue to the pebbles and the carpet at once. Then apply the pebble and hold for 15 seconds.
- Let the fake dry thoroughly.
The product is ready! This concludes our selection.