Memo to a newbie
Uzambara (Uzumbar) violet is a plant of the Gesneriaceae family, growing in the natural environment of tropical and subtropical regions of Asia, Africa, Eastern Australia, South America and the Indian Ocean islands.
Saintpaulia is a plant named after the Saint-Paul father and son, who brought a plant unknown to Europeans from the Uzambara district (modern Tanzania) in the 19th century, presented for the first time at the international flower exhibition in Ghent in 1893.
Indoor violet has been one of the most popular plants in indoor floriculture since 1927. By 1949, more than 100 varieties had been bred, and today their number exceeds several thousand.
Rooting
- possibly in water, in substrate, moss.
Priming
- purchased soil or a mixture of leaf, coniferous, turf and peat soil in a ratio of 3:1:2:1 with the addition of raising agents (perlite, vermiculite, river sand, crushed sphagnum moss.
Lighting - it is best to place flower pots on western or eastern windows. To ensure that the plant is evenly illuminated from all sides, the pots are periodically rotated. In winter, when daylight hours decrease, you can use artificial lighting - fluorescent lamps.
Caring is a real art and serious painstaking work at the same time, including watering, fertilizing, and creating a favorable humid climate. Water Saintpaulias as the soil dries. The soil must be moistened regularly, but excess moisture should not stagnate in the roots. When watering, you must ensure that water does not get on the leaves. You cannot water the Uzambara violet with cold water. Fertilizing is done with complex mineral fertilizer once every two weeks. Saintpaulia reacts negatively to a lack of nitrogen in the soil. Optimal air humidity is approximately 50%, temperature is 20-22 ° C, without sudden fluctuations and drafts. The leaves of the plant should not touch the window glass. Removal of faded flowers and damaged leaves is carried out regularly.
Reproduction - planting a leaf cutting, part of a leaf, or a daughter rosette. The most popular method is rooting leaf cuttings. The formation of roots and the development of children lasts 4-8 weeks.
Pests are one of the gardener's problems. There are many different types of pests and it is very difficult to classify them. Among Saintpaulia pests, several groups can be distinguished: mites (spider mites, flat mites, transparent mites, etc.), insects (aphids, thrips, springtails, poduras, scale insects, whiteflies, scale insects, etc.), worms (nematodes).
Diseases - distinguish between infectious (gray rot, powdery mildew) and non-infectious diseases (rotting of the stem and root, wilting of the lower leaves, yellowing, leaf spotting, incomplete opening and premature drying, falling of flowers) of plants. The causative agents of infectious diseases are bacteria, fungi, and viruses. To prevent infectious diseases, you should strictly observe the regimes of watering, temperature, humidity, and lighting. Non-communicable diseases usually arise due to poor agricultural practices. They may appear in one instance and not spread to others.
People who communicate with us are: Moscow, St. Petersburg, Novgorod, Omsk, Krasnodar, Yekaterinburg, Voronezh, Kazan, Samara, Togliatti, Novokuznetsk, Astrakhan, Volgograd, Vladimir, Bryansk, Izhevsk, Irkutsk, Ufa and rep., Chelyabinsk, Chita, Yaroslavl , Kaluga, Sochi, Orel, Orenburg, Penza, Perm, Rostov, Ryazan, Saratov, Smolensk, Syktyvkar, Tver, Novosibirsk, Tula, Tyumen, Krasnoyarsk, Ulan-Ude, etc.
CIS countries, Belarus, Ukraine, USA, Germany, Latvia, Moldova, Kazakhstan, Russia.
Forum | Let's consider everything: reproduction and care at home, master classes. Let's discuss home (indoor) types - help, advice: how to do it right, what's best.
“Violets without borders” – 2011-2019
Types of violets
Making a shelving unit in the garage with your own hands
Different types of violets side by side on the same rack in the house
It is no secret that these delicate flowers are now represented by dozens of species, and finding the type you like is not difficult. They differ so much from each other, but this makes them no less pleasing with their beauty and unusualness to both serious gardeners and amateurs who grow several of these delicate plants at home.
But first, let’s explain how some varieties may differ from each other:
- Size - the plant itself can be standard, giant, miniature or microminiature;
- Leaf color - for different varieties, the color can vary from light green to a rich dark green shade;
- Type of petals - common, double and semi-double;
- The shape of the leaves is round and oval, with uneven edges and smooth;
- Shade of colors - they can be plain, unevenly colored, blue, pink, purple, etc.;
- The shape of the flowers is classic, star-shaped, chimera, star-shaped, edged.
This is interesting: Violet chic poppy - description and main characteristics
Reproduction
DIY rugs - unusual ideas for using in home and garden design
To propagate Saintpaulia, you need to take an ordinary plastic cup and fill it with expanded clay (a little less than half), and then add the earthen mixture. You can buy soil for violets at a specialty store or prepare it yourself.
To make your own soil mixture you need to take the following components:
- perlite - 1 part;
- ordinary land - 3.
Everything needs to be mixed, and the substrate is ready for use. You need to plant cut violet leaves into the prepared mixture. The leaves should be sunk into the ground by about 0.5 cm, and then covered with polyethylene and covered with a jar, but do not forget to ventilate. You need to care for the planted leaves correctly so that they take root well.
When the flower takes root, it should be transplanted into a vessel filled with sand and soil in a ratio of 1 to 2. After some time, the young violet should be planted in pots containing peat, leaf soil and sand. Use small bricks or sawdust for drainage.
Made of metal
Interesting DIY handicrafts for the home TOP of the most original ideas
Creating metal shelves with your own hands is not very difficult, the main thing is to prepare correctly. Metal rods (their diameter should be 8-10 millimeters) are welded using a welding machine into the desired structure, of any size. The ideal size for the side bases of a metal rack for saintpaulias is 20 by 90 centimeters (for installing four shelves at a distance of 30 centimeters from each other).
Crossbars and fastenings are also provided during the welding process. After this, painting occurs in a color suitable for the interior of the apartment or room. The planks are cut out of bars, 50 centimeters long, in the amount of twenty pieces, and laid out exactly parallel, and then knocked down with planks 20 centimeters long.
To install a rack on the wall, ordinary self-tapping screws are often used. Then the wooden shelves can also be painted, and after that they can be installed on the crossbars.
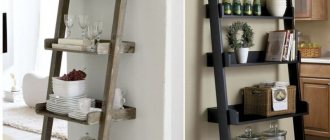
Made of wood
You need to start making a wooden shelf with your own hands by purchasing chipboard scraps from the workshop. Or you can buy a whole sheet and cut it into the desired pieces at the store. Each fragment can be, for example, 15 by 20 centimeters, or maybe narrower.
To build a wooden rack for Saintpaulias you will need:
- Chipboard fragments;
- Hammer;
- Drill and screwdriver;
- Drill;
- Shoe knife;
- Adhesive edge – jig and tape;
- Plugs;
- Dowels;
- Glue;
- Canopies, self-tapping screws, euroscrews.
To begin with, chipboard fragments should be pasted over with an edge (for example, using an iron), cutting off excess particles with a knife. Excess can also be sanded off with sandpaper. Some of the fragments - which will be the basis of the shelf for Saintpaulias - need to be pasted over only to the middle. Drill two holes in the un-glued part and drive in dowels using glue. Having done the same with the counterpart, connect them with a “ladder”.
It will take several hours for the shelves to dry. The “ladder” of fragments consists of four elements (vertically). After this, you need to mark the rack for violets, drill holes, screw the cells, screw on the canopies and erase the markings. The heads of the Euroscrews must be sealed. Using self-tapping screws, the original shelf for beautiful Saintpaulias is screwed to a flat vertical surface, for example, to a wall.
DIY racks for violets
For beginning violet growers, the question arises - where to start? You can use the tips in the article on how to plant, arrange, and sort. But today we will talk about do-it-yourself shelving. If you love violets and grow them, you can make a rack for violets with your own hands.
First you need to allocate space for the shelving and decide on its height. It is better to immediately build a high rack, because even a multi-tiered structure may not be enough later.
The shelves must be placed at a distance of 40-50 cm from each other. At the same time, take into account the width of the shelves, the amount of light, and also decide whether you will place the violets “on the wick.” The width of the shelves determines the number of lamps.
Next, you should choose furniture panels for the rack. It's good if they match your furniture.
It is also necessary to purchase chrome-plated pipes and heels into which metal racks are mounted.
Pipes are usually sold in three-meter lengths.
If cutting them seems difficult to you, you should contact the seller. Stores provide a similar service.
The pipe should have a length equal to the distance from shelf to shelf.
We drill holes for furniture screws (50x7 mm) and remember that the hole in the end part of the shelf should be smaller than in the side wall. The back wall should be light or (if funds allow) mirrored.
On the front (top) part of each shelf we screw a partition, it serves for fastening (the shelf becomes more reinforced), and the light from the lamps does not blind the eyes.
To connect the rack to the electrical network, before assembling, drill holes for the wire. We install electrical equipment by first purchasing copper wire (preferably 1-2 mm in cross-section), assembled lamps (they include starters, chokes), junction boxes, plugs, plastic brackets. We carry out wire, attach the lamps, output it all through a timer.
When you have assembled all the components, pick up a screwdriver and start working. Assembling the rack will take about three hours. Making a rack today is a very pressing issue for amateur flower growers. To begin with, you can build a rack right on the windowsill, and install lamps because on winter evenings, for better flowering of violets, you still need lighting.
The page was found by the following queries:
- where in Vladimir to order a flower rack
- shelves for violets
Stands for violets on the windowsill
Industrial production
A flower stand for a window sill can be made from different materials , many of them are created not to increase the number of violets placed, but for beauty.
Metal
Purely metal shelves, for the most part, are forged products that serve more of an aesthetic than a practical role.
Forged stands for violets (photo for example).
Often such stands can rightfully be called a work of art, but such options are made to order and are quite expensive. They also exist for general sale; they are simpler, but also look beautiful.
Tree
Wooden stands are more like shelves. Often shelves are made mixed from metal and wood. This type of stand can also be decorated very beautifully ; carving and burning are often used, and the shape of the shelves itself can be unusual.
The stands can be arranged in the form of a slide or regular shelves.
Wooden stand in the form of a double-sided slide.
One-way slide.
Plastic
Plastic ones are considered the cheapest; they do not offer much variety, but are convenient and practical to use . Plastic shelves are basically shallow baskets on plastic or metal bases.
This type of shelves is well suited for children , and for keeping a large number of violets with artificial lighting, less often in natural light.
Plastic stands based on plastic tubes.
Some stands are designed to accommodate as many places as possible for violets. One such option is different racks for vertical placement.
Racks for violets on the windowsill are mostly made of metal, plastic and wood . The number of seats depends on the height of the rack and the order in which the placement points are placed.
Plastic vertical stand.
Important! One large stand is usually placed on the windowsill, or less often several smaller ones. If it is possible to place several vertical stands, this option is worth using, especially if the number of violets is large.
Proper placement of such stands will reduce the space required to contain the largest possible number of individuals.
Own production
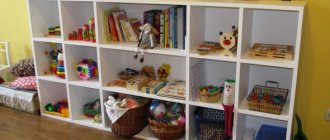
Wanting to save money, many gardeners make shelves themselves. Among the most common options are shelves made of wood, glass and plastic.
Wooden
Like store-bought ones, DIY violet stands made of wood usually look like simple shelves. To make them, you need bases (metal corners or wooden beams, maybe even boards) and boards for shelves.
As an addition, you can decorate the shelf by burning, decoupage, decorative painting or any available methods. The manufacturing sequence is simple:
- Knock down a base from boards or beams;
- Cut shelf boards to size;
- If desired, decorate or simply paint the bases and shelves;
- Place the shelves on the bases and secure them if necessary.
Glass
Shelves are usually constructed from glass with metal bases made of pipes or corners; sometimes plastic pipes are used. These shelves for violets on the windowsill are quite easy to assemble with your own hands:
- Measure the dimensions of the required glass;
- Cut or order glass;
- Depending on the base, holes are cut in the glass for pipes;
- If the base is made of corners, they need to be welded, but there is no need for holes in the glass;
- The shelves are assembled using special fasteners, or the pipes are cut into pieces, and thin tubes are inserted between them, which are threaded through the glass holes.
Glass stand.
Glass stands look more aesthetically pleasing, but heavy pots cannot be placed on them , and you should also be careful when placing Saintpaulias on wick watering, because this will add additional weight.
Plastic
Shelves made of plastic are made just like shelves made of wood. Often the bases for them are made of metal or plastic (pipes or corners). The shelves themselves are made of plastic plates, grids or shallow drawers.
The manufacturing procedure corresponds to the chosen base, and completely repeats the sequence of one of the first options.
How to make a mobile floor shelf
Shelves can take completely different forms, but the most common are floor-mounted ones, which can combine a stand for pots and a place for plant care products. We offer a master class on making a floor rack on wheels that can be easily moved if necessary. For work we will need:
- a sheet of plywood, a wooden beam (it can be replaced with a metal profile) and wooden spikes;
- self-tapping screws, furniture wheels and legs for them;
- tools for assembly (jigsaw, drill, PVA glue, paint brushes, acrylic paint itself of the selected shade);
- cross members and racks.
Our floor flower shelf will be a three-level structure that can be placed near the window and, if necessary, easily pulled out onto the balcony in the summer. The dimensions of the mobile rack are selected individually.
First, we make a drawing, mark the required dimensions, and mark the plywood for cutting. Now we assemble the frame from timber (we will need two pieces), we fasten the parts using tenons and self-tapping screws. If a metal profile remains after the repair, then you can use it instead of bars. We cut out the shelves according to pre-designed dimensions, and make special grooves for the frame posts. When asked how to make a shelf for flowers, many often think that this is problematic. But the most difficult thing is to come up with its shape; assembly will not be difficult.
Mobile rack
We cover the prepared shelves with white or any other paint that matches the style of the interior. While they are drying, we attach bars for the wheels to the frame and paint the entire structure. After drying, screw on the wheels, attach the shelves and check the rack for reliability. The picture shows a model with partitions, you can come up with any other option. The number of levels is selected taking into account the height of the plants, but it is not recommended to do more than 5, as the structure will be bulky and difficult to move.
In such a new house, violets, gloxinia, chrysanthemum will look great, and a coffee tree will not refuse a convenient place.
Plastic shelves
This method of arranging shelves can be done with brackets or chrome-plated metal tubes. The installation process is quite simple; holes are drilled in the shelves for pipes that serve as racks. The shelves are pulled together with special holders, so the height can be adjusted. And the pipes themselves are attached to the ceiling and floor, just like in a bus. The main thing here is to secure it firmly and drill the entrance holes evenly; there are no more tricks on how to make shelves.
There are many ways and options, it all depends on you and your fantasies, and, of course, possibilities, do not forget that violets do not like darkness, so in dark places you need to make shelves with lighting, good luck to you.
Growing rules
In order to properly grow Saintpaulias on a windowsill, experts use special stands. At home, stands are used very often for growing violets outside the window. What are the benefits of stands or racks for Saintpaulias?
As far as everyone knows, lighting plays a big role in growing violets. Sunlight is simply necessary for the growth of indoor Saintpaulias, and for some varieties it is even necessary to create additional lighting during the winter season, so stands are great for this.
If you decide to use racks for growing Saintpaulias, you should be aware that house flowers do not tolerate direct sunlight very well, so it is recommended to cover the rack for violets with a curtain.
Indoor flowers have an extremely negative attitude towards drafts, this can lead to the death of the flower. Also, violets do not like too stagnant air. This must be taken into account when choosing a place outside the window for the stand where the flowers will be placed. It is best to place the shelf behind a non-opening window in the apartment. Because such a window is very suitable for keeping violets: fresh air and ventilation.
An important component for keeping flowers on shelves is the temperature regime in which home flowers grow. Since the homeland of the Uzambara violet is Africa, the temperature at home should be appropriate
The optimal temperature for growing violets is 22-24 degrees. The temperature on the shelves should not be below 20°C, otherwise the flowers will begin to fade. For normal flower growth, it is necessary to monitor the temperature so that there are no sudden changes; fluctuations are only allowed by 2-3 degrees. When using a shelving stand, your violets will grow more actively and richly.
Many varieties of violets can withstand temperatures of even 8°C, but with a sharp increase to 33 degrees, indoor flowers will receive great stress, and this will negatively affect flowering. Each variety of Saintpaulia requires specific lighting. Flowers with rich green foliage require brighter light, while varieties with bright rosettes need less light.
In a dark room, it is necessary to turn the rack towards the light, otherwise indoor flowers will slow down in growth and the rosette will begin to deform. In such conditions, the leaves will begin to grow upward, and the lower leaves will begin to turn yellow and crumble. In poor lighting, violet inflorescences will be less saturated and small.
How to ensure a comfortable existence of a plant in winter?
Flowerpots standing on the windowsill in winter are vulnerable. For their comfortable existence it is necessary to provide them with warmth , for this they use different methods:
- insulation of the window sill - a large share of the cold from the window sill, so the pots are placed on a hill or insulation is laid under them;
- increasing the distance from the glass - the further away the violet is, the lower the risk of hypothermia from cold glass;
- placing Saintpaulias on windows without vents or insulating the vents to avoid drafts, which are very harmful to this species;
- To minimize the possibility of hypothermia, watering is carried out only with warm water.
Read also How to ferment cabbage in a bucket video
In winter, the window sill should be insulated.
Rack installation instructions
First, let's quickly look at installing a wall shelf made of any material.
All you need to do is attach the bracket with one side to the shelf and the other to the wall. Using a drill, 4 holes are first made in the wall (2 for each fastener).
Installation of a wooden rack should begin with the manufacture of a frame, for which horizontal and vertical beams are cut out and fastened together in the form of a rectangular frame with horizontal jumpers. The frame can be fastened using bolts, confirmats or screws. Next, shelves are mounted, which are fixed horizontally or using confirmats, for which holes are made with a drill 1–3 mm smaller than the diameter of the confirmat. Also, to mount shelves, you can use mounting angles, which are attached with one side to the end and the other to the shelf.
Illumination can be done using a lamp on a clamp, clothespins or LED. In the latter case, a strip of LEDs is glued to the edges of the shelves and connected to the network via an adapter. A fun and easy option is to use garlands for lighting, hung on the windows where the structure is installed, or on the shelving slats.
Rack installation
To make a rack we will need some material that someone may have in their garage or closet:
- Bars 2x2 cm (if the farm has a larger cross-section, you can use them, but the main thing is that the structure does not look bulky)
- Plywood or chipboard for shelves
- Fasteners - euroscrews or self-tapping screws
- Racks can be made in various variations, from plywood, in the form of a cabinet, or an open type using bars for this. The latter option is more rational than the first, light will come from all sides, and you don’t need a lot of material for this design. The production process is no more complicated than assembling shelves and it looks like this:
- The bars for the racks and crossbars are cut, which will be used to fasten the racks together. Each set should have its own dimensions, for example, 4 racks of 2 meters and 4 racks of 40 cm each.
- The next step is to create a frame; you can fasten the bars together with self-tapping screws and a corner or just Euroscrews, but for this you first need to drill a hole with a drill of a smaller diameter. Only then tighten it with Euroscrews.
- Now that two or three frames (depending on the length of the rack) are ready, you can begin to assemble the structure. There are two manufacturing options:
- The first option is if the rack is planned to be no more than a meter long, then the frames can be connected together with shelves. Bars are sewn onto the frames in increments of 45 cm and shelves made of plastic, plywood, slats or fiberboard are installed, after which they are fixed with self-tapping screws. If you need a rack with wheels, then it is worth strengthening the structure and adding more bars to the end of the lower and upper parts of the frames. Then we install wheels on the bottom of the rack. Finally, the completed rack is coated with paint or varnish.
- The second option is that long racks must be reliable. This means it is necessary to assemble a frame on which the shelves are laid. To do this, the frames need to be connected on all sides into a three-dimensional rectangle. A large rack should be assembled using metal corners and screws screwed into all corners. When the frame is completely tied, shelves are laid on the strapping, which also serves as a base, and fixed with self-tapping screws for reliability. Shelves can be made from any available material, the main thing is that they do not sag under the weight.
Materials
To significantly reduce costs, we will assemble the rack with our own hands. Of course, you can buy something similar at IKEA, but it will obviously be more expensive, especially since special importance is attached to the material for the shelves
For this we will use white plastic 10 mm thick: it is inexpensive, easy to clean and, most importantly, has excellent reflectivity, so we will not need special reflectors for the tape, but we will be able to increase the illumination naturally.
So, we go to some Castorama or Leroy Merlin, where we will purchase all the necessary “ingredients”. Let us remind you that our goal is to minimize production costs.
We purchase: Materials for assembly
| No. | Name | Units | Qty | Note |
| 1 | Wooden slats (beams) 40x40 (30x30), length 2000 mm | PC. | 8 | We will use them for shelving racks |
| 2 | Wooden slats (beams) 30x30 (30x20), length 2000 mm | PC. | 24 | This will be the basis of our shelves |
| 3 | Metal corner 40x40, width 20 mm | PC. | 120 | We will use them for corner joints |
| 4 | Wood screw 18 (20, 30) mm | kg | 1 | To reduce the cost of the design, you can save on the corners and tighten the racks with shelves with 70 mm self-tapping screws |
| 5 | Paint white | kg | 2 | PF paint, if it is possible to air dry. If not, wood emulsion |
| 6 | Starting guide for plastic 10 mm 3000 mm | PC. | 6 | |
| 7 | White plastic 10 mm, 250 x 3000 mm | PC. | 15 | The cheapest plastic is suitable for shelves |
Tips for shelving materials:
- Try to choose a lath in the store that is as dry as possible, fairly smooth with a minimum of knots;
- You can, of course, choose colored plastic, but it still fades in the light;
- Cut 3000 mm plastic immediately in the store into two parts: 1200 mm and 1800 mm;
Now all the overall dimensions of our purchases are ready to be transported in a regular passenger car and without having to pay for delivery.
Care
At home, Saintpaulias need to be properly cared for, otherwise they will grow poorly and wither. If you use stands for growing plants, they must be watered properly so that they do not die. Violets on racks should be watered when the soil in the tanks is completely dry
It is very important not to flood the flower
Professionals advise placing the vessel with the violet on a shelf in a deep container filled with water. This is done so that the plant itself regulates how much moisture it needs to absorb. Excessive soil moisture in most cases leads to rotting of the root system of the flower.
Also, the leaves of violets growing on the shelves should sometimes be sprayed with a spray bottle. Water should be taken at room temperature. After the procedure, the flowers need to be dried well, otherwise, when sunlight hits the plant, light spots may appear on the leaves. The shelving stand is used very often when growing violets. You need to care for plants properly, and then the plant will bloom well.
Coasters can be bought in a store or made by yourself. To make racks yourself, you can use the Internet and find various diagrams.
In order for a violet to have a beautiful appearance, it needs to be properly cared for. Saintpaulia on the windowsill needs feeding. In summer, the plant should be fed once every three weeks, in winter - once a month. Top dressing can be purchased at any flower shop.
Care for Saintpaulias on the windowsill must be organized correctly so that the flower grows and develops well. To avoid hypothermia of house plants in winter, you need to wait until they are completely dry. After spraying, it is not recommended to place plants on stands located outside the window. If you like growing violets on the shelf and want to propagate. Saintpaulias are best propagated by leaf cuttings. Proper care of violets is the key to long flowering.
Dimensions
The dimensions of the rack will depend on the number of plants that will subsequently be placed on the shelves and on the placement location.
On the windowsill, the height of the structure will correspond to the height of the window opening, the same must be said about the length of the shelves and their width. The height and width of the rack installed against the wall can be adjusted as desired. The structure can be as high as the ceiling, but at the same time take into account the moment of caring for flowers: how convenient it will be to carry out watering and fertilizing procedures.
The distance between the shelves varies from 40 cm to 50 cm. When measuring the required size, you need to take into account the height of the growing violet bushes and the height of the artificial lamp above them.
Did you know? The Romans considered the violet a symbol of innocence. Flower wreaths were worn by brides and vestals (virgin priestesses of the goddess Vesta).
Making a rack with shelves for violets with your own hands
You can make a rack with your own hands, since it is not that difficult and you can use any materials. Another plus is that the size of the future rack for violets depends only on you! (do it according to your parameters)
The most common wooden rack. First you need to buy chipboard boards of the size you need. If there is a need, you need to sand out the flaws with sandpaper, and then proceed with the installation of lighting fixtures and fastening.
Another option could be a glass shelving unit. To directly cut the material, you need to resort to the services of craftsmen. The glass must have at least 1.5 cm! To attach such shelves you need to use aluminum profiles, dowels and adhesive pads.
You can design a mobile rack on wheels. To do this, assemble a frame from a profile or timber, at the bottom of which holes are made for the wheels. Then the wheels are attached and the shelves are installed directly. You can also use your imagination and decorate it as you wish.
Another option would be a metal shelving unit. To do this, you need to have rods with a diameter of 10-15 mm and use a welding machine to create a metal frame. The shelves for such a rack are cut out of wood and fixed to a finished frame. For greater stability, you can additionally attach the structure itself to the wall using self-tapping screws.
The choice is yours; it depends only on you what material your design for violets will be made of, what appearance, color, and size it will have.
DIY rack with lighting
To make a backlit rack you will need the following materials: a drill, wooden boards and beams, a level and a tape measure, self-tapping screws and screws, metal pipes, lamps, junction boxes, chokes, starters and several plugs.
It is imperative to collect all the necessary materials, since searching for them may take more time than assembling the rack itself!
You need to determine the height of your flower rack before you get started! It is better to immediately make the rack high, so as not to redo it in the future. You need to make a gap of 45 cm between the rack and the ceiling. The width of the shelves depends on the number of lighting fixtures that will illuminate the violets.
The first thing to do is to mark the height on the wall with a pencil - 40 cm from the floor. Then, above this mark we mark 4 more points at a distance of 40-45 cm. This is done in order to see where our shelves will be located.
Then you need to cut the slats and crossbars. If these are metal strips, then you should measure and cut them in advance in workshops.
Where the planks and posts intersect, we make holes and fasten them together.
To assemble the shelf, we need to cut out 3 racks and 1 support, which will only be auxiliary, which we will then remove.
The next step is to attach the slats to the stand and crossbar and fasten them with self-tapping screws. For greater strength, we can coat the part with glue. We fix the shelves in the same way.
LED lighting for a violet rack, video:
Before you begin installing the rack, you should drill holes for electrical wires in the shelves and back wall. To prevent the light from the lamps from blinding your eyes, you should install a partition on the front of the shelves. Then you need to drill holes for the hooks on which the lamps will be attached. We fix the hooks on the shelf and attach the lamps to the holes in the back. Several lamps can be brought out into one plug and connected through a carrier.
We will spend no more than 4-5 hours on the entire frame assembly. But your plants will be provided with a sufficient amount of light, and you will be able to water and fertilize them without any problems.
Watch the video: DIY illuminated violet rack
Varieties of violets
Violets, as indoor flowers, were already in Europe at the beginning of the 19th century, and they were brought from East Africa, which is considered the birthplace of violets.
Today, there are dozens of types of violets, which are not difficult to find and purchase. They are different from each other, but at the same time so beautiful and unusual. They appeal to both experienced gardeners and amateurs who admire them at home.
Varieties of violets differ among themselves: in size (standard, giant or miniature), leaf color (from light green to rich dark green), type of petals (regular, double, semi-double), leaf shape (round, oval, with smooth and uneven edges ), the shade of the flowers (solid, unevenly colored, purple, pink, blue, etc.), the shape of the flowers (classic, star-shaped, star-shaped bordered).
Also read: How to propagate chimera violets?
From glass
You can create beautiful, transparent glass shelving with your own hands. The thickness of glass for shelves must be at least 1 centimeter.
The fragments must be cut and polished in a workshop when purchasing glass. Aluminum profiles are used for fastening. You also need to purchase dowels, screws, spacers (adhesive), a screwdriver, a jigsaw, a hammer, a drill, a level, a pencil and a tape measure.
Using a level, dowels, drill, and screws, screw the profiles to the wall and install them. Tapping with your hand, insert glass shelves for Saintpaulias, attaching gaskets to their rear ends. The main thing is to ensure that the fastening is tight. If desired, the shelves can be equipped with lighting, and special fluorescent lamps are very important for violets, since they often replace natural lighting.
Proper care of violets
Violets under the ceiling - an interesting combination of business and pleasure
In order for a violet to grow and delight you with its blooms, you need to take care of it. Otherwise, it may get sick, spots will form on the leaves, they will curl and wither.
To prevent this from happening, you need to follow some rules in caring for this delicate flower:
- Avoid direct exposure to sunlight. Violets love diffused light, but do not like bright sun. For a plant to bloom, it needs to be exposed to light for at least 12 hours a day. If there is not enough light, the leaves will tend to rise; if there is too much light, on the contrary, they will fall over the edge of the pot. In order for violets to delight with their flowering all year round, it is worth arranging for them a rack with fluorescent lamps with a power of 40 W.
- By maintaining this temperature regime, the plant blooms long and luxuriantly and grows strong. If the plant blooms in the summer, in a heat of more than 30 degrees, it is noted that the flowers are smaller and paler; on the leaves of different types of violets, characteristic specks or borders are absent or weakly expressed. To correct the situation, you can use an air conditioner or a stream of fresh air from an open window. In the cold season, you need to beware of drafts; if the plant freezes, its root system will die, and if it is exposed to cold air for a long time, light spots will appear on the leaves, which will significantly spoil the appearance of the violet.
Wooden shelving of different heights
- It is advisable to water the plant with water without additional impurities. For these purposes, ordinary tap water is also suitable, which should be allowed to stand for a couple of days to get rid of excess chlorine. Next, you should boil the water to get rid of the salts and leave to cool. The liquid for irrigation should have a temperature higher than the soil in the pots and the air in the room. It is noteworthy that water at room temperature is not suitable for watering plants, especially in winter, when the plants on the shelf have a higher soil temperature than the water. Because of this, centopolias often die en masse during the cold season. It is best to water violets from above, pouring water into the pan. After 10-20 minutes, it is advisable to get rid of excess water, since its excess can lead to rotting of the roots. Once a month, you need to wash the leaves with a damp cloth and a spray bottle.
- To ensure normal growth of the violet, the humidity in the room must be at least 50%. During the heating season at home, this rule is not easy to follow. As an option, you can place an open container of water near the plants or use a humidifier. However, there is no need to be too zealous, because at a humidity level of more than 70%, the plants will be actively attacked by fungal diseases.
Metal rack with separate lighting for each shelf
- Soil and fertilizers. The soil must retain moisture and nutrients well; for this, you can additionally add perlite or vermiculite - these are natural minerals. The violet needs drainage; for these purposes you can use foam chips. The acidity of the soil is not least important; neutral or slightly acidic is suitable for violets. During vigorous growth, the plant needs phosphorus and potassium; thanks to these additives, the violet blooms magnificently. Once every 3-4 weeks these substances should be added to the soil.
- A plastic pot is suitable for violets; it is easier to care for. Each time the plant is replanted, the diameter of the pot should be increased. It is believed that the diameter of the plant should be 3 times larger than the diameter of the pot. When replanting a plant, you do not need to compact the soil too much, as this will prevent water from saturating the soil, and soil that does not dry out for a long time will lead to rotting of the root system.
How to properly care for violets at home
In order for the plant to delight you with its flowering all year round, you need to take care of it. Otherwise, diseases will appear and the leaves will begin to wither and fall off. To prevent this from happening, we advise you to adhere to certain rules. First of all, keep the violet out of direct sunlight. The plant does not like bright light. For him, it is enough to get 12 hours of light a day. If there is not enough light, the stems will rush up or vice versa - the leaves will begin to fall. The best option, especially for the winter, is to install a 40-watt fluorescent lamp in the room. At the same time, different types of violets react differently to light.
In order for the violet to have a long color, you need to create an optimal temperature regime. So, small and pale flowers will be in the heat of thirty degrees. An air conditioner will help correct the situation. In winter, the plant, on the contrary, needs to be protected from drafts. So, extreme cold will cause white spots to appear on violet leaves. They will significantly spoil the appearance of the flower.
Wall mounted shelves, photo
You need to water the violet with clean water without impurities or additives. Regular tap water, left to steep for two days, is enough. To remove salts and chlorine from water, you need to boil the water. The water temperature must be greater than the ground temperature. You cannot water violets in winter with water at room temperature. The plant is watered in two ways: from above and into the pan. If after 20 minutes the water is not absorbed, then it is drained. Otherwise, the roots will begin to rot.
For normal development of violets, the humidity in the room should be at 50 percent. During the heating season, it is extremely difficult to achieve such an indicator. But you can leave a jar of water near the plant or use a humidifier. However, the humidity level should not exceed 70 percent, otherwise the plant will begin to rot.
Shelves for violets on windows
The soil for violets must be fertile and rich in nutrients. Typically, perlite or vermiculite are added, which are types of natural minerals. Without drainage, violets will not grow. Crushed foam can be used as drainage. Acidity should be medium. When flowering, phosphorus and potassium are added to the soil. These substances are administered once a month.
The best option for a pot is made of plastic. It's easier to care for. So, the diameter of the violet should be three times larger than the pot. When transplanting violets, the soil is not compacted much. Otherwise, the water will not be absorbed, and the water that is absorbed will not be able to come out in time and will lead to rotting of the root.
Installation of wooden shelves
Wood is considered an environmentally friendly and durable material, so if you have timber and plywood on the farm, you can make it from these leftovers. There are several types of stands for violets in the form of shelves or racks. Making shelves will not take much time; they are usually installed on walls, so you need to purchase iron brackets. To assemble this design we will need:
- Plywood, fiberboard, slats or durable plastic such as window sill
- Brackets
- Fasteners - self-tapping screws, dowel-nails, as well as decorative screws
And, of course, for assembly you need to prepare a tool:
- Screwdriver or shaped screwdriver
- Impact drill or hammer drill
- Pobedite drill with a diameter of 8-10 mm
- Jigsaw or wood saw
- Tape measure and pencil
- Building level
- Sandpaper
Having collected everything you need in one place, you can start arranging shelves for violets, the order of work is as follows:
- Preparing the shelves - if the stands for the pots are made of untreated material, for example, unlaminated plywood or chipboard, then you need to give the shelves a presentable appearance. To do this, sharp corners are removed with a jigsaw or the front end of the material is rounded with a wavy line. Then the rest of the stands are aligned using this template and the edges are cleaned with sandpaper or a file. Unprotected wood must be edged or varnished, otherwise the plywood or chipboard may swell and peel off due to humidity.
- Marking - the length of the shelf is measured with a tape measure, after which this data is displayed on the wall using a pencil and a building level. The first shelf should be 40 cm from the floor, and the distance between the shelves should be 45 cm from each other. When all the lines are set, it is necessary to mark the mounting holes. To do this, brackets are placed on the line and all the centers of the holes are outlined with a pencil.
- Making holes - using a Pobedit drill inserted into a hammer drill, all the designated points are drilled.
- Attaching the bracket - to do this, you need to attach the bracket itself and secure it with a dowel - a nail or a decorative fastener.
- Installing a shelf on a bracket - in order for the stand to be reliable, you need to screw it to the bracket with self-tapping screws or screws.
- As you can see, making shelves is not difficult; any craftsman can do this task. There is another way to grow violets - on racks. They are stationary and mobile.
How to make plastic shelves
Plastic shelves for violets can be part of a wooden or metal structure, but their manufacture is the most difficult. If in the previous two cases you can use scraps of old pieces of furniture or shelving, then with plastic stands you will have to start from scratch, since in natural conditions there are few places where you can find smooth plastic slabs.
To make the device, you will need rectangular flat plastic products measuring up to 100 cm in length, 30 cm in width and 50 mm in thickness. Most often, to obtain such material, contact a company that deals with plastic products, where they will cut out and immediately process shelves of the required size. It's not too expensive since plastic itself is a fairly cheap material.
After you have cut out the stands for the violets, all you have to do is mount them into the shelving frame or nail them to the wall using fasteners. It should be remembered that it is better not to place products made of inexpensive plastic near the window, since in hot weather this material will, if not melt, then burn out and dry out, which will lead to the destruction of the structure.
What material can plant shelves be made from?
When choosing a material for the shelves and the structure itself, consider its safety, strength, weight and durability, as well as the ease of installation and maintenance of the structure.
Made of wood
The advantage of wooden shelves is that, having a minimal set of tools in the house, you can cut shelves of any shape and size. The design can be made curly, geometric or classic.
Familiarize yourself with the features of growing these varieties of violets:
Tools and materials you may need:
- boards;
- metal stands and fasteners;
- saw and plane;
- drill;
- tape measure and pencil;
- hammer and screwdriver;
- sandpaper;
- wood varnish, paint.
How to make plastic shelves?
Plastic is a practical and cheap material, easy to care for. A significant disadvantage of the material is that it tends to overheat, losing its shape and color. Therefore, it is not recommended to place a rack with plastic shelves on window sills.
To process shelves, it is easier to contact a company that produces plastic products. The length and width of the shelves are chosen as needed; the thickness is recommended to be at least 50 mm.
The finished shelves will remain assembled and attached to the racks. Holes for fasteners can be drilled using a drill.
Video: 5 secrets of proper shelving
Metal shelving
The frame for the structure is made of metal, and the shelves can be made of any material you like. The advantage of metal is its durability; in addition, it is easy to hide wires from lighting or other household appliances in the hollow frame posts.
To work with metal you will need:
- grinder or hacksaw;
- welding machine.
Important! It is advisable to equip the bottom of the racks with plastic knobs so that there are no scratches or dents on the flooring.