Modern furniture is usually made from chipboard or MDF. When disassembling and reassembling, small pieces often fall out of the attachment point or small sections of material split. You can cope with the problem using an ordinary match. It is driven into the funnel (it is important that it is small in size), after which the self-tapping screw is tightened.
Using a match when tightening a self-tapping screw
After pressing against the wall, the match fills the crumbled area, and the reliability of the fastening increases. This method is suitable for products that are not subject to high loads and intensive use. On actively used connections, such fasteners will not last long.
Choosing self-tapping screws for furniture assembly wisely
For the manufacture of furnishings, various elements for connecting parts are used. Self-tapping screws are a popular type of fastener that has its own undeniable advantages. They are especially often used for assembling cabinet furniture, ensuring a sound and durable connection of structural parts.
Self-tapping screws are a popular type of fastener that has its own undeniable advantages.
It is recommended to consult with the seller if you intend to create the furniture yourself.
Self-tapping screws have different types. It is important to select fasteners based on the material and its density, thickness, etc. The selection of self-tapping screws is also influenced by the type of design and the desired appearance of the product.
Self-tapping screws have different types.
What is a self-tapping screw?
This type of fastener, known as a self-tapping screw, is a type of metal screw with a screw thread and a pointed or flat end. The head of the element has a notch (straight, cross or polygonal) for twisting it into the fabric. To more quickly connect parts of a cabinet or other object, for elements with a sharp end, use a screwdriver (in the absence of a screwdriver).
The selection of self-tapping screws is also influenced by the type of design and the desired appearance of the product.
To connect specific parts, elements with different coatings are used.
Self-tapping screws are used to fasten parts without prepared holes or with them. Due to the thread, the screw is easily screwed into a wooden panel or chipboard. For hidden fastening of furniture parts, an eccentric coupler is used, in which self-tapping screws play a major role. As a result of this type of assembly, tables or other objects are neat, without external traces of installation that spoil the appearance of the product.
This type of fastener, known as a self-tapping screw, is a type of metal screw with a screw thread and a pointed or flat end.
Important! The length of the screws can reach up to 50 mm and above. These fasteners are designed for thick solid wood panels.
Self-tapping screws are used to fasten parts without prepared holes or with them.
The appearance of the product is affected by the possibility of installing a hidden connection.
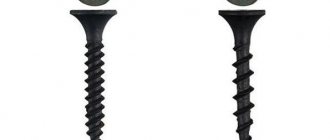
Types of self-tapping screws
Depending on the material and features of the design parts, there are two types of fastenings:
- with rare carvings and a sharp end;
- confirmations.
Due to the thread, the screw is easily screwed into a wooden panel or chipboard.
The first type is used for solid wood, chipboard, laminated chipboard and MDF. May vary in length and diameter.
Short screws are used to assemble narrow panels and plywood.
Confirmats often have a flat end and therefore require prepared holes.
For your information. Short screws are used to assemble narrow panels and plywood.
The length of the screws can reach up to 50 mm and above.
The second is used for making furniture mainly from wooden boards of sufficient width. It differs in that at the junction of the thread and the smooth upper part it begins to thicken. Confirmats often have a flat end and therefore require prepared holes.
Confirmats often have a flat end and therefore require prepared holes.
These fasteners are designed for thick solid wood panels.
Advantages and disadvantages
For furniture layout, fastenings are of utmost importance. And the appearance of the product is influenced by the possibility of installing a hidden connection.
For furniture layout, fastenings are of utmost importance.
The advantages of self-tapping screws as fasteners are:
- eccentric coupler;
- neat and reliable connection;
- precision in fitting parts.
When purchasing self-tapping screws, it is important to consider many points.
They are especially often used for assembling cabinet furniture, ensuring a sound and durable connection of structural parts.
If a set of self-tapping screws is used to assemble a furniture structure, then if you work with them carelessly, the following is possible:
- distortions of parts;
- loosening of the fastening when screwing in repeatedly.
The base of the screws is steel.
Advantages and disadvantages of wood screws
Self-tapping screws appeared in Russia back in the sixties of the 20th century; the classic bolt was taken as the basis. However, if you look closely, its thread covers the entire surface of the rod, while the self-tapping screw does not. And the material used for the improved fasteners is more durable.
There are types of self-tapping screws that are used when working with materials of different densities, such as metal, plastic, and wood. Sometimes these fasteners are also called “hardware,” short for “metal product.” If we talk about the advantages of such fasteners, they are obvious: High strength and rigidity of the connection. Reusable. Adjustment of the required screw-in depth.
You can do without electricity, because you can screw in a self-tapping screw with a simple Phillips screwdriver. Versatility. There is no need to use additional elements (washers, gaskets). High speed of work completion. The only drawback is considered to be some fragility of the screws (hardened steel becomes brittle over time). The fastener, especially with a phosphated coating, can burst under even slight force. And this cannot be seen from the outside. Unlike self-tapping screws, nails do not have such a hidden defect.
How to choose?
When purchasing self-tapping screws, it is important to consider many points. The base of the screws is steel. To connect specific parts, elements with different coatings are used. When assembling furniture, you must consider:
- length of fastening elements;
- their diameter;
- cap thickness;
- carving;
- degree of corrosion (depending on the coating).
| Thread width and height | Application |
| Rare and high | MDF, wood, chipboard, fiberboard |
| Frequent and low | Hardwood |
| Combined (two-way) | Combined materials (with different densities) |
To connect specific parts, elements with different coatings are used.
The selection of self-tapping screws is also influenced by the type of design and the desired appearance of the product.
The color of the fasteners is also important when the connection is open. In this case, it is worth choosing elements to match the canvas.
The color of the fasteners is also important when the connection is open.
To make a table or cabinet, you may need different screws, so it is recommended to consult with the seller if you are going to create the furniture yourself.
It is worth choosing elements to match the canvas.
Self-tapping screws have different types.
Confirmat is used for a more reliable screed. At the same time, a cap is often placed on the cap to make the fastener look more aesthetically pleasing.
To make a table or cabinet, you may need different screws.
Self-tapping screws are used to fasten parts without prepared holes or with them.
How to securely screw in a screw if the thread is broken
The reliability of the structure largely depends on the quality of the materials and fasteners used. Good fastening increases the service life of the structure.
Self-tapping screws are mainly used as fastening elements. They speed up installation and are used for wooden and metal products.
How to screw in a screw with worn threads on the head
The cap has a slot. This is a transverse or cross-shaped groove. A screwdriver is inserted into it and then screwed in.
These threads may become stripped due to manufacturing defects or after use. Sometimes the metal of the temporary element is softer than that of a screwdriver, so the tip of the screwdriver breaks up the groove.
To reliably connect the parts, you should not take a product with a damaged cap. If there is no other way out, then you need to use one of the following options for tightening products with worn threads:
- Use of rubber. You can use a small piece of a car camera. It is placed on the cap and screwed in with pressure.
- Hammer. If you can’t screw it in with a screwdriver, you can hammer the screw in like a nail. This option is only suitable for hardened products. They are distinguished by their black color.
- Pliers. If the screw is long, then grab it with pliers and screw it in. The remainder is hammered in.
- Sawing a groove. Using a hacksaw blade, saw off the head of the screw. Afterwards, insert a screwdriver into the formed groove and tighten it. This method is suitable for soft metal products.
To speed up the process, drop a small amount of glue into the hole. It will act as a lubricant, and when dry it will give additional strength to the product.
How to tighten a screw into a broken hole
Sometimes shurpas need to be screwed into a broken hole in wood or chipboard. In this case, it practically does not tighten and turns. To begin with, you can try screwing in a product with a larger diameter.
If this is not possible, then the hole can be filled with matches, paper soaked in glue or steel wool.
On a note! If glue was used, the screw will then be impossible to unscrew.
You need to insert a wooden chopper into the broken hole on the chipboard sheets.
To do this, expand it slightly using a wood drill, pour in glue, and insert a prepared piece of wood. Afterwards it is carefully driven in. When the glue dries, drill a new hole.
Its diameter should be about 70% of the fastener. All manipulations must be done carefully, as the wooden chopstick may crack.
What do you use more often: self-tapping screws or self-tapping screws? Share your experience in the comments.
Did you like the article? Subscribe to us in Yandex Zen. By subscribing, you will be aware of all the most interesting news. Go and subscribe.
Source: tradinghub.ru
How to restore “torn” holes for screws in wood
Hello, dear readers and DIYers!
Surely many of you have encountered a situation where the fastenings of fittings to wooden furniture become loose. Often this occurs due to excessive loads, and the self-tapping screw simply breaks the thread in the hole. In this case, sometimes screwing in a self-tapping screw with a slightly larger diameter helps, but this is only a temporary solution.
In this article, the author of the YouTube channel “Jon Peters - Longview Woodworking” will tell you how you can easily and quickly restore loose mounting holes for self-tapping screws.
This method works great for both natural wood and composite materials such as chipboard, MDF, OSB and others.
This method is very simple and can be easily implemented at home with simple tools.
Materials needed for homemade products. — Two-component second glue — Sandpaper.
Tools used by the author. — Screwdriver with a set of bits — Screwdriver — Awl, plastic spatula, chisel. Manufacturing process. So, in front of you is a locker not of your first youth. One of its doors simply fell off over time. In addition, in addition to the torn threads in the holes, there is a long crack running through the entire sash.
First, the author fills the crack with the first component of “second” Star bond glue. Unlike classic instant glue, instant curing does not occur, and the glue penetrates deeply into the crack.
Next, using a special sanding block, on the edge of which there is no sandpaper, the master carefully rubs the restored surface with 180 grit paper.
This small protrusion on the door acts in this case as a stop, guiding the grinding block clearly along the line of the mounting holes.
Now you need to fill the voids left by the screws. The following mixture is perfect for this. Wood dust, or very fine sawdust, is thoroughly mixed with the first component of the glue using a plastic spatula. Each of the former holes is immediately filled with this composition. Using an awl, the master pushes the mixture deep, and the centers of each hole are marked in the form of a small conical depression.
And again, the hardener-activator is sprayed onto the surface of the composition.
After waiting for the mixture to completely polymerize, the thread is re-cut in each hole using the same self-tapping screw. If you have a screwdriver on your household, you can drill pilot holes with a thin drill bit. By the way, for precise drilling of pilot holes for fastening door hinges, there are special self-centering drills.
I wish you all a New Year's mood, good health, and interesting ideas! Subscribe to the telegram channel
site so as not to miss new articles.
The author's video can be found here.
Source
The hinges tore out of the chipboard (cabinet door) - how to fix it? Details + video version
Nowadays, most furniture, such as cabinets, bedside tables, kitchens, and so on, are made of chipboard. The material is good, quite flexible (there is one for every taste and color). However, it has a big disadvantage. Over time, especially if this is a frequently used door, the hinges can be pulled out by the roots (probably many have experienced this), and the hinge dangles... the sash sags, or even comes off altogether. In general, how can I fix this whole thing? Detailed instructions + video version...
The essence of the problem is that it will not be possible to screw the “screws” back into these torn fasteners. They simply won’t stay there. We need to fix it some other way. For me personally there are only three. I’ll tell you about each one separately.
screw the screw into the fiberboard
Gentlemen and, if you can, ladies. Tell me how to screw a self-tapping screw into fiberboard (kitchen furniture), if I turned it out once and I can’t screw it back in - it doesn’t hold (it’s obvious why). I can't make a new hole, I'm fixing the door.
and what does this have to do with the door and the fiberboard, and what is obvious is that it doesn’t hold (how many times does it have to go back and forth so that it doesn’t hold), please clarify what is attached where or if you have a door made of 3mm fiberboard)).
No, the door is normal. Fiberboard (maybe chipboard) is the material of the kitchen walls, I am attaching a “frog” to hang the door. I noticed that the door was askew, I decided to tighten the screw holding the hinge, but it did not tighten, it turned. Now the task is to secure the screw without changing the mounting location. I have nowhere to move the hole.
Rather, chipboard (chipboard), and fiberboard - hardboard - a thin, usually 3 mm, wood-fiber board.
Well, take a self-tapping screw of the same length, but larger - for example. was 4, let's take 4.5. Or drill it out, remove dust and place a wooden chip on PVA glue.
Pour PVA into the hole. Z.Y. Oh, already answered. Then I will comment on the previous post. Do not drill out. And do not remove the dust, but mix thoroughly with PVA.
and then I'll unscrew it? And is it necessary to let the PVA dry or screw it in immediately after pouring.
Do you need to drill out a lot in diameter?
Almost dry the PVA, screw in the self-tapping screw and let it dry (without loading).
One more PS: If your kitchen is made of that vile, loose material that I imagined, then a wooden chopper will not help, because... Over time it will fall out along with the screw.
PVA is not a construction material, but an adhesive. And there is no need to keep a concentrated load in a thick layer.
“In furniture made of chipboard, screws do not hold well, and doors especially often “suffer” (they warp or even fly off completely). You can avoid this in the following way: drill a hole for the screw to a diameter of 8 mm and hammer a wooden plug into it with glue. And then screw the screw into this cork. Just be careful, don’t drill right through the wall of the furniture!” ” > “In chipboard (chipboard), screws, as a rule, do not hold well due to the graininess and heterogeneity of the material structure. It is recommended to glue wooden plugs into the fastening areas. If the fastening is not very loaded, you can screw the screws directly into the chipboard, but then preliminary drilling and abundant lubrication are required. Wooden plugs must be made so that the screws are screwed in across the grain. Screwed along the grain (into the end of the wood), they hold much weaker. The length of the plug must be at least 30 mm. even for short screws. The small plug does not stick well to the wall. The length of the chipboard plug is determined by the thickness of the board.” " >
Regular matches
Everything is simple here, if your broken holes are not large, say, a piece of chipboard has not fallen out, then you can use ordinary matches.
How it works? Just hammer a match into the hole (great if the diameter is not large). And then we screw the screw in there. The match is pressed against the wall and thus the fastening is restored.
However, it is not suitable for heavily loaded doors that you rarely use. If you constantly open or close the sash, it will not last long . BUT as a temporary solution, why not?
Wooden “chopik” + glue
I think this method is the best. After such a repair, the door in my kitchen worked for several years, and nothing was torn out again.
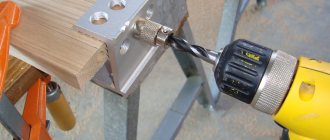
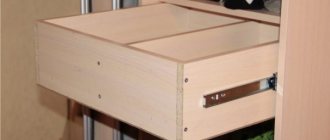
The principle is this: Remove the sash - door, then you need to take a drill and drill out the torn holes.
We take a drill with a diameter slightly smaller than a wooden “chopik”, for example, my chopstick is 9 mm in diameter, and the drill is 8 mm.
We do not drill to the full depth of the door, usually 80% is enough, the main thing is not to drill further, because the drill will come out on the other side of the door, which is not always necessary. To do this, there is a special limiter on the drill, or at the required depth, you need to screw electrical tape onto the drill and not go beyond its limits.
Next we pour glue into the hole, I take “MOMENT” which glues the wood (you can take any other one; there are now dozens of different ones). Well, we hammer in the “chopik”, do it carefully so as not to break the back wall!
Let it set for about 15 minutes. Then in our wooden inserts, I drill another hole in the center, also not to the full depth. This is done in order to tighten the “screw” freely, but do not overdo it. For example, I have a “screw” with a diameter of 4 mm, and I take a drill with a diameter of 2 mm.
I tighten it on the removed door, try it - it holds perfectly! Now you can hang it on the closet.
This third method, I think, is the best for repairing chipboard doors. Moreover, it is suitable for frequent openings.
Now we are watching the video version
This is where I end, I think my materials were useful to you. Read our construction blog, there will be a lot more useful.
Glue + sawdust
The solution is as old as time, and it should be noted that it works well. Perfect if you have a piece of chipboard torn out.
The idea is simple - we take sawdust (you can take it from a chipboard, a piece of which has been torn out), or find it near furniture factories, next to large construction supermarkets (usually there are pieces lying around that no one needs), crush them, mix them with glue (previously we used PVA) this Apply the mixture to the broken areas and let dry. And that’s it, tighten the “screws”. It's holding up well.
However, now there are a large number of adhesives; on the Internet I even saw a guy pouring a lot of glue from a glue gun into broken places. And everything seems to be holding up
I used to repair hinges in the kitchen a long time ago. BUT due to the fact that the sash was used often, it broke quite quickly.
So this is again an option for a while, for constant use (10 - 15 openings per day), this is not the best way.
Remember the life hacks of the masters
If the dowel does not hold, you already know how to secure it. Choose the method that suits you best, or better yet, test several options on an inconspicuous area of the wall. Finally, we have prepared lifehacks from experts for you that will help you achieve better results. Take note!
It is better to drill loose materials in a non-impact mode or in a soft impact mode - if your hammer drill has one. The hole will be more accurate, without chips and the required diameter. As a tool, craftsmen recommend a drill with a pobedit tip. If there is a risk that the fastener cannot be secured in a large hole, it is better to take a drill 0.5 mm smaller than the diameter of the dowel.
After preparing the hole, remove dust from it . You can take a special brush or use a construction vacuum cleaner. It is especially important to do this with materials that crumble a lot. Otherwise, it will not be possible to strengthen the dowel well. For greater reliability, craftsmen suggest priming the hole. Apply primer using a cotton swab and let dry. This will prevent dust from forming inside and improve grip.
We hope our tips will help you choose the best way to fasten dowels in loose materials. May your renovation go smoothly! And you can buy fasteners on our website.
Which self-tapping screw to choose for the job
The choice of self-tapping screws according to the type of cutting available on them is small: they can be universal or for wood, the pitch of which is much larger.
If you have to screw a self-tapping screw into metal, chipboard or plywood during your work, feel free to purchase universal products. If the work is to be done with wood, then only those that are designed specifically for this material are suitable. Why, you ask. The answer is simple. For the fixation to be reliable, the material must “settle” securely between the threads. The wood structure cannot do this if the thread pitch is too small.
Driving self-tapping screws into different materials
Concrete
Self-tapping screws are screwed into concrete using dowels. Dowels are tubes made of durable plastic. Dowels are installed in holes in the concrete, and a self-tapping screw is screwed into them. The dowel forms a spacer between the self-tapping screw and the concrete and provides adhesion. Many people recommend coating the dowels with glue before installation. I do this too. The glue also improves adhesion to concrete. Holes for dowels in concrete are drilled with a drill with a Pobedit tip and a drill with a hammer drill. It is almost impossible to drill into concrete without a hammer drill. (A hammer drill is a device in a drill that taps the drill along the drilling axis simultaneously with the rotation of the drill) If you are sure that you are drilling concrete and not plaster, brick, etc., feel free to turn on the hammer drill. The diameter of the drill must match the outer diameter of the dowel, and the inner diameter of the dowel must be suitable for the self-tapping screw. In this case, the self-tapping screws themselves can be used both on wood and universal.
Brick, cement plaster, screed, cement slabs, ceramics (tiles)
Everything is similar to concrete, but you need to be especially careful when working with a hammer drill. A hammer drill can split such a wall. It is better to drill with the hammer turned off. If, without a hammer drill, the drill suddenly stops and does not drill further, then you can turn on the hammer drill, carefully drill a little with the hammer drill, then turn it off again and drill without a hammer drill.
Soft metals. Copper, aluminum, bronze, duralumin, etc.
Let's measure the diameter of the screw pin without taking into account the thread. It is convenient to carry out the measurement with a caliper. Let's install the pointed jaws of the caliper perpendicular to the self-tapping screw, clamp it with these jaws so that they penetrate into the thread groove, and get the diameter. We choose a drill 1 - 1.5 mm smaller in diameter than the obtained size. In the material, where we will screw in the screw, we drill a hole. We screw the self-tapping screw into this hole. Before starting work, it is better to check on an unnecessary piece of the same material whether the drill is suitable. Drill a hole in it and try to screw in the self-tapping screw. The self-tapping screw should fit tightly enough, but without jamming, into the hole. If the screw cannot be screwed in, it’s too tight, then the hole should be wider; if the screw screws in too easily, then try taking a thinner drill, otherwise the screw may pop out. Use self-tapping screws with universal threads.
Unfortunately, errors are periodically found in articles; they are corrected, articles are supplemented, developed, and new ones are prepared. Subscribe to the news to stay informed.
If something is unclear, be sure to ask! Ask a Question. Discussion of the article.
Let's connect aluminum and copper wire. Cable, wiring. Apartment, house, . How to connect aluminum and copper wire? Connection of copper and aluminum wires.
How to cut laminated chipboard, laminated chipboard without chipping? How to repair chips. When making furniture, you have to cut laminated chipboard. Chipboard doesn't like this very much -.
Why does concrete crumble, crack, or deteriorate in the foundation, walkway, . The path and foundation were poured in the summer. After the winter, serious damage is visible, observing.
How to wash off, remove acrylic, alkyd, latex paint, primer, etc. The surface is covered with old paint and primer. In some places it peels off, peeling off.
We paint over the drips and glue the wallpaper after water leaks from above. Secrets. How to properly repair an apartment after it was flooded by neighbors from above.
What to use when you need to screw in a self-tapping screw
If there is only one self-tapping screw or if their number is very small, you can easily use a regular screwdriver. If you are assembling some complex structure with a large number of fasteners, then it would be better to arm yourself with a good-quality screwdriver.
To choose the right screwdriver, read our article, which we devoted specifically to this issue. The effectiveness of this device increases significantly if it is used with quality bits.
Now let's move on to the most important thing - screwing in the screws.
General technology for screwing in self-tapping screws
In order for the self-tapping screw to be securely fixed in the base material, when screwing it in, the following general technology should be followed:
- Use an awl or thin drill to mark the installation location;
- Place the tip of the product in the intended hole;
- carefully screw it in so that the position of the screw becomes stable;
- then continue screwing at maximum speed (if a screwdriver is used) and maximum force;
- at the last stage, reduce the force and speed to avoid damage to the screw and the material.
How to properly screw self-tapping screws into various materials
Concrete
Perhaps the method of installation in concrete is now known to everyone: first you need to install a dowel in it, and then you need to screw the self-tapping screw into this already installed dowel. According to many craftsmen, the reliability of fixation increases significantly if the surface of the dowel is lubricated with appropriate glue.
To drill holes, it is best to use a hammer drill, the rules for choosing which we have already written about earlier. By installing self-tapping screws on dowels, you can use both universal products and wood.
Ceramic tiles and bricks
If you need to screw a self-tapping screw into a brick or ceramic tile, proceed in the same way as with concrete. But to drill holes it is better to use a drill.
Useful tips for drilling tiles can be found here.
Soft non-ferrous metals
To ensure reliable fastening in such metals, before screwing the product into them, you should drill a hole of a very small diameter, smaller than the diameter of the self-tapping screw. Screwing it in is done without any special tricks. The only important point is that it is necessary to use only universal type products.
Hard metals
The diameter of the pre-drilled hole in such material should be equal to the diameter of the universal screw without taking into account its thread or slightly exceed it. However, some hard metals - cast iron, for example - are simply too tough for self-tapping screws.
Plastic
Self-tapping screws are not suitable for all types of plastic; some of its varieties may simply collapse when screwed in. If you are completely sure that your plastic product is not one of them, then in this case you should use the technology that was described above for soft metals, using self-tapping screws for wood.
Wood and wood panels
Naturally, in this case, you should again use self-tapping screws for wood. If they are screwed into thin boards or slabs, as well as into hard wood, a thin receiving hole must first be drilled. The easiest way to work is with thick boards made of soft wood: no special tricks are required for this.
How to screw it in correctly
In order to correctly screw in and securely fasten the self-tapping screw into the chipboard, you need to follow the recommendations for working with the selected type of fastener.
Chemical anchor
The strength of fastening with chemical anchors is higher than in the case of metal hardware. At the same time, screwdrivers and screwdrivers are not needed for installation; it is enough to buy a magic composition with a dispenser or several capsules. How the installation occurs: the compound is poured into the prepared hole, after a while the anchor hardens.
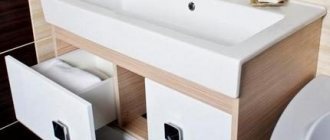
Chemical anchors are not subject to corrosion, which is especially important for assembling furniture and other chipboard products for bathrooms and other rooms with high humidity. Disadvantage - this type of fastener tightly connects the parts. Further disassembly and assembly will require design changes to the product.
Wooden dowels
Chopiks, also known as furniture dowels, are inconvenient to use for fastening chipboard sheets. Wooden dowels are usually used to fix plywood and natural veneer panels. Without skill, it is almost impossible to assemble a wardrobe on choppiks: you need to use glue and clamps. Self-tapping screws under chipboard greatly simplify the work of a furniture maker and ensure reliable assembly in a short time.
Metal frame dowel
The frame expansion anchor was originally used to secure the frame inside the window opening. Over time, this type of fastener has become popular in other areas of construction work and in furniture production, including when working with chipboard. The anchor consists of a spacer sleeve with a cone-shaped nut on the base, and a self-tapping screw that is screwed inward.
How to screw a self-tapping screw into wood.
There are three ways to screw a self-tapping screw into wood: a screwdriver, a screwdriver or a drill. The easiest and almost cost-free way to tighten a self-tapping screw is with a screwdriver. Wood material is soft and pliable, which allows you to screw a sufficient number of screws into it with a screwdriver without much fatigue. In order to tighten a large number of screws, you will have to resort to using a screwdriver; it will do all the power part of the work for you. Screwing a self-tapping screw into wood with a drill is also not difficult, but for this, the drill must have a function for smoothly adjusting the rotation speed.
How to screw a self-tapping screw into wood with a screwdriver.
In most cases, you have to screw self-tapping screws into wood with two types of slots, flat and cross-shaped. To tighten such screws, select the appropriate screwdrivers with a flat (marked SL) or cross-shaped (marked PH) tip. You can also find cross-shaped bits marked PZ on sale. PZ bits have additional edges and are used for self-tapping screws with a recessed slot. Sometimes flat-head screwdrivers are called minus-head screwdrivers, while those with a Phillips-head tip are called plus-head or figure-head screwdrivers. In addition to the letter index, their marking also contains digital indexing, which indicates the width of the flat tip or the group to which the cross-shaped tip belongs. When making furniture with your own hands, you most often have to use a screwdriver to tighten self-tapping screws whose diameter ranges from 2.2 to 4.2 millimeters. Therefore, for screwing flat-head screws into wood, the screwdriver designation must be SL from 4 to 8, and for screwing cross-slot screws into wood, the screwdriver designation must be PH or PZ 1 or 2.
How to screw a self-tapping screw into wood with a screwdriver.
Even a person who is far from this business can handle screwing a self-tapping screw into wood with a screwdriver, since the screwdriver will do all the work for you, you just need to choose the right attachment for the screwdriver (bit). The rules that must be followed when choosing a bit for screwing screws into wood are the same as when choosing a screwdriver.
How to screw a self-tapping screw into wood with a drill.
To screw screws into wood, the drill must have an electronic speed control function. In other words, the rotation speed of the drill chuck should gradually increase as you press the button. It is also worth remembering that most drills do not have a maximum force adjustment function like a screwdriver, and therefore you need to independently control the depth of screw tightening and remove your finger from the button in time. A regular drill has enough force to drive a screw deep into wood or even tear off the head of the screw.
How to tighten a self-tapping screw without a screwdriver or a screwdriver.
This method of tightening self-tapping screws is, of course, an exception to the rule, but in some cases when it is really necessary and only a drill and self-tapping screws are at hand, there is nothing else left to do but clamp the head of the self-tapping screw directly into the chuck and slowly tighten it. To prevent the screw from spinning in the chuck, you can hit the edge of the screw head with a hammer several times so that it becomes slightly deformed rather than round.
What drill to use to drill a self-tapping screw into wood.
There is no need to pre-drill the hole, since a self-tapping screw is nothing more than a self-tapping screw, and according to the manufacturer’s specifications, it is screwed into wood and plastic without drilling. To confirm this, you can think about what a drill should be like for drilling a self-tapping screw into wood 4.8*100, and if you think logically, the diameter of the drill should be approximately 3 mm. and the length is at least 130 mm. (Drill 100 and clamp 30 into the drill chuck). It is unlikely that such a drill can be found on sale.
And finally, remember that a poorly driven screw holds much better than a well-tightened nail.
Source: ptexpert.ru
Tools
0 votes
+
Vote for!
—
Vote against!
The modern market for construction fasteners offers the buyer a wide selection of self-tapping screws - so necessary for any repair of products. However, reviews of these “little helpers” are not always flattering.
Why?
The thing is that home craftsmen often do not know how to screw in a self-tapping screw correctly and how to choose it correctly.
Table of contents
- Types of self-tapping screws
- Tools for tightening screws
- General technology for screwing in self-tapping screws
- How to screw self-tapping screws into different materials?
- How to properly tighten a screw that has been removed?
Types of self-tapping screws
There are two main types of self-tapping screws used for self-repair - for wood and universal. Their main difference is in the thread pitch - “screws” for wood are characterized by a large pitch (more rare application of thread turns).
There is a misconception that universal parts are just as good for wood, plywood and chipboard as specialized ones. No, of course, it won’t be difficult to screw them into these materials, but how well they will stay there is a big question. The fact is that the “raw material” into which the self-tapping screw is “immersed” must lie securely in the grooves of the thread, and the structure of the wood will not allow it to fit well into the narrow “grooves” of the universal self-tapping screw.
Tools for tightening screws
Fasteners can have heads of different sizes and recesses in them of different shapes and sizes. Therefore, before screwing in a self-tapping screw, make sure that you have a screwdriver or screwdriver with a suitable attachment in your arsenal. In general, it is better to have, as they say, as many attachments for the corresponding tools as possible. Plus, they should be replaced regularly, since wear of the devices during operation cannot be avoided.
Note! The best attachments are those made of tool steel with hardening additives. Do not choose the first set you come across, otherwise after a couple of days of intensive work you will have to go for a new one.
If your plans are to screw one or two screws into a non-solid surface, then you can use a screwdriver. If it’s more, you can’t do without a screwdriver. Tightening fasteners with a screwdriver is not as simple an operation as it might seem at first glance, and requires some skill. A screwdriver will do everything quickly and efficiently.
General technology for screwing in self-tapping screws
Using an awl, make a small indentation in the space reserved for the screw. Place the product “in position”. Using careful but confident movements, rotate the part until it is well deepened and secured in the material. After this, the force can be increased. Towards the end of the “process” the speed must be reduced again so as not to damage the screw.
How to screw self-tapping screws into different materials?
Concrete
Many men, not knowing how to screw a self-tapping screw into concrete, spoil a sufficient number of purchased parts. In fact, everything is quite simple: self-tapping screws are “integrated” into concrete using dowels - durable plastic. First, a hole is made in the material, a dowel is installed there, which “accepts” the fastener.
Worth knowing! Craftsmen advise lubricating the dowels with glue before installation. This, in their opinion, strengthens the connections.
Drilling holes in concrete should be done exclusively with a hammer drill - even an impact drill may not hold up, let alone a regular one. Self-tapping screws are suitable for both wood and universal ones.
Brick, ceramic tiles, screed
Self-tapping screws are screwed into these media in the same way as into concrete. The only thing is that when working with tiles, it is better to take a regular drill, since it can crack due to the excessive power of the hammer drill.
Copper, bronze, aluminum
Measure the diameter of the fastener shank excluding threads. This manipulation must be performed with a caliper. Place the pointed jaws perpendicular to the screw and clamp the product so that they completely penetrate the thread groove; determine the diameter. Using a drill with a diameter a millimeter and a half smaller than the obtained value, make a hole in the material. Screw the screw into the hole and the job is done. Use parts with universal threads.
Note! Before “making a hole” in the main structure, it is recommended to test the drill on a small unnecessary piece of similar material. Drill a hole and try to screw the product into it. The drill is considered correctly selected if the self-tapping screw fits into the hole tightly enough, but does not jam. If the screw fails to “break through”, you should work with a thicker drill. Tightening the part too easily symbolizes that you need to take a thinner drill - otherwise the self-tapping screw may pop out at any moment.
Hard metals
The hole in the material should be equal to or slightly larger than the diameter of the unthreaded rod. Self-tapping screws will not be able to cope with a number of hard metals - in particular, screwing these fasteners into cast iron is almost impossible.
Plastic
Not every plastic material is ready to accept a self-tapping screw, so making sure before starting work that the material fits exactly is a good idea. The technology for screwing a self-tapping screw into plastic is the same as for soft metals - copper, aluminum, bronze. Recommended products - with wood carvings.
Wood, fiberboard and chipboard
Don't know how to screw a self-tapping screw into a board? Believe me, nothing is simpler. The basic rule is to use only wood screws. For hard wood, thin boards, chipboard, fiberboard, pre-drilling a hole for the product is mandatory, since there is a risk of the material splitting with a self-tapping screw. For thick boards made of soft wood, you can do without this manipulation.
If you are working:
- with hardwood - choose a drill with a diameter equal to the diameter of the self-tapping screw rod (without threads, of course);
- with fiberboard – 1 millimeter less;
- with chipboard or soft wood - 2-3 millimeters less.
Drywall
Mark dots on the sheet with a pencil. The optimal pitch between screws is up to 70 centimeters, depending on the expected loads on the structure. If you are using a screwdriver, you can start screwing the product in at maximum speed. After the self-tapping screw enters the surface by ½, it is recommended to gradually reduce the speed to minimum. When tightening with a regular screwdriver, all movements should be smooth. It is very important to tighten the self-tapping screw correctly - ideally it should be 1 millimeter below the level of the cardboard, not the plaster! This will ensure maximum strength of the future structure. If you suddenly did not follow the technology and broke through the cardboard, the “ill-fated” place needs to be puttied, and a new fastener should be placed at a distance of 5-9 centimeters from it.
The type of self-tapping screws for drywall should be selected depending on the material used to construct the sheathing. For a metal frame, universal or metal screws are required, for wooden sheathing - wood products.
How to properly tighten a screw that has been removed?
The unscrewed part must be re-tightened exactly as it was before. It is very important that the screw fits into the same groove, at the same angle. If the product “draws” a “new path” for itself, the reliability of fastening will be significantly reduced. How to get into an existing recess? Simply insert the part into the hole and turn it by hand without pressure. As soon as everything falls into place, you will feel it - the process will go like clockwork. There is no need to put pressure on a tight screw; you just need to remove it and try again. A little force is required only at the very end of screwing.
Now you know how to screw a self-tapping screw into drywall, concrete, brick, wood and metals correctly and what to do in case of “working hiccups”.