A modern bathroom is no longer an ascetic room with the minimum necessary. Old Soviet minimalism is a thing of the past. Today, in any bathroom, even a small one, there is a set of furniture, among which there is a cabinet under the sink. The choice of models is very wide and raises a logical question: “How to choose and install correctly?” Let's try to figure this out.
- How to assemble a cabinet
We will install a mortise sink of any model
Today, more and more people are choosing countertop sinks for their kitchens. In many ways, installing a kitchen sink on a countertop is more convenient:
- it cannot be torn off from the fastenings, even if some effort is applied;
- no need to choose a suitable wall, as when installing a wall-mounted sink;
- the thickness of the wall next to which the overhead sink is installed can be any;
- You can choose any location for installation;
- the table surface next to the sink is very convenient to use while preparing food;
- This sink looks very aesthetically pleasing;
- All connections to the sink are hidden inside the cabinet.
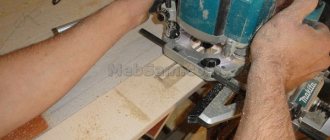
The listed advantages are slightly overshadowed by the difficulty of installation. Indeed, in order to install a sink efficiently, certain skills are required. The hole for installing the sink must be cut not only accurately, but also without damaging the surface of the table, and this is very difficult to do without a good tool and accurate calculations. This is practically artistic wood carving.
Our company's specialists successfully install any plumbing fixtures. We have many grateful customers, and we always welcome new clients. By inviting our specialist to connect the sink in the kitchen, you will be convinced that they are contacting us for a reason. The low cost of installing a kitchen sink and the high-quality work of our craftsmen attract new customers to us.
How to install an overhead sink on a cabinet - brief instructions
The overhead option for installing a kitchen sink can be ordinary or “slide-in”. In the latter case, the sink itself is equipped with curved slides on the side and front sides, and special grooves are provided on the bedside table. After you have successfully assembled a sink in the kitchen, all that remains is to slide the sink into these grooves, move the structure to the wall - and you can connect the communications.
If you use a direct overhead mounting option, you will have to seal all joints. High-quality waterproof sealant combines the properties of glue and a protective waterproof composition. The upper perimeter of the open cabinet is generously coated with this composition; all that remains is to precisely place the sink itself on top.
Otherwise, one day it will fall inside the cabinet along with the dishes, destroying the sewer and breaking off the pressure water hoses. Negative impressions from such an accident will be available to both you and your neighbors below. As well as eliminating the plumbing collapse and renovating two rooms from the personal budget. How to install an overhead sink on a cabinet without the risk of such an incident? Using auxiliary bars or internal sheathing.
Simple overhead sinks are usually equipped with additional fasteners. Massive bars, precisely screwed to the wrong side of the cabinet, are suitable as such. It is necessary to accurately mark the bottom edge of the pre-installed (without glue!) sink and build an internal sheathing along this line. Then the sink will rest on auxiliary bars, and not on the thin end of the bedside table. The operation is similar to the hidden installation of sheathing, only in the final stage it is supplemented with adhesive sealing of the joint between metal and wood.
Important nuances
Attaching the cabinet and sink to the wall is advisable if it is strong enough. In other cases, it is important to use a supporting frame. The installation height of the washbasin is selected individually, the average range is 80–85 cm. To make the sink comfortable for children to use, you can install it lower, and higher for tall people.
Plain paper will help to identify minor leaks after installing the washbasin (or make sure there are no leaks). It must be placed under the threaded connections and left for half an hour. If the paper remains dry, everything is fine. If wet spots appear, disassemble the connections and repair any leaks.
Sink installation diagram
Both variants of mortise and overhead sinks are mounted in cabinets with doors (less often with drawers) that do not have a back wall. The assembly of this element of the kitchen set has its own characteristics. They consist in the complete absence
internal partitions and walls, as they will interfere with the installation of the water supply. This means that stiffeners, which play an important role in strengthening the structure, are missing. And when a countertop sink is installed, even a large part of the countertop is missing, since it is replaced by the steel part of the sink.
When assembling a cabinet under the sink, you should put more effort and take this part of the furniture more seriously than the rest of the cabinets. It is advisable to place it on special substrates, as there is a possibility of water leakage. It would not be superfluous to treat the cabinet itself with a special water-repellent agent. It is better to provide special fasteners for tightening clamps from inside the cabinet (they are installed to strengthen the structure after installing the water supply system).
If the overhead sink is massive and heavy, sealing adhesive alone is not enough. This can lead to a broken sink and destruction of half the kitchen. In addition, neighbors on the floor below will suffer, since if a break occurs, the water supply system may be damaged and water will flow out.
It is better to strengthen overhead sinks with special fasteners. For these purposes, metal corners or special beams are used, which bear the main weight of the sink.
So, to install a kitchen sink with your own hands, you should follow a clear action plan:
- make preliminary markings;
- we decide on the location of the sink;
- installation work;
- finishing work.
In order to do this work yourself, you will need the following tool:
- drill with drills;
- screwdrivers, self-tapping screws;
- pliers;
- sealant;
- pencil, ruler;
- fasteners.
In the final part of the work, when the sink is installed, as a rule, faucets, water filters (if any) and other additional structures are attached.
Installing a stainless steel kitchen sink yourself is not such a difficult task. It is enough to take this work seriously, prepare the necessary tools and materials, and most importantly, decide in advance on the type of sink and the method of its fastening, since the specific assembly of the washing cabinet will depend on this. If you are not confident in your abilities, it is better to seek help from a specialist, but you will have to pay a lot of money for this work.
https://youtube.com/watch?v=Ndnm8yp-fLs
How to make and assemble it with your own hands?
The work process will look like this:
According to the existing diagram, we prepare the necessary parts. They are cut from lumber with a jigsaw or saw. If laminated chipboard was chosen as consumables, all edges are trimmed with PVC film .
This will prevent the material from swelling during operation.- The assembly of the cabinet begins with the manufacture of the sidewalls. In our case, their dimensions will be 87 by 60 cm. Small rectangles measuring 6 by 11 cm are cut out at the front at the bottom of the parts.
- Now the cross members are attached to the sidewalls. They are made of plywood, 8 mm thick. The width of the crossbars must be at least 12cm. Since these details will not be visible, there is no need to over-process and refine the details. But for long-term use, it is better to treat the plywood with an antiseptic.
- The cross members are attached to the sidewalls in different ways. They can be fixed with steel furniture corners or screws.
- Next we proceed to install the bottom. Its dimensions will be 70 by 50 cm. The bottom is attached with screws to the crossbars.
- Now you can attach the upper crossbars on which the sink will be installed. The first crossbar is positioned vertically and is fastened so that it does not protrude beyond the cabinet. The rear wall of the cabinet will be attached to this crossbar in the future . We place the second upper cross member horizontally.
- The next step in making a sink cabinet with your own hands will be fixing the back wall. There will be no load on it, therefore, it can be made from thin plywood or pressed cardboard. It will be much easier to cut holes for communications in these materials than in thick chipboard.
- Now you can begin assembling the front frame. When making shelves and doors, the dimensions indicated in the drawing are taken.
- The next step is to install the mortise shelf on casters.
- Next we attach the cabinet doors. Here special attention is paid to the loops. They must be of high quality and able to withstand loads. A good choice would be hinges with closers .
- The final stage of assembling a cabinet for a sink is installing handles.
Algorithms for self-installation
On the wall
Wall installation is carried out as follows:
At the selected level, drill holes (minimum 8 mm) for installing brackets.
- We hammer plastic dowels of the appropriate diameter into the holes.
- We screw the brackets themselves into the dowels, making sure that they are at the same level.
- We put the sink on the brackets, level it (the design of the mounting eyes on most models allows this) and fix it with fastening nuts.
- We attach the drain siphon and install a mixer to supply water.
- If necessary, apply a moisture-resistant sealant to the junction of the sink and the wall.
On a cabinet without a tabletop
The instructions on how to attach an overhead sink to a cabinet are also quite simple:
- On the inside we install mounting brackets made of plastic, or we screw wooden blocks with metal corners.
- We apply silicone sealant to the ends of the side walls.
- We place the sink on top, making sure that it does not move relative to the underframe.
- From the inside, we fix the sides of the sink (or special protrusions on them) with brackets. If there are no brackets, we snap them onto the sides with metal corners.
- Using a screwdriver, rotate the adjusting screws, securely clamping the bracket fastenings.
- Remove any silicone that protrudes from under the edge of the sink with a wet hand or a clean rag.
Into the tabletop
The price of sinks that are mounted in a mortise manner is usually quite high. And the countertops themselves are not cheap, so inexperienced craftsmen should not take on the job without preparation.
If you are confident in your abilities, then installation should be carried out according to the following scheme:
Before attaching the sink to the countertop, we prepare a hole for installation. To do this, we place either the sink itself or the template that comes with it on the surface. We mark according to the template using a marker.
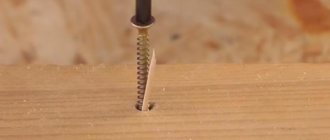
- We make holes at several points along the marking line using a wood drill. Then we connect these holes by sawing the grooves with a jigsaw.
- We process the edges of the resulting hole with a rasp, removing large burrs. After this, we apply a sealant to the cut, which will prevent the wood or MDF from swelling when in contact with moisture.
- If dismantling was previously carried out, then we return the tabletop to its place. Apply sealing butyl tape around the perimeter of the hole.
- We install the sink, positioning it in such a way that at least 10 mm of the edge extends over the entire area of the table.
- Using standard fasteners, we fix the sink from the wrong side. For mounting on thin countertops, additional wooden blocks are usually attached.
- Additionally, we seal all joints with silicone.
Types of sink brackets
The fasteners for mounting a washbasin on the wall must be able to withstand the weight of the plumbing fixtures with a margin. They are made from various metals.
- special mounts designed for mounting a specific model. Often these are exclusive designer washbasins with an unusual shape. Brackets for such plumbing fixtures are included and can be made in the form of specially shaped pins, pipes that go around the sink, or unusual welded structures. Such fastenings are treated with special decorative compounds (ceramic or metal).
Special spring-loaded frame mount for sink
- Brackets for standard wall-mounted sinks are made of cast iron or steel and coated with anti-corrosion paint. They are produced in the form of T-shaped or L-shaped racks, and can also be made in the form of frames with a sliding unit to adjust the size of the fastening. Brackets in the form of a metal frame into which the washbasin is placed are particularly reliable.
Steel L-shaped brackets
Recommendations from specialists for installing a kitchen sink and a list of necessary tools
If you decide to mount the sink yourself, then it will not hurt you to familiarize yourself with several rules that explain how to mount it correctly and where, what tools and auxiliary materials to use, depending on what your sink is made of (stainless steel or other) .
First, a sink (made of stainless steel, plastic, it doesn’t matter) should never be mounted next to an oven or refrigerator. Secondly, the location should be fairly close to the work area, since this is where direct preparation for food preparation takes place (cleaning, slicing, etc.). And finally, the third rule is that the sink should divide the work area into parts. The first will be intended for dirty work, the second for clean work, for example, serving.
As for the connection to the sewer and water supply systems, today this does not affect the installation location, since modern technologies and the use of new building materials make it easy to choose any suitable location for the kitchen system.
Now about the tools that may be needed during the work process. Here is their list:
- screwdrivers, preferably different ones;
- electric drill;
- electric jigsaw;
- wood drills;
- pencil and ruler;
- pliers;
- sealant (silicone);
- seal.
Installation and fastening of the sink
Before installing a stainless steel sink on a cabinet, you need to understand that you can use various fastening materials for this. For example, the easiest way is to apply sealant to the ends of the upper frame and place the sink itself on top of it. True, we must pay tribute to this plumbing fixture, which itself can withstand decent mechanical loads, which cannot be said about sealants. After all, the kitchen sink is constantly subject to shocks, displacements, and vibrations. Therefore, the sealant as a fastening element is in doubt in this case.
Someone is trying to convince you that instead of sealant it is better to use polyurethane foam, which has a greater adhesive effect. Nobody argues with this that foam is better than sealant in terms of adhesive function, but again there is no certainty that washing under the influence of mechanical loads and temperature changes will not come off this type of fastener.
Therefore, experts recommend the only correct fastening, which includes special fastening elements in the form of brackets. Here they are in the photo below.
They are installed on the ends of the sidewalls closer to each edge. Fastening is done with a self-tapping screw. That is, you need to screw in two self-tapping screws at a certain level on the inner sides of the side walls of the cabinet. The location of their installation is determined experimentally. To do this, you need to install the bracket with the top shelf close to the top end of the cabinet wall. Make a mark in the outermost slot
Please note that the brackets themselves are installed so that the slot for the screw, which is located at an angle relative to the top shelf, is positioned at this angle towards the door
Now, according to the marks on the sidewalls, screw the self-tapping screws, but not all the way, because you need to install the brackets on them, putting them on the slot and sliding them all the way. In this case, there remains a gap between the upper shelf of the fastener and the end of the side wall, where the seating edge of the sink itself will need to be inserted. After which the brackets are moved all the way, clamping the edge of the plumbing fixture, and the self-tapping screw is screwed in all the way, securing the bracket itself. This fastener for an overhead sink is considered the best. In any case, this is a guaranteed fastening. But before fixing the overhead sink using this method, it is recommended to treat the upper ends of the side walls of the cabinet with sealant. This, firstly, will strengthen the fit of the sink, and, secondly, will create conditions for hermetic installation of the device.
There is another option that is rarely used today. This is a mounting of an overhead sink on a stand made by yourself. It can be made in the form of a lathing that is attached to the sides of the cabinet. In fact, the design itself should somewhat resemble the shape of a sink bowl. That is, the sink will be supported not only on the side walls of the cabinet, but also on the manufactured frame.
What you need to install a sink
Stainless steel sinks are very popular due to their light weight, durability and ease of installation.
Before you begin installing the sink, you need to assemble the furniture. Depending on the type of cabinet, fasteners and assembly methods differ. The kit usually includes accessories and the necessary instructions. To attach the sink correctly, you need to assemble a minimum set of tools. To seal the seams, you will need silicone sealant, which will protect the surface of the furniture from moisture.
Installation accessories:
- electric drill or screwdriver;
- a set of drills with a diameter for fastening;
- screws and other fastening products;
- screwdrivers in a set with different sections;
- masking tape to protect furniture;
- ruler and device for level measurement;
- sealant for sealing joints.
Before installation, it is recommended to clean the space and remove excess. For convenience, all communications should be secured to the stand in advance. After fixing the sink, this stage will be problematic. The installation location will depend on the location of the water pipes and sewerage. If space permits, it is not recommended to place the cabinet next to the refrigerator and heating appliances.
Need to know before starting work
The bedside table can be sold assembled, but most often it is a set of individual components. Therefore, before assembly, you must read the instructions and drawings. Compliance with the rules and consistency ensures that, when assembled, the stand will fit in the designated place and will not interfere with the connection of communications.
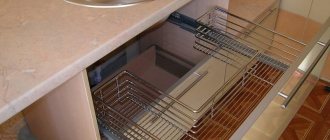
Before purchasing, you also need to evaluate the contents of the product. Additional drawers and shelves should have several height options to accommodate items of various sizes. The height above the floor at which the sink is supposed to be mounted should be suitable for each family member.
What determines the quality of our work?
Any installation of an overhead sink begins with studying the template configuration. The more complex the shape of the sink, the more effort will have to be made to cut the appropriate hole. The slightest mistake can lead to damage to the tabletop.
For a good craftsman, high-quality installation of a mortise sink does not depend on its model, shape and material from which it is made. Today in fashion:
- round sinks made of stainless steel and stone;
- double sinks with two drains in a variety of materials;
- built-in and surface-mounted granite sinks.
One of the popular models of sinks is a bowl made of granite chips. It looks solid, washes well, and lasts a long time. Its installation is more difficult than installing sinks made from other materials.
If there are no holes for installing such a sink, then installing a granite sink turns into a filigree work. Sometimes there are holes, but they are too small and you have to cut them out additionally.
Our craftsmen do an excellent job with this work, using special drills with a “diamond” crown and other tools. To determine how much it costs to install a kitchen sink, you need to know what material the master will have to work with.
The sink itself is quite heavy, so installing the sink into a kitchen countertop is done with great care so as not to drop or break expensive plumbing fixtures. More and more people are installing a convenient and practical double sink in their kitchen.
It is usually made of stainless steel, so it is easy to clean and is not “afraid” of chipping if you accidentally drop the plate into the sink. But there are other models - marble, granite or quartz. Installing these “stone” double sinks is similar to working with a granite sink
More and more people are installing a convenient and practical double sink in their kitchen. It is usually made of stainless steel, so it is easy to clean and is not “afraid” of chipping if you accidentally drop the plate into the sink. But there are other models - marble, granite or quartz. Installing these “stone” double sinks is similar to working with a granite sink.
Unlike a conventional sink, installation of a countertop sink with a double sink includes two drains. This turnkey sink is installed by our specialists and delivered to the owners in working condition.
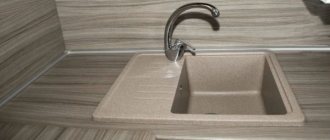
Installing a round sink in the kitchen or bathroom is no less popular. Like other models, it can be made from a variety of materials
The laconic geometric shape attracts attention and looks great in any interior.
The installation of any models of built-in or counter-mounted sinks is a little complicated by under-counter installation of the sink, because you have to work in an inconvenient narrow space.
Before you ask how much it costs to install a kitchen sink, tell our operator which model you want to install. By inviting a specialist to install a sink, you can be sure that a qualified technician will come to you.
By calling us and ordering any plumbing service, you will be convinced that we work not only efficiently, but also quickly. The best specialists of our company will go to fulfill your order.
How to attach a stainless steel sink to a cabinet
There are several ways to attach the sink to the cabinet:
Using sealant. Apply caulk to the edges of the cabinet and install the sink on top.
How to attach a stainless steel sink to a cabinet with fasteners?
Step-by-step instruction:
- On the inside of the cabinet, mark the locations for fasteners with a pencil.
- Screw the screws into the marked places (not all the way).
- Secure the brackets using self-tapping screws.
- Install the sink into the grooves of the fasteners. Check whether it lies evenly in the place allocated to it.
- Remove the sink and turn it upside down.
- Apply sealant to the ends of the side walls.
- Seal the perimeter of the sink with silicone sealant.
- Insert the bowl into the grooves of the brackets.
- Screw the sink from the inside with self-tapping screws.
- Remove any silicone that protrudes from under the edge of the sink with a wet cloth.
- Connect the water supply. Use flexible connecting hoses that make it possible to move the sink away from the wall for ease of installation. Connect the siphon to the drain pipe, connect the flexible hoses from the mixer to the source of hot and cold water.
- Hang the doors on the cabinet. To install the doors evenly, first screw the hinges to the doors, then attach them to the side frame and use chalk to mark the locations of the hinges and their holes on the side frames. Screw the doors one by one, making sure that the marked location of the hinges matches.
Adviсe:
- Install a surface-mounted sink with a faucet and siphon already attached to it, as this will be difficult to do after installation.
- To connect the water supply, use metal-plastic pipes. They are reliable, flexible and durable.
- The overhead sink can be secured using a sliding method. In this case, the cabinet must be equipped with guides, and the sink must have special curved edges. Installation of this model is quite simple - just insert the curved elements of the sink into the guides of the cabinet and push it all the way.
Useful little things
Finally, here are some useful tips that will come in handy for various mounting methods.
- Untreated ends of plywood or chipboard will quickly swell. They must be protected from moisture in any way. Usually paint, varnish or drying oil is used; The minimum number of paint layers is three.
Hint: in order not to wait several days for the coating to dry, it is better to use nitrocellulose-based paints and varnishes. Each layer dries in no more than half an hour. Do not forget about ventilation of the room: the fumes are toxic.
- It is also better to oil the block that is placed under the edges of the sink. Wood is less hygroscopic than chipboard, but it may very well rot.
- It is advisable to use screws with an anti-corrosion coating - yellow or silver. Otherwise, over time, rusty streaks may appear on the walls of the cabinet.
Assembling a cabinet for an overhead sink.
Before attaching the overhead sink to the cabinet, it still needs to be assembled. There shouldn't be any problems at this stage: just follow the instructions. In the end, you should end up with a cabinet without a top. The back part should have a cutout into which communication pipes will go: water supply and drainage. We fasten the side posts and the bottom using confirmats (furniture hex screws), corners or other fasteners. Then we nail or screw the back cover.
Ready! Now place the cabinet where it will stand and you can do the washing. How to attach an overhead sink to a cabinet? To get started, prepare all the necessary tools.
Choosing a location
Before you start attaching the sink directly to the cabinet, you first need to decide on a specific place in the bathroom for the cabinet. It is not always the case that the owners of a room want to install a sink with a cabinet in a standard place, chosen when planning the house. That is why you need to decide on the location in advance, long before you install pipes and other sewer lines.
Drop-in sinks are the most popular; they allow you to create a unified design of the room.
First of all, you should consider that in most cases the sewer pipe comes out of the floor. Therefore, decide immediately whether it will be convenient for you if, in addition to accessories, the cabinet contains some pipes. If yes, then choose a bedside table in advance so that cutting holes on its bottom and shelves for routing pipes and a siphon would be the least problematic. If this option does not suit you, then it is better to install the sink in another place. But the rubber outlet hose will still need to be brought under the sink, either from under the bottom of the cabinet, or by making a small side hole in it.
Consider the dimensions of both the total area of the bathroom and the individual cabinets. It is very important that in the future the bedside table with the sink does not interfere with your ability to walk comfortably or place other equally necessary things in the bathroom.
It is extremely important that the pipes through which hot water will flow do not come into close contact with the cabinet. This can severely damage its surface. Therefore, either position the cabinet so that the distance from the hot pipe is at least 3 cm, or attach heat-resistant plywood or regular thick foil to the point of contact with the pipe. This will preserve the surface of the furniture and provide the room with additional warmth. And this is also important, since heat will perfectly destroy dampness and prevent mold from appearing. And the air in the room will be warmer, which is very good in the cold season.
Related article: DIY bar counter: master class + real examples (42 photos)
Features of overhead sinks
The advantage of this material is that it can be successfully combined with almost any kitchen design. Overhead sinks are one of the most popular sink options. Their advantages are obvious:
- low cost;
- ease of installation of the sink.
The disadvantages include:
- relatively small thickness;
- gap between the cabinet.
Overhead models are placed on the cabinet and secured. This is extremely easy to do, especially if the height of the structures is standard.
Important. Such sinks are best suited to sets of separate modules, where the sink is not part of a single work area covered by a common countertop
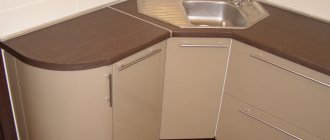
Installing an overhead sink is preferable in corner kitchens. where the headset is located in an L-shape, and the height of the modules is standard.
Types and materials of manufacture
They are subject to the general rules of kitchen interior and design, its dimensions, layout, ease of use, and practicality. There are the following types of cabinets:
- Floor-standing, characterized by: ease of installation; solid sizes.
- Suspended, winning visual weightlessness. Communications of this design are easily hidden under it. The disadvantages include difficulties in fastening and insignificant internal volume.
- Corner cabinet, characterized by compactness. It can be suspended or floor-mounted.
Cabinets are made mainly from wood and chipboard.
1280×960 Images may be subject to copyright. Read more... Corner kitchen sink