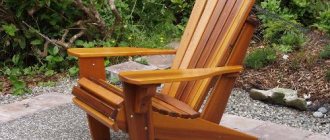
Wooden chairs often have one or the other joint unstuck, and the chair begins to sway. Without spending a lot of money, you can repair old furniture before it completely falls apart.
Unlike modern plastic ones, old wooden chairs consist of many parts connected with glue. Over time, some of the adhesive seams may come apart. The fact is that when wood dries, it shrinks. As a result, the connections become loose or even separate. In addition, the glue may dry out and no longer hold the parts.
However, this does not render the chair itself unusable. The skillful hands of a home craftsman may well save him.
The easiest way to repair chairs is when the four legs are inserted directly into the seat, which consists of one thick board. The rocking leg is pulled out, the old glue is scraped out without any residue, then fresh glue is applied to the leg and it is inserted back into the seat.
It will be more difficult to repair chairs with a drawer under the seat or chairs with crossbars inserted between the legs. There are a lot of tenon joints with glue here. Therefore, the chair should be disassembled with great care.
If only one seam has come apart, then drill a thin hole in this place from below or behind (so that it is unnoticeable) and through it use a disposable syringe to inject glue into the damaged area.
How to glue a chair leg
1.
Carefully remove the leg from the nest, being careful not to split the wood.
2.
Remove old glue and apply fresh glue.
3.
Place a weight on the seat. Remove any excess glue that appears.
Old chairs, made of solid wood at the end of the last - beginning of this century, usually have simple connections between the front legs and the seat. They are simply tenoned into the frame under the seat. A chair of this design always becomes loose easily. Even if such a defect has already been eliminated once, a new repair will be required in a few years. After all, the chair is subject to load not only from above: it is moved, tilted, rearranged, which is why simple adhesive seams are destroyed. Here the leg literally becomes a lever, which sooner or later will definitely separate the adhesive seam. To make the whole structure stable again, remove the wobbly leg from the frame and then re-glue it.
At the upper end of the leg, completely remove the old glue with a knife or chisel, being careful not to scratch the wood.
Damaged trunnion
If the trunion (the upper, sometimes tapered end of the leg that is inserted into the seat socket) is slightly damaged, make a “bandage” from a strip of paper that should not be wider than the length of the trunion. For greater stability, coat individual turns of paper with glue. Finally, glue the leg into the cleaned socket on the underside of the seat.
How to insert a wedge
If the swinging parts cannot be separated, try to spread the chair frame as far as possible and squirt glue into the groove.
However, if it is possible to pull out the parts, be sure to use it, because in this case the connection can be given additional stability by inserting a wedge. At the end of the axle, make a slot with a saw, into which then drive a thin wedge that barely protrudes beyond the end of the axle. It is easy to make from scrap wood. It will expand the trunnion slightly, resulting in a strong connection to the walls of the hole.
Pull the parts as far as possible and inject fresh glue into the tenon socket.
A narrow wedge will widen the trunnion and the connection will be stronger.
Features of work
Scheme for repairing an old wooden chair using hot water.
If the axle is very dry, then you need to insert a wedge into it. First, the part is removed from the groove, then its upper edge is split with a saw, and a wedge is inserted into the resulting gap. It should be thin and not very long so that it protrudes just a little from the surface of the trunnion. It is best to use wood chips as a wedge. As a result, the trunnion will be expanded and the connection will become more reliable.
If the pin has dried out, but is held firmly by the glue, then getting it out of the groove can be quite difficult. In this case, you need to try to move the parts of the chair as far apart as possible and inject glue into the resulting space. However, it is recommended to remove the leg from the groove.
You may need to soften the glue to release glued parts. If you are repairing a chair with slats between the legs, even strong seams will need to be separated. It is recommended to use steam on a strong adhesive joint. Steam is effective even for properly closed adhesive joints. To create a directed flow of steam, you will need a thin rubber hose (6-7 mm in diameter), 2 pieces of metal tube of suitable diameter, a stopper and a kettle. You need to put tubes on both ends of the hose, insert one of them into the hole drilled in the cork, and the cork into the spout of the kettle. Such a simple device will allow you to direct steam to the seam.
Glue the drawer
This is what the connection between the drawer and the back (above) and front (below) legs of the chair looks like.
A more labor-intensive method is gluing a chair, in which the drawers located under the seat are inserted and tenoned into the legs, and to increase stability, all corner joints are secured from the inside with triangular or trapezoidal blocks made of solid wood. Here you are faced with a rather complex connection, where it is not enough to separate just one glue seam. In other words, in such a chair it is impossible to separate one part and re-glue it: the entire drawer frame must be separated, or at least one corner of the chair frame must be completely opened.
Angled connection
If you use force, you will break the thorn of the tsar, or even break it off completely. This is where hot steam comes in handy.
Make sure that the frame is subsequently glued at exactly the same angle.
Thin wedges can be inserted into the large tenons on the sides to ensure a tight connection to the chair leg.
Softening old glue with steam
Steam flows from the kettle on the stove through a rubber or plastic hose to the socket in the chair. Hot water will flow down the tenon nest wrapped in a cloth. This way the remaining glue will dissolve faster.
To thoroughly strengthen a loose connection, the individual parts must first be separated. To do this, especially on frames with crossbars, it makes sense to separate the still quite strong adhesive seams.
If the chair wobbles not only because the glue joint has become loose, but also because the legs are different lengths, you should wait until the frame is glued back together. Only after this will it be possible to accurately determine the difference in the length of the legs.
If the glue is very strong, try steaming it. Regular glue dissolves in water. Steam can soften the glue even in tightly closed seams.
For this purpose, use a rubber hose that is used for squeezing juices, or buy a thin gasoline hose with a diameter of 6 or 7 mm at an auto parts store. Attach a suitable metal tube to both ends of the hose, insert one of them into the drilled plug, and it, in turn, into the spout of the kettle. This way you can direct the steam to the right place.
Before you start steaming, move a chair closer to the stove and position it so that you can easily reach the area to be treated. Make sure that the water formed as a result of cooling the steam does not drip onto other places, especially the soft upholstery.
Wear a mitten on the hand with which you will hold the hose, as the hot steam will cause the hose to become very hot.
Direct the steam to the edge of the glue joint and try to move both pieces of wood apart after a while - it is likely that this can be done in a couple of minutes.
This method will help remove old glue on exposed trunnions. Steamed wood must first dry before it can be glued again.
This is what the connection between the drawer and the back (above) and front (below) legs of the chair looks like.
A more labor-intensive method is gluing a chair, in which the drawers located under the seat are inserted and tenoned into the legs, and to increase stability, all corner joints are secured from the inside with triangular or trapezoidal blocks made of solid wood. Here you are faced with a rather complex connection, where it is not enough to separate just one glue seam. In other words, in such a chair it is impossible to separate one part and re-glue it: the entire drawer frame must be separated, or at least one corner of the chair frame must be completely opened.
If you use force, you will break the thorn of the tsar, or even break it off completely. This is where hot steam comes in handy.
Make sure that the frame is subsequently glued at exactly the same angle.
Thin wedges can be inserted into the large tenons on the sides to ensure a tight connection to the chair leg.
Strengthening the corner joints of the chair frame
On some upholstered chairs, the seat panels are not tightly connected to the frame, and as a result, it loses the necessary stability. This defect can be eliminated if triangular or trapezoidal solid wood chocks are tightly screwed to the frames that form the internal corners of the frame. This will strengthen the frame, it will remain stable even if the chair, for example, tips over or begins to be moved.
If the chair is used frequently and is heavily loaded, the reinforcements may also become loose. In this case, replace the old screws with new ones: they should be slightly thicker than before.
Drill holes in the corner chocks and frames so that the heads of the screws sink into them.
For corner chocks, choose screws of such length that they, without going through the frame, provide sufficient strength to the joint.
State of the chocks
It is better to cut a new log from well-dried hardwood.
A careful inspection of the old chocks will help you determine whether they need to be replaced or whether it is enough to scrape off the old glue and apply fresh glue, and then screw in new screws. Be sure to replace cracked or split logs with new ones, which must be cut out of hard wood exactly according to the shape of the old ones, then glued into the drawer frame and screwed with screws. You should ensure that the side surfaces of the cuts of the chocks fit exactly to the frame of the chair. Even a tiny discrepancy can lead to skew of the entire frame.
Repair of chairs with fixed corners
Methods for repairing frequently occurring chair destruction: 1 - destruction of the leg; 2 - destruction of the king; 3 - replacement of the destroyed section of the leg; 4 — replacement of the tsar pin; 5 - elastic crack tie with tenon reinforcement with an insert; 6 - sealing a wide crack with a bet.
Repairing chairs in which the drawers at the bottom of the seat are connected to the legs with a tenon joint is quite labor-intensive. Such designs provide additional corner fastening elements - solid wood lumps. They can be in the shape of a trapezoid or triangle.
With such a connection, separating 1 adhesive seam is usually not enough. It is necessary to disassemble at least 1 corner, and in some cases, the entire frame. Do not use force to disconnect such a connection. In this case, the tsar pin can be damaged or completely broken off. You can glue the parts by steam softening the glue. When gluing back, it is very important to maintain the angle. Small wedges can be inserted into the tenons on the sides to seal the joint.
In some cases, it is necessary to strengthen the chair frame.
This may be necessary if the seat panel is not firmly and securely fastened to the frame. To strengthen such a structure, it is necessary to screw a triangular or trapezoidal chock on the inside of each corner joint. Over time, under high loads on the chair, even such strengthened joints can become loose. In this case, you will need to tighten the screws or replace them with new ones.
Sometimes you need to replace the lumps. This is necessary if they are cracked, splintered, separated or split. The new parts must completely match the old ones in shape. In addition, it is very important to adjust the side surface of the chocks to the frame. If the new chocks do not match the old ones, then the entire frame may be warped. The chocks must first be glued inside the frame, and then additionally secured with screws.
After gluing the frame, it must be secured with clamps. It is not recommended to create very high pressure, so as not to squeeze out too much glue from the seams. Tensioning will take about 12 hours. It is very important to maintain the correct angle for the chair and prevent it from distorting. The tension pressure should be uniform.
Thus, repairing chairs with your own hands can be done even by an inexperienced craftsman, who will adhere to accuracy and precision in his work. Do not apply too much force to the frame of the chair, as this may damage its parts. Some adhesive joints may require steaming to release.
Tension
Adhesive joints must be secured with clamps, clamps or cords until the glue has completely dried.
The glue must dry under pressure. Therefore, it is recommended to tighten the newly glued frame using clamps, clamp vices or cords and keep it that way for about 12 hours. At the same time, you should not create too much pressure, otherwise a lot of glue will leak out of the grooves. After some time, loosen the tension a little.
Make sure that when tensioning, the chair frame is at the correct angle and is not distorted. This requirement is easy to fulfill when repairing ordinary chairs. The situation is more complicated, for example, with English chairs or rocking chairs. However, at least the front of the chair can be controlled using a plumb line. Please also ensure that the newly glued parts are connected without excessive tension and with uniform pressure, as well as that the angles correspond exactly to each other. Otherwise, the chair may warp under load, and then the seams will come apart.
Chairs made of wood dry out over time and begin to wobble. It becomes impossible to sit on such a chair. Don't rush to part with these interior items. Perhaps you have a reason not only to repair the chairs, but also to turn them into the highlight of the interior.
- How to repair dry wooden chairs
- How to renovate old furniture
- How to restore upholstered chairs
How to glue a chair with your own hands
To glue a chair, you must, in addition to glue, have the following tools and devices:
- hammer with rubber nozzle;
- construction knife or chisel;
- sandpaper;
- clamp, press or tightening belts;
- a clean piece of scrap fabric.
Restoration work on a wooden chair should be carried out in the following sequence:
- disassemble the loose knot by removing it from the groove, even if to do this you have to separate other strong seams;
- remove the remnants of old glue from the tenon or dowel using a knife or chisel (if the glue is difficult to remove, steam it with water steam);
- thoroughly clean the axle of the leg (or other piece of furniture) with sandpaper and remove shavings and dust from it with a cloth;
- apply a thin layer of glue to the axle and, inserting the chair part into the groove, hammer it in until it stops with a hammer with a rubber tip;
- be sure to remove any excess glue with a cloth;
- Depending on the place of gluing, tighten the chair fragments with a clamp, belts or press with a press.
The time for complete hardening of PVA glue is 24 hours. After a day, you need to remove the tightening straps (remove the clamp) - and you can use the repaired chair. If you want your restored wooden chair to last as long as possible, buy only high-quality PVA glue from our store!
How to glue curved legs
.
If you have to glue curved legs, it is better to process one leg first and leave the other in place. This way, it will be easier for you to determine exactly how to glue the leg so that the chair does not rock. To thoroughly strengthen a loose connection
, the individual parts must first be separated. To do this, especially on frames with crossbars, it makes sense to separate even the still fairly strong adhesive seams.
If the chair wobbles not only because the adhesive joint has become loose, but also because the legs are of different lengths
, you must wait until the frame is glued back together. Only after this will it be possible to accurately determine the difference in the length of the legs.
The glue must dry under pressure. Therefore, it is recommended to tighten the newly glued frame using clamps, zwings or cords and keep it that way for about twelve hours. At the same time, you should not create too much pressure, otherwise a lot of glue will leak out of the grooves. After some time, loosen the tension a little. This needs to be done to improve quality. Make sure that when tensioning, the chair frame is at the correct angle and is not distorted. This requirement is easy to fulfill when repairing ordinary chairs. The situation is more complicated with chairs, for example, English Windsor, or with rocking chairs. However, at least the front of the chair can be controlled using a plumb line
In addition, pay attention to the fact that the newly glued parts are connected without excessive tension and with uniform pressure, as well as to ensure that the angles match exactly. Otherwise, the chair may warp under load and the seams will come apart.
Wooden chairs not only have an attractive appearance, comfort, and exquisite design, but are also highly durable and environmentally friendly. Unfortunately, over time, such chairs tend to wear out, dry out, become damaged, or their legs simply become loose.
Unlike plastic products, they consist of many small parts that are connected with special glue and several tools. If your chair is drying out, you've probably asked yourself the following questions: how to glue it yourself at home, what kind of glue to choose for quality, and how to do the job correctly.
To know how to properly glue a wooden chair, experts recommend choosing high-quality glue according to the following characteristics:
- light fastness;
- water resistance;
- absence of traces on the surface;
- connection strength.
Furniture glue
Popular adhesives among craftsmen are PVA, BF, epoxy, syndeticone, polyurethane and others. Each of them has a number of specific advantages for sealing a wooden chair:
- PVA has an unlimited shelf life, acts quickly and is non-toxic.
- Epoxy adhesive has versatility of use and strong adhesion. It is popular due to its strong connection of various materials.
- BF has high moisture resistance and quick drying.
- Syndeticone durable adhesive can withstand high loads, is resistant to liquids and aggressive compounds.
- Polyurethane waterproof adhesive is used for gluing various materials. It is physically and chemically inactive to different temperatures, ultraviolet radiation, moisture, and is resistant to stress.
First stage of work
Carefully inspect the wooden chair from all sides. To fix it, you will need to disassemble the piece of furniture into its components. Remember its design. It is best for a novice craftsman to photograph the chair from all sides, so that later he can know exactly where and what part is attached.
Turn the chair over and look at the fastening of the soft or hard seat. It can be secured with bolts, or it can simply be inserted into the grooves. Pull it out and set it aside.
Separate the legs and remaining crossbars of the chair from each other. If there are screws anywhere, remove them. Disassemble the remaining connections using a hammer and a wooden block. Apply all blows to the chair only through a block so that you do not form dents or chips on the wooden surface.
Clean all grooves from any glue residue. Use a screwdriver, an awl and sandpaper. Examine the wooden spikes. If any of them are damaged, remove them with pliers. Lubricate the recess with PVA wood glue and insert a new one. Clean the remaining spikes with sandpaper.
To repair chairs, use PVA carpentry or furniture glue. They contain special additives that, after the glue dries, maintain the elasticity of the connection. When using the chair, the wood will not be destroyed.
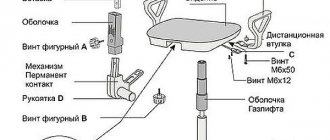
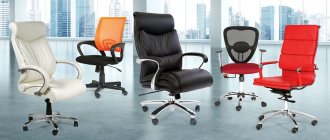
We restore an office or computer chair
An office or computer chair is a large chair made of metal and plastic, upholstered in soft fabric. The convenience of such furniture lies in the fact that the design of the chair allows you to change the height of the seat, the position of the backrest, and the chair also has the ability to move freely on the floor due to a system of wheels.
When purchasing such furniture, much attention should be paid to the design with wheels, as well as the seat height adjustment system. It is in these places that a computer chair breaks most often.
The following are the most common breakdowns of office chairs:
- the lever that is responsible for raising and lowering the seat does not respond to pressure, which is a consequence of a broken air valve;
- the seat is not adjustable and is not fixed at the required height, which is also a consequence of a gas lift failure;
- if the back of the chair is not installed in the specified position, then the reason lies in a broken fastener;
- one of the most common problems is a broken crosspiece or wheels falling out;
- When used, the chair creaks or makes other unnatural sounds.
In most cases, if the problem has not started, you can fix a computer chair at home yourself. Of course, you should make sure that you have instructions that will allow you to safely disassemble and then reassemble the chair.
To fix the problems associated with the gas lift, the chair will have to be disassembled, or rather, its upper part with the seat and back will have to be removed. Next, you should experimentally find out why the lift lever does not work and whether this can be somehow corrected. If the release lever is bent and does not reach the button that is responsible for adjusting the chair, you can try to straighten the structural element. You can use a hammer or pliers for this purpose.
If the valve inside the gas lift is not sealed, it may cause the seat to lower every time the chair is used. You won’t be able to fix such a breakdown yourself, and professional craftsmen most often recommend purchasing a new gas lift and installing it on a computer chair or office chair.
As for the crosspiece and wheels, in this case it will also be necessary to replace parts. If the wheel just falls out, it may be enough to replace the fasteners. The situation is the same with repairing the backrest. Sometimes just tightening the adjuster tight is enough, but if it's broken, the part will have to be replaced.
You can try lubricating a squeaky chair. To do this, you need to disassemble the chair and get to the gas lift. The bearings are lubricated with special oil. If the back squeaks, just tighten it.
Repairing a computer or office chair at home is really problematic. You definitely won’t be able to deal with a serious breakdown on your own. But you can try to eliminate minor shortcomings.
You can learn more about how to fix a broken shock absorber and secure the seat of a computer chair by watching the video below.
Chair assembly
Lay newspapers or plastic wrap on the floor. Thickly coat the grooves and tenons with PVA glue and assemble the chair structure. Press each joint firmly so that the adhesive comes to the surface. First remove the excess with a knife blade, and then immediately wipe with a damp cloth.
If the groove has become loose and has become too large for the tenon being inserted into it, drive another wooden splinter, toothpick or wooden skewer into it, coating them with glue.
Secure the assembled frame of your wooden rarity tightly with a rope and leave to dry for a day or two, depending on the ambient temperature.
Master class on restoring a chair with your own hands (step-by-step instructions with photos)
Are the tools ready? Chair and are you ready? Forward!
1) Let's see how the chair was fastened together. First of all, you need to disassemble everything that “moves”:
- Where there are screws, carefully remove them,
- We carefully remove the wooden dowels on the legs with a drill (we just drill them out),
- Very carefully pull out the nails (if the chair was knocked together).
2) We number all the details that exist. Necessarily. The numbering goes from the legs up. Accordingly, you should have at least 10 parts, depending on how the chair was made:
- legs,
- Crossbars for legs,
- Seat,
- Two slats for the back,
- The back itself.
We carefully inspect all parts for cracks (you can’t see everything at once, don’t worry). If you doubt your memory, take a regular photo when restoring furniture. It helps, honestly.
3) Glue all the cracked parts together. Excess glue will be removed after sanding.
To ensure that the parts stick together well and are guaranteed to last longer, we compress them with clamps
4) We pay special attention to the repair of the chair seat:
- We simply trace the old plywood seat onto a new sheet of plywood, carefully cut it out with a jigsaw,
- Glue the foam rubber (also cut to the shape of the seat) onto the new plywood seat as carefully as possible.
- Be sure to secure the foam rubber along the edges with a furniture stapler and leave it to dry for a day.
If you want to make the seat softer, then you attach each new layer of foam rubber along the edges, without gluing it.
We throw out the old seat.
4) After gluing the parts, carefully sand them with a grinding machine and sandpaper (round and small parts cannot be passed through with a grinding machine). Remove any remaining fine dust with a slightly damp cloth. We inspect everything again for cracks. Here is a video on restoring an old chair from one home craftsman, you might be interested:
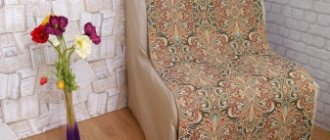
5) Finishing the seat. Restoring an old chair is no less important than the repair process. We staple the tapestry on the widest part of the seat, pull it forward very tightly, and fold the edges under the seat. There should be at least 5 cm of fabric along each edge. We fasten the fabric with a furniture stapler at a distance of 1-2 cm. We repeat the procedure on all sides of the seat.
The result is a kind of drum, inside of which there is not emptiness, but foam rubber.
Continuation of the video from a home craftsman, do-it-yourself seat restoration:
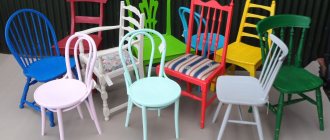
6) We cover all the parts with stain, and after a day we paint them with 3-4 layers of varnish so that the chair does not become covered with cracks the first time a guest sits on it.
7) Assembling the chair. When gluing the parts, we do not spare the glue; we very carefully wipe off the excess and remove it with a slightly damp cloth.
We reinforce the connecting parts of the seat and legs, crossbars and backrest with metal corners mounted on screws!
Nails do not have the desired “longevity” effect.
 We cover it again with a layer of varnish to hide the unevenness and that’s it - your chair is restored and ready for use again!
End of the video on chair restoration from a home craftsman:
As you can see, everything is very simple. The main thing is not to rush, to approach all stages of restoration carefully, and not to miss the details. And then everything will work out, the restored chair will be better and more beautiful than the new one!
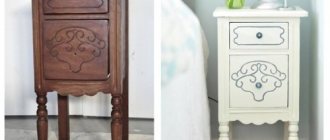
Seat update
While the wood frame is drying, work on the seat. Remove the upholstery from the upholstered seat. Look at the condition of the foam. Remove it if necessary. Cut out a new piece of foam and secure it to the seat using double-sided tape.
Place the old upholstery on newspaper and trace it with a pen. Cut out the pattern and transfer it to the new material. If the fabric is thin, make a backing for the foam from another dense material. Assemble the seat. Cover it with new fabric, securing it on the reverse side with staples from a furniture stapler.
Renew a dried out wooden chair frame. Remove the old varnish coating from it using a sander and sandpaper. Fill any old chips with wood putty. Prime the surface, and after drying, apply several layers of varnish with intermediate drying. Place the seat back into place.
What to do if the tree has dried out?
Over time, the wood from which the chair is made may dry out, which will lead to a loss of strength of the furniture. What should be done to avoid this or fix the problem that has already appeared?
First of all, I would like to note that wooden furniture, be it a chair or a cabinet, requires careful care.
This material does not tolerate sudden changes in temperature, as well as high or, conversely, too low humidity.
As a preventative measure, the varnish of a wooden chair should be renewed, which will significantly reduce the chances that the wood will dry out. In construction stores you can purchase special varnish, as well as paint with an additional protective layer.
If the problem has already appeared, then only wooden inserts will help, which will hide the cracks that have formed and strengthen the structure of the chair. They are performed using the same method as described in the section on fixing a broken chair leg.
If the cracks are small, you can use special wax or wood putty; retouching construction pencils will also help. After treatment with the selected product, the surface of the chair must be painted and varnished.
Having studied the information provided, you now know how you can repair a wooden chair or office chair on wheels yourself at home.
A computer chair is an essential attribute of a modern person’s workplace, without which it is difficult to imagine a study or office.
Office chairs are designed to be lightweight, maneuverable and comfortable for long periods of work in the office or at home.
The comfort of a computer chair is expressed in its ergonomic and functional form, it is suitable for people of any build, height or weight. All this is possible thanks to the unique ability to adjust the height or level of backrest tilt to the needs of a specific user, for which the gas lift built into the design of each chair is responsible.
The main signs of a gas lift malfunction
However, this same part is also a vulnerable point, the breakdown of which renders the entire functionality of the seat unusable.
Office chairs are comfortable and functional furniture, but sometimes they require repairs
Computer chair parts that may need to be replaced or repaired
Office chair design diagram
If you are faced with a malfunction of your computer chair, you need to find out which part requires repair. One of the most common causes of failure is the gas lift, as the part that is most susceptible to wear.
Do-it-yourself repairs will not restore the full functionality of an office chair
There are two ways to fix a broken gas lift. The first option is to replace the faulty part with a new one, no matter what, from a whole chair or purchased in a store.
A chair gas lift or lifting mechanism is designed to adjust the height of an office chair
- carpenter's hammer;
- pliers;
- bolt with a diameter of at least 10 mm;
- screwdriver or screwdriver;
- technical lubricant.
Set of repair tools
To replace the legs of a computer chair, you must follow the step-by-step instructions:
The second method is cheaper; it involves fixing the gas lift in one position. However, this method eliminates the possibility of adjusting the height of the chair, but if you need the same height, it is quite suitable. You will need:
- screwdriver;
- a pipe, rubber hose, or a set of washers, depending on what you have on hand;
- cloth to remove traces of oil.
Before starting repairs, it is important to make sure that there is no gas in the gas lift and that the gas chamber has free movement up and down, that is, if the height adjustment lever dangles freely. Only then follow the instructions.
According to the instructions presented earlier, remove the chair along with the swing mechanism, leaving the cross.
Use a mallet to knock the crosspiece off the chair; you need to hit it as close to the middle as possible, alternately from different sides of the pneumatic chuck
We turn it up and see a latch in the center, remove it, and then take out the oil-coated washers. Having done this, you can pull out the outer housing, from which the lifting rod sticks out, on which a rubber damper, a thrust washer, a bearing and a second thrust washer are attached.
Removing the steel latch washer
We remove the glass, and then everything else from the axle - the rubber band, washers and bearing
Next, we select a supply that we will attach to the lifting rod, thereby securing the height of the chair at a certain level. You can use any material from PVC pipe to hose and washers with nuts, the main thing is that it fits freely on the rod.
We make a tube of the required length, with an internal diameter no less than the diameter of the axis
Measure the required length of the hose and secure it with a damper, then attach a thrust washer, a bearing, a second washer and insert the structure back into the gas lift body.
We put the resulting tube on the axle, and then the elastic band (if it is still alive) and washers with a bearing
Reassemble the gas lift by installing the outer washers and latch. The chair is ready.
We put the cross in place and complete the assembly by installing the wheels
Repair of minor damage
Small defects do not require complete disassembly of the product. To renew your paintwork or repair minor cracks and chips, you need to follow a few simple steps.
If the product is still strong and does not wobble, then it is enough to renew the surface. For this:
- the upholstery is removed;
- the old layer of varnish or paint is removed;
- the surface is sanded and primed;
- a new layer of paint or varnish is applied;
- The upholstery is installed after drying.
Minor defects include cracks, chips or holes made by insects:
- If the width of the cracks is less than 0.5 mm, clean them from dust, fill them with glue and wrap them with paper tape.
- If the cracks are larger than 0.5 mm, they are filled with glue and secured with a clamp or clamp.
- Chips and holes are sealed with a mixture of glue and sawdust.
How to repair a broken leg
Repairing broken legs is a common furniture problem. If the element breaks exactly according to the texture, and when combined, all the parts fit perfectly, then it is necessary to apply wood glue to the ends and compress it well using clamps.
How to fix the leg of a wooden chair if it was originally attached with glue, but is now loose? To do this you need:
- remove the leg from the hole;
- remove remnants of old glue;
- apply a new layer of glue to the base of the leg;
- install the part into the hole;
- secure with a weight, placing it on the seat. Excess glue is removed.
It is recommended to use PVA-based glue for repairing the legs of wooden chairs. It must be water- and light-resistant, and also have high adhesive strength.
Repair of rickety furniture
If the chair begins to wobble a lot, the problem may be under the seat frame or in the leg area. Let's look at detailed instructions on how to fix a loose wooden chair with your own hands:
- We change the upholstery. We remove the old layer and change the foam.
- We inspect the surface for minor damage and repair it.
- We lay the new upholstery on the seat and nail it to the wood with nails or a construction stapler.
- If the legs become loose, renew the glue in the holes.
- If one seam of wooden furniture with a drawer has come apart, you need to make a hole at the bottom or back and pour glue into the damaged area.
- If the trunnion is damaged, it can be repaired using pegs or a bandage made from strips of paper.
The chair is wobbly (do-it-yourself chair repair)
The chair is wobbly (do-it-yourself chair repair)
Post by gjeglov » 04 Apr 2021, 11:23
I bought 2 chairs for the kitchen that seemed to us to be of good quality. Time passed and one of the chairs began to wobble, it looked like someone liked to swing on its back legs, now the chair wobbles even with a light touch. I watched a bunch of videos regarding repairs, a lot of “slag” ranging from “-glue it with epoxy” to “-put it on a self-tapping screw.” I’ve already had this experience; after self-tapping screws, even if you disguise them, the chair in the future becomes, in most cases, unrepairable, and with epoxy, repeated repairs become much more difficult.
Has anyone had personal experience in repairing chairs? Please share.
The chair is wobbly (do-it-yourself chair repair)
Message by Happy1 » 04 Apr 2021, 11:56
The chair is wobbly (do-it-yourself chair repair)
Posted by onozdrachoff » 04 Apr 2021, 13:31
The chair is wobbly (do-it-yourself chair repair)
Post by Serj » 04 Apr 2021, 14:15
The chair is wobbly (do-it-yourself chair repair)
Post by veles » 08 Apr 2021, 06:58
The chair is wobbly (do-it-yourself chair repair)
Post by Serj » 08 Apr 2021, 22:21
The chair is wobbly (do-it-yourself chair repair)
Post by NataliaJ » 09 Apr 2021, 17:59
What to do if a squeak appears?
Loose and creaking furniture can last for a long time if the cause of the problems is removed. To do this, you need to carry out a small repair of a wooden chair with a backrest, which does not require special equipment.
First you need to determine where the squeak appears. This may be play in the slats or crossbars at the attachment points. To eliminate the defect, it is necessary to replace loose nails or introduce glue into the gap.
If the squeak remains, you will need to disassemble the product and remove the loose fasteners. All grooves and tenons need to be treated with glue, then assembled and allowed to dry completely.
How to repair a wooden chair with your own hands?
How to repair a cracked Viennese wooden chair with a backrest with your own hands? To do this, it is necessary to inspect and identify all defects. After determining the number of problems, you should perform:
- complete or partial disassembly of furniture;
- restoration of the frame and connecting elements;
- seat repair;
- sanding and painting the product;
- product assembly.
If wooden chairs have dried out, this is not a reason to throw them into a landfill. You can solve any problem yourself. You can repair cracked chairs with your own hands (videos can be found on the Internet, where they tell in detail and show how to repair loose chairs, as well as fix other problems in furniture). And if you don’t have the patience and time, you can always turn to the services of a master.
Do it yourself - How to do it yourself
Stools, chairs, and tables often break. If the joints have dried out, then the repair is simple - disassemble the product, clean it, coat them with glue and reassemble everything again.
But what if the leg breaks at the site of a hidden knot or due to poor-quality material from which the part is made? To make a new one, you will need certain skills and professional craftsmanship of a carpenter.
New part
It is much easier to repair a broken leg without disassembling. You need to saw off the damaged part with a well-sharpened hacksaw with fine teeth (so as not to leave chips). In cross-section we will get a rectangle or a circle depending on the profile of the part. After this we find the center of the plane.
EVERYTHING YOU NEED FOR THIS ARTICLE IS HERE >>>
To do this, we connect the opposite vertices of the corners of the rectangular plane with straight lines. If we have a circle, then we draw two diameters perpendicular to each other. The point of intersection of these lines will be the center. Using a drill with a diameter of 8-10 mm, we drill a hole 50 mm deep.
After this, we proceed to making the blank from the bar. Suitable pieces of birch, pine, oak lumber. The block should be 5-8 mm longer than needed, and the cross-sectional sides should be 2-3 mm larger than the part to which the one we made will be fitted. This is necessary for subsequent adjustment.
Using the above method, we find the center of the cross-section of the workpiece from the bar and drill in it exactly the same hole as before.
After this, we make a dowel with an outer diameter equal to the diameter of the drilled holes. We insert it into the hole in the leg, place a blank of a block on the free part, combine it with the ribs of the leg or with a circle and see how the connection turns out.
If the workpiece fits tightly to the leg, then all operations were performed correctly. If not, then you need to use a fine-toothed hacksaw to cut down the junction area so that there are no gaps. In this case, you need to be careful not to accidentally saw through the dowel, since the fitting is carried out in assembled form.
Often the task is to cut the cylinder straight. How to draw a line? The safest thing to do is trust... water. Place a pan of the appropriate size on a flat surface (check with a level) and lower a cylinder into it, with a mark on one of its sides. Now it is enough to pour water, tinted, for example, with beet juice, to the level of our risk. After this, we carefully take out the cylinder on which the cut zone is imprinted.