Furniture
0
11 488
Share
Despite the fact that furniture plywood is an environmentally friendly and wear-resistant material, it is quite difficult to find a finished kitchen made from it. But what prevents you from assembling the headset yourself? We prepare a kitchen project, make drawings of plywood furniture, pick up the tools and start manufacturing. Such an environment will be pleasant at the price and will last a long time - about 20 years. And you don’t have to adjust your headset to the standard sizes of manufacturers. A kitchen made of plywood with your own hands is not made quickly, but every centimeter of it turns out to be as functional as possible.
You can make furniture from plywood sheets yourself
- Which plywood to choose for the kitchen
- Kitchen measurements and design project
- Preparation of materials and accessories: plywood sheets and more
- Tool preparation
- Preparing parts
- Making a headset: assembling the frame and beyond
- DIY tabletop
- Making a dining table
- Summing up
Which plywood to choose for the kitchen
Plywood is glued together sheets of veneer, of which there is always an odd number. Wear resistance and strength are achieved by placing the fibers of each sheet in different directions relative to each other. Usually birch or coniferous wood is used, while the inner part can be coniferous (GOST 3916.2-96), and the top made of birch veneer. Hardwood plywood (GOST 3916.1-96) is considered to be of higher quality and costs more.
Material classification
There are several parameters by which the material is classified:
- Brand - determines moisture resistance and scope of application. Main types of FC, FSF, FKM, FOF, FBA
- Grade - determined by the appearance of each surface. The letter E denotes the highest quality, then there is a decrease from grade I to grade IV. The grade is determined separately for the face and the back - 1/1, 2/2, ¼ and other combinations
- Surface treatment - unsanded plywood is marked with the letters NSH. If there is one sanded side - Ш1, if both sides have a polished surface - Ш2
- Formaldehyde content - the letter E with an index in the range 1-3 indicates the environmental friendliness of the material
Plywood for the kitchen must be free of formaldehyde.
To make a kitchen set from plywood with your own hands, choose sheets with average moisture resistance and no formaldehyde.
More about brands and sizes
Let us give a brief description of the main brands of plywood so that you can immediately see which of them is suitable for making furniture and which is not:
- FC - adhesive composition based on urea resins, average moisture resistance, used for interior work or furniture making
- FSF - usually used for outdoor work, moisture resistance is high. Formaldehyde resins are used as glue, so furniture is not made from FSF plywood
- FKM - synthesis of FK and FSF, veneer sheets are glued with melamine resins, suitable for any work, characterized by high moisture resistance and strength
- FBA - albumin casein glue is used to join sheets; the material is highly environmentally friendly, but has low moisture resistance
- FOF - laminated plywood. The material is covered with a film of various colors, is used in construction and furniture production, and is more expensive than other materials
It turns out that plywood for furniture is selected from materials marked FK, FKM, FOF. Standard sizes of sheets are given in table No. 1.
Table No. 1
| Brand | Width, mm | Length, mm | Thickness, mm |
| FC | 1525 | 1525 | 3 4-10 (in 2 mm increments) 9-30 (in 3 mm increments) |
| 1500 | 1500 | ||
| FKM | 1220 | 2440 | |
| 1250 | 2500 | ||
| 1525 | 3050 | ||
| FOF | 1220 | 2440 | 4, 6 9-30 (in 3 mm increments) |
| 1250 | 2500 | ||
| 1500 | 3000 |
What to make kitchen furniture from
When choosing plywood for furniture, attention is paid to the following indicators:
- Quality of gluing, wood
- General view of the sheet
- Wood species - deciduous is more resistant to temperature changes and high humidity
- Country of origin - preference is given to Russia, since Chinese materials do not have the necessary environmental friendliness, and Finnish plywood is too expensive
Taking into account the standard size of a plywood sheet, the properties of the material, quality, grade and price, the FC brand becomes the optimal choice. The selected grade is ½, sheet size 1525×1525 with a thickness of 6, 12 and 18 mm. You can make plywood products with your own hands from laminated sheets, but the cost of the material differs significantly from the FC brand.
Laminated plywood will help you build a beautiful kitchen
Preparatory stage ↑
The greatest difficulty for beginners in making a kitchen with their own hands is taking correct measurements and drawing up sketches of future furniture. After all, if everything is done correctly, all that remains is technical work: making blanks and assembling the set. Therefore, we will consider in detail everything you need to know about planning.
How to make a kitchen unit project - drawings and calculations ↑
To make a high-quality wooden kitchen set with your own hands, you need to take care of an accurate visual aid - a drawing of the future project. To do this, you will have to spend time measuring the free space, thinking through the models and layout of the desired furniture.
Plan of upcoming work:
- Kitchen measurements - you need to take into account not only the presence of various protruding parts and communications, but also the possible curvature of the load-bearing surfaces. Therefore, we measure the length of the walls at three levels: above the baseboard, in the center and at the ceiling and select the smallest value.
How to take measurements correctly
- The basis of the drawing is to transfer the obtained figures onto paper, as well as accurate data on all elements that extend beyond the plane of the walls. This includes building components (door frames, window sills, baseboards) and communications (water and gas supply pipes, sewerage, heating, ventilation holes and sockets with switches).
Measurements of protrusions, niches and openings
Attention! After preliminary marking the future location of furniture and household appliances, include additional sockets in the diagram. This way you will not only increase the convenience of work, but also reduce the load on the kitchen power supply line, which according to the standard is not designed for the modern number of electrical appliances.
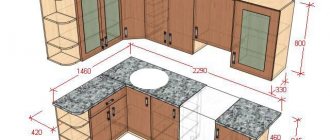
- We draw up a sketch of the headset. We mark the location of the main pieces of furniture on the drawing, focusing on standard parameters, the dimensions of which can be found on any furniture website. If you still have empty spaces, you can either cover them with false panels or provide retractable cargo systems for them. When making calculations, be sure to take into account the space for installing all necessary household appliances.
Visual sketch
Headset drawing with dimensions
- Detailing - after creating a general design for the set, we draw up a detailed diagram indicating the dimensions for each piece of furniture. The blanks will be cut according to these drawings. The markings include all parts - sidewalls, horizontals, base strips, insert parts (boxes, baskets or drying racks) and fittings. When calculating dimensions, be sure to take into account the thickness of the plywood.
Detailed diagram for making a floor stand
Advice! To facilitate the work of novice designers, there are special computer programs (PRO100, AutoCad, Basis Furniture Maker, etc.) that can create a complete color 3D sketch of the kitchen interior based on your data, and some of them (for example, BlumDynalog) can even provide detailed detailing and material cutting diagram.
An example of drawing up a kitchen sketch in the PRO100 program
For help from specialists - ordering components ↑
In principle, cutting plywood sheets according to detailed sketches is quite simple. Problems can only arise in the absence of professional tools - the cuts need to be made perfectly even. Therefore, the optimal solution at this stage is to contact specialists who will quickly and efficiently cut the purchased plywood into the required fragments. In just a couple of hours of work you will receive a complete set of blanks for your future plywood kitchen.
Cutting plywood
Important! When contacting a construction or furniture company, you must have the same detail of all items discussed in the previous section. Moreover, it is advisable, in addition to the dimensions of the components, to also indicate the locations for the necessary holes - both for leveling protrusions in the kitchen and for fasteners. Then you won’t have to worry about drilling and cutting yourself.
After receiving all the blanks, you will have to spend a little more time to bring the parts to the desired state. First of all, it will be necessary to sand (process with sandpaper) the cuts and cuts so that the edges become even and smooth. And coat all components twice with an antiseptic primer (or simply dry them) to increase the service life of your homemade plywood kitchen set.
Workpiece processing ↑
The resulting pieces of furniture must be cleaned to improve resistance to moisture, temperature changes and minor mechanical damage. Particular attention should be paid to those components that, after assembling the set, will be visible - the facades and the worktop. And, of course, you should cover unprotected cut areas at the ends.
Protective coating options:
- The easiest way to finish is painting with any waterproof paint.
A spray gun will help you quickly paint wooden parts
- The next alternative is to treat it with decorative stain and cover it with varnish or oil-wax impregnation. This method is excellent for high-quality plywood, as it does not cover the wood patterns of the veneer.
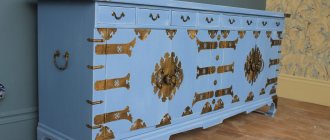
- One of the most controversial options is the application of self-adhesive film. Although the finished facades look very good, it will take a lot of time and effort to complete this work. In addition, in order for the furniture to retain its appearance for at least 2-3 years, the film must be of high quality and expensive. Cheap analogues will begin to peel off quickly, and in less than a year the new kitchen will require a new renovation. In addition, pasting should be carried out on perfectly flat surfaces, but even on them, if not done carefully, unsightly folds and bubbles may form. In a word, if you are dreaming of a colorful kitchen with any images on the decoration, it is better to make it directly from laminated chipboard or MDF with photo printing.
- And the most reliable (and most expensive) way is to apply plastic as a protective coating. But this can only be done in a workshop with specialized equipment.
Important! It is recommended to apply protective and decorative coatings before assembling the furniture. However, in the case of painting, you can also process a ready-made kit.
Kitchen measurements and design project
Accurate measurements plus a verified sketch of the headset will allow it to be manufactured with high quality and reliability. The main advantage of such furniture is the individuality of execution.
When making a kitchen set yourself, you should take into account ergonomic standards, the height of the housewife, the geometry of the kitchen, and the wishes of family members
Stage No. 1 - kitchen measurements
The dimensions of the room are measured taking into account protrusions, niches, and passing communications. The parameters are transferred to a sheet of graph paper in accordance with the scale. Instead of drawing by hand, using computer programs to create 3D sketches is suitable.
Stage No. 2 - sketch development
An initial version of what a plywood kitchen looks like, taking into account the arrangement of household appliances, is being worked out. Then the specific dimensions of the furniture sections - cabinets, shelves, drawers - are thought out. Taking into account the individual characteristics of the project, adhere to the developed ergonomic standards for kitchen furniture (Table No. 2). Dimensions are given in centimeters.
Table No. 2
| Floor cabinets | Wall cabinets | ||
| Height | 85 (including countertop) | Height | 70 |
| Width | 60-80 | Width | matches floor |
| Depth | 45-50 | Depth | 30 |
Additional sizes:
- For drawers, a width of 30-40 cm is suitable
- Plywood shelves are placed at a distance of 30 cm from each other
- Shelf width = cabinet width - 36 mm (frame is made of 18 mm sheet)
- The distance between the upper and lower tiers is 45-65 cm
Please remember that these are approximate dimensions and may be adjusted depending on specific circumstances.
Stage No. 3 - drawing up a design project
The sketch is complemented by the verified dimensions of cabinets, cabinets, drawers, and shelves. Additionally, the dimensions of the facades are calculated taking into account technological gaps. An individual calculation is carried out for each furniture unit. The drawing of the modules is made in two projections, indicating the dimensions, dimensions of technological holes and grooves. This will help you choose the dimensions of the plywood sheet to minimize the cost of purchasing materials.
Kitchen design made of plywood can be the most fantastic, it all depends on your imagination
Other kitchen furnishings ↑
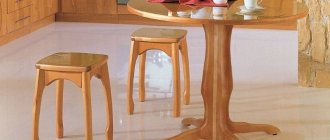
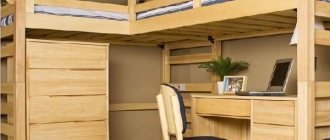
If you have assembled a good-quality wooden kitchen with your own hands and have not lost your enthusiasm, then you can easily continue working by moving on to the dining set. A small table and several stools, made in the same style, will be a good addition to the kitchen set.
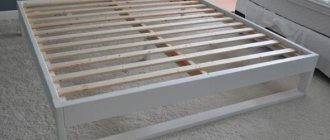
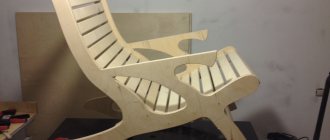
The tabletop and seats can be made from high-quality plywood with a sheet thickness of 18 mm. For the frame, the same or slightly thinner (12-16 mm) plywood, sawn into narrow (about 10-12 cm) boards, is suitable. For the legs, you can take timber of the required size.
Stool made of beams and plywood
On a note! If you have the necessary equipment, you can also turn the figured legs in a woodworking workshop, where you will order cutting of the main parts.
You can also make dining furniture from boards with your own hands. True, in this case there will be a little more work.
- The boards must be matched to each other using the “top to bottom” principle, focusing on the pattern of rings.
- The end sides should fit tightly to the adjacent ones along the entire length, so they should be processed with a jointer.
- The most reliable and rigid connection is considered to be the placement of boards on furniture dowels. Holes are drilled along the center line of the end in increments of 10-15 cm. Wood glue (or silicone sealant) is applied along the entire length of the end surface, and dowels are also glued. The rod is driven into the holes of both adjacent boards, which are connected by tapping until the gap completely disappears.
- The resulting shield is dried, and excess glue is removed using sandpaper.
- The corners of the table top are rounded with a plane and sanded.
- The top surface is covered with varnish or other decorative coating.
The frame and legs are dealt with in the same way as with plywood.
Dining set with curly legs
Preparation of materials and accessories: plywood sheets and more
Let's consider which plywood, fasteners, and accessories to choose.
The sizes of plywood sheets that need to be purchased depend on the elements being manufactured:
- Thickness 18 mm - used to assemble the frame; for cabinets, shelves are cut from plywood of the same thickness.
- Thickness 12 mm - selected for the manufacture of facades of floor cabinets.
- Plywood thickness 6 mm - suitable for wall cabinet doors that are reinforced with stiffeners.
Fasteners
The next step is to decide how the parts will be attached to each other. As experience shows, when making furniture from plywood with your own hands, it is enough to use only screws. Plywood sheets do not delaminate, do not crumble, and hardware does not come loose in the holes. Using furniture minifixes to fasten elements at home is more than problematic, since the highest precision in cutting holes in three planes is required. Having an accurate drawing, you can contact specialized workshops to make holes.
Be sure to make a drawing and then you will understand how much material and what shapes you need
So, to connect the parts you will need:
- Screws, minifixes or confirmats - European screws with a countersunk head
- Glue, silicone sealant
Fittings and finishing
This includes handles, hinges, closers, decorative plugs, if minifixes are not used. It should be remembered that kitchen furniture made of plywood is not overloaded with fancy fittings.
For painting you will need putty and paint, for pasting with film you will need putty and self-adhesive. Furniture can be covered with stain and varnish.
Tool preparation
The kit depends on how you plan to cut plywood. It is recommended to do this in a furniture workshop, since the process requires high precision and the presence of a plunge-cut saw with an attachment for cutting sheet materials. To assemble the furniture you will need:
- Cordless screwdriver or screwdrivers, drill, drill set
- Hammer, chisels, files, chisel, plane, hammer, mallet
- Plunge saw, jigsaw, hacksaw
- Tape measure, ruler, square
A standard set of tools should be in every home
Making a headset: assembling the frame and beyond
To make furniture from plywood, you will need to assemble a frame, hang doors, install shelves and drawers.
Plywood has sufficient strength, so timber is not used to assemble the frame. The parts are marked for screws or confirmations. Using a special stepped drill, holes are made with threaded and non-threaded parts, and a recess for the Euroscrew head. For a regular screw, countersinking is carried out with a drill of a larger diameter. Fastening from the front side is carried out using minifixes, then there is no need to install decorative plugs, but euroscrews are also suitable.
Before tightening the parts, the ends are coated with silicone sealant.
Headset assembly
The kitchen set made of plywood will be finally ready when the doors are hung on the frame, shelves and drawers are installed. The holes for the fittings are marked and drilled in advance, and the guides for the drawers are installed before the frame is assembled.
Assembling the headset requires care and painstaking approach
The doors are made of 6 mm thick sheets, and stiffening ribs give them stability. To cut out plywood shelves with your own hands, take material 18 mm thick. The front edges are chamfered, the sections are puttied or sanded for painting or covering with film. When processing with varnish, sanding is sufficient.
When covering your headset with self-adhesive film, give preference to expensive and high-quality material - Chinese film does not stick well and looks bad
Furniture made of laminated plywood has an ideal look - a variety of shades allows you to choose a material that suits a specific design.
Features of a wooden set
In reality, not everything is so rosy. Of course, wood has exceptional visual appeal, but it also has a number of features that have earned it a reputation as a capricious material that requires attention:
- wood has its own rich range of colors and unique wood grain. It does not require additional finishing, as it is attractive in itself;
- this does not exclude a variety of decorative works that can be done with wood: the relief surface, carvings, and applied decorative elements turn each set into a unique one;
- wood is very pleasant to the touch, as it maintains temperature but does not heat up;
- Unfortunately, solid wood facades are prone to cracking and drying out. Wood reacts to changes in temperature and humidity. To somehow slow down this process, it is necessary to equip the kitchen with a powerful hood and maintain a constant humidity at 60–75%;
- Wood in the sun fades over time. The material is protected with varnishes;
- Furniture made from natural wood requires careful handling and care. The surface should be treated with wax or oil to prevent the action of moisture, and the varnish coating should be periodically renewed. Any scratches and abrasions that appear must be rubbed down and varnished;
- Solid wood products always cost much more.
The last consideration forces home craftsmen to try to make furniture with their own hands, using both wood and wood materials. The wood-effect kitchen set in the photo below can serve as an illustration.
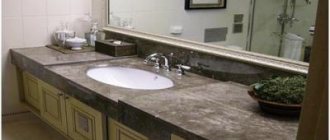
DIY tabletop
A work surface made of laminate looks great. It’s easy to implement an economical option yourself by choosing a coating to match the headset or playing with contrast. The joints of the panels must be coated with sealant to avoid the harmful effects of moisture on the laminate. The front edge is closed with a decorative metal corner.
The high moisture resistance and dimensions of laminated plywood also allow it to be used as a tabletop. The film reliably protects the material from the penetration of liquids, and the edges are impregnated with a moisture-repellent composition.
Making a dining table
To give your kitchen a finished look, try making your own rectangular shaped plywood dining table with two wide legs.
A plywood table can be made of absolutely any shape
To do this you will need the following supplies:
- Plywood for the tabletop - sheet 80×120 cm, thickness at least 18 mm - 1 pc.
- Horizontal strapping - plywood strip 15×110 cm - 1 pc.
- Tabletop and leg supports - timber with a section of 7.5×20 cm and a length of 68.7 cm - 2 pcs.
- Table leg - timber with a cross section of 7.5×20 cm, length 60.0 cm - 2 pcs.
You will need to work on every detail to make a plywood table.
Supports for table top and legs
The beam is sawn lengthwise, resulting in 4 pieces measuring 7.5x10x68.7 cm. The elements that are adjacent to the floor are shaped into legs. Marks are placed at a distance of 20 cm on each side, between which an arched line is drawn with a maximum height of 5 cm. The outer part of the support for the legs is rounded or left rectangular.
In each tabletop support, a part of a rectangular block is cut out in the center to a depth of 40 mm - the table leg should fit into the recess. The outer edges are rounded.
Table legs, horizontal strapping and table assembly
The legs are left rectangular or given a curly shape. A horizontal strap holds them together, and the part is chamfered.
After sanding the workpieces and treating them with an antiseptic solution, a plywood table is assembled:
- Connect table legs to tabletop supports and floor elements
- Tighten the structure with a horizontal strap, installing it between the legs
- Place the tabletop, tighten it with screws from below through the supports - you will need at least 4 screws on each side
All parts are fastened together with euroscrews, the caps of which are closed with plugs. The table is coated with varnish that dries for 36 hours.
WATCH THE VIDEO
Prices
7 USD
2 USD
1 USD
1 USD
2 USD
| What | How many | Price |
| Plywood, 10 mm. | 2 sheets (2.326 m2 each) | |
| Beam, 50x50 mm. | 3.24 m. | |
| Self-tapping screws | 30 pcs. | |
| Pens | 2 pcs. | |
| Furniture hinges | 4 things. | |
| Varnish + paint* | 5 USD and less | |
| Self-adhesive* | 5 USD and less | |
| Total: | 18 USD | |
The calculations do not include the cost of tools and deliberately do not indicate the necessary list; prices are indicated with a reserve. Thus, the lower tier of the direct kitchen is 3 sq.m. will cost about $40 because:
- The sink cabinet does not require a back wall and a countertop (for a sink cover)
- It is possible to combine several cabinets into one - less plywood will be required
- You can refuse to buy timber in favor of furniture corners
- It is not necessary to close the base
- Prices for accessories vary greatly
- You can easily find much of this list in your garage/dacha/at your neighbor’s house.
Summing up
Preparing materials, furniture diagrams and drawings, and directly assembling a kitchen from plywood is a painstaking but interesting task. The headsets are durable and beautiful, the release of harmful substances is minimized. Self-manufacturing of the design allows you to take into account the nuances of a particular room and the individual characteristics of family members. If the set is a complex structure, then the table can be assembled in 1 day. Try to start with this to understand how plywood behaves and what skills will be required to make more complex structures.
Where to start - tips for beginners ↑
If you are planning to make a wooden kitchen with your own hands for the first time, take the advice of experienced furniture makers. This will allow you to avoid many mistakes and get a good result the first time.
Stylish and practical kitchen made of wood
- Choice of design. For the main frame, take the simplest option. Standard rectangular sections are much easier to calculate and assemble.
Simple shapes are ideal for the first steps in furniture making
- Standard sizes. Do not overdo it with originality when creating bedside tables and cabinets, otherwise problems may arise with the selection of fittings and internal filling (if ordinary partitions can be made with your own hands, then ergonomic retractable systems, washing, drying and other functional elements will have to be purchased ready-made).
Cargo will help fill narrow gaps between cabinets
On a note! To ensure that the set exactly matches the size of the kitchen, you can add narrow cargo cases or drawers of any configuration to the usual set of hanging cabinets and floor cabinets of standard sizes - let them fill the gaps left free. Such additions are especially convenient for small rooms, as they allow you to place the entire arsenal of necessary kitchen small things in a limited space.
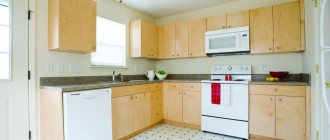
- Selection of material. In order not to worry about damaged workpieces, it is better to use inexpensive plywood or wood boards (for example, laminated chipboard).
Kitchen made from plywood - inexpensive and environmentally friendly
Important! The selected material must be protected from moisture, otherwise the wood (and with it the new kitchen set) will not last long. If possible, immediately buy moisture-resistant plywood or wood boards, or treat the workpieces yourself with impregnation.
- Protection and decor. Don’t forget about the outer coating - in the humid and warm microclimate of the kitchen, wood without it will quickly lose its original appearance and luster. The simplest option is treatment with varnish or wax-oil impregnations, which will help preserve the beauty of the wood structure. But you can choose any shade of paint, cover it with film, or buy ready-made materials (chipboard or postforming) with factory protection already applied.
Treatment with varnish or impregnation emphasizes the beauty of the wood structure
Kitchen made of laminated chipboard
Advice! When choosing a color scheme for new furniture, take into account the rules of color: light glossy tones visually enlarge the room, bright colored spots attract attention, contrasting combinations will help in creating a stylish interior. Cool colors calm you down, while warm colors increase your mood and appetite.