The concept of decoupage technique
The technique of decoupage on furniture dates back to the Middle Ages. For many centuries, people have been using this method of decoration to decorate furniture, walls and other interior items. This method appeared in Venice, which is famous for its sophistication.
Knowing the basics of decoupage is an easy and useful skill.
The essence of the decoupage technique is to decorate furniture and other objects with pictures cut out of paper. As a rule, napkins with a floral pattern or special decoupage cards are used for this.
The decoupage technique replaces complex methods of painting furniture, which require special skills, sophisticated equipment and caustic paints. For decoupage, all you need is a small amount of auxiliary materials that can be purchased at a regular stationery store and a set of beautiful napkins.
This type of creativity will breathe new life into old interior items.
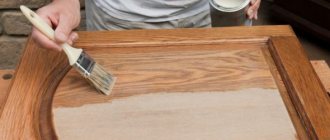
Decoupage does not require special surface treatment. To decorate with paper, you just need to clean the surface. The technique can be used on any material - from plastic to antique solid wood.
Using this method, you can decorate the entire surface of furniture if it requires serious restoration. And you can highlight only certain elements, giving the item an original and unusual look.
Stages of work taking into account materials
Each decoration method requires following certain steps and has its own nuances. It is important not only to properly prepare the piece of furniture, but also to do the decoupage correctly. In this case, the finished result will please you for many years.
Napkins
Decoupage with napkins is the best option for beginning craftsmen. The method is simple and gives complete freedom in choosing a pattern. So, for decoupage of kitchen furniture, thematic pictures with cooks, fruits or vegetables, and floral patterns in country style are suitable. You can choose neutral patterns, flowers, and ornaments for your bedroom. It is recommended to decorate the headboard of the bed with patterns in vintage style. Floral patterns on closet doors and chests of drawers look beautiful. Images of animals, cartoons or toys, and decoupage cards are suitable for the nursery. They can be used to decorate cabinets, cribs, and drawing tables. For the living room, it’s also easy to find suitable ideas depending on the room’s design style; for example, marine-themed images on the table surface and cabinet doors look beautiful.
This decoration method is perfect for decorating doll furniture.
To decorate the surface with the selected napkins you need:
- Apply a solution of PVA glue and water (1:1) to the prepared product, and then proceed to gluing the napkin element you like.
- The image should be carefully straightened, expelling the air.
- After gluing, treat the surface with glue and leave for a while.
- When the decor is completely dry, cover everything with furniture varnish.
Materials and dimensions of furniture adjustable supports, operating rules
Glue the cut out elements of the napkin onto the prepared product, straighten the images, expelling the air
Apply glue to the surface and leave to dry.
Coat with furniture varnish
Shell
The decor with nut or eggshells is reminiscent of craquelure patterns. Despite the apparent complexity, this is a simple technique. Moreover, it can be performed either separately or with additional decoupage patterns. When using shells, you can achieve the effect of antiquity, and some craftswomen even use this technique to imitate reptile skin.
A similar effect will look beautiful on kitchen furniture; the appliances can be used to decorate cabinet doors and table surfaces. In the bedroom and living room, products that seem to be covered with the skin of an exotic reptile look beautiful and appropriate. For a children's room, you can decorate a chest of drawers in a vintage style or decorate the cabinet doors using the decoupage technique with napkins and add shells.
To work, you will need raw egg shells. It is thoroughly washed and the inner film is removed. You should also prepare PVA glue and a brush. After this you need to proceed as follows:
- If you are planning a decor with an image, then the first thing you need to do is apply the design using the technique you like.
- Apply a layer of PVA glue to the area of the surface selected for decoration, then apply a shell and lightly press on it so that it cracks.
- Using the back of the brush, place the pieces in the desired order. Then press down lightly again.
- Then, when the pieces are in the desired position, lightly tap them with the back of the brush. In this way, you should cover the entire desired surface with decor, then coat the shell again with PVA glue diluted with water.
- To give the effect of reptile skin, lightly tint the shell with special wax, and finally secure the decor with 2-3 layers of varnish.
Prepare furniture
Apply a layer of PVA glue to the surface, place the shell pieces in the desired order, tap on the surface with a brush
Apply a solution of glue and water, add a design if desired, secure the decor with several layers of varnish
Paper
The most popular methods of decoupage furniture using paper. These could be photographs, unwanted wallpaper, clippings from comics, newspapers or magazines. For the living room, wallpaper that matches the decor of the room is suitable. They can be used to decorate a closet, chest of drawers or coffee table. It is better to choose comics and clippings from fashion magazines for the children's room. In this way you can decorate a table, chest of drawers, closet or headboard. It is recommended to decorate the compartment doors in the bedroom with photographs.
It should be remembered that the thicker the paper, the more glue it requires to get wet. For example, wallpaper requires at least 3-4 layers. They must become plastic in order to fit as tightly as possible to the surface. Do-it-yourself furniture decoupage is performed in the following sequence:
- Properly prepare the surface of the furniture.
- Spread the area for decoupage and paper with glue. The latter should become as flexible as possible.
- Place the paper on the surface and gently smooth it out, expelling air bubbles, then apply diluted glue to it and leave to dry.
- To secure, coat the product with varnish.
If desired, this technique can be combined with coloring. It is permissible to use craquelure varnish.
Spread the area for decoupage and paper with glue
Place the paper on the surface, smooth it out, expelling air bubbles
Apply diluted glue to the surface, leave to dry, and coat the product with varnish to secure it.
Textile
Fabric can be decorated in different styles. Using this material, it is possible to create volume so that the drawings seem as realistic as possible. To decoupage furniture with fabric, you can use any smooth textile - from chintz to silk.
In this case, you can use either large pieces of fabric or work using the patchwork technique. Such decoupage will look very beautiful on cabinet doors and bed headboards. For the kitchen, you can use fabric that matches the color of the walls or household appliances. Children's cabinets or a chest of drawers will be transformed after decoupage with bright, colorful fabric, and the living room will look beautiful after decorating with floral motifs.
Classification of furniture handles for cabinets, selection criteria
Master class step by step:
- Carefully soak the selected material with PVA glue.
- Place a piece of fabric on the surface for decoupage and give it the desired shape.
- Leave to dry.
- Afterwards, if desired, paint the necessary parts with acrylic paint and add additional decor.
After everything has dried, you need to coat the fabric with acrylic varnish in several layers. Lace decor has its own characteristics. Such elements should be covered with putty so that they stick well later. However, the product will have to be removed from all the recesses so that the texture of the lace decoration appears.
Impregnate the material with PVA glue and place it on the surface of the furniture.
Give the required shape, leave to dry, cover the fabric with acrylic varnish in several layers
Leaves
This technique requires collecting the leaves you like, placing them between white paper and ironing them. As the substrate gets wet, it should be replaced. Thus, it is necessary to completely dry the leaves.
Using dried leaves, you can lay out ornaments, flowers, drawings on furniture, or decorate the entire surface. So, in a nursery it will look beautiful if you decorate the head of the bed with delicate leaves and flower petals. For the bedroom, you can decorate the cabinet doors with an autumn herbarium. A country-style living room will be decorated with a chest of drawers with falling leaves on the front side; it is recommended to decorate the kitchen cabinet with leaves of fruit trees or grapes.
To decoupage using this method, you should prepare leaves, PVA glue and brushes. Then you need to act like this:
- Apply PVA glue to the surface to be decorated.
- Lubricate the leaf and apply to the product. Next, you need to carefully iron the element and cover it with diluted glue.
- This is how you should decorate the entire area.
- Wait until the surface is completely dry and coat it with varnish.
Apply PVA glue to the surface to be decorated
Lubricate the leaf, apply to the product, iron the element, cover with diluted glue
Wait until the surface is completely dry and apply varnish.
Types of techniques
During the existence of decoupage, several different techniques have been created, which differ slightly from each other. The choice of technique depends on the type of surface, as well as on the visual effect that needs to be achieved in the end.
Decoupage of old furniture is an inexpensive and very effective way to restore something that has served for a long time.
Classic decoupage. The simplest technique. Its essence lies in simply gluing images to a surface. The furniture is first cleaned, primed, then napkins or decoupage cards are glued onto it. Finally, the item is coated with a finishing fixer or varnish so that the paper does not deteriorate during the use of the furniture.
Restoring worn-out furniture will help save your budget several dozen times
Reverse method. It is used on glass, transparent surfaces. The picture is glued to the reverse side. Then it is completed on the outside. Thanks to this, a feeling of volume and depth is created, since the picture seems to fall into the subject.
Artistic decoupage. This method imitates painting. It involves blurring the boundaries between the picture and the background. The picture is first carefully cut out, then pasted onto the surface, and then its borders are shaded or completed with paint. Shadows and tonal transitions are also drawn separately. Finally, the surface is varnished. Thanks to this, it seems that the picture is not pasted on, but drawn on the surface. This method distinguishes three directions: smoky, landscape and classic. They differ in the type of design of the picture borders.
Having mastered the “decoupage” technique, you can significantly transform your interior.
Volumetric method. The main goal of the method is to make the image in relief. This is achieved by gluing additional elements that copy individual details of the image: flowers, leaves. Today, special 3D pictures or elements made of non-toxic thermoplastic, which are glued by heating, are produced for this purpose.
Decopatch or patchwork method. With its help, the surface is completely formed. Thanks to this, it changes its color and appearance. This method is suitable for very old furniture that needs to be completely restored. Decopatch is considered the simplest technique, as it does not require special skills and knowledge.
What a beginner needs for decoupage
In order to make a complete list of what is needed for decoupage, you need to imagine how the entire creative process occurs.
- Select an item for decoupage.
- Prepare the surface: clean, sand, degrease, prime if necessary, paint.
- Apply glue.
- A design is cut out from a special napkin.
- Apply the design to the glue-coated surface. To prevent it from becoming deformed, use a regular stationery file.
- They expel the air from the center to the edges and smooth it out.
- Cover with varnish, usually in two layers, allowing each of them to dry.
It is impossible to carry out all these actions without a minimum set of tools and materials necessary even for beginners who do not pretend to create true masterpieces. Here is a list of these items:
Item for decoupage. You can often find it at home, but sometimes you have to purchase the weaving item separately. As already mentioned, it could be a canvas, a wooden board or box, a plate or a bottle, perhaps something else. Only by choosing an item for decoupage, you can choose a napkin with a suitable pattern.
Napkin or napkins for decoupage. It is better to choose special napkins that are sold in specialized stores. If there is no such thing in your locality, you can order napkins online.
Sandpaper (any kind will do).
Alcohol, vodka or a cloth soaked in alcohol-containing liquid to degrease the surface.
Primer. An acrylic primer is better suited for decoupage; it can be bought in art stores.
Acrylic paints. They are needed for painting surfaces, for painting on the image if it is slightly damaged while gluing the picture.
Acrylic paints are what you need: they dry quickly, are easy to apply, and can even be washed off if a little time has passed after application (this is especially important for beginning decoupage artists).
Glue. You can use special glue for decoupage, but experienced craftsmen claim that ordinary PVA is not inferior to it and even superior: it is not noticeable, it holds well.
Acrylic lacquer
It can be very different, including allowing you to give a diamond shine or, on the contrary, dullness. You can even buy varnish with a craquelure effect, which gives things a vintage look (this varnish cracks as it dries). It is important that the varnish is acrylic.
Brushes for applying primer, varnish, paint. Wide and flat, but not hard, synthetic brushes 2 cm wide are best suited. For underpainting, you can use thin core brushes. Stationery file.
Scissors with thin and slightly curved tips can also be used for manicure.
A small roller. If necessary, you can do without it by expelling the air and smoothing the design with a wide brush.
An experienced craftsman may need other materials and tools, but for a beginner, the items included in the above list will be quite sufficient. Creative success!
Share
- 3
Existing decoupage styles
In addition to different decoupage techniques, different styles of this art are also used. The choice of design style depends on the overall artistic design of the interior.
The decoupage technique allows you to create unique furniture.
Provence. It can be called classic for decoupage. It is used for rooms decorated in the same or classic style. The style is distinguished by a highlighted background, an artistic method of applying images, delicate pastel colors and floral motifs.
Simple style. The option is suitable for both classic interiors and loft, hi-tech or modern styles. It uses bright geometric images, old newspapers, magazine clippings or photographs. As a rule, the decopatch method is used here, with which the entire surface of the furniture is sealed. French vintage. For this direction, contrasting, ornamental images of two or three colors are chosen. Floral motifs or photographs are rarely used here, usually limited to only ornament. Well suited for classic or rustic interiors.
Artificially aged furniture with a vintage look will add interesting notes to the interior design of your home.
Victorian style. It is a little similar to Provence, but is more complex. Requires artistic skills. For decoration, complex images of flowers, landscapes, and various scenes are used. This style is characterized by a deep transition of colors and shadows. Usually soft tones are used with the addition of gold or silver paint.
Shabby style. Imitates an antique item. The surface is not fully decorated, but with individual elements. The borders of pictures are usually blurred and blend into the background.
Decorating a box in the shabby chic style with your own hands is quite simple.
Important! The first steps in decoupage should be taken with the simplest styles, for example, decopatch. And then move on to more complex, artistic options.
Decoupage on glass Talented craftsmen share their experience
Decoupage / Decoupage on glass
Decoupage master class: Reverse decoupage on a glass plate with baking
Today I’ll show you how to do reverse decoupage on a glass baking plate. (by request )
Decoupage / Decoupage on glass
Master class on decoupage on glass: Bottle “Snowmen”
This master class will show us how to make decoupage of New Year's bottles. We will make a New Year's bottle, which you can later give as a gift or decorate your holiday table with. Once done, you will want to create...
Read more…
Decoupage / Decoupage on glass
Master class on decoupage on glass: Jar using decopatch technique
The decopatch technique appeared relatively recently. The main difference from decoupage is that the surface is covered with pieces of paper, which tears into small pieces. This is a kind of mosaic in which your imagination will not know...
Decoupage / Decoupage on glass
Master class on decoupage on glass: Bottle “Happy wedding anniversary”
In this lesson you will learn how to decorate a bottle using decoupage. Such an original gift will be unforgettable for your dear people.
Read more…
Decoupage / Decoupage on glass
Master class on decoupage on glass: Decorative plate “Japan”
In this master class we will work with Japanese-themed pictures. All pictures are on Freedecor material for light surfaces.
Read more…
Decoupage / Decoupage on glass
Master class on decoupage on glass: Decorative plate
Today I want to show you a master class on decorating the most ordinary plate using the decoupage technique. If you decide to update your dishes, don't throw away your old plates, they will come in handy.
Decoupage / Decoupage on glass
Master class on decoupage on glass: Jar with a transparent pattern
This master class shows how to leave an openwork transparent leaf-shaped pattern on glass. You don’t have to cut out a piece of self-adhesive paper and try to glue it evenly onto the shaped jar. No! ...
Read more…
Decoupage / Decoupage on glass
Master class on decoupage on glass: Tile panel
Are you planning to renovate your kitchen or bathroom? The most popular finishing material for bathrooms and kitchens is, of course, tiles. It is used not only in apartments, but also for…
Read more…
Decoupage / Decoupage on glass
Master class on decoupage on glass: Plate “Rose”
Today we would like to invite you to make a decorative plate with your own hands using the direct decoupage technique. You can use it as an interior decoration or a plate for sweets.
Read more…
Decoupage / Decoupage on glass
Master class on decoupage on glass: Creating a background on plates using acrylic paints
Today we will be working with acrylic paints and decorating three plates in different ways.
Read more…
- Master classes
- Made of epoxy resin, vitral
- Lampwork
- Jewelry assembly
- Soutache
- Wire Wrap Jewelry
- Toys
- Embroidery ribbons
- Decoupage on wood
- Toys
- Flowers made of nylon
- Author's dolls
- DIY wire
- Batik
- Crafts from foamiran
- Crochet
- Natural flowers
- For home
Features of decoupage of polished and plastic furniture
If the furniture has a glossy smooth surface, then its processing should be approached with particular care. You won't be able to simply stick an image onto a glossy surface. Due to the nature of the coating, the glue will quickly come off, which will ruin the appearance of the furniture.
Modern stores sell a variety of decoupage materials for every taste.
Therefore, when decoupaging polished furniture with your own hands, you should carefully prepare the surface. To do this, it must be treated with sandpaper, giving it a slight roughness. The same should be done with a plastic surface. For plastic, it is better to use fine-grained sandpaper, and for polished wood, it is better to choose an option with coarse grains.
How to prepare the surface
Preparing the surface for decoupage consists of several stages:
- Degreasing
- Sanding smooth surfaces
- Primers
You can degrease furniture with any dishwashing detergent or a 1:1 solution of vinegar and water. After this, the surface should be lightly sanded. Here it is important to achieve a rough, but at the same time smooth coating.
Choose a quality primer.
After this, a special primer is applied. The composition should dry out a little. Old wood furniture is characterized by uneven absorption of the substance, and some wood fibers may swell unevenly. Therefore, after the primer has dried, you should carefully inspect the surface. If necessary, sand it again and coat it with the compound again.
After sanding, the surface should be primed with the first coat of paint.
It is not necessary to coat the glass surface with a special layer of primer and sand it. In this case, it is important to degrease the glass well. After the surface is prepared, you can begin the most enjoyable activity - decorating the furniture with beautiful pictures.
Advice. Before gluing pictures to furniture, you should place them on it and evaluate the overall composition from different angles. Temporarily the pictures can be fixed with water. The ensemble may need to be modified or additional elements added.
Tools and consumables
Before you do anything using the decoupage technique, it is important to prepare all the tools and supplies necessary for the process. The quality of work and the convenience of the master depend on this. To prepare the surface you will need sandpaper, both coarse and fine grit. In addition, a spatula is useful for leveling the surface with putty or applying a base coat.
For better adhesion of the decor to the surface, it is recommended to degrease it with alcohol-containing products.
To treat the surface and apply the background, you need foam sponges and synthetic brushes of different sizes. Disposable plates come in handy; they are used instead of a palette. You will need scissors for cutting out pictures, acrylic primer for pre-treatment of the surface.
Purpose of furniture supports, overview of the main varieties
For decoration, three-layer napkins and pieces of wallpaper are used. Nowadays, fabric, lace, leather and magazine clippings are also used for these purposes. To glue pictures, use PVA glue, glue-varnish for decoupage, to depict the background - acrylic paints, to cover the decorated surface - varnish.
The craquelure effect is often used in decoupage. It allows you to get artificial cracks in the old style on the surface to be decorated. For this purpose, craquelure varnish is used. The product is processed in several stages. Initially, apply regular paint, then varnish and again a layer of paint. As a result, when the surface dries, it becomes covered with a network of small cracks. This is how you get the old effect on the product.
Common mistakes when using technology
In order for the work to be enjoyable and the result to be proud of, you should pay attention to important nuances. This will avoid standard errors:
- Neglect of surface preparation. Beginning craftsmen often immediately glue paper onto wood or plastic. As a result, over time the paper comes off and it looks very ugly.
- No primer. If you work without a primer, the result will be the same - over time the image will fade.
- Lack of thoughtful composition. You should devote no less time to creating a composition than to processing the surface. Otherwise, the patterns will look sloppy.
- Inaccuracy when gluing motifs. They may appear accidentally - for example, due to a draft in the room. When gluing, it is important to ensure that there are no empty spaces or unglued areas.
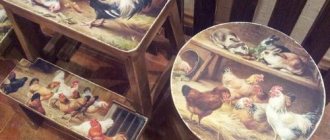
Roses – pictures for decoupage
If you want to decoupage a bedside table with your own hands, or decoupage a buffet, you may need decoupage pictures that are printed on a color laser printer.
Ready-made examples of do-it-yourself decoupage of old furniture
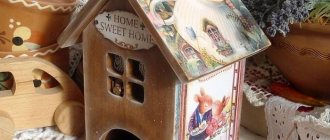
The technique of decoupage on furniture is so diverse that there are no limits to the author’s imagination. You can decorate not only furniture, but also other items in the interior:
- Caskets
- Interior doors
- Window frames
- Window sills
- Floor
Very often the decoupage technique is used for decoration.
When designing, you can combine several materials, not just paper images:
- Lace
- Rhinestones
- Tree leaves
- Decorative ribbons
All these options create interesting and unusual images, and also make the interior bright and original.
Trying our hand at creating a vintage style
By definition, vintage is a winemaking term that literally means “aged wine.” From winemaking, the term has become fashionable, and is understood as an original thing of the previous generation. Things that are older than 30 years are already vintage. Age is not yet a basis for classifying an item as vintage. Vintage items should be original pieces of art, as in the photo above, and fully express the fashion trends of their time. To decoupage furniture in vintage style and give an aging effect, you can use craquelure varnish. As this varnish dries, it forms cracks of various textures - this depends on the thickness of the applied layer. Then oil paint is rubbed into the cracks; it remains only in the recesses. Thanks to decoupage of furniture in vintage style, it acquires a noble antique look.
Decoupage furniture in the photo
Master class for beginners
Now let's look at a more labor-intensive project - a bedside table with drawers:
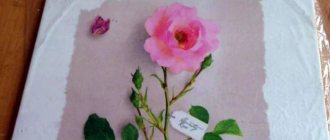
The decoration in our case will be beautiful wallpaper with notes, an old letter and a contrasting rose. The last two elements are cut from pictures found on the Internet:
1. First you need to fix the base picture on the outer surface of the bedside table (if desired, you can also paste over the side surfaces of the drawers). As with the high chair, place the wet sheet on the glue-coated surface and gently smooth it out from the center to the edges.
2. Let the base dry, then work the corners, cutting and folding the paper where necessary. Cover the entire covered surface with varnish. The result should look something like this:
3. Place and secure additional decoupage details on the paper base. As can be seen in the photograph, the letter was cut into strips of the appropriate size, which were then glued to the front surface of the boxes and also varnished:
4. Insert the dried boxes into place and glue on the last detail - the rose. It needs to be moistened with water (see above) and glued directly on top of the closed boxes, and then varnished. When the varnish is almost dry, you need to cut slits around the perimeter of the drawers. To avoid tearing the paper, it is better to use a very sharp knife or a sharp thin blade:
5. After waiting for the composition to dry completely, remove all the drawers and make sure that the edges of the paper and folds are well taped. The drawer handles can be replaced with ones more suitable in style or also treated with paper and glued in place.
Now you know the general principles of furniture decoupage, which can be implemented on any item. And at the end, some ideas for inspiration.