Benefits of using changing tables
You have to change clothes for an infant very often - at least five to seven times a day.
Not every mother can do this while bending over the sofa - often after childbirth, temporary back problems arise when the load on the spine is undesirable. A specially equipped table in this case is a real salvation; its height (80-100 cm) allows you to avoid these overloads. Floor-standing models of tables for changing a baby include not only a diaper, but also a number of drawers or shelves to accommodate all the things necessary for this process: nappies, diapers, baby vests and hygiene products.
Having these items at arm's length is not only convenient, but also advisable from the point of view of the baby's safety - he will not have to be left unattended while the necessary things are collected around the house.
Additional safety, unlike a regular table, is provided by the sides of the changing table, which run along its three sides and prevent the child from accidentally falling.
Convenience is the main criterion for almost any furniture, and the changing table fully corresponds to it. It is compact (you can choose a model that matches the size of the room) and multifunctional, very convenient for therapeutic or preventive exercises and massage.
You can use this design for quite a long time (up to a year), and then, if desired, convert it into a regular chest of drawers.
Peculiarities
A baby changing table, which is sold in a store or can be made by hand, must meet certain parameters:
- all materials must be safe, natural and certified;
- the design of the product is thought out so that the baby does not get hurt or hit, and the surface is created as smooth as possible;
- the size of the changing table must correspond to the height and weight of the child from the moment of birth until at least six months, while it will be actively used;
- water-repellent fabric for the mattress to avoid washing and damage during repeated use;
- creating a rigid mattress base for the convenience, comfort and safety of the child.
A changing table for newborns is not an essential item, but it greatly facilitates the process of changing a child at any time of the day, makes it more comfortable to get ready for a walk and undress after it; In addition, you can do exercises and massages on the diaper, which are useful for all children without exception, and some are also necessary as prescribed by doctors.
This is interesting: Step-by-step making of a table from boards with your own hands, examples of decor
Types of changing tables
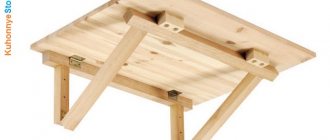
Modern designs of changing devices are not limited to the standard classic chest of drawers with three sides, but even this model comes in different types. For example, there may be a larger number of sides or a changing station expanded due to the folding surface.
Today, not only floor tables are available for sale, but also hanging and portable tables.
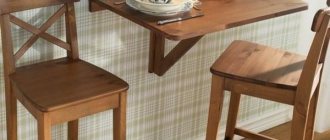
Suspension
The table is attached to a vertical surface and therefore does not take up much space. Like any other changing device, it is equipped with sides and a soft surface. There may be pockets at the bottom for storing diapers and other small items.
When installing a wall-mounted changing table, special attention should be paid to the reliability of the fastenings.
Folding
This is a type of hanging table, but with the ability to remove it by connecting it to a wall panel using a mechanism equipped with gas lifts (to avoid accidental collapse or, conversely, opening).
The shelves included in the design make it even more convenient and functional. This is a very compact option, suitable not only for a nursery, but even for a bathroom.
For this model, as well as for the hanging one, the surface itself to which the structure is attached is of great importance - it must be durable and withstand the weight of the child, therefore such a table is not recommended for installation on plasterboard partitions.
Portable
It is a board with sides and a soft surface, with fastenings for stability. This option is very convenient for small apartments: the diaper is securely fixed on the backs of the crib without taking up space in the room, and is also useful if you need to go on a trip.
In addition, this is the easiest and easiest type of changing device to make yourself.
Removable bathroom table
A removable bath changing rack attaches to the sides of the adult bathtub. After the bath you need to dry off and change clothes. During this time, the child may have time to freeze. The presence of a diaper reduces the time, and the baby is not exposed to extreme temperatures.
Collapsible
You can take a collapsible or folding table with you on a visit or to the country house. The table is disassembled like an ironing board. And in appearance it looks like her, only with sides. The structure is metal, the tabletop is made of plastic and covered with fabric. Below is a shelf for necessary accessories. From some manufacturers you can find collapsible tables with a bath under the tabletop.
Dresser
This is a classic model with drawers and a built-in or removable soft changing board with sides. Of all the above, this is the most capacious design, but also the most voluminous, so even compact models of chests of drawers are not suitable for small spaces.
Transformable bed
A transforming bed is a 3-in-1 table model. These include cribs, a changing table, and a chest of drawers. Most young families prefer this model. Although the cost is high, it is justified.
Universal changing board
A changing board is the most budget-friendly and simplest option. It can be installed on a crib or chest of drawers. Externally it is shaped like a kitchen tray. Consists of a flat board and two sides on the sides. This option is small-sized and mobile. It can be moved from room to room. But not stable. Limited in functionality. It does not have shelves, drawers or an organizer for storing dirty linen and a change of clothes.
When purchasing such a table, make sure that it has a streamlined shape. And the surface is stable and covered with high-quality, dense fabric.
Other types of structures
A bookcase is a structure with open shelves. Due to the absence of closed drawers, it is lighter than a chest of drawers and does not visually clutter up the space.
A folding changing table makes it possible to lay out the structure. This can be attributed to both the advantages of this model and the disadvantages: if it is not needed, it is removed and does not take up space, but at the same time, it is not very convenient to constantly disassemble and reassemble it.
A transformer is a model that combines several furniture options. For example, it can be transformed after the child grows up into a desk or be combined with a crib.
The last version of the model is the most difficult to manufacture independently. If you choose this design, it is best to give preference to finished products or order it from specialists.
Varieties
Since the convenience of changing tables has long been proven by thousands of mothers, manufacturers have come up with quite a large number of these products, among which the following varieties can be distinguished:
- portable;
- stationary;
- suspension;
- shelf table;
- changing chests;
- with folding mechanism.
Each option has its own characteristics, advantages and disadvantages, so parents choose the one that suits them:
- a portable changing table is convenient because it can be installed on any flat surface;
- a stationary swaddling device is safer, but requires carrying the baby to it;
- a hanging table will appeal to those who have little free space in the apartment; using a hanging structure that folds out and tucks away against the wall is the most convenient;
- the shelf table will please parents who want to have everything at hand so as not to leave the baby for a second - thanks to the presence of shelves under the changing table, this becomes possible;
- a changing chest is suitable for those who are not going to use different surfaces to care for the child, placing all the necessary things in the shelves of the chest - you can easily change the diaper and change the baby’s clothes without leaving the place;
- products with a folding mechanism are considered the most convenient, as they provide more space for mother and baby, and also allow the diaper to be used for other purposes.
Pros and cons, what can be replaced?
The main positive quality of a changing table is, without a doubt, convenience . Having placed the baby and the necessary items on it, the mother quickly changes the baby’s clothes, spending a minimum of effort and time. The baby will be safe on such a table, because it has restrictive sides. If the product is mobile and can be moved , this further increases its value for parents (the table can be moved to the bathroom or taken with you on a trip).
Most models have shelves , so mom and dad will have all the necessary children's things at hand. No need to leave your little one unattended to fetch cream or a clean diaper. In addition, thanks to the waterproof coating, you don’t have to worry about accidental “wet accidents ,” while the upholstery of the sofa can suffer significantly in such an incident. It is this reliability and functionality that makes swaddling diapers so popular among new parents.
As for the minuses, in various reviews you can find the following complaints:
- some tables are quite large and take up a lot of space in a child’s room or parent’s bedroom, reducing free space;
- When using a changing station, you should always be on alert - do not leave the baby alone, fix the wheels, watch for sharp parts;
- Highly functional models have a fairly high price.
The simplest option for replacing a changing table is a changing board . It consists of a solid base on which a mattress covered with waterproof material is located. Such a board is affordable and can be placed on a regular chest of drawers, on a bed or in another place.
It is shaped like a tray - the middle of the product is flat, and the edges are raised to form sides.
Its disadvantages include low functionality, instability, and inability to store the child’s belongings. An even more simplified form is the changing mat. Unlike a board, it does not have a hard base; inside the product there is a soft hypoallergenic material that holds its shape well, and on top there is waterproof upholstery. To change a child's clothes, such a mattress is usually laid out on the bed or on the table.
Luxury or necessity?
Before you start building a changing table, you need to understand whether its presence is really necessary for the child. On the one hand, this is a fairly convenient thing, but on the other, many young parents can do without it.
The main advantages of the changing table include:
- Convenience for mom. Sometimes a baby has to be changed many times - either he burped, he peed himself, he got dirty, then he needs to be ready for a walk, or undressed. If the mother constantly changes the baby's clothes while standing over the sofa or bed, then she will constantly strain her back. And this part of the body of a young mother is already subject to constant stress. The diaper is at the optimal height, which allows the parent not to bend.
- Safety for the child. As a rule, a changing table or chest of drawers is equipped with various drawers and shelves that contain everything necessary for small children. Therefore, when changing the baby’s clothes, the parent has access to all the supplies he needs, which allows him not to leave the child alone. This provides him with additional safety, because a few months after birth he will learn to roll over, which means he may fall.
- Baby's health. Often a small family member needs therapeutic massage or gymnastics. These treatments allow you to develop muscles and flexibility. For proper treatment, a flat surface is required, which is what the swaddling device has.
Having studied all the positive qualities of this piece of furniture, you can be sure that it is necessary for the early development of the baby. But you don’t have to buy it in a store, because its cost is significantly higher than the cost of ordinary tables and chests of drawers. In addition, a homemade table will become the highlight of a children's room.
How to choose material for a changing table with your own hands
All materials that you will use to make the changing table must be as environmentally friendly as possible. Most often, natural wood is used for a table in the form of a chest of drawers; in addition to it, laminated types of chipboard or MDF with E1 marking are also used.
Use quality wood to make the changing table.
In addition to the main material, do not forget about additional tools, such as glue that does not contain toxic substances, certified paints and varnishes, waterproof natural fabrics and high-quality filler.
Step-by-step instructions for making a changing chest
If you decide that you need a changing table to care for your child, but buying it is expensive and unprofitable, and you don’t know how to make a changing table yourself, then the instructions and features of assembling a changing table with your own hands, which we will discuss below, will help you easily make exactly the model you need.
When choosing a material for making a table, parents should be based on its safety.
Definition with material and design
As we have already said, the materials from which the product will be made must be absolutely harmless to the newborn. Therefore, it is best to choose natural wood; it is the most durable and safe material, however, its cost is quite high.
From a wide variety of changing tables, you should choose the one that suits you best.
The design also depends on your needs and placement options. If the living space does not allow, of course, it is better to choose a hanging or folding option, but if you want the most convenient and comfortable changing table with a storage system, choose a chest of drawers.
Make a lid
1. Glue the panel blank for cover P and saw it to dimensions of 330×698 mm (Fig. 1). Route along the ends and leading edge of a 6mm radius fillet on both sides. Finish sand the cover with 150-grit sandpaper.
2. Cut out the back side Q from 18 mm plywood (Fig. 5). Mark the arc using a flexible pattern, cut it out with a jigsaw and sand it to the line.
3. Cut out a blank with dimensions of 45x76x686 mm for the figured overlay R. Draw a center line across the width on one edge and a line along the bottom edge at a distance of 38 mm from each end (Fig. 6). Use these lines to mark the arc on the overlay (photo E). Cut out the arc and sand to the line, ensuring that there are no gaps between the back side and the trim.
Align the back bead Q with the marks at the ends of the trim piece R and trace around its edge to copy the arc.
Spread the legs of the compass by 25 mm. Holding it perpendicular to the edge, draw a line parallel to the cut arc.
4. Mark a second arc on the overlay R parallel to the first (photo F) , saw out and sand to the line. Using a milling table, make roundings along the upper edges and ends (Fig. 1 ). Then mill along the bottom edge of the fillet with a 5mm radius.
5. Cut out the S . Glue them to the ends of the back side Q , aligning them in the middle of the thickness (Fig. 1). Then add a shaped R . Once the glue has dried, give the assembly parts a final sand if necessary. Glue the assembly to the cover P flush with the back edge, centered.
Drawing up drawings and taking measurements
Before you start manufacturing, you definitely need to prepare a drawing; you can make it yourself if you have some experience, or you can select a suitable one from various specialized Internet resources.
There are also software products that allow you to model a future piece of furniture, as well as calculate the required amount of material, for example, PRO100, Basis-Furniture Maker and others. Of course, when creating a diagram, it is necessary to imagine the dimensions of the product.
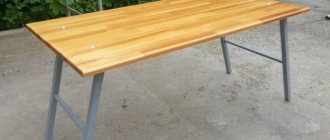
Standard simple changing chest.
Thus, the standard for the size of a changing table for newborns is:
- in height – within 80–110 cm,
- in depth – at least 70 cm (optimally 90–100 cm), taking into account the child’s growth characteristics,
- Any width, but the range of 80–100 cm is more convenient than the others.
Preparation of parts and blanks
Cut out the details of the future table in accordance with the drawing. A mandatory requirement for a changing table is rounded corners and edges, so a jigsaw is required for this purpose.
Use professional tools to make the changing table.
It is also necessary to treat surfaces with an antiseptic composition. Additionally, the edges can be covered with edge adhesive tape. After this, use a pencil to mark the finished parts for the required holes and fasteners. Drill the holes indicated.
If you have the financial opportunity, of course, it is better to choose natural wood.
Important! It is necessary to strictly observe all the dimensions required; the holes on the sides must be mirrored and completely coincide. Deviations exceeding 1 mm should not be allowed.
Add simple drawers
Note. To ensure tight and strong connections, set up the saw as shown in Fig. 4. Cut out one additional front and side wall to check the settings. Having achieved a good result on the test connection, proceed to processing the details of the project.
1. Cut out the front/back and side walls K, L (Fig. 3).
2. Set up the saw (step 1, Fig. 4). Cut grooves 6 mm deep at a distance of 6 mm from both ends of the side walls L.
3. Raise the saw blade to a height equal to the thickness of the side wall L . Having placed the front/rear wall K on the end, press its inner side against the longitudinal (parallel) stop plate and cut a groove along each end (step 2, Fig. 4).
4. Remove part of the ridge from the inside of the front/back walls of K (step 3, Fig. 4).
5. Cut out the bottoms of the M to the specified dimensions (Fig. 3). Glue the boxes together and secure them with clamps, making sure they are square and not distorted. Sand the drawers smoothly after the glue has dried. Insert the drawers into the openings, measure the gaps at the top of each drawer and sand along the bottom edge of the front walls to a chamfer of the same width.
6. Drill holes for the button handles (Fig. 3) and install the handles in place.
7. Cut out the adjustable shelf N and the edge trim O (Fig. 1). Glue the trim to the shelf and, when the glue is dry, sand with 150-grit sandpaper.
How to convert a chest of drawers into a changing table
If the owners have a chest of drawers, the device can be easily converted into a changing table. There are 2 ways - to make a soft pillow on the top of the chest of drawers or to build a folding mechanism. Both options are effective. However, the best example would be a folding mechanism.
You will need additional sheets of chipboard or MDF and mounting materials. You need to assemble the mechanism taking into account the original dimensions of the chest of drawers. You should pay attention to the dimensions of the tabletop, which will be a guideline not only for the folding mechanism, but also for the soft pillow.
Initially, you need to cut a sheet from a solid board. This part will serve as the basis. After preparing the base, you need to make sides and drill special holes in them that are needed to fix the bars. The bars play the role of a connecting element between the base and the sides. All parts must be carefully coated with high-quality glue and firmly fastened.
It doesn’t take much time or effort to acquire a useful device for changing your baby. You can make your own table from fairly inexpensive materials. And if there is unnecessary old furniture in the house, then through simple manipulations it is turned into an original chest of drawers.
Prepare materials
Prepare materials Assemble the mechanism according to the drawing
Ready-made chest of drawers
What is it needed for?
Not all expectant mothers consider a changing mat for babies a necessary purchase. However, experienced parents declare with full responsibility that such a mattress will make life and procedures with the baby easier, at least in the first months after birth. According to the experience of mothers and grandmothers, some parents adapt any surface for these purposes, endangering their baby and causing a lot of inconvenience to themselves.
Using a changing mat provides the following advantages:
- In the first months of a child's life, changing diapers and other hygiene procedures occur very often, so it is convenient to have a corner specially equipped for this with a soft surface and everything necessary at hand. Such a mattress can be placed on a changing chest or attached to a crib, it all depends on the modification of a particular model.
- Pediatricians often recommend that, in addition to visiting a massage therapist, mothers do independent gymnastics with their baby. In addition, many parents invite massage specialists to their home for better training with their child. Various exercises will help you quickly learn new skills and strengthen your muscles. The most comfortable place for such activities is a changing mattress.
- Most often, mattresses are equipped with soft sides on both sides so that a child who has mastered the skills of turning over does not roll off it. Sometimes there is also a side at the head, which protects the head of an already grown baby when practicing crawling. However, you should still not leave your baby unattended in the changing area.
- Due to its mobility and fairly light weight, a mother can easily move the changing board from room to room or place it in the bathroom for post-bath procedures.
- Many young mothers have back problems due to the increased load, because they have to carry the child in their arms for a good part of the day and even at night. Installing a changing mat at a level that is comfortable for mom will save her from constantly bending over to the sofa, which usually brings even more discomfort in the lumbar region.
Folding changing table
The simplest option, which is quite easy to move from one place to another, is a folding changing table. Usually it does not take up much space, weighs little and is easy to fold if the baby grows up and the time comes to give it up.
This folding table is easy to take with you on trips, even to other countries. This type of changing table is perfect for small rooms.
Step-by-step instruction
When planning the assembly of the classic and most functional model of a changing table, namely a chest of drawers with internal drawers and a hinged lid (removable if desired), work begins with drawing up a diagram, selecting and calculating materials, preparing tools and premises. The process itself is divided into separate stages:
- Marking and cutting of workpieces.
- Processing of edges and surfaces. Unlike ordinary chests of drawers, such products have a minimum of protruding corners; their sides are necessarily rounded.
- Sequential assembly of the frame, drawers, fastening of guides and the table itself.
- Preparation of the mattress, decoration.
Tips for making a computer desk with your own hands, stages of work
In the classic design, the chest of drawers is equipped with regular drawers (2 in the top row + 2 or 3 common bottom ones), but there are no restrictions. The general requirements include only the need for a higher back wall and a protrusion of the sides up by 10 cm. When assembled, the folding part of the changing table must be closed.
Marking and cutting blanks
Edge processing and corner rounding
Assembling the frame and fastening the guides
Assembling the box
Installing drawers in a chest of drawers
Preparing the mattress
Create a drawing
Ready-made drawings of changing tables for newborns are freely available on various online resources. In the absence of experience in carpentry work, it is not recommended to deviate from the dimensions indicated in them. If you need to make adjustments or design your own model, programs like PRO100, Astra, Basis-Furniture Maker, WOODY are a good help. These same services help calculate the required amount of material and draw up a cutting plan for sheet plates.
The height of the chest of drawers remains standard, the main level is maintained within the range of 80–110 cm. The depth is selected taking into account the height of the child; when unfolded, the length of the changing pad should be at least 70 cm (optimally 90–100 cm). The width of the chest of drawers can be any, but models in the range from 80 to 100 cm are considered the most comfortable.
Preparation of materials
A jigsaw is best suited for cutting blanks for a changing table. If you are confident in the sketch, slab materials can be cut in the warehouse at the time of purchase. Mandatory requirements of the technology include rounding the edges of individual parts, treating open areas with sealing and antiseptic compounds, followed by covering with tape.
Taking into account the rounding of the parts, it is difficult to calculate the exact length of the tape, so it is recommended to purchase it with a small margin.
The preparation stage ends with drilling holes for fasteners, after mandatory checking of the markings. In addition, the locations of corners, intersection ties, guides or confirmations are marked on the blanks with a pencil. All necessary points on the sides or edges must “mirror” each other; deviations from a single level of more than 1 mm are not allowed.
Lay out the workpieces, make markings according to the drawing and drill holes for fasteners
Frame
The finished parts are assembled into a single structure using a screwdriver or hex key. The table assembly procedure is standard:
- The chest of drawers is assembled sequentially. At this stage, the bottom, sides (if there are separate elements), and the back wall are screwed to the sidewalls with fixed guides.
- Using confirmations, the internal shelves are fixed.
- The boxes are assembled separately and the evenness of each is checked. The second part of the guides is fixed on the outer sides of the drawers along pre-marked lines.
- The smooth movement of the drawers is checked, and if there are no problems, the fittings are fixed on the facades.
Regardless of the method of arrangement of the internal shelves, at each stage of assembly, using a square and a building level, the evenness of the structure is checked.
Install the guides on the side walls of the chest of drawers
Sequentially assemble the product box
Collect boxes
Fix the fittings
Table installation
The folding table is assembled and mounted last. Maximum reliability of fastening the horizontal part and sides is provided by ordinary metal corners. Installation is completed by tightening the double-sided bolts, which are finally tightened after checking the stability, evenness and smooth tilting of the shelf-lid.
Making an inversion table with your own hands, operating tips
To avoid mistakes, you should study the video instructions explaining what and how to make a changing table with your own hands. Any defects are eliminated directly at the installation stage. The chest of drawers is put into operation only if there are no distortions or deflections.
Secure the back wall and install the changing table
Stages of work
The manufacture of a swaddling device begins with the creation of a sketch on which the dimensions of all parts are clearly indicated. Before starting work, it is important to think about the place where the future product will stand or hang, at what height the working area will be located - this is important for the ease of use of both parents. Once all the nuances have been worked out, you can begin the process of creating a changing table.
The stages of work will be as follows.
- Manufacturing of all parts according to the developed sketches. To work, you need a jigsaw for cutting out parts, a pencil and a tape measure for transferring the drawing.
- Sanding products or gluing furniture edging. In your work, you can immediately use coarse-grained sandpaper, then fine-grained sandpaper.
- Assembling parts into a finished structure. To work with a wooden structure, you will need sealants and a key for them, a screwdriver and self-tapping screws, as well as a hammer and nails.
- Checking the functionality of the finished structure and its safety.
- Decoration of the changing station.
In the process of creating a pelenator, the first thing you need to do is assemble the box itself , for which we connect the sides with the lid and bottom. When the base is ready, the sides and the back wall are attached to it , which should be higher than the sides. The next stage is attaching the internal shelves. Guides are attached to the base and shelves, and all the parts are assembled together. When the product is ready, the fittings are installed, and you have the opportunity to decorate the diaper to your taste.
The creation of each type of pelenator has its own characteristics:
- for a portable one, you need a sheet of chipboard or thick plywood 90x60 and two sides, everything is connected and fastened with screws to each other;
- for hanging, you can also use chipboard or plywood and attach it to the wall from below with wooden or metal corners;
- a folding version can be created from the same materials, but in the form of a rack with shelves and a front door that opens from top to bottom to an angle of 90° using mechanisms with gas lifts;
- For tables that are part of other furniture, it is important to use the same materials for manufacturing and focus on the dimensions of the entire product.
The changing table must have clear dimensions, less than which the product is inconvenient and unsafe. The length of the table should be 70 cm, width – 60 cm, height of the sides – 10 cm. You can create large surfaces, but the child can roll over and fall on them, so it is not recommended to deviate from the dimensions of the working area of the swaddling device.
General design of a changing table: dimensions and diagram
Making a changing table and chest of drawers with your own hands is not difficult. There are drawings and diagrams on the Internet, thanks to which the preparation process is minimized. It is often enough to download a ready-made cutting drawing and visit any furniture workshop with it, where you can purchase a ready-made board and cut the parts on the spot.
Many mothers doubt how to swaddle their baby correctly: loosely or tightly. Read about the features of wide swaddling.
When choosing sizes, take into account the features of the chest of drawers and the height of the baby’s mother, since most often she will have to do the swaddling. During operation, it should stand straight and not bend over the tabletop, so you need to adjust the height of the structure to suit ease of use.
Making blanks for the table
The classic design of such a chest of drawers provides for a height of no more than a meter, a width of about 50 cm and a length of 80 cm. The top shelf for changing is folding. This table has three large drawers for linen and personal items, and on top there is one row for storing small things for changing: powder, sanitary napkins, new diapers or nappies.
For consideration, let’s take a design of a chest of drawers 400 mm wide, 960 mm high, 800 mm long. The height of each large drawer is 204 mm, the height of each small drawer is 130 mm.
Did you know? Popular US supermarkets Macy's even have changing tables for public use in the men's restrooms. This is done so that young fathers can not interrupt their shopping and change their child’s diapers right in the store.
We will need:
- fronts of large drawers 183x764 mm - 3 pcs.;
- fronts of small drawers 183x371 mm - 2 pcs.;
- walls of large drawers (front and rear) 710x150 mm - 6 pcs.;
- walls of small drawers (front and rear) 710x150 mm - 4 pcs.;
- sides of drawers 450x150 mm - 10 pcs.;
- folding shelf for changing 322x765 mm - 1 pc.;
- horizontal partition between small boxes 187x500 mm - 1 pc.;
- shelves and bottom of the chest of drawers 768x500 mm - 3 pcs.;
- plinth 768x100 mm - 1 pc.;
- rear side 768x175 mm - 1 pc.
- bottom of small boxes 347x450 mm - 2 pcs.;
- bottom of large boxes 740x450 mm - 3 pcs.;
- back wall of the chest of drawers 795x795 mm - 1 pc.
Forming grooves
A groove is a recess into which the protruding part of another object is inserted when joined. In our design, grooves will be made in the sides and back wall so that the ends of the tabletop can be inserted into them later.
Important! Some craftsmen advise using two or more blades inserted into one hacksaw to form grooves.
This will provide a quick way to make grooves without spending additional processing time. To select them, use a simple chisel or a convenient end mill for a grinder. It is better to make the indent from the bottom edges at a height of 20 mm, the depth is 7 mm, the width for convenient entry of the end of the tabletop is 8 mm.
Formation of places for fastenings
To attach to the partition, you need furniture corners measuring 20x20 mm, which are attached inside the structure to the upper partition.
In order for there to be a gap under the table for air access and easier cleaning, you need to attach four legs made of plastic or metal to the structure. The recommended height of the legs is 50 mm; in case of distortion in the height of the floor or the chest itself, it is possible to use telescopic plastic legs that can be twisted to the required height.
The fastenings themselves do not require any special preliminary preparation work. You can use any rounded lid or small saucer as a stencil for rounding corners.
Assembling the changing table
If you have prepared parts and the necessary tools, the assembly process is simple:
- we assemble boxes from walls, bases and facades;
- install the guides (with the wheel towards the back wall) on the inner walls of the chest of drawers;
- we connect the sides of the chest of drawers to each other;
- install the back wall of the chest of drawers on the frame;
- We install a folding cover for changing.
Construction methods
The assembly principle of different models of changing tables is different.
Folding wall
The changing table, which is mounted on the wall, is almost invisible when folded. Due to the lack of support, it is necessary to make some efforts to create a stable structure.
The wall-mounted table must be mounted on a strong and reliable wall.
This is necessary so that it can withstand a weight of up to 10 kg. The hinged lid of the product must be installed on gas lifts, which will allow it not to close spontaneously. It would be nice to build several shelves in the wall part of the diaper changer. In this way, you can not only organize a storage system, but also provide additional stability to the base.
Suspension
The design of a hanging changing table is made of a board, sides and supporting corners. All these elements must be cut out of chipboard and connected using self-tapping screws. For better fixation, it is better to fill the holes for the screws with glue.
Portable
A portable changing board is good for its mobility. To make it you will need chipboard sheets, an electric jigsaw, self-tapping screws, a primer and paints and varnishes.
The base of the product consists of a board, the length of which is 90-100 cm, and the width is 60 cm. The sides have a length equal to the length of the board, and their height should not exceed 10 cm. You can build an additional side at the head of the structure. Its length in this case should be 60 cm.
The parts are connected with screws or self-tapping screws, and at the end of the work the entire table is primed and painted.
Soft
A soft table can be made from a foam rubber cushion 3-4 cm thick. The top should be covered with a waterproof material, for example, a diaper. Separately for the product it is necessary to sew a cover made of natural fabric, which will have a zipper on the side.
Dresser
To assemble this type of structure, it is advisable to have professional carpentry skills. It is imperative to use detailed drawings indicating all measurements.
Chipboard boards should be cut as carefully as possible. In addition to the boards that come with the kit, you need to check the presence of guides for rolling out drawers, handles, legs, corners, self-tapping screws and self-tapping screws. Tools you will need are a screwdriver, an electric drill, a measuring tape and drills.
The assembly process is quite complex, so it is important to strictly adhere to the drawings and do everything consistently.
Whatever model of changing table is chosen, you need to sensibly assess your own capabilities. A little patience and free time, and an individual diaper for newborns is ready.
For more information on how to make a changing table, watch the video below.
How to sew a mattress
Mattresses for changing tables are sold ready-made, but if you have a sewing machine at home, you can make them yourself. Depending on the type of filler, there are:
- hard types of mattresses with a base made of dense foam rubber with a thickness of 3 cm and above;
- soft “blankets” with an inner layer of holofiber or padding polyester.
The outer cover for the changing table is removable whenever possible. Medical oilcloth or waterproof raincoat fabric are best suited for these purposes. A budget alternative is high-quality canvas; the same material (or any dense cotton calico) is used to make the main inner cover.
The main guideline for cutting is the size of the table. A good mattress completely covers the sides and headboard without sliding off the furniture. The margin for seams is relatively small (0.5–1 cm); the bend areas of soft products are simply sewn on a machine. For decoration, soft braid, satin ribbons, appliques or bright fragments of child-safe textiles can be used.
Hard
Soft
Popular models
The modern selection of baby products is represented by a wide range of products from both domestic and imported manufacturers of changing accessories. Products from different companies differ in quality and materials used, as well as in price.
Among Russian manufacturers, models from Globex or Fairy compare favorably with others. They choose high-quality foam rubber and cotton fabrics as materials for their mattresses, which can provide the baby with optimal softness and comfort. The side skirts of the models of these companies are designed to provide additional safety, and the lower price characteristic of all Russian goods with proper quality attracts a large number of buyers.
- Polish-made mattresses from Disney or Ceba, which have models with impressive dimensions in their assortment, also have an acceptable price.
- Along with Polish products, there are also accessories from the Latvian company Troll, which are distinguished by their lightness and waterproof cotton surface.
- German quality has long been famous throughout the world, so companies from Germany are among the leaders in the issue of children's accessories. Popular models are from Geuther, the base of which is made of high-quality foam rubber.
- In addition, among European companies we can note Bebe Jou from the Netherlands, which successfully uses advanced technologies and produces mattresses filled with polyester foam. European factories produce accessories that cost above average, but this price is justified by excellent quality and high wear resistance.
Classic table and table with additional features
A classic table can be made not only of wood, but, for example, of metal. The design can be very diverse; if possible, you can develop it yourself.
Its appearance most often resembles a structure consisting of a large number of shelves of different sizes. The main thing is to choose a good mattress for it. You can also choose a table with additional options. For example, with a bath.
How to make a mattress for a hanging table with your own hands?
Parents who go shopping for their future baby are simply shocked by the prices of children's goods. But since you are reading this article, the changing table is most likely made by the man in your house.
But the woman’s task is to supplement the diaper directly with a mattress.
Hard foam
Material: hard foam rubber with a cut height of 5-7 cm; water-repellent material is raincoat fabric, oilcloth on a fabric basis is possible.
Size calculation: measure the width and length of the bottom. We cut out the foam rubber with a gap of 1 cm (0.5 cm on each side). The mattress can be either flat or with sides.
Mattress
If you decide to do it with sides, cut out a strip of foam rubber, the length of which will be the length of the mattress. Cut diagonally along the piece. It turns out two corners the length of a mattress. We glue them to the sides with hot glue. Then we move on to patterning the material covering the mattress.
We sew everything together except one end side, through which we insert the foam rubber inside. Sew it together. The mattress is ready.
LiveInternetLiveInternet
Quote from candra
Read in full In your quotation book or community!
Then I took a green fabric of the same size, placed it on the resulting “sandwich”, and overlocked the edges with an overlocker (for convenience, so that all 3 layers and the padding polyester would stick together. However, after making this mattress, my overlocker broke, after all, the parts are thick, you can see in the photos that the overlock stitches sloppily, but it holds!). That’s it, the base of our mattress is ready, now let’s work on the sides, they should protect the baby from hitting the sides of the chest of drawers, which means they should also be soft, that is, with synthetic padding. We measure 3 sides (which will have sides) of our base, it turns out to be approximately 2.05 (we will add about 15 cm for the folds in the corners). We sew a 2.20*0.20 strip of green parts and the exact same strip of white. For convenience and if we have the same color material, we make a strip 2.20*0.40. Fold it in half lengthwise and lay padding polyester along the entire length. We also sew at a distance of approximately 8cm.
We also process the edge using an overlocker to fasten the layers together for convenience. Then we process one edge of our strip,
whichever one is more convenient for you, I first made the left one and from left to right I started sewing the sides to the base by hand over the edge.
Having reached the corner, you need to try on the mattress on the chest of drawers to determine the size of the fold in the corner. Having completed the sewing, we cut off the excess and sew it in the same way as on the left side. Our mattress is almost ready, I thought for a long time about what to do on the front, and settled on this option.
Having sewn the front side, it is better to put our mattress on the chest of drawers and sew the corners of the sides directly on it so that they do not puff up.
This is the mattress I got, soft and safe.
It’s inconvenient, of course, to describe the production of an already finished item; I may have written something unclear. Everything seems to be clear by itself. Here are some more photos
It all doesn't look very neat from the inside, but it's durable. From the front side everything is very decent. A friend who came to visit recently didn’t believe that I did it myself, but as soon as I turned it inside out, she believed it. So this is my mark of quality, like “made by mom”
My son is almost 4 months old and he still fits on the table.
I specifically pulled out a stack of diapers to show the convenience of the table for a newborn.
Additional functionality
As a rule, changing tables are equipped with drawers, baskets, hangers, closed and open shelves. Such elements increase the functionality of the product, allowing you to store dirty and clean linen, baby cosmetics, diapers and other items necessary for the daily care of a baby.
The design of individual changing tables includes bedside tables, ironing boards, and bathtubs. There are also heated equipped with a radiant heat source. Such changing tables are placed in clinics, hospitals and maternity hospitals to examine the child, change his clothes, and perform various diagnostic or therapeutic procedures.
Sources
- https://vdome.club/obstanovka/deti/pelenalnyy-stolik.html
- https://oboiman.ru/inside/pelenalnyj-stolik-dla-novorozdennogo-37-foto-komod-s-pelenalnym-stolom-svoimi-rukami.html
- https://o-krohe.ru/detskaya-komnata-mebel/vybiraem-pelenalnyj-stolik-dlya-novorozhdennyh/
- https://severdv.ru/mebel/stoly/kak-izgotovit-pelenalnyj-stolik-svoimi-rukami/
- https://mblx.ru/prilavok/samodelnyj/1427-pelenalnyj-stolik-svoimi-rukami.html
- https://valis-mebel.ru/stoly/pelenalnyj-stol-razmery.html
- https://mebel-sovet.ru/stoly/samodelnye/1350-pelenalniy-svoimi-rukami
- https://heaclub.ru/kak-sdelat-pelenalnyj-stolik-svoimi-rukami-shema-i-materialy-dlya-sborki-pelenalnogo-stolika