There are many creative ideas used by furniture makers when making their own masterpieces. A bright, original and memorable product that will perfectly decorate a modern interior and create a unique atmosphere is a coffee table with an infinity effect. Making it is not very easy, but it is quite possible if you have some skills in working with wood and glass.
You can place a table with lighting both in an office space or in a country house, as well as at home. LED lamps used in the assembly of such furniture are absolutely safe for human health, as well as for the environment. Such lamps are durable and economical, so using a table with an infinity effect will not lead to increased energy consumption.
The illusion of an endless tunnel is created by using two mirror surfaces and LEDs located between them. The colors of the lamps used can be any, but experts say that red diodes can make the tunnel deeper, since red color is less prone to scattering than other colors.
To control the backlight, you can use the on/off button or a special remote control.
What is special about the design of a table with an infinity effect?
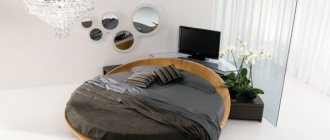
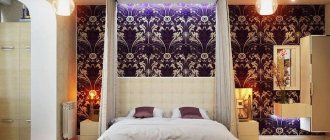
The originality of the design of such a table lies in the use of two mirrors and LED lighting placed in the tabletop. This table is most appropriate in a recreation area, that is, in the living room. It will fit into such interior design styles as modern, high-tech, minimalism. By attaching wheels to the legs of the table, you can easily move it around the house. Such tables look good in various interior styles. Using a mirror as a tabletop allows, on the one hand, to prevent scratches, and on the other hand, makes the structure fragile and susceptible to strong mechanical influences.
A mirror surface is used as a tabletop for this table.
How to care?
Any furniture needs to be looked after. If it is a mirror, then it is better to purchase special napkins. Painted legs should be washed carefully, as some cleaning products or acids will corrode the paint.
Before deciding on a purchase, you need to carefully weigh your financial capabilities. You need to take a close look at the interior; perhaps some details of your interior, for example a mirror, will make it possible to refuse any attributes present in the table.
A reverse turn is also possible. The lack of storage space may push you to buy a table with more storage space.
In any case, this table should bring joy and comfort to the house, because joy is the most important thing in life.
How to make an infinity table yourself
Design of a table with an infinity effect, description of manufacturing
The price for such a piece of furniture is not encouraging, and the purchase is not always affordable for the average resident of the country. However, you can get an unusual thing if you know how to use tools. Just make a lighted table yourself.
To do this you will need the following materials and tools:
- boards for the table;
- mirror and glass (the latter can be replaced with a translucent mirror);
- LED Strip Light;
- self-tapping screws;
- screwdriver
All wires are mounted in the table legs.
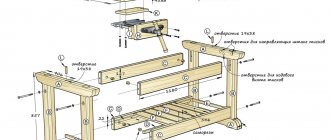
First of all, you need to develop a drawing, taking into account all the dimensions of the future piece of furniture. You need to make blanks from MDF (or wooden boards) and mirrors, according to your calculations. There should be 3 wooden templates with an internal hole, one of which has a larger internal diameter by approximately 1 cm. This is where the LED strip will be located. The resulting blanks need to be glued together, not forgetting to insert one mirror between the two lower templates. Then you need to carefully smooth all sides and corners.
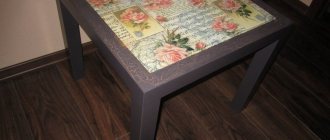
Next you need to attach the cover. It would be better if it was removable. This will provide access to electricity. This cover for the future table can be decorated to suit your interior. You can paint it or decorate it in any other way.
In the opening of the table cover it is necessary to drill holes that are necessary for attaching the LEDs. Now you can insert the tape into this opening and secure it in a way convenient for you. The best option would be to use glue, the effectiveness of which you will be 100% sure of.
Now you should cover it all with a second mirror, translucent.
All wires are routed through the table legs. To do this, they must have a wide cross-section and through holes.
Interactive table
Here you will learn how to make a beautiful interactive coffee table that will amaze you, amaze you, and maybe just make your head spin a little! The sides are painted, clear coated and engraved. The table contains more than 960 LEDs, each of which is controlled by 24-bit color. The LEDs make up a total of forty infinity mirrors, culminating in one stunning composition. The design features 4 hidden USB ports, each capable of charging up to 2A. In addition, the table is equipped with an inductive charging pad, which is clearly laser engraved.
To top it all off, there are 2 AC outlets for those who would like to plug in a laptop or charger. The final feature is a hidden LCD touch display that allows you to fully control the table's functions. Of course, this project is not for beginners. You must have good woodworking, electrical skills and the ability to adapt to any challenges during assembly. This is a complex design, but for those who want to try to make such a backlit table with their own hands , the result will be amazing. So, if you take on this project, you will have to invest a lot of time and effort. If you want to challenge yourself, this is definitely for you.
The basic instructions in this tutorial rely heavily on the use of CAD drawings. The drawings show individual parts and components and you should be able to interpret them to assemble the table.
Skills
- Must be able to read and create CAD models and drawings.
- Be able to design your own parts if you want to make changes.
- Good understanding of wiring and programming.
- Be able to open CAD models in case the drawings are difficult to interpret
If you decide to take a risk, read the large and very detailed instructions on the website, link below under the gallery. Everything is there, a list of materials, tools, wood specifications and separate instructions on how to work with CAD drawings. Everything else depends only on your perseverance.
Photo source: www.instructables.com/id/Beyond-Infinity-Table-the-Interactive-Coffee-Table/
Preparing hand tools
DIY computer desk: instructions for dummies
To work with wood you need quite a few different tools. The amount of harvested wood depends on the type of table. During the manufacturing process, both hand tools and automated devices can be used. It all depends on your personal equipment. The list will include the following tools:
- Plane. This is a standard tool for any carpenter; it is used to process a wooden workpiece, eliminating its unevenness;
- Chisel. With its help, various holes and the necessary grooves are made;
- Various saws. Used for cutting wood into various workpieces;
- Measuring instruments, and pencils;
- Screwdrivers of different types;
- Sandpaper. Wooden surfaces are sanded with it to eliminate roughness.
Tools, fasteners
The set of tools for work should include:
The composition of fastening elements and materials includes:
If you plan to assemble a dressing table with your own hands with drawers (doors), then additional parts are added to the list - fittings for them, as well as guides equipped with rollers. A master ready for a “heroic feat” will need other elements. Often such furniture is made in a non-standard shape, complemented with mirrors with lamps around the perimeter, decorated with LED strips, decorative panels, etc.
Model features
Desk height: how to choose the right one?
A table with lighting (if it is turned off) is very similar to a regular coffee table. But as soon as the system turns on, the tabletop begins to sparkle and shimmer. At the same time, it seems that the lights go far into the depths. This is how the infinity effect is created.
It is achieved due to the special design of the tabletop, which consists of several mirrors and lighting. The lights can be turned on via a power outlet or via a battery; there is also a remote control option. This piece of furniture is suitable not only for home use, but also for organizing a relaxation area in bars, restaurants, and offices. It can be combined with a deep chair.
The product looks good in a minimalist, futuristic design, as well as in a high-tech style. A table with lighting has the following advantages:
- ease of operation;
- possibility of application in different styles;
- spectacular appearance;
- operation from mains or battery;
- remote control.
This piece of furniture is unique. You can create the design yourself, provided that the craftsman has carpentry and electrical skills.
Backlight options
This piece of furniture can decorate any interior, turning an ordinary environment into an original, ultra-modern one. To make the table, different lighting options are used, each of which has a number of features:
- LED bulbs. Suitable for large items. The elements provide bright light, the shade is deep and rich. LEDs last much longer than conventional lamps, burn out less often, and have a higher efficiency. The advantage of such lighting devices is the absence of heating, so installation is allowed in any frame. It is possible to choose a suitable color scheme. LEDs are safe and inexpensive.
- LED strips. Such devices are distinguished by their versatility and practicality. They are easy to use and install, and have a high level of reliability. You can equip the table with LED strip not only from the inside, but also from the outside. It is compact and elastic. The devices are environmentally friendly and consume a small amount of energy. The market offers a wide range. The user can independently adjust the color and brightness of the lighting. Tapes are quite expensive and have a limited length.
- Neon lamps, threads. They provide a soft glow that is distributed evenly, with no contrasting shadows. Controllers help regulate the color and intensity of the glow. Warranty service life – 20 years. The shape of the tubes varies. The products do not create noise during operation and do not irritate the eyes.
The gas present inside neon tubes may contain mercury vapor, so the product requires special disposal. Such lamps must be installed by a specialist.
Tunnel lighting can be monochromatic or multi-colored. In this case, the light may blink or fall evenly. The color variety of lamps allows you to choose any option for making a table. Red diodes have the lowest degree of dispersion, so they will be preferable: these lamps make the tunnel deeper.
Types of cabinet-desk, their features, configuration options
It is not always possible to purchase original pieces of furniture in a store at an adequate price, so you can make a table with lighting yourself. The product is multifunctional, since it is used both as a regular coffee table and to create an accent in the interior.
LED bulbs
LED strips
Neon lamps
Assembly
Before assembly, it is necessary to develop a drawing of the table, calculate the distance between the mirrors, the number of diodes, and think about the location of the electrical elements.
To get an idea of how the twinkling lights will look in the finished product, simply place any light source between the bottom and top of the table and look at the result.
Regarding the distance between the mirrors, everything is individual and depends on your wishes. But often the average value is chosen - 8 cm. To calculate the depth of infinity, the distance between the covers must be multiplied by 16. Also keep in mind that the depth of the tunnel will depend on the light transmittance of the top cover. After all the calculations, you can proceed directly to assembly.
Step-by-step instructions for making a table with an infinity effect with your own hands - making the base:
- From bars with a cross section of 5*5 cm and metal corners you need to make the frame of the future table. For fastening, use screws and a screwdriver.
- Using sandpaper, carefully sand all edges and corners to make them smooth and remove burrs.
- Drill holes for electrical elements using a drill, follow the drawing. The holes need to be sanded tighter.
- For additional fastening of the structure, you can treat the joints with glue. After this, the frame must dry for at least 24 hours.
Frame assembly.
Assembling the tabletop step by step:
- Attach boards (section 5*1 cm) to a sheet of plywood of the required size along the outer perimeter, and at a distance of 5-6 cm along the inner perimeter. There should be a kind of gutter between the boards - this is where the wiring and electrical elements will be placed (see photo above).
- Place a mirror on the bottom of the tabletop with the reflective side facing up.
- You need to attach the LED strip to the inside of the smaller frame using double-sided tape.
- Wiring is installed in the space between the frames.
- Attach the top mirror cover to the tabletop.
- The entire structure is held together with screws.
Assembling the tabletop.
At the end of all the work, you should end up with something like this table with a mirror surface:
Finished product with the backlight turned off.
However, it is worth understanding that you can make a table with an infinity effect from any material that you know how to handle - for example, plexiglass, plastic, metal.
- When working with mirrors and glass, remove the protective film only after completing all processes.
- Be sure to thoroughly study the diode connection diagram to avoid a short circuit, or worse, a fire.
- For fastening, use moisture-resistant glue.
- In the event of a breakdown of electronic parts, it will be convenient to have free access to them, therefore it is better to place the controller and programmer not inside the table, but outside - placing it in a neat box and securing it under the tabletop.
There are many creative ideas used by furniture makers when making their own masterpieces. A bright, original and memorable product that will perfectly decorate a modern interior and create a unique atmosphere is a coffee table with an infinity effect. Making it is not very easy, but it is quite possible if you have some skills in working with wood and glass.
You can place a table with lighting both in an office space or in a country house, as well as at home. LED lamps used in the assembly of such furniture are absolutely safe for human health, as well as for the environment. Such lamps are durable and economical, so using a table with an infinity effect will not lead to increased energy consumption.
The illusion of an endless tunnel is created by using two mirror surfaces and LEDs located between them. The colors of the lamps used can be any, but experts say that red diodes can make the tunnel deeper, since red color is less prone to scattering than other colors.
To control the backlight, you can use the on/off button or a special remote control.
Where can the table be used?
The use of strips with LED lamps is absolutely safe for human health and the environment, so the table with the infinity effect can be located anywhere. In addition, such lamps are famous for their durability and efficiency. A product with a tunnel effect will serve you for quite a long time, thanks to its reliability and ease of use. This table can be seen in:
- modern apartment;
- country house;
- nightclub, bar or restaurant;
- hotel;
- office.
DIY 3D table
Let's consider making a more complex one,
but the safest and most
beautiful
LED table.
Materials
In order to make a table, you will need the following materials:
- Mirror
(diameter 60 cm); - Mirror translucent self-adhesive film;
- Expanded polystyrene
(for the body); - Glass
or plexiglass (thickness 4 mm, 65 x 65 cm); - Metal strip
in roll (for window); - Wires;
- Instant superglue;
- Double sided tape;
- Power supply
5/5.5V 200/300mA with USB output; - LED
strip (not less than 1.5 - 2 meters); - Arduino Uno;
- Programmer
for Arduino (for projects); - USB
for powering the microcontroller.
Tools
Tools,
necessary to create an LED table:
- router
(you definitely need an attachment for making round parts); - regular or
- soldering iron
(you definitely need solder for a soldering iron); - Dremel;
- scissors
; - knife
(for cutting metal and plexiglass); - pencil, pen, thin marker;
- square
(ruler).
Stages of work
Step 1.
From a piece of plexiglass we cut
a circle
along the diameter of our mirror.
the edges and
remove the shavings.
Step 2.
Carefully glue the self-adhesive
film onto the plexiglass.
We glue the plexiglass to the table with tape.
We remove the film that is applied to the plexiglass
and the film from the mirror film.
Spray the plexiglass with water,
or even better,
with a soap
solution.
We place the mirror film on the glass and expel all the formed bubbles.
Step 3.
Cut
off the protruding edges of the mirror film with scissors.
We leave the entire structure to dry (at least 12 hours
).
Step 4. Carefully attach the metal strip to the dried mirror plexiglass using transparent superglue. Step 5. We glue the LED strip to the inside of the metal strip. Step 6. Drill holes for the wires in the metal strip. Step 7. Grind the resulting holes.
Step 6.
We drill holes for
the wires in the metal strip.
Step 7.
Grind the resulting
holes.
Step 8
write
the connection code yourself, or you can use a ready-made one.
diagram
:
Step 9.
You need to cut 10 - 15 small
rectangles from plexiglass.
Using clear instant adhesive, attach them to
the front
of the mirror.
They will serve as supports for structure
.
The size of
the rectangles should be such that the strip along with the plexiglass overlaps our mirror.
Step 10.
We install
of the rectangles .
The glue must dry completely .
It is advisable to put something heavy on top to
better
bond the surfaces.
Step 11
the second (outer)
film
from the plexiglass.
This design can be used as a mirror.
We install the structure on a table with a tabletop of the same or smaller
diameter.
Step 12
We supply power to
the Arduino
and upload our
code.
- You should not start
making a glowing table if you are not sure that
will correctly
connect the LED strip to the battery or network.
Incorrect or careless use may result in short circuit
and fire.
We remove
the films that protect
the glass from external influences last - this way it
will preserve
its appearance.- Before cutting
the plexiglass,
we attach a piece of wooden
double-sided .
It will serve as a support for the router. - The glue must be waterproof.
- glue
the LED strip with good, strong double-sided
tape.
If the tape comes off when the table is completely ready,
you will have to
open the entire structure to
fix
this problem. - the minicontroller
in a box and attach it to
the bottom
of the tabletop.
To power
the tape, you can use electrical networks or build a small
battery.
When powered by a battery, the table will become even
safer
and will not depend on the power grid.
It can also be installed in a country
house where there is no power supply.
LED strips are safe and durable.
To illuminate the table, you can use
a single-color
or
multi-colored
LED strip (they differ only in price).
The luminous
table will delight the owners and their guests with its unusual
design.
How to install lamps to illuminate your desktop in the kitchen, see the following video:
See inaccuracies, incomplete or incorrect information? Do you know how to make an article better?
Would you like to suggest photos on the topic for publication?
A small urn made from an old bucket or barrel
Used tanks for liquid and bulk products should not be immediately disposed of in a landfill, because they can also serve well within the perimeter of a summer cottage. As an example, we would like to give old buckets and barrels, which can be easily converted into trash cans and small trash cans.
Any old bucket that is not too dilapidated, or a barrel that is not rotten, can become a garbage container in a gazebo, near a summer kitchen, and so on. To do this, we won’t have to upgrade much, but just adjust the tank to size, perhaps patch up the old holes a little, repaint it in a cheerful color and install it where necessary.
Buckets can be used almost immediately, but barrels often have to be trimmed a little because they are too large. After carrying out the simplest reconstruction work, you can upholster the tank with building materials - plastic, wood, thick cardboard, after applying patches of tin or aluminum sheet. That’s it, now it’s just painting in the desired color or a bright pattern to match the design style of the location.
Assembling the base and legs of the product
When the backlit tabletop is ready, all that remains is to make the base and legs of the table. The legs should be thick enough (about 10 cm in diameter) so that a hole can be drilled inside one of them for the wires. Exiting the wires through the leg is a solution that allows you to make the product as aesthetically pleasing as possible. You can route the wires directly from the tabletop, but this will make the table less beautiful and convenient to use.
When the legs are made, you need to form a through hole in one of them with a diameter of about 5 cm. In the upper part of the leg, you should make two grooves through which the wires will pass, and also cut out a corner hole necessary for fixing the tabletop.
The height of the hole should be equal to the height of the table top. The depth of the hole must be calculated individually in each case; it must ensure reliable fixation of the tabletop. Similar corner holes are made on all four legs.
In addition to the legs, you need to prepare the base in which the tabletop will be placed. The width of the base should be such that the base protrudes 8-10 cm on each side of the tabletop placed inside it. Free space around the tabletop is needed to accommodate wires and related equipment.
A hole is formed in each corner of the tabletop into which a leg is inserted. Then an outer frame is attached to the base using self-tapping screws, the height of which is equal to the height of the tabletop. Then the legs are screwed on, and the tabletop is placed into the finished structure. The spaces between the table top and the outer frame house wires that are routed out through the table leg.
When the assembly of the base and tabletop is completed, all that remains is to close the space with the wires and additionally fix the tabletop inside the base. A special frame is made for this.
The width of each side of the frame is calculated as follows: the width of the trench with wires + the thickness of the outer frame + a few centimeters to ensure the frame fixes the tabletop. This frame is assembled from four blanks and fastened with self-tapping screws. It is then bolted to the outer frame as well as to the LED tabletop frame.
The holes for the bolts must be drilled in advance to avoid delamination of the wood. The design is ready!
Some tips
The following recommendations will simplify and secure your work:
- When working with mirrors and glass, remove the protective film only after completing all processes.
- Be sure to thoroughly study the diode connection diagram to avoid a short circuit, or worse, a fire.
- For fastening, use moisture-resistant glue.
- In the event of a breakdown of electronic parts, it will be convenient to have free access to them, therefore it is better to place the controller and programmer not inside the table, but outside - placing it in a neat box and securing it under the tabletop.
Preparing to start work
To make a coffee table with a mirror, you need to prepare the necessary tools and materials. The master will need:
- boards - wood or chipboard;
- sandpaper - it is needed for processing the boards after cutting them (if the material is purchased cut into suitable elements, then there is no need to use sandpaper);
- an ordinary mirror - for a coffee table with a diameter of about 60-70 cm;
- translucent mirror - its width should be approximately 10 cm larger than the width of a regular mirror (the additional size is needed so that the glass can be glued to the strips with LEDs); in the absence of a translucent mirror, you can use glass on which a mirror film is glued;
- power supply with USB output;
- self-adhesive LED strip no less than 1.5–2 m long;
- wires;
- USB for powering the microcontroller;
- microcontroller and programmer for it;
- self-tapping screws;
- Super glue;
- screwdriver
Some craftsmen prefer to make a table with their own hands using a New Year's garland instead of an LED strip. In this case, there is no need to purchase equipment that is equipped with designs with LED strips (microcontroller, USB).
How the infinity illusion works
The illusion of an endless tunnel is created by reflecting a light source in two mirror surfaces at the same time.
Due to the fact that light has the property of scattering, the effect of its gradual attenuation is created somewhere in the depths.
Due to the peculiar reflection of light, such tables create the illusion of an endless tunnel. An important condition for creating such an illusion is the selection of the correct distance between the mirrors. Experts recommend installing mirrors at a distance of approximately 8 cm from each other.
What tools and materials will be needed
You can make an infinity table from mirrors and lighting from any regular table you have at home, removing the standard tabletop.
The first step is to remove the old countertop from the table. If you want to create a table from scratch, then you will need:
- material (chipboard, MDF, plywood or wood);
- self-tapping screws;
- mirror;
- translucent mirror or glass with a mirror film attached;
- sandpaper (or sanding machine);
- Super glue;
- LED strip with programmer, microcontroller, wires and power supply.
As an alternative to the LED strip, you can use a regular New Year's garland, then accordingly there will be no need for other lighting equipment.
If desired, the LED strip can be replaced with a regular New Year's garland. Wood as a table material will look richer, but will also cost more. It is also more durable than chipboard or MDF and is not subject to rotting. It is worth noting the high environmental friendliness of wood. It is best to choose red LEDs, since their light scatters the least and, accordingly, the depth of the tunnel will be greater.
Manufacturing materials
To make a table with an infinity effect, you need a translucent mirror or glass covered with a reflective film. It is mounted at the top of the structure. A mirror cloth is also usually needed. Translucent glass should be 10 cm larger in size.
Types of folding tables for the balcony, stages of self-production
Another main element is the backlight. This could be an LED strip, a garland or another lighting device. For its operation, you need a power supply equipped with a USB output. To adjust the brightness or characteristics of the glow, a programmer and microcontroller are used. To make a box, you can use the following materials:
| Material type | Characteristic |
| Chipboard | Inexpensive option. Easy to process. The product is lightweight and thin, so even a beginner can handle the task. However, fibreboard has a loose structure and contains harmful components. Before use, a protective layer is applied to the sheets - it is better to use the laminated version. The material is temperature resistant, there is a choice of colors to suit every taste |
| MDF | Environmentally friendly and characterized by good strength. Easy to process, does not contain toxic substances. This material is able to imitate the texture and texture of wood. It is resistant to moisture and suitable for complex processing. When choosing MDF, you need to make sure that there are no mechanical damages or chips on the surface. In addition, it is necessary to ensure proper care of the slabs |
| Plywood | The material is durable, but somewhat difficult to process. Plywood has a relatively low cost. Positive properties include flexibility and a smooth surface, which eliminates the need for additional grinding. Coloring of the material is allowed. The disadvantage is the risk of fire and the negative impact of moisture. Plywood contains harmful components in its composition, since glue is used in production. The surface requires additional protective impregnation |
| Tree | Environmentally friendly material, which is characterized by high strength. Quite expensive raw materials, but the price is justified by the long service life. The wooden frame can be repaired if broken. Since wood is flammable, it must be treated with a protective compound. |
A variety of tables made from pallets, popular models and decor options
When making your own coffee table with an infinity effect, it is better to use wood.
All lighting fixtures must be well insulated. It is allowed to use ready-made frames that are suitable in size.
Chipboard
MDF
Tree
Plywood
LED strips
When making the table, LED strip is used,
which creates the effect of infinity.
The most convenient are self-adhesive
tapes.
Operating principle
The LED strip consists of two diodes - single-chip,
having one color spectrum, and
three-crystal,
consisting of three
color
spectrums (green, blue, red).
Emissions from crystals
mix to form a wide
range of colors.
Specifications
- The type of LED is
the main difference between all LED strips. The most common LEDs are SMD 3028 and SMD 5050. The abbreviation stands for “surface-mounted device”, and the numbers indicate the dimensions of the LED lamps: 3.0 x 2.8 mm and 5.0 x 5.0 mm. - Density.
The more LEDs there are per linear meter, the brighter the glow from the tape. - The color of
the LEDs can be any. The most popular colors are white, yellow, cold and warm tones. - Moisture protection.
IP 20 - open, IP 65 - moisture resistant, IP 68 - the highest degree of moisture protection.
Advantages
- High light output;
- High strength
and vibration resistance of the tapes; - Long
service life (about 100 thousand hours); - Various tones and shades
of lamp glow; - The inertia of
the tapes is low, which allows you to use the
highest
brightness from the very moment you turn it on; - The number of cycles
does not affect the service life of LED strips; - Environmental friendliness;
- Safety;
- Budget cost;
- Not susceptible to breakdowns due to low temperatures.
How to illuminate a computer desk using an LED strip, watch the video:
Types of perimeter lighting
Lighting around the perimeter of the ceiling structure visually expands the space of the room, and, if necessary, serves to zone the room. To create a special atmosphere, blue, purple, green and other unusual shades of lighting are used.
Contour
A system with contour lighting involves attaching an LED strip directly to the edges. This tape does not heat up, thus protecting the ceiling tension material from overheating and deformation.
floating ceiling
Lighting with cornice-mounted lamps visually increases the height of the room. In addition, hidden linear lighting creates the illusion that the ceiling does not touch the walls, but “floats” in the air.
Use of modern technologies
The emergence of new technologies is opening up ever greater horizons for the activities of furniture design masters. Artistic photographs on plastic and glass have become firmly established in thematic interiors. The use of 3D printing technology allows you to turn ordinary tables into fabulously beautiful works of art. The choice of theme for decoration is limitless: stone, wood, concrete and metal textures are reproduced with high precision. The base repeats the richness of colors and the smallest details of the drawings.
3D drawings will help complement any interior with a beautiful, unique table. A tabletop in the shape of a world map will take its rightful place in the marine living room, and an original photo collage or comic book will highlight the idea of pop art. Newspaper pages on the table will add a vintage feel, and cosmic distances will fit perfectly into the interior with a touch of fantasy.
The tops of desks and coffee tables are often decorated with typesetting designs. A variety of materials can be used here, from wood cut using a laser machine into simple geometric shapes, to stone, glass, and anything that will be inspired by a design idea.
Unusual furniture always attracts attention. When thinking about purchasing a custom table for your home, you need to carefully consider the future interior
Bold design solutions are increasingly finding fans, turning apartments into cozy themed corners.
What determines the depth of the tunnel?
The depth of the backlit coffee table tunnel depends on several factors:
- Degree of transparency of the top surface. If you apply a 70% automotive film to the glass, the depth will be less than when using the 92% option.
- The depth of the table tunnel with LED lighting (LEDs) also depends on the distance between the mirror surfaces.
- The brightness of the light source - the more intense it is, the greater the illusion of depth.
An illusory infinity mirror occurs when LEDs are repeatedly reflected between a real and an imaginary mirror, creating a tunnel that tends inward and toward the center. In this case, the translucent surface experiences the main reflection losses, and each subsequent one becomes weaker by a percentage of its transmission capacity. Therefore, the greater the distance between them, the deeper the tunnel will be.
The reflection coefficient can be calculated using the formula: (n2 - n1)2/(n2 + n1)2, where n are the refractive indices of the two media.