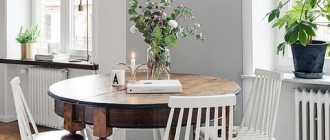
A coffee table in an apartment is always a necessary and relevant thing. It will be useful not only in terms of decor, but also in everyday life. There are situations when you would like to refresh it a little and give it a new look. And we will not be talking about global changes, but more about simple decorative improvements.
Where to start
Any finishing, in construction, room decoration or decorative art needs preparation. Before you start decorating an old piece of furniture, you need to remove the old paintwork. You can use all suitable means for this: from sandpaper to special solvents. It can be especially difficult to work with Soviet lacquered tables, because they were made to last.
Whatever method of removing old paint or varnish you choose, you cannot skip the next step: the table must be thoroughly cleaned with fine sandpaper.
Then the item is inspected for cracks or holes that need to be repaired with wood putty. The dried composition must be sanded again.
The next mandatory step is applying a primer. This is the only way to be sure that the decorative layer will not fall off over time, and that the varnishes/paints will apply more evenly. After the primer mixture has dried, you can begin decorating.
There are several ways to decorate a coffee table, and we will tell you about them.
Required tools and materials
Before restoring the table, you need to prepare the following:
- sandpaper (with medium grain sizes and fine-grained) or sanding machine;
- small roller and brushes;
- drills and electric drill;
- plane;
- chisel;
- nail puller;
- nails;
- hammer;
- felt-tip pen or marker;
- hacksaw;
- roulette;
- putty;
- primer, paint and varnish;
- glue;
- means for treating wood against pests.
The restoration process may require various materials and tools.
Do not forget about your own safety during operations. To do this, you should prepare special clothing, a respirator, safety glasses and household gloves.
We must not lose sight of various small details that greatly simplify the restoration process.
Decoupage
The name of the technique itself is translated from French découper - “cut”. It consists of attaching (gluing) a cut-out design, ornament, or painting to an object. Then the decorative layer is varnished to ensure the durability of the pattern.
To decorate a table using the decoupage technique, you can use various elements:
- old newspapers, books, music notebooks;
- wallpaper remnants;
- patterns and ornaments cut from disposable paper napkins;
- family photos;
- pictures cut out from magazines;
- pieces of fabric.
The prepared surface of the table is covered with PVA glue and the necessary elements are laid out. Using a rubber roller or plastic spatula, smooth the surface, removing bubbles. After the glue has dried, coat it with several layers of varnish.
You can apply the ornament on top of a painted table, and sand the edges, creating a worn effect. This table will look original in a Provence, country or shabby chic room. But this is only true for wooden furniture.
You can also decorate a coffee table using the decoupage technique by choosing a lace pattern for the tabletop.
Decorating a table with painting
Even if you don’t have any artistic painting skills, your table can still become interesting and original. You can decorate a coffee table with painting using acrylic paints (sold at any art supply store) and a stencil.
When choosing shades and patterns, be guided by the style of the interior. It is not at all necessary to use flowers, monograms and “curls”; you can also refresh the surface with the help of geometric shapes.
You should also immediately decide whether your drawing will have a background, and what kind. Most often, neutral shades are used so that the painting itself does not get lost, but stands out. When the background paint has dried, apply a stencil and apply the pattern with a brush or roller. You can decorate the entire surface or part of it. If necessary, you can use masking tape to protect those areas where you do not plan to apply the pattern. When the paint has dried, you can outline the contours of the design with a thin brush - this step may be necessary in those places where the stencil did not fit tightly and the design has spread.
The painting on top must be protected with several layers of varnish.
Please note: regular acrylic varnish can be used for protection, but parquet varnish will create a more durable coating. However, it smells too much, so it is better to work in the fresh air.
Toning and painting the table
Before finishing, the surface should be treated with primer. Apply the composition to the tabletop and frame.
Restoring lacquered furniture is an excellent way to restore interior items, giving them an attractive appearance.
Stages of table processing:
- Rinse the surface and apply the composition in a thin layer using a spatula.
- After the first layer has dried, apply the next one.
- When all layers have dried, remove any unevenness with sandpaper.
If your problem concerns the darkening of the varnish, then restoring the furniture will also involve erasing the old varnish coating and applying a new one.
You can do all these procedures yourself. After priming, you can begin painting or tinting the surface. Renewal of the base can be done by simple painting with a brush and roller, or the paint can be applied through a stencil or tulle. Next comes the treatment of furniture with wax or varnish. The first provides excellent protection from the effects of adverse environmental factors. The surface is tinted using stain.
Using masking tape, a brush and paints, you can apply various designs to the surface of the table.
In order for the painting to be of high quality, it is important to apply the paint evenly, and after the first layer has dried, go over the base with sandpaper. Reapply paint in a perpendicular direction. All layers of dried paint must be sanded to ensure a smooth surface.
Monitor the application process carefully. After covering the entire surface, the first layer must be thoroughly dried.
It is important to know! The condition when choosing brushes is to pay attention to their quality, since the bristles of a low-quality brush remain on the surface. If places are hard to reach, it is recommended to treat them with a thin brush.
Decorating a coffee table using craquelure technique
Craquelure translated from French craquelure
means a crack in a layer of paint or varnish, giving a special “aged” look to an ordinary thing.
Among designers and decorators, a similar technique is used in conjunction with decoupage in such style directions as shabby chic (shabby chic) and Provence.
To create artificial aging you need 3 compositions:
- paints of two contrasting colors, one of which plays the role of a “substrate”, the second - an aged layer;
- and, in general, a special craquelure varnish applied over the first paint.
Pronounced cracks look very original, but for this you need to choose two contrasting paint colors.
If no painting or other decor is planned on top of the aged paint, then it is better to varnish the dried layer for better preservation.
How to decorate a table with stickers
Surely many of you have seen decorative vinyl stickers in stores intended for interior decoration. But who said that they can only be glued to walls? This method of decoration is the simplest and least expensive in terms of time and finances.
However, if you decide to choose this method, it does not mean that preparing the table surface can be neglected. It will also have to be sanded and primed, and maybe even painted, creating a certain background for the ornament. The selected elements are glued onto a dry and clean surface and carefully smoothed. If necessary, the decorated tabletop can be varnished.
Basic Techniques
There are many ways to decorate your table with your own hands. It may seem difficult, but in reality, all you need is an idea and free time. High-quality table decor requires accuracy, patience, and you don’t have to be an artist to create. There are two main methods of decoration:
- finish the surface itself, mask imperfections in order to completely change the look of the furniture;
- use decorative elements for decoration.
The second method is suitable for those who are satisfied with the quality of the surface and do not want to radically change the design. Table decorations are convenient - you can always easily change them, without wasting effort and time, updating the interior every day. The original decor will look especially beneficial on a coffee table. An interesting tablecloth usually only emphasizes the beauty of the kitchen, but it is better not to overload the workplace with table decorations.
Before decorating a coffee table, you need to assess the condition of the tabletop. The choice of decoration method will depend on this.
Surface decor
Use of decorative elements
Ceramic tile
There are no limits to the imagination of modern designers and a variety of materials are used to achieve a certain goal.
If none of the above methods for decorating a coffee or coffee table suit you, pay attention to the following unusual methods.
You can decorate the surface of any table in an original way using ceramic tiles. The only difficulty is to select the required quantity according to the size of the table. You can decorate it in different ways: lay out an original panel in the center, framed with monochromatic elements, or come up with a geometric pattern (zigzag, checkered pattern, squares, herringbone) - such decor will look original and fresh.
How to decorate a coffee table with ceramic tiles: master class
For work you will need:
- the tile itself or a panel made from it;
- adhesive composition (you can use liquid nails or dilute special tile adhesive);
- spacer elements “crosses” (the smaller they are, the thinner the joints between the tiles will be);
- you can use any grout, but epoxy is more practical and reliable;
- rubber spatula for applying grout;
- notched glue spatula;
- sponge;
- several clean napkins (both wet and dry).
First, decide on the pattern of how you will lay out the tiles: it is better to lay them out on a flat surface so that the pattern on the panel matches. The tiles should be laid the way they will lie on the table.
Then the material needs to be prepared: wipe the tiles from dust with a napkin - the back part should be dry and clean. We hope you have already prepared the surface of the table.
Apply the adhesive composition to the surface of the table with a notched trowel, laying each tile on it, carefully pressing down with your hands so that there are no bumps. Place crosses between the elements. Wipe the adhesive off the face of the tiles as needed.
Please note: you should not apply glue to the entire surface of the table at once, otherwise it will have time to dry by the time you reach the last tiles.
After gluing, leave the table to dry for at least a day.
The next step is to fill the joints with grout. We hope you have chosen the appropriate composition and read the instructions on how to use it. Fill all the seams with a rubber spatula; remove excess with a damp sponge. As you fill, remove all spacer crosses from between the tile joints. If necessary, create seams using either your gloved fingers or a rubber spatula.
Once all the seams are filled, remove excess grout from the face of the tiles with a dry cloth, being careful not to touch the seams. Leave to dry for at least a day. Wet cleaning of the table can be carried out according to the instructions on the grout packaging.
How to choose tables with glass tops?
Regardless of whether you are interested in glass dining tables or you are choosing furniture for the kitchen or living room, it is worth paying attention to their design. A table with a glass top usually has a metal or plastic frame. A glass tabletop is somewhat less often combined with wood, but such configurations do exist.
It is worth paying attention to the weight of the entire piece of furniture. In some solutions, for example, heavy glass kitchen tables will be better if you need very high strength and stability.
Otherwise, lower weight may be more desirable. In this case, light, small glass tables for the kitchen, dining room or living room are much better suited. Another important feature concerns the glass itself. When purchasing a table, the glass top should be made of tempered glass , which guarantees safety during its use.
Popular colors that modern glass tables can have are mainly black, white, various shades of gray and brown. Of course, there are other colors, such as red or even blue, in both muted and rich variations. Therefore, when shopping for modern glass tables, you can easily find something for yourself.
The undeniable advantage of a table with a glass top is its original appearance. Regardless of which model you choose, it will be a great addition to the interior in which you place it. If you choose a designer glass table, you will get a great decoration for your room.
POPULAR QUESTION: CAN I WASH A GLASS TABLE WITH DISHING LIQUID?
Our grandmothers and mothers use dishwashing detergent on almost any surface. You might even think that these inconspicuous bottles hide a mysterious superpower that is a weapon in the fight against all types of dirt. As furniture specialists, we professionally debunk such myths - and this time we have something to say about the already legendary dishwashing liquid.
Advertising producers readily convince us that the most effective liquid is one containing alcohol. Yes, it is the one that removes stubborn greasy stains the fastest. The problem is that it evaporates just as leaving unsightly streaks and a rainbow effect.
However, this does not mean that we write off all dishwashing detergents. The composition should not contain alcohol , but a good cloth, preferably microfiber, is also necessary. With these two things (or maybe three - let's add patience), you will bring your glass table to aesthetic perfection, which even the most ideal housewife would not be ashamed of.
A more natural alternative to dishwashing liquid is a 4:1 solution of mild vinegar (assuming you can smell a slight odor): four units of water uses one unit of vinegar.
Decorating a coffee table with mosaics
Mosaic is a universal element for decoration; it decorates not only aprons in the kitchen or niches in the bathroom, but also mirrors, panels and furniture. The only difficulty is correctly calculating the size and number of necessary elements for the table area.
The decorating process consists of gluing mosaics in the desired order, forming a pattern, ornament or some simple picture. Modern mosaics are usually sold on a grid, but if necessary they can be easily cut with scissors into the required pieces. Moreover, the mosaic elements themselves can have different sizes and shapes. As for the material from which mosaics can be used, there is no limit to the variety: wood, glass, ceramics, metal, and plastic. Tables decorated with shards of old ceramic tiles look very original.
For gluing, you can use any suitable glue, applying it with a notched spatula to the prepared surface of the table. After the mosaic elements have dried, the seams are also filled with grout (it is better to use epoxy). Clean the surface with a damp cloth.
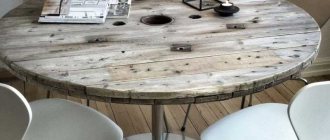
Coffee table made from pallets
A table made from pallets is the fastest way to make it. The pallet itself is already a prefabricated structure. You can make a simple table from one or more pallets stacked on top of each other and secured together.
The structure is painted in any color acceptable for the interior, and furniture wheels with a diameter of 100-150 mm are installed on the bottom. It turns out to be an original mobile table for the living room.
Mirrors
Mirrors have always added mystery and expansion to a home. Reflective surfaces, whether on the wall or on furniture, always increase space and are appropriate in the smallest rooms. Well, by decorating a coffee table with a mirror, you can get an unusual piece of not just furniture, but decor. You can use either the whole canvas or its small pieces. A mirror mosaic or a “broken” mirror looks original, refracting more light. To get small pieces, the mirror cloth can be placed between two wet wipes and lightly tapped with a hammer - this will prevent the fragments from scattering to the sides.
Most often, only the table base is decorated with a mirror, but you can go even further and decorate the legs of the table by ordering a mirror of the required size in the workshop:
Please note: to fix the mirrors, you must use a special glue that does not damage the back part - the amalgam.
Well, the legs can be easily repainted in the desired color.
Advantages of glass tables:
- The glass tabletop is transparent and very suitable for modest-sized rooms. If you don't have a lot of space to create a dining area in the living room or even the kitchen, the transparency of glass will help maintain an airy atmosphere. In addition, glass reflects light well, and this detail helps create the desired bright atmosphere.
- A glass table adds extra sophistication to the interior and can be integrated into any interior, except a rustic one. You can also choose a glass table in the kitchen, not only in the living room, but only if you are used to spending a little time on cooking. Let's face it, a glass countertop in a room where a lot of hot or cold containers are handled and where heavier objects occasionally fall onto the table is not the best choice.
- Tempered glass does not scratch, and can only be broken by very strong mechanical blows. But even in this case, it will break not into small, but into large pieces.
- Glass is a non-porous material that is easy to clean and does not require special care. However, in order for the glass tabletop to maintain its impeccable appearance, you need to wipe it with a damp cloth almost daily. Don't forget about hot food holders, although tempered glass can withstand high temperatures, it's a good idea to protect it with a food prep cloth.
- Reflecting and amplifying light, both natural and artificial, a glass table is a practical solution for interiors that have little light, rooms with small windows, located on the ground floor or facing north.
- Glass can be combined with different types of contrasting materials, from solid wood to leather and steel. The benefit of contrast is that it makes each of the elements used stand out and the effect is interesting and attractive.
- There are frosted, colored, patterned or plain glass with plenty of options to choose from. Opaque glass visually increases the space due to reflected light.
Glass
There are several ways to use glass to decorate a coffee table.
- Option 1: using glass with photo printing. Glass with an applied ornament or photo printing is simply glued to the base, and the legs can be painted in any color. Frosted glass with ornaments will be original.
- Option 2: bars are attached around the perimeter of the tabletop, on which the glass is laid. Any items for decoration are placed under it: colored sand, buttons, beads, shells, pebbles, memorable items. It is better to attach glass to the bars, but for this you need to make holes in it (it is better to order glass where they can do this).
- Option 3: very thick glass is used, simply placed on the tabletop, and photographs, compositions of dry leaves, fabric or paper are placed under it. Since the material is very heavy, there is no need to fasten it; with its weight it will tightly press all the elements.
You can decorate the glass with your own hands: on the back side (the one that will lie on the table) any design is applied through a stencil. This move is relevant if your table has a glass top, but you want to update its appearance. You should choose colors that contrast with the table; you can use both stained glass and acrylic paints - they are more resistant to moisture and safe, since they do not emit toxic substances into the air.
Seasonal decoration
The design of the coffee table can be adjusted according to the season. Seasonal decor creates a mood and creates a current atmosphere.
In November-December, you can replace the bouquet in a vase with a composition of fir branches. Place decorative balls in a vase that was previously empty. Add candles. The surroundings of the winter holidays will envelop you with a joyful feeling.
New Year and Christmas are behind us - we are changing the design to a universal one. Spring has come - we buy tulips and add a bird figurine. Before Easter, we include a vase with multi-colored dragees into the decorative base. And so on throughout the year.
Changing the filling is not difficult at all. This may take a few minutes. But the sofa area will always delight and inspire.
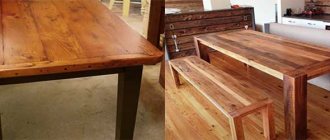
Decorating a table with wood
As strange as it may sound, any table, even a wooden one, can be further decorated with the same wood. However, this requires some work skill (the ability to cut it to size). Or order a cut at a workshop.
To turn a regular old coffee table into a fashionable one with a wooden top, you need to:
- Take all measurements: for correct cutting you need to know the width and length of the tabletop.
- Cut (can be done in production) wooden lining or ordinary beams, clean if necessary.
- Cover with stain or varnish of the desired color. In the meantime, prepare the table itself: clean it and coat it with primer.
- Using liquid nails or any glue intended for wood, glue the planks to the table, place a weight or secure with clamps.
- If necessary, seal the seams between the planks (you can use epoxy grout or a sealant of a matching color).
Another way to decorate a coffee table is to stick wood cuts on the tabletop - such a decoration looks original and unusual. The space between them is filled with epoxy resin. By the way, they can also be placed under glass.
Another way to give an old table base the texture and color of wood is veneering . But for this you will need sheets of natural wood veneer (not all construction centers have them). Such sheets are mounted on a prepared tabletop using PVA glue and smoothed with a hot iron through sheets of white paper.
Thus, using different shades of wood veneer, you can lay out a pattern or ornament. If desired, the surface is varnished for protection.
Please note: during the process of gluing veneer, air bubbles may form, which must be removed immediately: just pierce the problem area with a needle and “blow off” the air, then go through it again with a hot iron.
If you don’t have the opportunity or desire to tinker with natural wood, you can go a very simple route, but your table won’t last long: go and buy a self-adhesive PVC film “like wood.”
Location rules
To create a beautiful composition, you need to remember the basic principles. Three items are the best option for decorating any table. And for the composition to look harmonious, you need to comply with at least two out of three points:
- different size;
- different shape;
- different colour.
For example, you can put three round pots with fresh flowers on your desk if their colors are different and the plants themselves are different sizes. Decorative candles of various shapes and parameters, but of the same shade, are also suitable. It happens that there are more than three items for decoration, but even in this case the rule works. To do this, you need to apply it twice: first, dividing it into equal groups based on one characteristic, and then forming a composition in each of them.
Table decor also depends on the season. For example, bouquets of yellowed branches and autumn berries are suitable in the fall, and willow branches in the spring. In winter, compositions made from candles, pine cones and Christmas tree branches look great. And fruit bouquets are ideal for decorating a coffee table in the summer.
To decorate a long table, you can use several different groups of decor. Identical or alternating vases with flowers at equal distances from each other will also look beautiful. And if you combine them with fruits or nuts, the decor will also be practical.
The size of the tablecloth decorating the dining or coffee table should be such that it covers not only the surface, but also hangs from the sides by at least 15-20 cm. Thus, for furniture with dimensions of 60 x 110 cm, the textiles should be approximately 90 x 140 cm This algorithm is also suitable for a square table. An oval tablecloth can be used for both oval and rectangular pieces of furniture; and round - for square and round. This also works in reverse.
It should be remembered that the composition must be complete from all visible sides, harmoniously combined with the overall interior of the room. It is important to maintain proportions. On a massive table, figures that are too small will simply get lost. Also, voluminous decorations on a small tabletop would not be appropriate. All elements must be combined with each other in color and texture. The maximum height of the composition may vary depending on the size of the tabletop and location. In the center or in the corner near the wall, you can place long elements (but no more than 35 cm), but if the decor is located along the edges, then the height should be no more than 10-15 cm.
Autumn table decor
Willow branches for table decoration
Composition of pine cones and Christmas tree branches
Textile tablecloth for the dining table
Decorating a round kitchen table
Decorating a coffee table with coins: master class
How to beautifully decorate an old coffee table at the lowest cost? Use coins! A very original decor will give a boring piece of furniture an updated and unusual look.
To work you will need:
- a lot of old (or not so old) coins, preferably of the same shade;
- liquid nails or any other strong adhesive (for example, “dragon” or “titanium”);
- baguette for pictures or ceiling plinth (for a frame around the decor);
- notched spatula;
- epoxy resin.
The first step is to carry out all the manipulations with the table: remove the old paintwork, sand and prime it. If desired, coat with paint of the desired shade.
Then we cut the baguette so as to lay it around the perimeter (saw at an angle of 45 degrees). If you can’t do it yourself, you can order a ready-made “frame” from a framing workshop. We mount our edges to the table - they will not allow the epoxy to spill over the edge of the table, we fix them with clamps until the glue dries. If necessary, we paint it the same color as the table itself (but you can leave it in a contrasting color).
Before fixing the coins, it is advisable to arrange them in the way they will be glued, so that they can be rearranged if there is empty space. We glue the coins to the tabletop with liquid nails, starting work from the edge. Let the glue dry.
The next step is to use epoxy resin or glaze. We will not recommend any specific brand; any hardware store will tell you what is available and for what purpose it is intended. We dilute the solution according to the instructions and fill the entire surface of the table. Using a notched trowel, spread the resin over the entire surface. Small bubbles may form during the process, you can leave them or try to blow on them to make them disappear.
Please note: the room in which you work with epoxy must be well ventilated, or you can move the table outside.
We leave our table to dry. An unusual piece of furniture is ready!
Magazine made from old wooden beams
- 1. To make a table from old wooden beams, you will need 2 beams of the same height.
- 2. Closer to the upper end of each beam, a 5 mm thick slot is made on one of the four sides.
- 3. Then the glass tabletop is selected. This could be glass from an old frame or a small rectangular mirror.
- 4. Afterwards, the glass surface is inserted into the slots made on the beams.
And the table is ready! This table will perfectly decorate a country house.