Types of shelves in the house
Depending on the installation location, shelves can be wall-mounted, floor-mounted or hanging. If the floor shelf has a large height - from a meter and above, it is often called a rack. A few words about hanging ones: usually these are decorative structures that hang on a pipe or a specially driven bracket. This option is popular in rooms where heating pipes run under the ceiling: they just beg to have something hung on them. Shelves are hung on the pipe in the kitchen and bathroom: it’s convenient there.
These hanging kitchen shelves are convenient and functional. You can use the same pipe to make a story made by yourself.
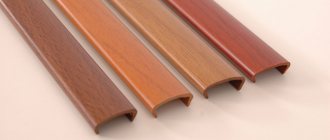
They are made of wood, plywood, laminated chipboard, fiberboard, and there are glass shelves. The same materials are used as stands, but they are also made from metal, plastic and other absolutely incredible things - for example, pipes or bottles.
In living rooms, it is not so important what material the shelf is made of. It is important that its design is in the same style as the interior. Even functionality is not always important: some play a purely decorative role. If they have anything on them, it’s only one or two items. Their role is to give the interior of the home a special style and flavor.
If we talk about shelves in technical rooms - the kitchen and bathroom, in particular, then in addition to aesthetic considerations, practicality requirements are almost universally added. Even decorative shelves in the kitchen should be washed well. For bathroom shelves, the requirements are generally high: periodically there is very high humidity and materials are required that can withstand it without any harm. There aren't many of them. These are plastic and stainless steel. They also make bathroom shelves from MDF, but they can be used normally if there is good ventilation in the bathroom.
How to make a rack with your own hands
- 1 Development of drawings
- 2 We make the base of the structure
- 3 Install the box and shelves
- 4 We are approaching the finish line. Attaching the front panels
- 5 Photos
Do you need to organize your personal belongings? Don't have a specific place to store them? Then you need a shelving unit. This is the simplest and most practical way to solve this problem. The rack will be useful not only in the pantry, as many believe. Its use is practical in the garage, in the library, in the office, and even in living rooms. In order to make a rack, you don’t need superpowers, and you don’t need special tools either. If your funds are limited, then you can make a shelving unit from materials that you have at home.
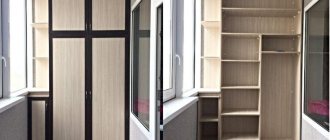
Shelves on the wall
In any room there are places on the wall where you just need to hang something. After all, most modern furniture occupies only the lower part - sofas, tables, couches. The upper part remains empty and dissonance arises: the lower part of the room is overloaded and the upper part is half empty or completely empty. These voids on the walls are organically filled with shelves.
The whole system, and the most “dead” space is used - the corner
Structurally, most shelves consist of the actual shelves and lintels. But these components are combined into so many options that it is impossible to count. A simple design is good: you can make any shelves with your own hands. Moreover, these products may be the first self-made things. It's really simple.
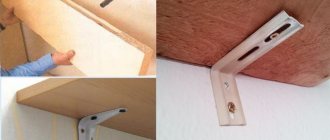
How and what to attach it to
It’s not for nothing that we start with fasteners. The design of a wall shelf largely depends on the type of mounting. Or maybe it’s the other way around. It depends on what to dance from...
Traditional hinges
Traditional hinges for hanging shelves
There is a traditional way - on loops. It is suitable for wood and fiberboard, any other material that is thick enough to attach. Screwed onto the sides with self-tapping screws. Then the distance between the centers of the loop holes is measured and marked on the wall (make sure it is horizontal). At the marked points, holes are drilled for the dowel, the dowel is inserted and a dowel-nail with a small head is screwed into it, which fits into a loop or bracket (a pin slightly bent upward). Then a shelf is hung on them.
Not all materials can be drilled. For example, glass shelves. You definitely can't screw anything into them. Fastenings for glass shelves are special: they consist of two parts, between which glass is inserted. Often elastic pads are installed between the holders. The bottom mount usually has a small clamping screw to secure it in place.
Fasteners for glass shelves
The most popular mount for glass shelves is called “pelican” - for its unique shape. It looks good on its own and is available in different colors. The thickness of glass that it can hold is from 8 to 34 mm. You can insert not only glass into it, but also any other material of such thickness. It just looks stylish with glass.
It’s easy to make glass shelves on the wall with it: you buy a mount, order pieces of glass with processed edges of the required size and shape from a glass workshop (or cut them yourself, if you know how). All that remains is the assembly itself:
- Attach the pelicans to the wall. Two dowels each. The case is collapsible - the decorative trim is removed, and there are two holes in the mounting plate. One is higher in the body, the second is lower. We secured it and put the decorative trim in place.
- Glass was installed.
- Tightened the screw. All.
Marking and drilling
.
All holes on the front side are drilled with a Ø7mm drill. All holes on the end side are drilled with a Ø5mm drill.
On our shelf blank, we retreat 8 mm from the rear edge, 40 mm from the side. On the other side, the marking is done in the same way. (Drill Ø7mm.)
After marking and drilling, the holes can be countersinked (Fig. 9) (so that when assembling the product, the Euroscrew head is neatly hidden).
(Fig.9)
Marking and drilling (drill Ø5mm) on the side is done from the unpasted end (Fig. 10), the distance from the edge should be 38mm, i.e. after assembly, the shelf (Fig. 11, part No. 1) should protrude in width beyond the side (Fig. 11, part No. 2) by the thickness of the edge on each side. (Fig. 11), (Fig. 12)
(Fig. 10)
(Fig. 11)
(Fig. 12)
After assembling our parts, all that remains is to drill a couple of holes in the side (for the self-tapping screws with which the shelf will be attached to the wall) (Fig. 13), read further on the kitchen website. See useful articles on how to choose the right kitchens to order, how to replace facades and update furniture, how to improve kitchen and living interiors.
.
(Fig. 13)
Now you can attach the shelf to the place you need (Fig. 14) and use it for its intended purpose (Fig. 15).
(Fig. 14)
(Fig. 15)
- home
- About the interior
- DIY furniture for the kitchen and home
- How to quickly make a durable chipboard shelf with your own hands
→
→
→
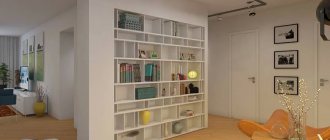
Bookshelves
There are strength requirements for bookshelves: they can hold significant weight. Therefore, the fastening, materials and design must be reliable. Traditionally, bookshelves are made of wood, laminated or veneered fiberboard. And then fiberboard with a long span (more than 90 cm) sag over the years.
When planning shelves for books on the walls according to your own dimensions, keep in mind that the distance between the supports should not be more than 90 cm. Then even when fully loaded it will not bend. There are two types and varieties of shelves: wall-mounted and floor-mounted. Both of them can be angular.
In the simplest case, it is a board secured in one of the following ways. Some options, especially when presented correctly, look very good.
The simplest design of a shelf at the bottom of a wall for books (a secret fastening is used)
And with imagination, several planks turn into a very interesting thing, which can even be the main element of decor. Ideas for DIY are collected in the photo gallery.
Floor bookshelves can be loaded more seriously. Here the forms are different: there are racks to which shelves are attached. The highlight can be a broken or unusual line of shelves, as well as interesting racks.
Read about the manufacture of fountains (both small indoor ones and more substantial ones for a country house, personal garden or garden plot) here.
Making shelf sidewalls
Let's make the sides of our shelf. On the existing sections of laminated chipboard you need to mark the contours of the shaped parts.
This is easier to do with an improvised compass.
You should start bending not from an arc, but from a flat area of 30–100 mm, otherwise there is a risk of getting an untidy joint when gluing the edge.
Two identical parts can be cut along the same contour by fastening two sheets of chipboard with clamps.
The inner post does not have a top protrusion; it is slightly shorter than the outer one.
Even when using a high-quality file and jigsaw, unsightly chips like these may appear on the edge.
You can get rid of them by sanding the ends with a sanding machine with a sanding belt of K80 or K100 grit.
After sanding the edge looks like this.
To the nursery
While the child is very small, I want functional shelves, but with children's drawings. But where can you get these? Do it yourself. Any shelf of the configuration you like can be covered with non-woven wallpaper or thick wrapping paper (glued with PVA). After drying, coat twice with water-based varnish. Such shelves can be washed, but what’s most interesting is that the shelf can change with the child. You tear off the old decor, glue on the new one. The idea is simple, it works perfectly.
Here's what can happen
For children, the shelves are not very different in design. If we talk about floor or shelving, then they must be strong, taking into account the fact that older children will definitely want to climb on them. Therefore, often even those shelves that stand on the floor are additionally attached to the wall: so that they do not collapse and crush young climbers. Based on these considerations, they are not made tall: even if they fall, it’s not scary.
The shelves in the children's room also differ in color - they are brighter, can be made in the form of letters, and boxes for toys can be installed in them: this makes it easier to keep them in order. In general, functionality and security must be combined.
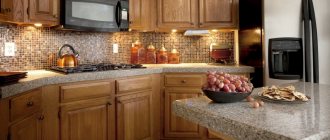
Shelves and shelves for the kitchen
Say what you like, but in the kitchen the main thing is functionality. There is not much free space even on the walls: the cabinets take up a large area. Therefore, one of the tasks is to make the most of free space. There are interesting ideas for small or even very small gaps between the wall and the refrigerator or other household appliances. Strictly in size, you can make a pokka on wheels, which can be pulled out and completely hidden there. It is wide and narrow (see photo).
It’s easy to make such a retractable shelf-rack on wheels for different jars. Everything you need is at hand and out of the way
There are also interesting ideas for saving space. If the sink or station is located near the window, you can take the sides. There is an interesting hanging option - a grid on chains to which all sorts of utensils are attached. But such a shelf is possible if the desktop is not against the wall. Another option for saving space is if the kitchen-dining room is zoned with a counter, you can also make a shelf above it, which will be partially hanging. One part of it rests on the wall, the second on the counter or “hangs” on the ceiling.
Covering the entire wall above your desk with cabinets is not the best solution. They look heavy. The problem can be solved by using glass doors, but not everyone likes this. The solution is to make open shelves between the cabinets. They will add more lightness to the interior and the work area will not put so much pressure on the rest of the space.
Installing the box and shelves
Rack assembly diagram
At this stage, the rack can be sheathed with pre-prepared chipboard or MDF boards, which should be attached to the beams - below, above and on the sides. The result of the work will be a finished box without a back wall. But, if you have a desire, then you can make a design with a back wall, here you can be guided by your own wishes or the purposes of using the rack. In general, the simplest design can consist only of beams and shelves. The bars and shelves can be painted.
With a standard room height, it is most practical to install 6 transverse shelves. You can determine their height yourself. Recently, racks with asymmetrical shelves have become popular. The middle shelf is subject to the greatest loads, so it must be especially strong. To better secure the shelves, you need to use metal corners.
Another important detail: the thickness of the shelves should be 4-6 mm less than the length of the self-tapping screw with which the shelf and the bar are connected to each other.
The design will withstand even heavy loads if the corners are securely fixed. For best results, it is important to check the level of each shelf before finally fixing it. Corner connections must be strictly at an angle of 90ᴼ.
Decorative and original
Often, shelves on the wall play a purely decorative role. They are designed to attract attention and this goal is achieved by an unusual shape, contrasting with the walls and color. You can’t bet much on it: one or two things, but how interesting they are.
Another interesting topic is glass shelves. Just one glass is not very interesting. Its combination with wood and steel is more attractive. The effects are sometimes unexpected. Glass is assembled on guides: the material is fragile and heavy, and it needs to be held. Steel can do this.
An interesting glass option. You can arbitrarily change the height between tiers
In fact, these systems are intended for creating store interiors, but they also look stylish in an apartment in a modern or loft style.
Also suitable for vintage style
What are shelves made of? Even from pipes. Metal and plastic. Do you have any samples left from the renovation? Put it to work and get a designer item, interestingly, assembled from trash.
There are examples that simply amaze you. Well, how could you come up with this?
Original options for shelving structures
Anyone who believes that a rack is a rough frame with shelves is deeply mistaken. Indeed, for the basement and garage you don’t have to imagine too much. Strength, durability and functionality are the main slogans for these premises.
For the home interior, on the contrary, I want to do something special and non-trivial. Therefore, home-made masters spare no time and effort to capture our imagination. A couple of oak boards and a few glass bottles are all that is needed to create an original design.
Despite its simplicity, the strength of such a rack is quite high. You can store not only books on it, but also use it to display your wine collection.
Anyone who has dealt with high shelf structures knows that without a good ladder it is impossible to reach their upper tier. Why not use shelves as steps - a resourceful person thought and created such an original system.
The classic frame shelving rests on the floor, and to install the rope shelving you only need two hooks in the wall. Of course, it won’t be possible to store heavy cans of preserved food on it, but it is perfect for books, photographs and souvenirs.
You can make a rack with your own hands so that others will appreciate your creative nature using steel water pipes and fittings. This design looks perfect in an industrial-style interior. In addition, it is quite appropriate in an ordinary apartment.
Pay attention to the original way of mounting the shelves. They are mounted on racks according to the principle of a children's “pyramid”, tier by tier.
This rack does not have rear support posts. The high rigidity of a steel pipe reinforced with tees makes it possible to eliminate them. This design can be placed anywhere: in an apartment, on the veranda, in the attic or cellar.
If your house has a staircase leading to the second floor, then the free space under it can be adapted for shelving. It will turn out functional and beautiful, as in photo No. 5.
Having studied the original homemade options, we will consider the sequence of design and assembly of wooden and metal shelving.
Shelf drawings
Basically, the designs are simple: you look at it and have a rough idea of how it should be done. For those who want to make shelves with their own hands, here are a few drawings. Having them on hand, you can easily make the required changes in size. Just remember that from fiberboard with a thickness of 16-18 mm, the span between the supports should be no more than a meter, or better yet, 90 cm. Otherwise, there will be a deflection. The situation is approximately the same with plywood.
The only thing that may be unclear is how to assemble some nodes. Let us explain with one diagram; the rest of the assembly is similar. All connections are made at the corners. To make the structure reliable, the shelves are cut out intact, and jumpers are attached to them at the corners.
All these connections are made at the corners
The corners are installed from below, two for each connection on the right and left. They are made from metal or plastic. If the load is planned to be significant, install metal; if the shelves are decorative, you can use furniture made of plastic.
Some types of corners
Now you can make your favorite wall shelves with your own hands (and floor ones too).
“>
List of tools!
We will need:
- Sander (belt)
- jigsaw
- drill
- square
- drills (5mm and 7mm)
- countersink
- knife
- hex key
To make a shelf, we must prepare parts for this shelf (Fig. 2). I sawed them off in advance. Choose the shelf size yourself. The height of the side (thin part) must be at least 50mm, and the length depends on the size of the shelf.
(Fig.2)
If the ends of the product are covered with melamine edge, then the side can be made the same length as the shelf. If the ends of the product will be covered with PVC edges, then the side should be 4 mm shorter than the shelf. (Fig. 3) If the ends of the product will be covered with edging, then the side should be made shorter than the shelf by 8mm. (Fig.4)
(Fig.3)
(Fig. 4) When working with PVC edges, first we paste over the short sides of our blanks (Fig. 5), and then, after processing them, the long front side (Fig. 6). (There is no need to paste over the back side).
(Fig.5)
(Fig.6)
Now that all the necessary sides of the workpieces are pasted over (Fig. 7), you can start marking the drill bits.
(Fig.7)