Idea: ironing board built into the closet
An ironing board built into the closet will allow you to avoid cluttering up extra space and will not spoil the interior.
Every home has an ironing board. When folded and disassembled, it is bulky and takes up a lot of space. It is difficult to hide it so that it does not interfere, but at the same time is always at hand. If you live in a small apartment, this can be a serious disadvantage. But even in a large house, a board stored in a visible place does not look aesthetically pleasing. You can attach an ironing device to a free corner, but this is not the best solution. To solve the problem once and for all, we suggest getting acquainted with various ways to store an ironing board built into a closet. In this article, we have selected the best solutions so that you no longer have to look for a place for this item in your apartment.
- Types of built-in ironing boards Ironing cabinet
- Board built into the wardrobe
- Mirror cabinet
- In the dressing room
In the chest of drawers
And this is a real find for connoisseurs of versatility. A chest of drawers with a built-in ironing board is considered a convenient, and even an indispensable piece of furniture for some housewives. You can store things and an iron inside it. Today, manufacturers produce transforming chests of drawers that will fit into any interior style.
Types of built-in ironing boards
Ironing cabinet
Furniture stores sell ready-made kits for making an ironing cabinet. They have everything you need, all that remains is to assemble such a set, following the instructions, and place it so that it fits into the interior of the home. The set includes a rotating mechanism for the doors so that they open both left and right. If you like to craft, then it will not be difficult for you to make the space in your home functional and comfortable. Thanks to the choice of colors and textures, such a cabinet will easily fit into the interior of any room in the house.
Board built into the wardrobe
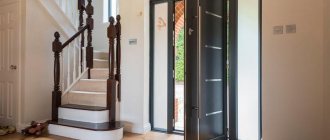
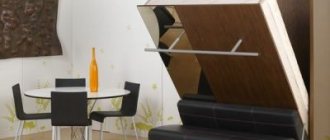
You can also build an ironing board into an existing wardrobe or wardrobe. In this case, the board is attached to the back wall using a special mount, with the help of which the structure can easily be given a vertical position. And after use, with one movement of your hand, return it to its place.
It is better to immediately order a wardrobe option with an ironing board built into it. But even in an existing one, you can free up space for an ironing unit by removing several shelves. If desired, such an installation may contain additional devices, such as closers, thrust bearings (to protect the floor from damage), and blocks of springs that simplify manual work. The big advantage of the ironing board built into the closet is that you can store things prepared for ironing, as well as an iron and steamer, next to it.
To install the ironing board yourself:
- Attach two bars of the same size to the base of the finished ironing board, but with a minimum width of 40 mm and a thickness of 70 mm. They should be located where they are attached to the cabinet. The edges are sawn off.
- Prepare the hinge fasteners and use them to install the board in the desired place.
- It is advisable to install a rotary stop on top for better fixation of the board.
Mirror cabinet
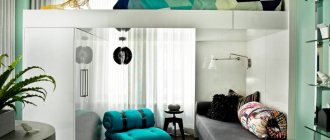
A very original way to hide your ironing board is to put it in a wall cabinet with a mirror. It won’t be difficult to make such a cabinet yourself, showing a little imagination and ingenuity. A folded ironing board usually takes up space no more than 10 centimeters wide. It is enough to attach a timber frame to the wall, hang a door with a mirror surface on its hinges, and attach an ironing board inside such a cabinet. Thus, you will save space in the apartment and create a stylish interior detail. When the door is closed, it is impossible to guess that an ironing structure is hidden behind it.
In the dressing room
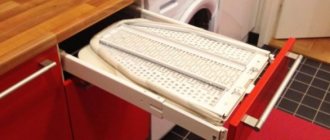
If you have a dressing room, then a pull-out ironing board can be an excellent solution. This compact device will make ironing easier for you. And thanks to the retractable mechanism, you can easily hide it in a chest of drawers or cabinets in a horizontal position. The dimensions of the board will depend on the size of the box in which it will be stored. The retractable ironing board built into the set significantly saves free living space, remains always at hand and does not get in the way. And also such devices can be solid or folded in half, which is an additional space saver.
Board and mirror
Fashionistas will love this option. It will fit harmoniously into the interior of the room, thereby not disrupting the harmony, but rather adding light and space to the room.
Related links: Growing microgreens on the balcony - a useful product with your own hands
The place to store the board should be near an outlet. Make sure that children cannot reach the iron and socket.
Advantages and disadvantages
An ironing board built directly into the closet is a design that will allow you to save not only free space in the house, but also physical effort. It is easy to use - efficient mechanisms easily and quietly pull out the board when you open the cabinet doors, reducing physical activity to a minimum. Such designs are usually reliable and safe.
A negative factor for an ironing board built into a closet can be its overpriced price. But convenience and functionality make such expenses justified. And also the disadvantages include the fact that the process of ironing your clothes will take place all the time in the same place. Therefore, think ahead to make sure you are comfortable. Another important detail is that there should be an electrical outlet near the place where you will have the built-in structure.
If you follow all the recommendations, the ironing board built into the closet will become your indispensable assistant in everyday life.
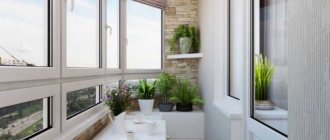
On the balcony
The insulated loggia and balcony can be used as a utility room for drying and ironing clothes. The ironing board can be built into a closet, if you have one, or you can purchase a special design that is attached directly to the wall. On a fairly wide balcony, designers suggest placing the device not lengthwise, but across it: this way it will be more convenient for the hostess or owner to iron the laundry.
Pros and cons of ironing boards built into cabinets and mirrors
In this article I will talk about the ironing board built into the closet and mirror. I will consider the features and characteristics of all types, and give advice on choosing a quality piece of furniture.
- Advantages and disadvantages of built-in ironing boards
- Types and device
- Folding board
- Built into the mirror
- Pull out from cabinet
- How to choose a built-in ironing board
In the closet
Does the room fit a large wardrobe or even a dressing room? The question of storing the board disappears by itself. You can hide the device when folded in a pre-selected compartment, an empty part of a corner cabinet, or hang it on the side wall of the frame. If you are just planning to buy a cabinet, you can order a special internal filling with a built-in ironing board.
Types and device
The design of built-in ironing boards includes three main elements: an ironing surface, a support, and a transformation mechanism. There are two types of work surface folding: folding and retractable.
Folding board
The folding design is equipped with a supporting metal frame, which is attached to one of the shelves or wall of the furniture. A lifting mechanism with vertical guides is attached to the frame, which ensures folding and unfolding. The surface is supported by a metal stand or the supporting frame itself.
The option attached to a shelf requires trimming the upper shelves so that the structure fits without interfering with the door panels. In the closet, folding options can be located in a separate niche. This option is the most convenient, but significantly hides the functional space of the cabinet.
The version with a rotating mechanism can be attached to the outer wall of the cabinet. To unfold the ironing surface, you need to pull the board towards you and turn it around its axis 90 degrees. This option is relevant for saving space in the closet; it is suitable for modular furniture, between the racks of which there is an opening with a minimum width of 8 cm.
Built into the mirror
Manufacturers offer an interesting option - an ironing surface built into the mirror. This is a design in the form of a suspended narrow box with hinged or sliding panels, on the facade of which a mirror panel is fixed.
The board is attached to the wall using brackets, equipped with a support leg and clamps for securing it when not in use.
The ironing board behind the mirror is invisible when folded
The option hidden behind the mirror helps save useful cabinet space. These models decorate the wall well, visually expand the space of the room and play the role of a mirror in the bedroom or hallway.
The facade of a hanging cabinet can be designed in different styles. These options are indispensable when a mirror is not appropriate in the interior. Ironing boards are sold complete with a box; all you have to do is choose a place and securely attach it to the wall.
Folding options are adjustable in height, have magnetic or plastic inserts for fixation when assembled, and are equipped with iron stands, extension cords and sockets.
Pull out from cabinet
This modification is mounted using supporting frames inside the cabinet drawer. The board is equipped with a transformation mechanism that folds, unfolds, and extends the ironing surface. The support for the retractable options is the drawer design.
When folded, the surface dimensions are halved and completely hidden in the drawer. At the same time, there are requirements for the minimum size of the box. It depends on the model - depth from 500 mm, width from 300 mm, height from 130 mm.
Pull-out ironing board takes up the space of just one drawer
Retractable boards can be additionally equipped with rotating mechanisms. The ironing surface can be positioned and fixed at a convenient angle.
Pull-out options are mainly made to order in furniture shops to fit the dimensions of a specific cabinet drawer. This option takes up less space and is much more convenient to use than the folding design. But such models are more expensive.
How to choose a built-in ironing board
When choosing, you need to pay attention to the technical characteristics and quality of parts.
- Transformation mechanism . All parts that bring the board into different positions must have high quality base material and assembly. Aluminum parts have the best qualities.
- Quality of support . Legs and other supporting elements must be stable and light. Aluminum structures have these properties. The supports must be equipped with rubber or plastic tips to protect the floors from damage.
- Weight . When purchasing, you need to take into account the maximum permissible load on the mounting location: shelves, cabinet walls, room wall material. If the weight of the structure exceeds the permissible load parameters, the support will quickly break.
- Ironing surface . Plywood and chipboard bases will not last long. The cover should be heat-resistant and waterproof, and easy to remove for washing.
- Additional functions . A board equipped with a socket, extension, height adjuster, and rotating mechanisms facilitates the ironing process.
Be sure to pay attention to the manufacturer. The models “HAFELE” and “BELSI” have proven themselves well.
Crate model Asko HI1152W
Folding version of Hafele Ironfix
An ironing board built into the furniture greatly facilitates the ironing process and eliminates the need to search for storage space. With proper use and selection of a high-quality model, it will last for many years.
Drawer
This is another very convenient option for storing your ironing board. Many manufacturers of wardrobes and chests of drawers have begun to use such a function as a retractable ironing station when planning the filling of furniture. Thanks to this, after ironing things, you can put them on closet shelves or in dresser drawers without leaving the board.
Related links: Choosing a modular picture for the living room
One conclusion can be drawn - you can always place a necessary thing in everyday life correctly in your interior, find several ways to use it and add a useful set of options to everyday items.
Built-in ironing board: what types are there, which mechanism to choose
- Mechanisms
- Folding
- Retractable
- Built-in cabinet
- Advantages and disadvantages
- Recommendations for selection
Hi all! Many of you are very familiar with the problem of small apartments. Because of this, we have to look for more rational solutions in terms of furniture and equipment of the house, choose transformable elements, etc. All this for the sake of saving space.
One such solution is a built-in ironing board. Everyone needs to iron things, but doing it on the kitchen table or coffee table is completely inconvenient. In order not to take up space with a classic board, a built-in structure comes to the aid of a practical person.
I will try to tell you what they are, what mechanism is used, their strengths and weaknesses. Plus I’ll give you some useful tips on choosing built-in ironing boards.
You take an active part in the discussion, express your own opinion and share your personal experience in using such solutions.
Ironing board dimensions
Every person always enjoys wearing well-ironed clothes. Almost all materials need to be ironed. If this is not done, natural fabrics quickly turn into a “crumpled rag”. It is very inconvenient to iron on the table. This procedure does not cause much delight among household members. Therefore, every housewife strives to purchase a special ironing board with suitable sizes.
The modern market offers a large number of such products for sale, differing in their design. The most popular model is a folding board with a metal stand on which you can place the iron while ironing.
Mechanisms
Let's start with what mechanism is used to embed a board into a wall, into a chest of drawers or into a closet, for example.
Built-in boards, which you can make with your own hands if you really want, are divided into 3 variations of execution, depending on the mechanisms used:
- folding;
- retractable;
- built into the closet.
It is also worth noting that there is a board built into the mirror. But the principle of operation of the mechanism is the same, therefore it can be classified as a retractable model.
If you are interested in a retractable rotating or folding model, you should immediately turn your attention to quality products. Cheap boards definitely won’t last long.
Among the popular ironers, I would highlight the following:
- Rocket;
- Hafele;
- Pelly Golf;
- Belsi Iron Compact;
- Shelf On, etc.
Go to any IKEA store or other furniture markets, of which Moscow, St. Petersburg and the same Novosibirsk offer in huge quantities, and you will definitely find decent offers from really good manufacturers.
But it seems to me that simply listing the types of mechanisms is not enough. You should familiarize yourself with them in more detail.
Folding
This is the simplest mechanism. A metal-based frame is used here, to which the tabletop is fixed and mounted on the wall. A door or panel is placed on top. The decorative panel is usually a mirror, a picture or some other decor.
If you want to get a reliable and stable structure, pay attention to the strength of the support. Using thin-walled plywood, it will not be able to hold the board structure for a long time. It is optimal to use a support with dimensions of about 1750x480 mm.
The advantage of folding built-in boards is that they are quickly and easily transformed.
Retractable
They are available in the appropriate furniture workshops, or they are made by hand.
Drawers in chests of drawers and cabinets are often used as sliding mechanisms. Here you need a board that will fold like a book, that is, a widow.
The wide element is mounted inside the box. After use, the ironer can be returned to its place in just one movement. The size of the board is limited by the dimensions of the chest of drawers.
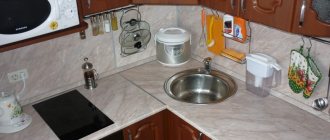
Occasionally you can find retractable built-in boards for the kitchen. But this is not the most practical option, since not everyone is comfortable ironing there. Whether to buy a smoothing iron for the kitchen or not is up to each individual.
Built-in cabinet
Still, the most popular and relevant option can be considered a board in a closet. Such designs significantly save space.
I strongly recommend that you consider the issue of having a board in the compartment when ordering furniture. Since it will be problematic to install a board in a ready-made compartment.
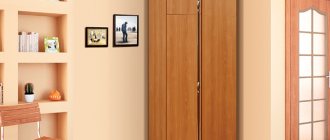
The advantage is that you can use almost any door to install the board. The ironer will not take up much space inside the cabinet itself. Assembled width only. And this is usually no more than 10-15 cm.
It is only important to provide sufficiently thick and strong walls so that they can withstand the load from the built-in structure. First, the support is mounted on the door, and then the ironing surface itself.
Behind the mirror
Such designs reliably disguise the ironing device and do not spoil the appearance of the room. The main advantage of a board built into a mirror is convenience. It easily unfolds and hides after use. You can order a ready-made piece of furniture or make it yourself.
Advantages and disadvantages
Almost everyone has their strengths and weaknesses. You shouldn’t choose built-in irons just because you liked them from the photo. First, evaluate their actual characteristics. It is possible that you will decide to buy a classic board that will be stored somewhere in a chest of drawers.
Among the undeniable advantages of built-in ironing boards are the following:
- high level of practicality;
- space saving;
- quick folding;
- convenient storage;
- ease of operation;
- the ability to easily fit into any design;
- invisible when folded;
- variety of designs;
- a large assortment.
But don't rush to conclusions.
There are several disadvantages to the situation with built-in ironing boards, regardless of the mechanism used. They appear as follows:
- Cheap designs are made from low-quality materials, which leads to short service life;
- The design is more complex than in a regular board, and therefore the likelihood of breakdowns is higher;
- Quite a big price. Not everyone will want to buy such a solution based on savings.
You decide. But for myself I made one simple conclusion. If you correctly and in advance provide the same wardrobe with a built-in ironing board, and at the same time order a high-quality design, these costs will be fully justified.
As a parent, I realized how every little thing makes a difference when you have kids running around the house. Having caught on the ironing board several times and received corresponding injuries, it was decided to get rid of the old ironing board. Instead, I used a built-in mechanism in the closet.
- no one clings to the board;
- it does not spoil the appearance of the room;
- the board does not take up extra space in the closet;
- When needed, the board is at your disposal.
Of course, the children found other interior elements to bump into. Therefore, here you have to think further about how to solve a new problem.
But the fact is that built-in irons have much more advantages. And the shortcomings are extremely conditional. If you don't save money, the money spent will be completely worth it.
Recommendations for selection
When you decide to buy yourself a built-in ironer, pay attention to its design. It is not so important where exactly it will be built. Let's look at the main criteria for choosing the board itself with all the components.
- Folding mechanism. Maximum reliability. This is the main requirement. Look at the material. If the board looks flimsy already on display, don’t buy it. Otherwise, you will be disappointed or simply throw it away soon;
- Support. Maximum quality. When the support does not have strong mechanisms that allow it to be fixed to the surface of the wall or box, the structure will easily fall out of the cabinet;
- Weight. Look for a middle ground. Too light ones will not last long, and heavy ones have a strong impact on the cabinet walls. They will not withstand such a load;
- Additional functions. Their list depends on the manufacturer. As for me, it’s better to have maximum reliability and a minimum of unnecessary things. But at least the height adjustment function is worth choosing;
- Sustainability. Do not buy structures that become too mobile, wobbly or not stable enough once extended. Otherwise, you may get burned, drop the iron, and experience other unpleasant situations.
How to assemble an ironing board depending on the model
T220p Soffiante is one of the most popular models. This is because it is an element that can be assembled and disassembled, as well as with special properties and functions. In order to assemble this ironing table, you need to lower the board vertically, resting it on the free leg.
Important! This leg should not be either of the two, namely the support for the boiler should be at the top.
Then you need to press the handle while simultaneously pushing the support leg inward. And voila, the device is assembled.
The next most popular model is this. This is also a device with heating and other auxiliary functions. How to collect it? Everything is very simple.
- Unplug the cord from the outlet and carefully roll it up.
- We hide the cord along with the pedal in a place to store them.
- Then you need to pull out the height locks and very carefully lower the board to the floor.
- And the last, final stage, you need to secure the legs in the lock for safe transportation.
Important! The ironing board must be stored in a vertical position with the rounded side of the platform facing down.
And the last most popular model is . Also an electrical device with all the improved features (iron recess, iron hook, etc.). This ironing chair is assembled in the same way as the model presented above. It is very light and easy to assemble and unfold, but it lacks the function of fixing when folded. The whole point is to bring the ironing tool into a vertical position and pull out the clamps, or you just need to move the leg to the side, freeing it from the stop, and carefully fold the ironer.
How to make a built-in ironing board yourself
There are several options for installing an ironing board. Before choosing a niche for installation, select the type of product. Comfort of use also depends on this.
- From the closet. Ready-made models are used. A good plus is that there are no costs for additional shelves, partitions and other cabinet elements.
- Retractable system. Used in kitchen sets, wardrobes and simple chests of drawers. The main elements are guides. The size of the board is equal to the size of the box. This parameter is increased by folding the headset in half. The advantage of the system is its compactness.
- Folding board in the wall. The structure also includes a frame built into the wall and a footrest. The size depends on the room and preference. This is one of the popular installation options.
Important! The wardrobe is durable and comfortable furniture for this design. But before installation, carefully inspect the wall to which the entire structure will be attached. If the back wall is in poor condition, a board with a heavy load may tear the wall and fall.
On the door
Placing an ironing board on the door is a great solution to keep it out of sight. Attach special fasteners to the door, with which the folding board will then be secured. It is easy to get it at any time and use it in everyday life. But you need to use the door carefully and not slam it with all your might. For structural strength so that the ironing board does not rattle when the door opens or closes, add additional fasteners. The advantages of this design:
- The board is hidden from view.
- Doesn't take up extra space.
- Quick access to the board.
Related links: Arrangement of a children's room for a boy
The only drawback is that you need to control yourself when you open or close the doors. But by taking care of reliable fastenings, you can be confident in the safety of the structure.
Required materials and tools
To make a folding ironing board from a wall, cabinet or other element (mirror-shaped designs are often used), not many elements are needed.
- Plywood or other material for the entire frame, more than 12 mm thick.
- Tightening material, staples.
- Flange.
- Sawn chrome tubes.
- Washers for joker pipe or bolts for upholstered furniture. The second option is better, because without manipulation it completely disappears in the frame.
- Guides.
- A bolt with a hat turned on a grinder or a long block for fastening to the guides.
- Handles for guides.
- Cut bolt.
- The plate to which the fixation lock will cling.
The tools you will need are a screwdriver, a mallet, a grinder, a hexagon, a pencil, a meter or ruler, a square, a stapler, and scissors. Depending on the approach and elements used, additional tools may be required.
Step-by-step instruction
Installation includes work with the frame and ironing board. Depending on the type of structure, work begins by creating a niche.
Important! When installing into a wall, it is necessary to legally coordinate the work. This will save you from possible problems with regulatory authorities.
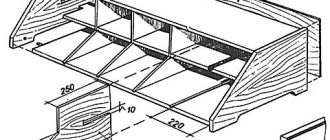
- An ironing board is cut out, about 125 mm long and about 40 mm wide. Change sizes based on the room and your own preferences.
- Create a frame for installation. The depth is calculated from the size of the chrome pipe, the thickness of the rear wall, and the protruding elements of the flange.
- After creating the frame, install the jumper in the frame. It should rotate freely. To do this, it is best to use special bolts for upholstered furniture. They don't perform. Hole size – 10 mm. They are drilled at a distance of 10 mm from the edge, 15 mm from the front, 110 mm from the bottom. If the bolts have small protrusions, cut the header approximately 6mm less than the internal width of the frame.
- Attach the jumper to the guides. For fastening, two methods are used: a bolt with a turned head or a long block. The second option is easier. The block, about 100 mm long, is quickly driven in with a mallet. To do this, place the tube on the wood and hit it from the other side. Make a hole in the center of the hammered block. Attach to self-tapping screws on the inside of the guides.
- On the other hand, handles are installed. They are necessary to remove the fixation. Trim the bolt for a durable fastener.
- Bend the corner on the guides where the handle is located 45 degrees inward. This must be done before fixing it to the structure.
- Bend the plate inward by 45 degrees and attach it to the frame.
- Fix the fastening of the central tube exactly in the middle. Immediately insert the tube and tighten the screw to secure it.
- The remaining tube structure is assembled.
- To ensure that the ironing board is parallel to the floor, the guides must be properly attached. Take into account the thickness of the board. Therefore, it is necessary to make the tube hang in the air 16 mm from the wall (approximately). They make notes.
- Pull out the guides. Fastened with self-tapping screws.
- Check the angle of the resulting structure in the extended state. The angle with the table should be 90 degrees. Also check in a vertical position.
- For safety, you can install latches.
- Then install the sawn board. Cover with material using a stapler and staples.
The final stage is the installation of the door or sash. Several options are used: swing doors or a retractable system. The last option is considered the most compact, because it saves space and does not interfere with work. This depends on the location of the ironing board. Paintings, mirrors, trim around the edges and other options are used as decorative elements.
This DIY design does not require a lot of time and money. It takes up little space, fits into the interior externally, and is easy to use.