In the hallways there are two types of storage places for shoes: for those that are worn now and those that will be needed in other seasons. In the second case, space is allocated in closets and wardrobe compartments. Narrow shelves, drawers and baskets, various storage systems and organizers allow you to bring order and consistency. But for the first case, some kind of separate cabinet, chest of drawers or do-it-yourself shoe rack, made of the right size for the hallway, will come in handy. I selected photos and drew drawings and diagrams of the most successful models of narrow functional shoe holders and overshoes, which can be purchased ready-made or made independently.
Old simplicity
Drawings of a shelf for shoes made of plywood
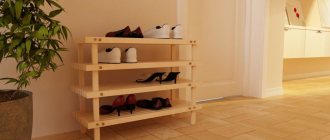
The traditional, simplest and cheapest option for storing common shoes in the hallway is a 2-row floor shelf made of 6-10 mm plywood; for drawings see fig. on right. Shoes with high tops or berets (laced tops with tongues) are placed on the protruding part. This shoe rack is good for everyone, except for one thing: for 10 pairs you will have to give almost 0.5 square meters. m of usable area. And what’s worse, the width of 400 mm is the minimum possible for such a design. What if the entire hallway is 1.25 m wide? Therefore, the main trend in the design of modern shoe racks is compactness due to elongation and the use of simple mechanisms.
Note: depending on the availability of free space, a simple shoe rack can be made in other ways, see for example. track. video.
Now
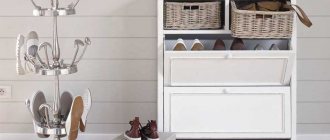
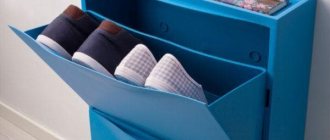
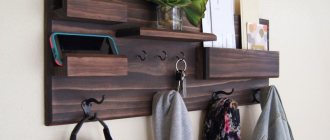
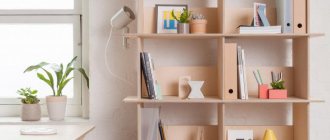
The main module of a compact shoe rack is a cabinet for storing out-of-season shoes (item 1 in the photo) with compartments for shoes without high tops and with tops/tops. The first ones are usually made 3 (spring, summer, autumn), and one high, but those living outside the city need 4 low and 2 high compartments; “extra” for placing work shoes. They will not hurt in the city, for children's shoes.
Types of shoe racks
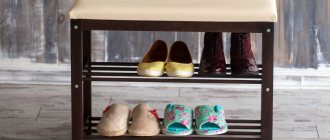
A shoe rack in the hallway is complemented, if there is enough space, with a bench or banquette for ease of putting on/taking off shoes. It is advisable to make openwork shelves under the seat for drying shoes (item 2), but in general it is better to dry shoes, especially for country residents, in a separate dryer, see below.
Drawings of a pouf for the hallway with accessories for shoe care
If there is very little space, you can get by with a pouf instead of a bench. A single owner can fit shoes out of season under his seat (item 3), but the conditions for storing them in this case are not entirely favorable. It is better to keep shoe care accessories in a pouf (see the drawing on the right), and place the supply of shoes in a separate organizer, see below. If the now unnecessary shoes are still in the pouffe, its drawer for ventilation should be equipped with holes in the bottom, and vents should be cut out under the seat.
The width of the pouffe seat and a regular bench is approx. 400 mm. In a narrow hallway with them there is less room for passage than ergonomics require, and even a hanger with clothes is right there. Therefore, the so-called petal shoe racks (item 4); shoes are stored in them in a vertical position on the shelves of folding trays, reinforced between the sector rotary sidewalls - petals. It is possible to make a petal-type shoe rack with a width of 250-260 mm: sitting down is enough, and in the hallway 1.25 m wide there is a passage of approx. 1 m, which is acceptable. In addition, the petal shoe rack provides good ventilation of the contents both with closed and open trays. And if you fold down the tray, the shoes dry in it better than on the shelves under the bench.
Due to their compactness and large capacity, petal shoe racks are often combined into monoblocks with other pieces of furniture for the hallway. A common option is a bedside table in the hallway with a shoe rack, pos. 5. With dimensions in plan (600-800) x (250-270) mm, it can accommodate the everyday shoes of a small family. If there is enough space (approx. 1.1 x 0.4 m in plan), the monoblock is supplemented with a seat (item 6).
Partitioning a round shoe shelf
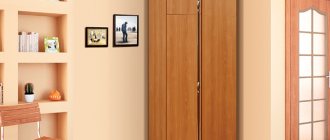
If there is an unoccupied corner or niche in the hallway (which is not uncommon in old houses), then it is convenient to store shoes here in a carousel shoe rack, pos. 7. Dividing the contents into 4 seasons in the carousel shoe rack is achieved in the most natural way. To store winter shoes (boots, ankle boots), the shelves are partitioned asymmetrically, see fig. on right.
Note: A reasonably spacious hallway corner deserves more than shoe storage. For example, see another video - how to equip a corner closet with a shoe compartment in the hallway.
Advice from professionals
- When making a shoe rack with your own hands, start with detailed measurements of the room. The more carefully you do this, the more accurate the drawing will be. Agree, it will be a shame if the finished cabinet blocks a switch or an existing outlet by a couple of centimeters.
- When drawing up a drawing, take into account the types of shoes you are going to store and their quantity. This will help you correctly calculate how many shelves are needed and at what height to install them.
- Design will help simplify graphic programs for designers. They are quite easy to master. They allow you to quickly draw up a drawing and even make a 3D visualization. If you are not going to stop at a shoe rack, pay attention to this opportunity to make the furniture making process easier and faster.
- When choosing legs for a shoe rack, choose those that are height adjustable. They are easy to use. Such fittings will help level the height of the cabinet, correcting possible errors in the design or uneven floors, which are far from uncommon.
Having carefully thought through everything and studied the advice of professionals, you will certainly make the shoe rack of your dreams, practical and beautiful.
Materials and connections
Shoe storage is best made from softwood or plywood .
For maximum durability, dried shoes should be stored at room temperature and average (approx. 60-65%) humidity. But you can’t overdry shoes, especially budget ones made of leatherette; this often causes the uppers to crack. And over-drying will not benefit any other shoes, if only because the uppers with the markings of modern shoes are connected not with grit and nails, but with glue. Therefore, shoes are stored slightly damp. Porous wood will absorb excess water vapor, and if there is a lack of moisture in the air, it will release it. A wooden shoe rack is the only reliable option for storing everyday shoes if the box for them is blank, for example. in the pouf cabinet. Properly dried shoes (see the end for more information on drying shoes and dryers for them) in a well-ventilated storage room can be stored immediately. In this case, the shoe rack can be made of laminated chipboard with a thickness of 12 mm; for the face you can order more expensive, but also more spectacular MDF. Laminated chipboard for shoe racks should be taken of medium grades after the expiration of phenol-containing compounds (E1 or E2). “Children’s” laminated chipboard of class E0 is expensive and fragile, and cheap lower classes E3 and E4 emit too much phenolic resin vapor. They are no less harmful to shoe leather, synthetics and glue than they are to you and me. For the same reason, OSB is not suitable for shoe racks - it is a building structural material that emits excess phenol during construction.
Note: only open, freely ventilated shoe racks are made of metal and plastic. The reason is that while laminated chipboard breathes at least a little in step with the shoes, metal and plastic do not breathe at all.
As for the connections of the shoe rack parts, they can be any kind of furniture: on dowels, confirmations, corners/overlays, tenons, miters, staples with a furniture stapler, etc. In general, assemble as you know how. For movable joints of petal shoe racks, see below.
How to make shoe racks
Petalaceae
Shoe racks with folding trays on petals are the most perfect, so let's start with them. The most seemingly complex (and expensive when purchasing a kit at retail) parts - the side petals - can be made with your own hands from sheet metal or hard plastic with a thickness of 4 mm or more. You can also cut the petals out of plywood with a thickness of 6 mm, then soak them twice with water-based acrylic varnish diluted in half. Impregnation is needed in this case to increase the rigidity of the part. The varnish is diluted with distilled (!) water.
Drawings of the petal shoe rack are shown in Fig. below. Each tray is 2-tier (spring-autumn and summer-house). For tall shoes you will have to add a locker, because... shoes with tops and ankle boots do not fit in the trays; This is perhaps the only drawback of petal shoe racks. The total height of one section H is taken from 300 mm. The upper and lower gaps between the tray cover and the front panel of the shoe rack are required to be at least 6 mm for ventilation. For the same purpose, the “sinus” pocket above the top tray should also be ventilated. To do this, a series of holes with a diameter of 40 mm or more are made at the top of the back wall of fiberboard or a gap is left. Ball locks or removable pins are installed in point A of the middle shelf (marked with a red arrow) so that the position of the middle shelf can be adjusted according to the contents.
Drawings of a shoe rack in the hallway
The design and dimensions of this type of trays for storing shoes in a wall niche with a depth of only 200 mm are given in the following. rice. The peculiarity of this design is that the sockets of the rotary hinges (see below) are made simply in the form of holes in brackets made of steel angles, mounted from the inside on the front trim of the niche. The tilting clamps are also attached to them, if it is far from the side walls of the niche. In this design, the front cover of the tray can be as high as desired, so this version of the petal shoe rack can also be made for tall shoes. One condition is that the front trim of the niche must be strong enough, not fragile. Drywall, for example, is not suitable in this case.
Setting up a shoe rack in a niche
Note: how to assemble a narrow shoe cabinet with your own hands, see the master class below.
Organizer made of fabric or cardboard
Let's consider the case when the corridor is so small that there is no room for a bedside table at all. In this case, the organizer will come to our aid. It can be purchased at the store, or you can also make it yourself. The material for making the organizer can be fabric or a cardboard box.
If the hallway has a closet with a suitable niche, then you can place organizers in it. We stack them on top of each other and set them apart . During the manufacturing process, we impregnate it 3 times with a water-repellent spray or a solution of water and PVA glue. Thus, our product will have greater rigidity.
DIY shoe cabinet (video)
Hinges and clamps
In petal, and some other shoe racks (see below) with hinged doors, there is another, at first glance, tricky assembly unit - a rotary hinge. There seems to be no way other than buying it, but you can still make it yourself. You only need pieces of thin-walled seamless tube, preferably brass - pieces of ballpoint pen bodies, elbow connectors of old spinning rods, etc. The cases of some types of Cuban cigars are excellent, but the prices for them now are not good for the night. And the actual procedure for making a homemade hinge for a folding shoe tray is as follows:
- We cut off parts from the tube with a length equal to the depth of the hinge socket. Usually - 1/2-2/3 of the thickness of the side wall of the shoe rack, but not less than 10 mm. The walls behind the nest should remain at least 5-6 mm. These will be socket clips, you need 2 of them for each hinge..
- Using a scraper (scraper, reamer), the same one used, say, when installing/dismantling air conditioner pipelines, we remove 0.25-0.35 mm chamfers from the inside of the clips.
- We select bolts for the holders with a round head of such a diameter that they fit into the holder with a gap of up to 0.5 mm. We remove burrs on the heads of the bolts (if the slot is straight) with a needle file. If necessary, you can use sandpaper to adjust the head to the holder.
- Use a Forstner drill to drill holes for the clips; It is advisable to take a drill of such a diameter (or select tubes for the clips) so that the clips fit tightly into the hole.
- We press the clips into the holes. If they fit freely, you can glue them with any metal mounting adhesive.
- We install the bolts accordingly. holes in the petals, tighten with nuts and spring washers - the hinges are ready for assembly.
Storage
It is preferable to store shoes that are not worn for a long time in a stable favorable microclimate (see above). Also, a cabinet or cabinet for out-of-season shoes in another room is necessary if there is not enough space in the hallway. In general, it is undesirable to keep shoes that have not been worn for a long time in the hallway, especially in a private house, where through the open front door you can smell cold or feel damp.
Rack and cabinet
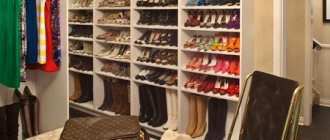
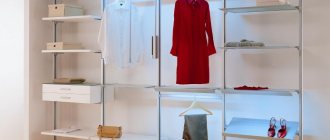
Schemes of an open rack for long-term storage of shoes and a more compact shoe cabinet with hinged doors are shown in Fig. above and below respectively. The rack provides optimal conditions for long-term storage of up to 30 or more pairs of shoes, but requires approx. 0.6 sq. m area. With minimal ergonomics, this rack requires a dressing room of 6 square meters. m. The rack has no back wall; it is attached to the wall with steel corners and 6x70 self-tapping screws in plastic dowels. The material of the shelves and walls is board or chipboard 20 mm and timber 30x30 mm. Shelves, for better ventilation, made of steel mesh on wooden frames.
Schemes and drawings of racks and shelves for storing shoes
Note: this rack is universal. High and low sections can be added to it in width and height without restrictions, as long as there is enough space. Due to the distribution of fastenings, the wall behind the rack may be weak, e.g. a partition made of foam concrete or aerated concrete blocks.
The shoe cabinet is more compact and fits in a passage with a width of 1.5 m. The length of the cabinet is up to 2 m. The shelves are of the same design as in the previous one. case; They are attached to the sidewalls with dowels, corners, in milled grooves or on regular shelf holders. The back wall is ventilated, like a petal shoe rack (see above). An option with ventilation almost like a rack - a cabinet without a back wall with a gap between the cabinet and the wall of 40 mm (the width of the floor plinth). Then assembling the cabinet according to the diagram on the bottom right in Fig. The lining at the back is made from the same board as the shelves with partitions.
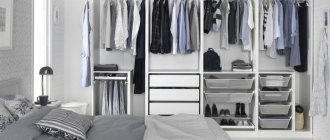
Organizers
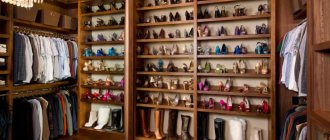
But what to do if there is no space at all for a shoe closet? In this case, an organizer for long-term storage of shoes that are not currently worn will help out. True, in furniture stores you will most likely be offered a special shoe organizer closet (item 1 in the figure), which, with the doors open, will take up somewhere from 2 square meters. m. But in haberdashery and clothing stores you can find an incomparably cheaper shoe organizer-suitcase made of fabric, pos. 2, fits under the bed. In addition, shoes breathe freely in it.
Shoe organizers
But you don’t even need to buy a suitcase organizer if you have a sufficient number of shoe boxes. They are simply glued together, pos. 3. It is no more difficult for shoes to breathe in such an organizer, and it is easier to push it into the niche of the under-bed drawer. In this case, the soft organizer-suitcase often gets stuck.
A shoe organizer made of cardboard can also be glued together, for example. to the dacha, pos. 4. Designed with imagination, it can be completely in place in the apartment, if there is a suitable niche in the hallway, pos. 5. Then the cardboard shoe rack in the niche should be positioned in a spaced position so that the sides of the niche give rigidity to the entire product. For the same purpose, cardboard blanks are impregnated 2-3 times on both sides with a water-polymer emulsion or PVA diluted 2-3 times with water.
Preparation of parts
To simplify the work, you can order ready-made parts for the screed in the store. You need to decide where the shoe rack will stand. Take measurements of the cabinet in terms of width, length and height. Then create a drawing that should show the number and size of shelves, taking into account the thickness of the chipboard.
Assembly drawing.
Using the diagram, make a cutting map, on which you can see each part of the required dimensions. Order shelves, walls and risers sawn with edges pasted over in the store.
When ordering, choose the color according to your taste..
You will also need confirmations, adjustable legs, shelf holders, metal corners, drawer guides, canopies and furniture handles.
Parts for assembling a shoe rack.