Methods for attaching shelves
There are several common ways to mount a shelf to a wall.
- Brackets. This method involves the use of L-shaped metal brackets. Their upper part is attached to the shelf, and the lower part to the wall. Thus, the brackets create a reliable support that can withstand even significant weight.
- Corners. In this case, small steel corners are attached to the upper plane of the shelf. Their free part is fixed to the stele. This type of fastening is quite reliable. However, it has one significant drawback - the corner often does not fit with the rest of the interior, so it has to be somehow decorated or disguised.
- Holders. You can find special metal shelf holders in hardware stores. They are made in the shape of the letter P, located in a horizontal plane. The holder is fixed in the wall, and a shelf is inserted into the gap between its parts. It is also secured. The disadvantage of this mounting method is that the holder only includes relatively thin shelves (most often glass, less often made of thin plywood).
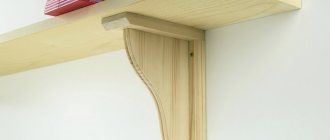
- Hidden fasteners. The same is done using a holder, but of a different shape. The part is a plate with holes for screws, to which a metal pin is attached. The device is attached to the wall, and a shelf is put on the pin. To do this, holes of suitable diameter and length are drilled in it. A distinctive feature of this type of fastener is the absence of visible installation parts.
- Loops. Used for closed type shelves (racks). They are attached to the top of the product box so that the hole protrudes above it. Afterwards, the shelf is simply hung on screws screwed into the wall in advance.
The nuances of invisible fasteners
It makes no sense to talk in detail about this method of installing wall shelves if you carefully understand only 3 main issues.
See also
Console tables: design options, buy or make yourself
- Thickness of the wall used. Installation with invisible fastening is possible in situations where it is a brick or concrete wall. Moreover, the concrete partition must have a minimum thickness of 105 mm, and the brick partition - 250 mm. If the parameters are smaller, you will have to use additional elements. Cinder block and plasterboard walls with a thickness of less than 100 mm are suitable only for hanging decorative shelves on which there is no load or it is minimal;
- The thickness of the shelf itself. It is not recommended to use shelves that are too thin or too massive. The material should not sag, must be dry and have a high-quality finish. If the load on the shelf is minimal, the thickness is selected from 30 mm. If the shelf is for books and other heavier objects, the thickness is taken in the range of 45-60 mm;
- Fastening. Fasteners are selected based on point 2 and the purpose of the shelf itself. Invisible fastenings are made in the form of a hinged loop and a rod. The loop is mounted on the back of the shelf and markings are made. A hole is made in the wall and a plug is inserted inside. Next, all you have to do is screw in a screw or self-tapping screw to the desired depth and attach the hinges to them.
Be sure to consider the expected load to avoid unnecessary problems. The higher the load, the more hidden fasteners need to be used. Remember to have a sense of proportion.
Required tools and materials
In order to mount the shelf on the wall, you will need the following materials
- dowel-nail (or screw with dowel);
- fasteners of a suitable type;
- the shelf itself.
You will also need tools:
- drill;
- screwdriver;
- hammer;
- roulette;
- marker or pencil.
screwdriver
Can it be hung?
Regardless of how the wall is built, cabinets can be mounted on it. But it is important to provide a fastening system so that the weight is distributed evenly and not pointwise. If the partition is made of half a brick, then it is important to carefully choose the method of fastening and fittings that hold the drawers. It is also necessary to pre-prepare the wall and surface so that the entire structure lasts a long time and does not destroy the wall.
How to prepare?
If the work is carried out independently by a beginner, then it is useful to consult with a specialist.
To prepare for installation, it is recommended to carry out the following work:
- Level the wall with plaster or plasterboard if the unevenness is very noticeable.
- Mark the surface for the mounting strip or dowels so that the weight of the future structure is distributed evenly.
- For preliminary preparation, it is recommended to fill the voids in the brick and, if necessary, drill a hole, which also needs to be filled with concrete.
Return to contents
What materials and tools are needed?
For reliable fastening, it is important to choose high-quality screws or give preference to a set with dowels of the required size. For installation on a brick wall, it is recommended to prepare the following tools and materials:
- drill with rotation speed controller;
- a drill suitable in size for the dowels;
- level and measuring tape for correct marking;
- mounting plate or hooks (as needed).
Return to contents
Types of fasteners
A point fastening system, in which nails or screws are simply driven in, is not suitable for brick walls. This can destroy the base material, which will lead to deformation of the wall. The following installation methods are recognized as the most reliable:
- using special mounting hooks and loops;
- on through bolts with a retaining strip;
- using mounting tape.
Return to contents
How to hang it correctly and safely?
If the master is not confident in his abilities or is carrying out installation for the first time, then it is better to consult a professional or carefully study all the tips and recommendations related to the work. It is much safer to learn from the mistakes of others, instead of renovating the premises. It is recommended to drill holes at low speed, having previously marked the attachment points. Before installing dowels and screws, it is important to make sure that the head of the fastening loop is the appropriate size.
How to hang a shelf
Let's consider the procedure for attaching a shelf to walls made of various materials.
On a brick wall
The most convenient way to hang a shelf on a brick wall is with dowel nails. Here are the steps you will need to take to do this:
- screw the selected fasteners to the product;
- attach it to the wall and draw with a marker or pencil the location of the holes;
- drill holes in the wall at the marks with a drill;
- insert a dowel into them;
- attach a shelf to the wall;
- insert the tip of the nail into the dowel through the fastener holes;
- carefully drive the nail in with a hammer;
- when the nail enters the wall almost completely, tighten it with a screwdriver (this is necessary so as not to damage the piece of furniture being mounted with a hammer).
Assembling a rack for a workshop or garage: material, shelves, components
The more order in the garage and workshop, the safer it is to work there. In this article, we have collected useful tips on how to organize space for storing tools, spare parts, consumables and materials. We help you choose racks and components.
Shelving material: wood, metal or plastic
First, let's decide what you will store on the shelves. Heavy objects: winter tires, electric wood splitter, circular saw require a metal rack. The wooden structure will withstand small and medium-sized plumbing and carpentry tools. The plastic version is suitable for boxes with nails and screws.
Advantages and disadvantages of shelving made of metal, wood and plastic:
Please note: wooden racks are less stable than metal racks. The wooden shelves and side walls are connected to each other with self-tapping screws; the structure is not rigid enough - therefore, we recommend attaching wooden racks to the walls.
Rack: do we buy ready-made or make it ourselves?
Now let's decide what to choose: buy a ready-made rack or make it yourself. Each option has its own advantages and disadvantages. A homemade rack will cost less than a purchased one. But at the same time, you will spend time on drawing, selecting materials and components, cutting and assembly. The ready-made option is suitable for those who want to set up a garage or workshop as quickly as possible.
Useful tips
Here are some useful tips that will come in handy while working.
- If the wiring has not been changed for a long time, it will not be superfluous to determine its location before drilling. After all, if it is damaged, a short circuit may occur that can damage household appliances. The apartment may also be without power. The location of the wiring is determined using a special device that can be purchased at a hardware store. They are led along the wall. If there is wiring nearby, the LED on the device lights up. It is better to start your search from places where wiring is certain (sockets, switches).
- When it comes to a wooden wall, there is no better fixation than ordinary screws. Dowels will be completely unnecessary for them. Wood can hold even quite a lot of weight well without them.
- You can make a shelf with a hidden fastening with your own hands from an ordinary one. To do this, you need to purchase the fasteners themselves, and then drill holes for the pins in the piece of furniture using a drill.
- It is better to purchase dowels with antennae located on the sides. They hold up much better. This is especially true for concrete walls.
- To achieve the correct horizontal position of the shelf, it is better to use a building level. Of course, you can try to install it by eye. But then deviations are possible. And they don't look very nice.
- When using metal corners, they need to be decorated after finishing work. The best option is to stick a PVC film or a small piece of PVC plate onto the mount. However, for a high-tech interior, you can leave bare steel, in which case it will look organic.
Ikea against Russian politics
The furniture company tries to stay out of politics, but despite all its efforts, it has not always been able to successfully balance between European values and Russian legislation.
Last year, the company decided to stop publishing its Russian-language advertising magazine to avoid incurring charges of violating a law banning the promotion of homosexuality to minors.
Prior to this, IKEA excluded material about a lesbian couple from the UK from the Russian version of the magazine. In the end, there were no problems with the law, but the company incurred the wrath of representatives of the LGBT community from all over the world.
A year earlier, the management of the world’s largest chain of furniture and interior items stores decided, just in case, to remove a photograph of people in colored balaclavas from the company’s Russian website.
The company's management explained their decision to remove the photo by saying that colored balaclavas had become a symbol of the punk group Pussy Riot, and “IKEA is a commercial organization that operates outside of politics and religion.”
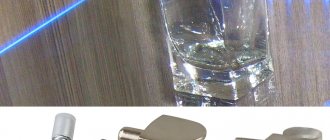
Dowel for hollow bricks
Visually it has a cylindrical shape, resembling a cork with a hole. Its body expands when the screw is screwed into the surface.
This leads to its reliable fastening in the walls of the hole. Equipped with a special cuff corresponding to the screw head, it does not allow a nail or screw to fall inside the dowel.
Type of dowels
Anchors are used for hollow or porous brick walls. Screwing into brickwork occurs in the form of a knot, with the end widening. Inside the voids, the resulting nut securely fastens any object.
Small nail dowels are used under the sheathing of the finishing material to secure the laths.
Umbrella dowels are used to fasten thermal insulation. A metal or plastic nail is driven into the insulation of the pre-installed umbrella. Dowels for brick and concrete are used for loads of several tons.
Metal fasteners are used for installing suspended ceilings. Because plastic ones can melt during a fire and cause the ceiling to collapse.
Advantages of dowels
Because their design is equipped with mustaches and spikes that do not allow them to scroll:
- Very practical to use.
- Withstand heavy loads.
- They are used outside and inside the building.
Features and Tips
Before drilling, it is necessary to accurately determine the wall material. To do this, in a non-impact mode, using a Victory drill, a test hole is slowly made in the wall.
It is important to keep the drill strictly perpendicular. The softness of the material is determined by the effort expended. If drilling occurs with alternating force: sometimes easy, sometimes hard, then you are dealing with a hollow brick.
Additionally, the material can be determined by the color of the dust hole:
- Red - brick.
- Flour-like, coarse-grained and soft indicates foam concrete.
- Sandy white color is a sign of sand-lime brick.
- Floury, white or light gray indicates concrete.
A mandatory parameter when selecting dowels is the predicted load. Fasteners with a depth of at least 85 mm are used when installing exercise equipment. Therefore, taking into account the size of the hole, dowels of the same size are selected.
Installation instructions
Mechanical stress on the seams between bricks can cause the wall to crumble, so it is better to use a drill instead of a hammer drill.
The blows of the hammer drill lead to the destruction of the brick. The damaged area complicates further installation of the dowel. You need to be extremely careful to create a hole of the right size and even shape in a crumbling wall. In order not to cause cracking of the hollow building material, it is necessary to completely abandon impact drilling.
Sequential installation algorithm
Using a pencil or pen, mark the location for the future hole.
To make drilling more convenient, use a knife or nail to make a small indentation.
When selecting a drill, keep in mind that the dowel should fit a little tight, with little effort. If you plan to use fasteners with a diameter of 9 mm, then the diameter of the hole should be the same.
The depth of the hole must correspond to the length of the fastening. Additionally, make sure that the sizes of the screw and dowel match. Since unreliable installation of the dowel can lead to it falling out under the weight of the load.
Position the drill strictly perpendicularly and, in non-impact mode, slowly drill to a depth of 1 cm. For further drilling to the desired depth, you can increase the speed.
If there is no stop-limiter on the drill, to control the drilling depth, a mark of the required hole size is placed on the drill. To do this, attach a dowel to the drill and mark its size on the drill with a mark or tape.