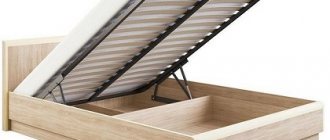
Euroscrew (confirmed)
Many people are familiar with the concept of “euro-screw”, who have assembled furniture themselves at least once in their lives. Another name for it is confirmation. Confirmat is a special fastener that fixes furniture, which is necessary for assembling cabinet furniture, which is difficult to do without in the modern world. They became popular back in the nineties of the last century, and are still in great demand to this day. Many have probably heard such names as euroscrew, euroscrew and others. Experts considered that all these names were complex and found a suitable designation.
Furniture Features
There are various cabinets on sale, the assembly of which may vary depending on whether they belong to a particular modification. Therefore, before we begin installation, we decide what needs to be assembled.
| Illustrations | Modifications according to location method |
| Built-in . Such cabinets are built into a niche or in the gap between the walls and fit perfectly into any interior. | |
| Wall-mounted . This is a standard cabinet configuration where the furniture is assembled and installed flush against the wall. |
| Illustrations | Modifications by configuration type |
| Linear (straight). Such cabinets have a rectilinear base, and therefore are installed along one flat wall. | |
| Angular _ These cabinets consist of two halves or have a triangular base. Thanks to this feature, this furniture is installed in the corner between two adjacent walls. | |
| U-shaped . These are wall-mounted straight cabinets that are assembled for installation around the perimeter of the doorway. There is a mezzanine on top. |
| Illustrations | Modifications by assembly method |
| Cabinet (frame). Such designs use the top and bottom, sides and back wall. | |
| Frameless . This category includes built-in furniture, the assembly of which does not use the sides, back wall, top and bottom. |
| Illustrations | Modifications by opening type |
| Swing . This is a standard scheme in which the doors open towards themselves. | |
| Coupe. In such cabinets, sliding doors move relative to each other along special guides. Such furniture would be appropriate in a living room, in the hallway and on the balcony. |
If this brief overview helped you decide on the choice of cabinet, move on to the next stage - prepare the tool.
Tools and accessories
A minimum set of tools that you cannot do without when installing a cabinet
From the tool you will need:
- A screwdriver with a drill function and a set of bits for self-tapping screws, plus a wood drill with a diameter of 2 mm;
- Slotted and figured screwdriver;
- 5 mm hexagon;
- Square;
- Hammer and rubberized mallet;
- Iron for gluing edges;
- Tape measure and pencil;
- Spirit level and plumb line (relevant for assembling built-in cabinets).
Standard set of components for assembling cabinet furniture
All components necessary for assembling cabinet furniture are usually included in the kit. Therefore, when buying furniture for subsequent self-assembly, make sure that the package includes:
- Fastening elements (Euroscrews, self-tapping screws, wooden dowels for adhesive joints, corners, etc.);
- Fittings (hinges, guide profiles, locks, door handles, etc.);
- Filling (determined by modification of the purchased cabinet).
If the kit does not include the listed components, you will have to purchase them yourself.
Purpose of panels
Determining the purpose of the panels when assembling a wardrobe is not difficult, the main thing is to follow the instructions and not confuse elements from different sets
Cabinet furniture for self-assembly is sold in the form of structural elements packaged in separate packages. Each box in the set is numbered and labeled with its contents. Before you begin installation, you need to read the instructions and arrange the boxes in accordance with the numbering.
The numbering of the boxes is not random, since the structural elements are packaged taking into account the correct assembly sequence. As a rule, the kits contain together the elements for assembling the frame - the lateral upper and lower parts. Separate kits include door facades, back walls, filling elements and fittings.
It is almost impossible to confuse the structural elements, since they have been drilled into them from the factory to accommodate fasteners and fittings. There should also be no difficulties with positioning the panels, since the mounting holes on adjacent elements should coincide.
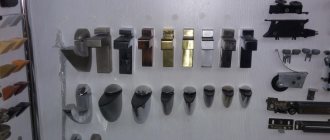
Rules for installing various hardware and other fasteners
In the cabinet assembly kit you will find a bag or box with fastening hardware (metal products), wood and composite fasteners. The assembly instructions describe in detail which fasteners are used and how they are used. However, I offer a brief overview of current mounts with a description of their installation.
| Illustrations | Description |
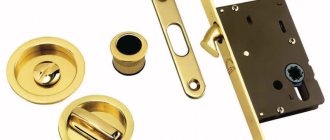
| Confirmat (europrop). These are hardware of different lengths and shapes, which are distinguished from ordinary self-tapping screws by a large thread pitch. Common confirmations are designed to be screwed in with a 5mm screwdriver or hexagon. The confirmat is screwed only into pre-drilled holes with countersunk. | |
| Minifix (eccentric fastener). If the confirmation is visible after installation, then the eccentric connection allows you to assemble the cabinets so that the fasteners from the outside of the finished product are invisible. Minifix is a collapsible hardware that consists of a rod, an eccentric and a fitting. The connection is removable. | |
| Hidden mount TENSO P14 . This is a composite fastener that is installed into a pre-milled groove. The elements to be connected are coated with glue around the perimeter of the fastener and snapped into each other. The connection is reliable, but inseparable. | |
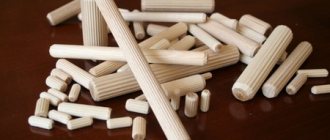
| Wooden dowel (adhesive connection). Holes are drilled in the parts to be joined, the location of which must coincide during connection. The holes are filled with glue and a wooden dowel is driven into them. The connection is hidden, non-separable and of low strength. | |
| Wooden dowel and confirmat . When high connection strength is required, the dowel is reinforced with a screw. In this case, there is no need for gluing. The connection turns out to be collapsible, but ceases to be hidden. | |
| Corner joints . To connect perpendicularly aligned parts, corner hardware and plastic products are provided. The corner is installed at the junction of two planes and self-tapping screws are screwed into the holes. Certain types of corners are installed as shelf holders. |
Design features
To understand even better what it is and what furniture confirmations look like, you can look at the photo and get acquainted with the design features.
Before us is a screw that has a countersunk head with a hole (slots) for a hexagon and a tetrahedron. With its help, the Euroscrew is tightened and unscrewed when assembling and disassembling furniture. This combination of splines allows you to simultaneously use a hexagon and a tetrahedron when fastening furniture elements.
The rod has a blunt end, and a wide pitch thread is used on the working surface. The lower turns of the existing thread are used to cut threads in pre-prepared holes. Because of this, their shape is conical and there are sharp serrations.
Under the head itself there is a smooth and fairly wide surface, devoid of threads. That is, the head, cap and threaded part can be distinguished structurally.
All confirmations have a zinc, nickel or brass protective coating. The euroscrews themselves are made on the basis of high-quality high-carbon steel. This provides the structure with a high level of elasticity. As a result, the Euroscrew bends but does not break. Plasticity is beneficial when removing screws in situations where installation was carried out incorrectly.
Confirmats are widely used when joining furniture components made of wood, chipboard, MDF, etc.
There are several standard sizes of these elements. Namely:
- 5x40;
- 5x50;
- 6x50;
- 6.3x40;
- 6.3x50;
- 7x40;
- 7x50;
- 7x70.
But these are not all the sizes that are available for sale. The price largely depends on the size characteristics.
At the same time, you can find products with dimensions of 6.3x13, 4x13, etc. The most popular and common sizes are Euro screws with a length of 50-70 millimeters and a thread diameter of 7 mm.
What furniture panels can be used to assemble furniture?
Before you start drawing up a drawing of the desired cabinet from furniture board, you need to decide on the choice of material. Different manufacturers offer furniture panels in a certain size range, and you can always develop a cabinet design in such a way that a minimum amount of waste remains.
What types of furniture panels are there?
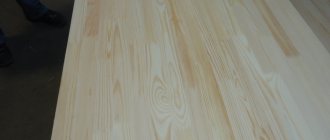
For the manufacture of cabinet and shelving furniture, furniture panels with a thickness of 18 mm are mainly used. But even among the assortment of blanks of a given thickness, you can encounter a lot of distinctive features.
Firstly, furniture panels are distinguished by the manufacturing method. There are two main types of panels:
- Solid-lamella (solid long planks are glued along the width).
- Spliced (from planks of different lengths with a tongue-and-groove connection, followed by gluing along the width of the manufactured planks).
Solid-lamella furniture panels are understandably more expensive, more aesthetically pleasing and more stable. Spliced panels can also look quite interesting in a design interpretation, however, they are less resistant to possible damage and are prone to cracking of the fabric along the joints.
Secondly, furniture panels are also distinguished by the type of wood. You can make a cabinet from furniture panels of pine, spruce, oak, beech, birch or larch. When calculating, processing and assembling, it is necessary to take into account the characteristics of each type of wood and be prepared for possible deformations of the panels when the finished product is used in unsuitable conditions.
Thirdly, to simplify the choice, there are several types of furniture panels. And this, perhaps, will be the most important criterion for selection. The grade determines the quality characteristics of the furniture board, which directly affect the durability and stability of the finished cabinet, cabinet and other furniture.
What type of furniture panels is best for making furniture?
Marking of categories (grades) of finished furniture panels is carried out in full compliance with manufacturing technology.
Grade B
The cheapest option is grade B furniture panel. It is a jointed panel with all the inherent disadvantages described above. In addition, grade B furniture board has a non-uniform texture in terms of pattern matching.
Grade A/B
The largest group of furniture panels offered for sale in well-known construction hypermarkets such as OBI, Leroy Merlin is the A/B grade in the middle price category. They are solid-lamella panels with a uniform wood pattern selected in texture and shade, allowing for a transparent or translucent finish. Grade A/B allows for the presence of small knots with a diameter of up to 5 mm in the amount of 3 pieces per sq.m. plane. When choosing, you should pay attention to:
- For the weight of the panels. Sometimes suppliers do not comply with storage conditions (and sometimes this is due to unscrupulous manufacturers who neglect to properly dry furniture pieces) and furniture panels become saturated with moisture, which leads to warping of the pieces over time.
- On the structure and design of furniture panels. Large knots with rings can “fall out” of the fabric, which will not add quality and aesthetics to an already manufactured and assembled cabinet.
- Compliance with the specified dimensions. If you want to assemble a cabinet from furniture panels, then you probably expect that when cut, the pieces will be exactly the size originally calculated. As practice shows, when choosing, it is better to measure furniture panels, since the canvas may initially be smaller in size or have a non-strict geometry.
Variety "Extra"
The highest grade of furniture panels with a complete absence of knots, chips, and resin inclusions. The panels ideally have a smooth polished surface with a uniform pattern. Cracks almost never form on “Extra” furniture boards due to changes in moisture and temperature. It is also easier to work with since no additional grinding or surface treatment is required. Typically, “Extra” furniture panels are used to make the front part of the cabinet, including doors and visible sides.
How to attach narrow strips to confirmations
Often, in do-it-yourself furniture, narrow strips with a width of about 50-80mm are used as connecting elements, drawers, sides, and stands. It is somewhat impractical to fasten them with two euroscrews on each side - holes located so close to each other do not add either aesthetics or strength to the finished furniture.
- If a narrow strip is “caught” on the long side (for example, if it is the base of a cabinet or the side of a drawer under the oven), the assembly with confirmations remains unchanged - this nuance can be ignored.
- If the connection is such that during the operation of the furniture the part will rotate relative to its axis, then it is better to foresee this moment in advance: drill for confirmations with a shift of a couple of centimeters relative to the opposite sides.
Examples of drawings of cabinets made from furniture panels
Beginners are recommended to start by making the simplest design of a cabinet, cabinet or desktop with a minimum number of cuts of finished workpieces. In this article we will present the principle of designing and drawing up drawings for furniture that any novice craftsman can handle.
How to properly design floor and wall cabinets and cabinets from furniture panels
When designing furniture from solid-lamella furniture panels, one must take into account the need to stabilize the fabric in order to avoid possible deformation of large panels along the grain.
- Therefore, for long spans of shelves and countertops, there is a reason to plan a base, timber paneling, and consoles for additional fixation.
- To reduce the risk that the furniture panel will “lead,” cabinets, open shelving and other furnishings are designed with a deliberately rigid structure, with multiple “cellular” fastening of the shelves.
- Or with solid rear walls that act as rigidity.
These are the main design principles. We will explain them in the following drawings and photos.
An open shelving unit, a hanger in the hallway and a wardrobe for the balcony made from furniture panels
It is advisable to tie the design of a cabinet made of Leroy Merlin furniture panels to the dimensions of the parts themselves.
The size range of finished elements is as follows:
- Blade width 200, 300, 400, 500 and 600mm.
- Blade length 600, 800, 1000, 1200, 2500 mm according to the table.
It is logical that the easiest way is to design cabinets, racks, and cabinets with a depth commensurate with the depth of the furniture boards themselves.
How to make a corner wardrobe from furniture board for clothes
The design of a corner wardrobe is calculated by analogy with the example given in this article . The only thing is that you need to adapt the calculations to the changed thickness of the case from 16mm to 18mm. It is also necessary to recalculate the size of the facade.
You can make a corner cabinet from a furniture panel of a rectilinear design with the ability to “attach” a narrow pencil case or an open shelf to it.
Arrangement of a storage room and a built-in wardrobe made of furniture panels
Using console mounts and wall-mounted shelving storage systems, with the help of furniture panels you can arrange a pantry space or design a wardrobe.
To stabilize solid wood furniture, it is more advisable to first assemble a timber frame for a built-in wardrobe, and then cover it with furniture board or plywood.
How to make kitchen cabinets from furniture panels
A kitchen made from furniture panels is designed by analogy with the option made from laminated chipboard.
- Drawings for upper cabinets and lower cabinets can be viewed here .
- Drawings of corner sink cabinets can be viewed here .
These articles provide examples of calculations for laminated chipboards with a thickness of 16 mm. In the case of furniture panels with a thickness of 18 mm, adjustments must be made to the calculation formulas for parts.
You also need to take into account that the narrow strips in the body parts of the lower tables-pedestals, to which the tabletop is attached, can bend. Therefore, there is a reason to abandon them in the design and attach the tabletop to the corners. Or replace it with solid upper horizontal bars or timber.
It is also recommended to replace the kitchen plinth made of furniture board with a ready-made plastic one (commercially available, sold by the meter). Or design the bottom of the kitchen without legs, with a rigid attachment of the plinth to the boxes of the lower modules.
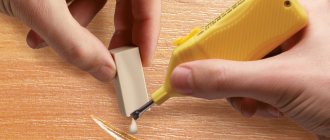
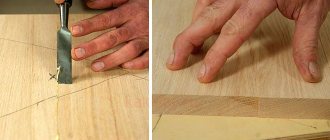
How to drill a hole for placing a confirmat
The confirmat is screwed into a previously prepared hole, so the question of how to drill such a hole is quite relevant. To do this you will need the following tools and materials:
- screwdriver or electric drill;
- bit of the appropriate size;
- drill for confirmation;
- a measuring tool, which can be a ruler (or a construction tape);
- pencil;
- awl.
To facilitate marking and maintain a strictly perpendicular position of the drill, use a template for drilling holes for confirmat
Hole dimensions for Euroscrew
For furniture assembly, Euro screws are usually used, the dimensions of which are 6.4x50 mm. To make holes for such a confirmat, the outer thread diameter of which is 6.4 mm, and the cross-sectional size of the screw body is 4.4 mm, a drill with a diameter of 4.5–5 mm is used. Drilling holes for confirmation of this type should be performed to a depth of at least 50 mm. If the diameter of the hole is larger than the specified value, then the Euroscrew simply will not hold; if it is smaller, it can tear the furniture element into which it is screwed.
The step drill is selected based on the dimensions of the specific Euroscrew model
The drill used to make holes for the confirmation must be equipped with a special working head. On the one hand, she prepares an expanded hole for the neck of the screw, on the other hand, she countersinks the place where the screw head will be placed. To place the confirmat, you can also use a regular drill, but in this case it is necessary to prepare places for the neck of the fastener and its head.
Marking drilling locations
The reliability and quality of connections made using confirmats largely depend on the accuracy of marking future holes for them. On the element that will overlap the end of another element of the furniture structure, two types of markings are made:
- drilling depth (5–10 cm);
- the center of the future hole (if the thickness of the joining part is 16 mm, it should be at a distance of 8 mm from the edge of the slab).
Dimensions and materials of manufacture
The sizes of confirmations are as follows: 5x40, 5x50, 6.3x40, 6.3x50, 7x40, 7x50, 7x60, 7x70 mm. The most common are single-element ties with a thread diameter of 7 mm and a length of 50-70 mm.
| Designation | Europrop 7x40 | Europrop 7x50 | Europrop 7x60 | Europrop 7x70 |
| Head height, mm | 10 | 10 | 10 | 10 |
| Length, mm | 35,5-40 | 48,5-50 | 58,5-60 | 68,5-70 |
| Key size, mm | 4,02-4,12 | 4,02 | 4,12 | 4,02 |
| Flange diameter, mm | 9,5-10 | 9,5 | 10 | 9,5 |
Fasteners are made from high quality materials, often carbon steel. They are coated to prevent corrosion. The coatings are:
- Brass;
- Nickel;
- Zinc.
Euroscrews made of aluminum alloy are quite flexible; they do not break during furniture assembly. Thanks to these properties, the fastener can bend; if installed correctly, it can also be easily removed.
Main settings
The Euroscrew has the ability to connect furniture parts whose thickness does not exceed 16 mm. To make a mounting hole, the easiest way is to use a special confirmation drill, and to secure the hardware, use a key designed for a Euroscrew. Connecting furniture structures requires care and a certain skill in work. An important step is the correct selection of the size of hardware and calculation of their quantity.