In the 40s of the twentieth century, the industrial style of decorating one's home became very popular in the United States. It gained popularity due to the lack of affordable affordable housing for ordinary people. Premises that were not originally intended for living - attics, attics, abandoned premises of factories and warehouses - were used for the arrangement. The premises were quickly settled in, so they were left in their original form, only slightly made suitable for living. This is how a new loft style was formed.
The originality of the loft style is that the space, reminiscent of an industrial one, is at the same time modern and comfortable
Soon, creative individuals - artists, actors, owners of spacious country houses - began to decorate their houses and apartments in this style. The loft has existed for over 60 years. It has no territorial or time boundaries, because the originality and unusualness of interiors in this style fits perfectly into the life positions of creative, free-spirited people.
The urban loft style in the interior has emerged as a trend that combines the features of the underground and bohemian
This direction allows you to arrange your living space in such a way that it becomes possible to embody the most daring ideas, go beyond what is permitted, and stand out with your individuality. There are many people striving for everything unusual not only in America, but also in Russia there is a large number of followers.
Originally industrial interior in loft style from the middle of the last century - housing for the poor
The introduction of the main elements will help you build the right interior in the loft style.
- Open space without partitions. Only the bathroom and toilet are fenced off. Even the bedroom is organized in a common area.
- Huge floor-to-ceiling windows are the main source of daylight. As a rule, windows are not covered with curtains.
- Massive beams under the ceiling, open ventilation pipes, iron fittings.
- The walls are not decorated with wallpaper or decorative plaster. Leave or imitate brickwork and concrete walls. The decoration includes wooden elements, sheets of plywood and aged metal.
- The floors are most often left concrete and replaced with old wooden boards. An option from marble slabs is possible.
Modern housing equipped in loft style
Round cardboard stool
Below we have given you step-by-step photos of a master class on how to make such a wonderful stool with a round seat.
The stool easily folds and unfolds literally without any extra effort, i.e. all sorts of latches and jumpers, everything is simple here. Please note how the author (who is unknown to us) carved wooden tubes to close the metal pin between the legs. This stool is made from 22 trapezoidal shapes made of 3mm corrugated cardboard, the shapes are glued together with PVA glue. Below you can see the drawings of this cardboard chair.
Note: in the photo there is a chair that has been used for 5 months daily by a person weighing 80 kg, which already speaks of its reliability and durability.
A wonderful and compact wooden stool looks like the one in these photos. Unfortunately, we were unable to find step-by-step photos, but from the photos taken from all angles and presented below, everything is clear; an experienced master should not have a question here.
You can make such a folding chair (or table: it depends on the size in which you will make this model) with your own hands according to the model shown in the photo collage below
This stool is made very simply and quickly, look at the drawings in the photo. It can be made from boards, plywood and chipboard.
Wooden stools 300 photos
Having experience in drawing, I made my own drawings of a folding stool made of wood.
Then I started manufacturing and assembling the stool parts.
- The timber was cut into pieces with a jigsaw:
- legs 48 x 4 x 2 cm – 4 pcs.;
- crossbars 23 x 4 x 2 cm – 2 pcs.;
- large spacer 32 x 4 x 2 cm – 1 pc.;
- small spacer 27.5 x 4 x 2 cm – 1 pc.
- The ends of the parts were rounded with a jigsaw and sanded with an emery wheel.
- I cut the ends of the legs on one side with a jigsaw at an angle of 45.
- I tightened the legs and crossbars separately with a clamp.
- At the junctions of the legs and crossbars, I drilled holes with a drill ø 6 mm.
- The holes were expanded with a 1 cm ø reamer fixed in a drill to a depth of 5 mm.
- I cut the board with a saw into pieces 39 x 4 x 1 cm - 6 pieces.
- I sanded all the self-made parts of the folding wooden stool with an emery wheel.
- The crossbars were secured with clamps, placing a temporary spacer between them.
- Laying 6 boards on the upper surface of the crossbars. with gaps between them of 10 mm, secured them with screws. The result is a seat measuring 390 x 290 mm.
- From the ø 6 mm reinforcement I cut a piece 315 mm long with a hacksaw.
- The fittings were clamped in a vice. At the ends of the segment I cut threads for M6 nuts with a die.
- I threaded the pin through the hole in one of the inner legs. I put a metal tube (tsar) on the hairpin.
- The other end of the pin was threaded through the hole in the second inner leg.
- The ends of the studs on the outer side of the legs were secured with nuts, having previously put on washers and groovers. I tightened the nuts with a head and a wrench.
- I inserted bolts into the remaining holes of the furniture parts, which were secured on the other side with nuts. I placed groovers and washers under the nuts. Grovers are necessary to ensure that the nuts cannot unscrew spontaneously under the pressure of the springs.
After checking the reliability of the connections, I finished assembling the furniture.
At the end of the work, I summed up how much it cost to make this furniture. Calculated the cost of materials and time costs.
Loft shelving
Loft rack, characteristics:
- Overall dimensions: 1840x1000x440 mm
- Square pipe 40x40 mm
- Shelf: 1000x360x40 mm
Drawing - assembly of loft shelving
Loft shelving detail drawing
Download loft shelving drawing
The drawing can be downloaded HERE or by clicking on the button below:
Stool in Art Nouveau style.
Before we present detailed instructions for making homemade loft furniture, we should introduce readers a little directly to the style itself. Why is it so interesting and why, despite the fact that it appeared back in the 40s of the twentieth century, does it still remain popular?
History of the loft style
Loft style furniture
The birthplace of the loft style is the USA. It was in the land of the Statue of Liberty that this simple, but nevertheless attractive style appeared. It originated in New York, in its industrial areas. During that time period, land prices were rising rapidly, and many property owners sold or completely abandoned their industrial premises just because of this.
And these same premises gradually began to be used by other people to create residential buildings. Moreover, such housing was inexpensive, and, as a rule, furnished “cheap and cheerful.” But, oddly enough, it turned out tastefully. This is how the loft style was born, which remains popular to this day. Gradually the style reached Russia.
Decoupage furniture in loft style
Moreover, both a living room and an office can be furnished in this style. Nowadays even restaurants or hotels are decorated in this way, and many modern hotels prefer to furnish guest rooms in a loft style.
Loft style interior
In order to embody the loft style in the interior, you do not need to spend money on expensive souvenirs, luxurious armchairs or antique cabinets. It is enough to use what in most cases was previously thrown away.
Loft style does not require large financial expenditures
Beautiful coffee table
Coffee table in loft style
It is easy to determine that a person is looking at a room decorated in this style. It is enough to pay attention to some signs.
- The room should have a lot of free space, and there are usually minimal partitions in it. In general, only the toilet and bathroom can be separated in the apartment. That is why the loft style is often used in studio apartments, where even the sleeping area is located in a common area.
About the characteristic features of the style - The windows should be large and preferably from floor to ceiling. This is the main source of light in the room. Moreover, curtains are used extremely rarely.
- The presence of various beams in the ceiling area is welcome, the ventilation does not need to be closed, and iron fittings add charm, but do not spoil the appearance of the room.
- You usually cannot see wallpaper or other decorative material on the walls in a loft-style room. Brickwork or concrete is often imitated or left completely as is. Also, plywood, metal, etc. can be used for finishing. It’s funny, but to achieve the desired effect, sometimes you sometimes have to purchase quite expensive materials.
Typical loft style interior - Option for the floor - concrete, board or marble. No complex designs or anything pretentious or extravagant.
And the main highlight of the loft is the furniture. It may be somewhat unsightly in appearance, made of simple materials, and does not have any decorations or monograms. Its charm lies in its simplicity and functionality. At the time when the loft was born, everyone had no time for luxury.
Loft bedroom
To make loft furniture, you can use simple boards, iron pipes and some modern materials. It is best if they have a somewhat aged look.
Loft style kitchen
Although, despite the apparent simplicity, to decorate a room in a loft style you need to have a certain taste. In general, with a successful combination of circumstances, a loft can harmoniously combine the incongruous. For example, a brightly colored modern sofa and an antique chest of drawers. So this style can be very, very different.
There are several loft style trends
Table. Loft style directions.
READ MORE: Do-it-yourself sauna, how to build a project, drawings
| Direction | Characteristic |
| Bohemian | This option is chosen by artists and poets, in a word, creators of beauty. Moreover, they can use the style not only at home, but also when organizing their own personal exhibition or show. Here the walls and ceilings are left almost without decoration, but other interior items or decorations are selected with a special sense of beauty. The walls may be decorated with paintings, there may be musical instruments, some sculptures, etc. in the room. |
| Glamor | This is a rather delicate loft, in which the same iron beams and beautiful chandeliers or sofas in the Baroque style can be perfectly combined. Here, much attention will be paid to lighting and directly to chandeliers and shades. The colors used for decoration will be gentle and pleasant (for example, it could be lilac). |
| Industrial | This is the most popular loft option, as it is the simplest and does not require anything special from the designer. It is enough to create the appearance of a moderately lived-in space. Furniture made by yourself is ideal for this type of loft. Even if it is a little unsuccessful, it will look no worse in almost industrial conditions than furniture from a store. Here any decorations are unnecessary. |
Bedroom in loft style
Using a square profile and a couple of boards, you can make a very simple and interesting chair that will fit perfectly into a loft style interior. However, this will require a little more effort than when creating a bed, and will also require some welding work.
Step 1. The first step is to draw a diagram of the chair and mark all its dimensions on it.
Scheme of the future chair
Step 2. Then, in accordance with the diagram, you need to apply markings to the profile along which the pipes will be cut.
Markings are applied to the profile
Step 3. Next, you need to cut the part from the square section metal profile to the required length. It is important to understand that not all parts will have straight cuts - they may also be beveled. This is necessary to make it easier to join them when assembling the chair frame.
Metal profile cutting
Step 4. Each section must be processed to remove burrs and other defects.
Sections are carefully processed
Step 5. Next you need to carry out welding work and connect the elements of the chair frame into a single structure.
Carrying out welding work
The parts are connected into a single structure
Step 6. Now the welding areas need to be processed so that they are even and do not stick out. A simple grinding with a grinding wheel is sufficient.
Processing of weld seams
Grinding wheel used
Step 7. After this, you need to assemble the back and seat of the chair from two boards of the same size. They can be immediately connected to each other. Or you can attach it to a chair separately.
You will need 2 boards of the same size
Chair back and seat
Step 8. In the metal frame and in the wooden blanks for the back and seat, you need to drill holes of the same diameter, which must coincide with each other when fitting the same seat to the frame.
Drilling holes in wooden pieces
Drilling metal elements
Step 9. Now you need to sand the wooden elements and varnish them, and the metal frame of the chair needs to be painted. Work cannot be continued until the paint and varnish materials have dried.
Painting the metal frame
Sanding wooden elements
Step 10. All that remains is to assemble the elements together, that is, screw the back and seat to the frame. And the chair is ready, you can use it.
Screwing the backrest
Ready-made chair in loft style
Portable welding machine
This easy-to-make stool can be used as a bedside stand for a phone or remote control, for flowers or as a mobile mini coffee table. Despite the apparent illusory nature of the wobbly post leg, this chair is actually a very stable example of fashionable and simple wooden furniture.
DIY folding tripod stool
The sequence of assembling the “skeleton”
A shelving unit is the largest piece of furniture in the house, large in size and accommodating a large amount of property. To create this structure, a metal “skeleton” is first created, which is then covered with wood.
First you need to decide on the type of rack you need:
- Corpus;
- Built-in;
- Semi-built;
- Diagonal;
- Trapezoidal, etc.
You can use an old ladder as a frame - it will be suitable for a high shelving unit. The surface is sanded, additional floors and levels are filled. An important detail of the cabinet is the presence of a pallet.
A cabinet with a metal frame is an excellent preparation for an open bookcase, onto which shelves are placed and attached. If you prefer a closed type of furniture, a metal base will allow you to variably place mezzanines and internal sections. Asymmetrically located shelves of different sizes, enclosed inside a simple rectangular frame, look interesting.
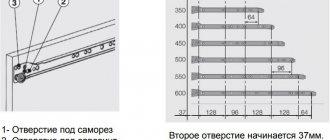
Step-by-step instructions on how to make a folding stool with your own hands
Do you know that a stool with three legs is much more stable than one with four? There is no secret, a structure of four supports requires a flat surface, and if there are only three supports, then they themselves “look for” where to rest. How to make a three-legged stool with your own hands? Watch the master class. Use a jigsaw to cut out the round seat, then the legs.
Make holes in the seat: using a compass, draw a circle on the bottom of the seat, divide it into three equal parts and determine the points for the holes. The hardest part is drilling the holes at an angle, this requires precision. Alternatively, you can use a block. Drill the holes one by one, resting the seat on the block, then the angle will be the same, the main thing is to point the drill accurately vertically. Then insert the legs and sand the surface. The stool is ready.
Selection of material and tools
Almost all the materials needed to make a folding wooden stool with your own hands were purchased at a building materials store. I had some little things in stock. Total materials obtained:
- pine beam 300 x 4 x 2 cm – 1 pc.;
- board 234 x 4 x 1 cm – 1 pc.;
- screws 4 cm – 16 pcs.;
- emery wheels – 2 pcs.;
- bolts ø 6 mm, length 4 cm – 10 pcs.;
- nuts, washers, groovers (spring washers) - 10 pcs. of each type;
- metal tube with internal ø 8 mm, length 195 mm;
- piece of reinforcement ø 6 mm, length 31.5 cm.
- pine beam 300 x 4 x 2 cm – 1 pc. = 30 rub.;
- board 234 x 4 x 1 cm – 1 pc. = 15 rub.;
- screws 4 cm – 16 pcs. in stock;
- emery wheels – 2 pcs. in stock;
- bolts ø 6 mm, length 4 cm – 10 pcs. = 10 rub.;
- nuts, washers, groovers (spring washers) - 10 pcs. of each type. = 10 rub.;
- metal tube with internal ø 6 mm, length 19.5 cm = 15 rub.;
- hairpin ø 6 mm, length 31.5 cm in stock.
Total costs were: 80 rubles.
To make stools in a small home workshop you will need a standard set of carpentry tools for woodworking and some consumables:
- hacksaw;
- plane;
- chisel;
- screwdriver;
- Phillips screwdriver;
- Sander;
- jigsaw;
- clamps;
- square, tape measure, pencil;
- manual frezer;
- Workbench.
To make the legs and frame of a homemade stool you will need natural wood. For seats you can take plywood, MDF, chipboard. In addition, you will need wood glue, tape and fasteners (screws, self-tapping screws).
Tree
A simple wooden stool will find its place in any home. Some models are quite easy to make. Experts recommend using pine, birch, oak, beech, and walnut. These types of wood are easy to process. It is better to make seats for stools from boards. A solid edged board or ready-made furniture panels will do.
READ MORE: Step stools wooden folding ladders children's plastic stools aluminum models for 2 steps
If suitable lumber is not available, chipboard can be used. Making a stool from solid wood is quite expensive, labor-intensive, and therefore impractical. The legs for such models are made of bars. If you wish, you can try to make a product with round legs, which are turned from timber on a lathe. Ready-made balusters are another good option for turned legs for stools.
Plywood
- Cutting blanks is a more labor-intensive operation than working with wood. This is due to the fact that the raw material consists of multidirectional fibers and a viscous adhesive layer.
- Sheets thicker than 6 mm are best cut with a circular saw.
- You need to work with plywood along the grain. If you need to saw the outer layer crosswise, you must first make weakening cuts with a knife, and then finish them with a jigsaw.
- Before screwing in the screws, holes of a suitable diameter are drilled.
The thickness of the sheets used depends on the type of product. It ranges from 6.5 to 18 mm. For household carpentry work, as a rule, plywood of the FSF and FK brands is used, and a cheaper option is Sh-1, with one side sanded. It must be taken into account that with a small thickness of the workpieces, the structure must have stiffeners. If you wish, you can make collapsible plywood stools with your own hands.
Cardboard
You can create elegant stools with your own hands from durable cardboard using basic cutting and gluing skills. Such furniture is an original design project for beginners. The product will also come in handy if you need more seating for a party. You can find quite a few interesting stool designs that are easy to replicate at home.
To make cardboard furniture you need a minimum of tools and consumables:
- glue;
- stationery knife;
- scissors;
- sandpaper;
- scotch;
- roulette.
A durable product will be obtained by using three-layer corrugated cardboard. If the thickness is insufficient, you can simply glue the layers together. When joining, it is advisable to change the direction of the stiffeners for greater strength.
Loft style furniture is very easy to make, since you don’t even have to worry about selecting materials. This style is ready to “tolerate” plastic, metal, wood, leather, and all kinds of fabrics. If you think through the design wisely, you can use anything. The main thing is that everything fits together in the end.
Loft style and its features
When making furniture, you don’t have to worry too much about neatness. Of course, you shouldn’t do everything completely carelessly, but you also don’t need to cling to the slightest drawback. Let this flaw become the highlight of a homemade piece of furniture.
Shelves and tables made using metal pipes or metal profiles look great in this style. The wood may be a little old and the fabric may be worn. Barrels, cable reels, pallets, old window glass - something that can be safely used in creating loft furniture. You just need to put in a little effort and these items can turn into real works of art.
Furniture design in loft style
Materials and decor of chairs in loft style
Modern furniture manufacturers have already mastered this style. Loft chairs can be purchased from the following materials.
- Wood. These can be chipboard scraps, pallets, driftwood and stumps. Always leave the natural color. For decoration and protection, glossy or matte varnishes are used; the wood must retain its texture.
- Glass. Seats and backrests can be made from this material. The material can also be used as decoration.
- Metal. A good solution for creating a high-quality frame. Pieces of pipes, angles, fittings, wire and other waste from metal production can be used for work. Decoration is usually done with enamels of different colors, less often chrome elements are used.
- Textile. Used for upholstery. Almost any fabric can be used, except for fabrics related to palace styles.
- Stone. Used for decoration.
- Plastic. Typically polycarbonate or acrylic is used. These are transparent or colored chairs. They can specifically focus attention on furniture and also create a weightless effect.
For the loft style, it is important to choose the color of the furniture. If the entire room is designed in soothing colors, the chairs should not stand out from the general background. The optimal colors are:
- white;
- grey;
- beige;
- brown.
Sometimes the design is made more cheerful. In this case, brighter colors can be used, for example, blue or yellow.
Various defects in materials are often used for decoration. For example, they leave metal elements unpainted and do not mask chips and cracks.
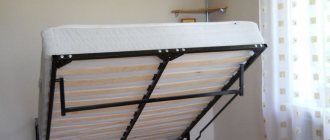
Bed made from pallets
Let's look at how you can make a simple bed from pallets that are used for transporting goods. It will cost mere pennies, or even almost free, which will save a lot of money. Moreover, such a bed will look very harmonious. The biggest expense for creating such a bed will most likely be a mattress, which, like it or not, you will have to buy.
Types of pallets
Step 1. The first thing you need to do is purchase the pallets themselves. You can buy them new, paying only 150-200 rubles per unit, or you can even find them for free by asking around in warehouses or trading companies. Often used pallets can be picked up "for pickup".
Finding pallets is not a problem
Step 2. Old pallets usually require drying. If possible, it is better to leave them outside in the sun for a few days so that they dry out a little.
It is advisable to dry the pallets
Step 3. After drying, the pallets need to be sanded and painted or varnished. Sanding can be done with regular sandpaper, but the work will be faster and easier if you use a special machine. You may also need a timber that will be used as a base; it also needs sanding and painting. However, you can simply put one row of pallets on top of another and thus make the bed higher.
Wood preparation
Step 4. Having chosen the place where the bed will stand, you need to lay either the first row of pallets on the floor, or a beam around the perimeter of the bed, creating a base.
Laying the base of the structure
Step 5. Next, you need to lay a row of pallets on top and secure them to the base using self-tapping screws. It is better to use them, since nails will not make it possible to create a monolithic structure - the joints may become loose.
Pallet stacking
Step 6. The next stage is sheathing. Usually only the top side of the pallets is sheathed with some kind of material. You can attach it to the tree using a construction stapler.
Sheathing material is secured with a stapler
Step 7. Then you need to put a mattress on top of the pallets sheathed with material.
The mattress is being laid
Step 8. The final stage is the selection of bed linen and bedspreads. The bed is ready.
Ready-made pallet bed
Sanders
Making a loft chair from a metal profile
Creating a folding chair from a sheet of plywood that can be folded into a flat structure occupies the minds of not only ordinary craftsmen, but also designers. Many options have been invented. And yet everyone strives to improve ready-made models. Thus, quite recently, French designer Christian Desile developed a well-known project for an original chair made of plywood, but craftsmen have already come up with their own interpretations of the product.
We invite you to take the opportunity to replenish your set of comfortable furniture. Several of these chairs can easily fit in the trunk of your car to make your picnic enjoyable and comfortable.
Preparing for work
To create your own folding chair, prepare:
- A sheet of plywood, the thickness of which is at least 18 mm. This project uses 19.5mm material.
- 4 regular door hinges. They will attach the folding parts.
- Wood screws with a flat head.
- Small pieces of leather will serve as an external decorative “cover” for the loops.
- Jigsaw.
- Drill.
- Chisel.
- A router with attachments or sandpaper of different grits.
Before starting work, each part diagram is transferred to plywood so that the elements are located one inside the other, as can be seen in the photograph.
Description of work
- Using a jigsaw, carefully cut out all three parts along the outlined contour.
- In the places where the hinges are attached, according to the size of the fittings, use a chisel to prepare the places for their installation. Part 1 will be attached in the lower front part to the bottom of the “bowl” of part 2. Part 2 is connected with hinges to part 3 at the top on the back side.
- Sand the surfaces of the parts, as well as the edges, using a router or sandpaper. To make the finished chair aesthetically pleasing and more comfortable, you can chamfer the edges of the elements.
- Place all elements for installing hinges on a flat surface. In order for the chair parts to lay out well, they must not rub against each other. Limit the space between the parts with small pieces of boards or drywall 0.5-0.7 mm thick.
- Using a screwdriver and flat-head wood screws, install the metal fasteners in the places prepared for them, with the loop facing inward.
- According to the size of the loops, you need to cut 4 blank strips from the leather; they will cover the unaesthetic metal parts.
- Use the outer self-tapping screws to attach the leather strips over the furniture hinges.
- To prevent parts from becoming loose when folding/unfolding, use a jigsaw to make slits in the bottom of the legs and on the edge of the seat. Then thread the belt through them.
READ MORE: Diseases and pests of clematis 24 photos what to do if clematis grows poorly and withers Treatment of clematis Description of aphids and how to deal with them Other pests
The folding chair is ready. An elegant and compact product will be useful in the kitchen, in the nursery, and on the balcony. You'll definitely want to make a few more of these.
A small homemade stool will be useful not only for those who like to fish. It is so small and compact that it can easily fit in a tourist’s backpack or just for a walk in the park. It is very important to choose the right materials for making a high chair - durable, light and wear-resistant.
The design of the stool is the simplest. It consists of only three elements and does not contain complex joints or hinges. The parameters of the chair proposed in the drawing are designed so that when folded it can be put into a backpack. If you need a larger product, they can be changed.
- A piece of plywood 40x30 cm with a thickness of at least 12 mm.
- Dense wear-resistant material measuring 30x35 mm. You can use a tarp or a small piece of carpet.
- Jigsaw.
- Milling cutter or sandpaper.
- Scissors.
- Wood paint, brush.
You can easily disassemble such a stool and put it with you in a hiking backpack or car, and it won’t take up much space. Even a 2-3 year old child can disassemble and assemble such a chair.
The photo below illustrates all the steps in making this model. Note. that the seat of the stool is held on by magnets, which makes disassembling the chair very quick and easy. The magnet, in turn, sticks to the glue.
This stool is assembled from parts cut from a single piece of plywood.
An unusual addition to a transformable chair, which can be both a stool and a ladder, was invented recently. The back of the transformer stool was replaced with an ironing board and this type of furniture acquired another remarkable quality.
I wonder what else the craftsmen would come up with to complement this chair???
Making a loft chair from a metal profile
Types of pallets
Pallet stacking
The mattress is being laid
From the pallets from which we made the bed above, you can make other furniture. These can be large and small tables, sofas, armchairs and much more. Now we’ll look at the option of creating a simple table with metal legs that will look very organic in a loft-style apartment.
Step 1. First you need to prepare. To create such a table, it will be enough to take one pallet, and you will also need to make or buy 4 metal legs of the same height. You will also need a saw, screws, a screwdriver, a brush and varnish. Sandpaper for sanding or a sanding machine will also come in handy.
Preparing everything you need
Step 2. The pallet needs to be partially disassembled. It is very large, and we are making a small table. Therefore, the excess pallet needs to be sawed off, and several boards need to be detached from the remaining piece of the pallet - they will be needed to create supports for the legs.
The pallet is disassembled
All excess is cut off
Step 3. It is recommended to sand all workpieces with sandpaper so that they are not prickly and dangerous. Next, you need to screw along the right and left ends along the board from those pallets disconnected from the rest. You should get flat platforms to which the legs themselves will be attached.
There should be flat areas
Step 4. To attach the legs to the corners, you need to screw metal corners at a short distance from the edge.
Screwed metal corners
Step 5. The free spaces between the boards on the “front” side of the table need to be filled with other boards from the rest of the pallet. They can be nailed, or they can be screwed onto self-tapping screws. There should be a solid surface.
All voids are covered with boards
Step 6. Next you need to fix the legs on the back of the table.
Metal legs installed
The table is varnished
Step 7. When the varnish is dry, the table can be used for its intended purpose. Namely, use it as a coffee table, a small dining room table, or put some things in unique shelves.
Ready-made table in loft style
Advantages of furniture made from pallets
Screwdrivers
Style Features
The loft style erases boundaries and boundaries - the most daring and unusual solutions are acceptable in it, which has become a real discovery for creative and modern people. The premises evoke delight and are distinguished by originality, while they are characterized by such features as:
- large windows without curtains or curtains;
- inadmissibility of plasterboard and other partitions;
- lack of finishing of brick walls;
- concrete floors are covered only with wooden flooring;
- the presence of a stove, fireplace, ceiling beams is acceptable;
- modern lighting devices are used;
- It is necessary to have antique-finished furniture or really old shelves and cabinets.
The loft is divided into: glamorous (bright interior elements), bohemian (the presence of antique items that are of high value), industrial (a minimum of decor and furniture).
Folding stool (or table) design
Before making a stool, you need to think about choosing a model. First of all, furniture for seating without backrests and armrests is classified by area of application. Based on this criterion, stools are:
- kitchen (in turn, they are divided into classic four-legged, solid, folding, transformable, step-stools, collapsible, three-legged with a round seat, and so on);
- bar (have a high seat and leg support);
- tourist (usually folding, made of lightweight, weather-resistant materials);
- musical (the design is height adjustable);
- children or adults;
- gardening;
- designer, made in Art Nouveau style.
In addition, they differ in shape, seat softness and design of support elements. Stool seats come in different configurations and degrees of hardness: square, round, wicker, soft and hard. Models, depending on the design, can rest on four or three legs.
Kitchen
Bar
Tourist
Children's
Garden
Designer
Basically, stools are decorated with beautiful carved legs, but you can also come up with something original for the seat. Here's an example - a do-it-yourself wicker stool, cheap and stylish. A simple diagonal weaving method is used here. All you need is a cord, preferably a parachute cord, nails and a hammer. You can make the stool yourself, this article shows many options, or you can use an old stool and perhaps remake the drawers a little.
- For the manufacture of load-bearing elements, plywood with a thickness of 18-24 mm is used; for backs or seats, 12-16 mm is sufficient. Only in this case will the structure withstand the weight of an adult; for children's models, the thickness can be reduced by 1-3 mm.
- The standard height of plywood chairs for adults varies from 42 to 48 cm; for children, the value decreases to 25-35 cm, depending on age. The main selection criterion is that the legs should be positioned at right angles and reach the support.
- If you plan to use the chair outdoors or in damp rooms, it is better to use moisture-resistant or laminated plywood.
- To obtain an aesthetically pleasing appearance of the product, it is necessary to use only grade 1 or grade 2 material; others will be extremely difficult to sand and paint with high quality.
- For use at home, stool chairs or designer models are more suitable, while for a garage or pantry it is better to give preference to folding or transformable products.
- The design of the manufactured interior item must correspond to the style of the living space. Simpler models with minimal decor are suitable for outbuildings and garages.
Use plywood with a thickness of 18-24 mm for load-bearing elements, for backs or seats - 12-16 mm
Standard chair height
For an aesthetically pleasing appearance of the product, use grade 1 or 2 material
The design of the chair should match the style of the living space
The pallet is disassembled