There are many cases when it is impossible to nail a nail to a wall in an apartment to install a shelf or picture. This may be due to renting an apartment when the owners are against any interference. Or there is a person living in the house who cannot handle a hammer and nails. Contrary to the usual, standard method of installing shelves on the wall - by hanging them on a nail driven into the wall - we will introduce several other methods.
Shelf holder in the closet: care and operation
As such, there are no special rules relating exclusively to the care of fasteners. Unless the plastic corners and tension sleeves are kept clean. The mode of operation is more important here. For example, a connection with Euroscrews does not tolerate loads in a perpendicular plane.
There are no special requirements for the care of fasteners. Minifixes, conical ties and especially rafixes have a greater degree of resistance. The weakest point of such fasteners is the cutouts for the pin. Therefore, you should not load the shelves more than usual. In addition, it is advisable not to allow excess humidity in the room, as this does not have the best effect on the mechanical properties of wood.
If the shelf is properly attached, it will last a very long time. Based on the large selection of available fasteners and auxiliary accessories, solving problems with installing a new shelf or fixing a broken one should not present much difficulty. Moreover, using original fastenings for shelves in the closet, you can try to optimize the internal space so that everything you might need fits there.
Modern types of furniture fasteners
Specialized departments offer many types of furniture fasteners. Almost all of them belong to the same type, this is a threaded screw. The design consists of a wide bolt and nut. During the assembly process, they tightly fix the various parts together. They are used to make kitchen tables, cabinet and upholstered furniture.
- bolts with driven nuts. The main advantage of such products is their reliability. The product is strong;
- confirmation It belongs to the screw type of fastener. The principle of operation resembles self-tapping screws or a hex screw. These products ensure quick assembly of the furniture structure, as well as its aesthetic appearance;
- eccentric couplers. Almost all high-quality products consist of such elements. They provide good fixation of each part. In addition, they allow you to increase the speed of assembly;
- wooden corners. This type was used more than ten years ago, but due to their reliability they are used for the production of modern furniture.
The stores offer a catalog of furniture fasteners. It concentrates more than 100 types of metal products for the production of one or another type of furniture paraphernalia.
Fastening in “serious” ways
In this paragraph we will look at ways to fasten objects or a series of objects that have significant weight, without using nails. It is worth noting that dismantling some elements will be difficult and will leave behind characteristic marks . In this regard, it will be necessary to update the wall covering.
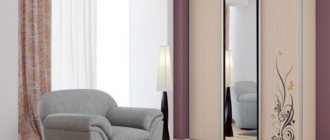
No. 11. Picture board
This method is used when you don’t mind the floor and ceiling , but you do mind the walls. Please note right away that if you have a suspended or suspended ceiling, then this method is not for you . Unless, of course, this was foreseen in advance. It is worth noting that using an entire separate wall to place objects will help achieve unique interior solutions.
Such a board can become the center of the room and set the rest of its furnishings. Compositions that are designed to tell about something look more harmonious and thoughtful. For example, a series of landscape photographs taken at different times of the year, which convey the brightest moments of each month and tell the story of the decline and rebirth of nature. Or a series of black and white portrait photos of a married couple, which depict the story of their acquaintance and the most significant moments. Or the story of a person dear to you growing up. to highlight such an element using spot lighting . And it’s even easier to build such a structure. You can use real wooden boards, knocked together into a single sheet of the required size. More affordable options involve the use of laminated or sanded chipboard or MDF.
You can paint the surface yourself in a suitable color. For fastening, you need special brackets , which are sold at any hardware store.
It is best to place 5-10 cm from the wall in order to emphasize the individuality of this object and direct maximum attention to it. If you have already decided on the order in which objects will be placed on the board, then it is better and more convenient to make fastenings for them before installation. If not, you will have to use the stairs.
Liquid Nails
Liquid nails are a special glue that securely connects surfaces. Simply apply liquid nails to the back of the frame in small dots (if the painting is heavy, you can coat the entire frame). Then press the painting flat against the wall surface and hold for a few seconds.
This is interesting: A small kitchen is not a problem! Expanding the boundaries
Universal modular shelf: an idea to note
Shelves are the thing that no home can do without. Place books, arrange tools, small items, dishes, trinkets, etc. — shelves can be used everywhere. But installing shelves often causes a lot of trouble. You need special fasteners, power tools for drilling holes for installing dowels, anchors, etc. At the same time, if you subsequently want to remove the shelf and move it to another place, noticeable holes from the fasteners may remain on the wall.
A way out of this situation is offered by innovators from California who have developed a rail system for attaching modular shelves. The essence of the new product is as follows: an aluminum guide rail is nailed to the wall using small nails, onto which a shelf or drawer is then hung using the tongue-and-groove system.
According to the developers, this approach eliminates many operations - there is no need to drill the wall, combine fasteners and hinges on the shelf.
All you need is a hammer, and only minor nail holes are left on the wall, which can be easily hidden if necessary.
Despite initial skepticism that the load-bearing capacity of the fasteners would not be enough, tests on a wall covered with plasterboard showed that the weight was distributed over a large area and the shelf did not fall.
Of course, such a shelf is not intended for storing very heavy things, but magazines, several books, and various household items fit perfectly into the concept of a mobile shelf.
Mobility is the second advantage of this system. By hanging the guide rails on the walls, the user can rehang the shelves in a few seconds, add the necessary elements and organize a convenient storage system.
The shelves themselves are made of polished aluminum, and the drawers are made of plywood and varnished. In the future, it is planned to modernize the system and expand its functionality. For example, shelves can be made of plastic, given an unusual appearance or decorated.
At the moment, several standard sizes of slats and shelves have been developed, intended for installation in rooms of different sizes and functionality.
In addition, there are additional accessories designed to store a mobile phone, electronic gadgets, lamps or mugs.
We also recommend watching a video that shows the process of making furniture from chipboard yourself.
Source
Tips for performing work
To ensure long service life and reliability of the structure, preference should be given to fastening elements that fully comply with technical requirements. To achieve a uniform load, the cabinet must be fastened exclusively by level. In order to prevent damage to the gypsum boards, it is necessary to strictly control the tightening force of the anchor bolts. The height of fastening objects to a plasterboard wall is determined taking into account your own height and family members, the distance between the work area and hanging pieces of furniture.
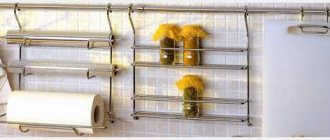
Fastening objects to tiles
Attaching the shower head
You can live without hanging pictures, but it’s impossible to live without shelves and other attributes in sanitary facilities. I will give the technology using the example of fixing a shower head in a bathroom on a tile.
A hole with a diameter of 6 mm is drilled in the tile, and a dowel is inserted into it. Since I found myself in a void, I had to install a 6x25 dowel with a flange so that it would not go deep. The hole in the base of the stand for the shower head is located at a distance of one and a half centimeters from the surface of the support; the self-tapping screw had to be taken so much longer, 45 mm. The required length was only available with a large pitch and a conical head.
The diameter of the hole in the base of the holder cone was comparable to the diameter of the screw head; to increase the support area, I placed a washer. The self-tapping screw is screwed in, and the watering can holder is screwed on with a union nut. It is done.
Attaching a hook for things
When choosing hooks for the bathroom to hang towels and bathrobes, I liked an inexpensive hook, but to attach it I needed to drill two holes in the tile. I didn’t want to do this, so I figured out how to get by by drilling only one hole.
I made the fastenings using an additional 4 mm thick plastic plate and two M2.5 threaded screws with conical heads. The plate can be made from any solid material.
The hole for the screw in the plate is made in the upper part so that the center of gravity of the hook is lower. The plate is secured to the wall with a self-tapping screw, with a universal thread pitch, with a conical head shape, standard size 3×25, and a countersink hole is made in the plate so that the self-tapping screw does not protrude, and the plane of the base of the hook fits tightly.
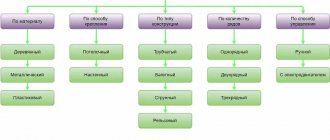
Types of fastenings for different shelves
There are three main types of shelves used in modern furniture:
- Wooden. The material is chipboard or MDF. The most common type.
- Glass. Manufactured from tempered glass through special thermochemical treatment. As a result, additional strength is provided, which allows them to be used in furniture production.
- Mesh or wire. They are a wire frame in the form of boxes or baskets.
Today, shelves are made from almost any material, including glass.
Shelves can have various modifications, including retractable mechanisms.
Hanging kitchen cabinets on drywall - 5 reliable options
Features of attaching wall-mounted furniture to plasterboard are related to the design of the walls and the characteristics of the material itself:
- The gypsum plasterboard wall is hollow - the thickness of the lining is only 1-2 cm;
- Drywall does not tolerate point loads well - around a self-tapping screw simply screwed into the plasterboard, the material quickly begins to crumble and crack.
If you make a mistake with the fasteners or choose the wrong fastening method, something like this may happen.
Taking these factors into account, several types of fasteners and professional techniques are used to securely hang a cabinet on a plasterboard wall. For starters, here is a useful video about fastening methods and methods:
Necessary materials and tools for installing drywall to the wall.
The most important thing is to choose reliable fastenings and hangers. There are many fasteners suitable for drywall. The difference lies in the type of furniture you are going to attach.
It is necessary to accurately calculate and measure the dimensions and weight of kitchen cabinets.
You will need the following tools.
- Anchor bolts.
- Retractable mounts.
- Internal technological supports.
- Intermediate slats.
- Suspended structures.
- Metal and synthetic cables.
- Dowels.
- Various hooks and loops.
- Roulette.
- Pliers and wire cutters.
- Knife.
- Hammer or rubber mallet.
- Phillips screwdrivers of different sizes.
- Bit.
- Drill bit with carbide tip (12 mm)
- Drill.
- Putty knife.
- Level or special plumb line.
You can use a milling cutter and a screwdriver, but this is not necessary.
If you wish and have enough experience, you can make fastenings no worse, but it will take much more time.
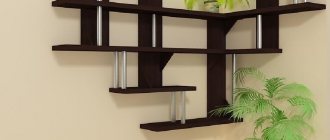
Alternatives to shelves
Instead of the usual shelves hung on the walls, designers offer some other tricks that are both easy to install and have a twist:
- To arrange clean towels in the bathroom, you can not nail a shelf, but buy a towel hook, hang a small paper bag on it and fill it with folded clean towels;
- The same towel hooks can be used in the hallway to store keys and do without a bulky key holder;
- Flat and lightweight objects - photo frames, light paintings - can also be easily mounted on the wall using mounting tape, rather than displaying them on a shelf.
It would seem, but what about books? You can only store them on shelves! But no, modern designers cleverly install floor shelving - both stylish and airy, and without the need for unnecessary installation work.
Build your Home!
1 – bracket for fastening the shelf; 2 – mounting holes; 3 – steel axle; 4 – suspension; 5 – shelf.
With thinner bricks, cinder block and plasterboard walls up to 100 mm, it is possible to use invisible fastening of shelves to the wall, but such shelves are suitable only for decorative purposes.
Since they simply will not withstand additional loads.
Then you need to determine the thickness of the shelf itself.
It can be determined by placing a load of expected weight on it. The absence of visual deflection and deflection to the touch indicates sufficient thickness of the board.
An exception may be cases when the choice of a thicker board is dictated by the general concept of the interior.
However, it is also necessary to take into account the fastening features, due to which the thickness of the board, as a rule, cannot be less than 30 mm. The thickness of the shelf must be selected depending on the load, for example, for books - boards with a thickness of 45 to 60 mm are suitable.
The board must be dry and processed in accordance with its purpose.
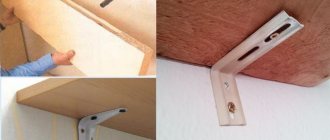
Types of fastening shelves to the wall
After this, the types of fastening the shelves to the wall are selected, depending on its purpose and the thickness of the board.
There are a huge number of fastening materials that can be expertly hidden from prying eyes; let’s look at some of them:
- The most popular at the moment is
the use of hidden hinges located on the back of the shelf.
Fastening technology using hinges:
For accurate hanging, you need to accurately measure the distance between the centers of the loops. This distance will determine the markings on the wall for the mounting holes. To ensure that the shelf hangs evenly and does not warp, it is better to use a building level, which will ensure an accurate horizontal line for the shelf. After the holes in the wall are drilled in accordance with the markings, they are filled with a plug into which screws are screwed. The screw should be screwed in deep enough, but the distance between its head and the wall should allow the shelf hinges to be put on.
The shelves come complete with special fasteners designed for invisible installation. A shelf installed in this way will be securely fastened. This will create a visual impression that it is literally hanging in the air.
Method of installing shelves using special furniture fittings
Let's look at the step-by-step implementation of this installation.
It starts with purchasing a modern shelf in a furniture supermarket or online store.
Step 1. Measure the distance between the centers of the mounting holes directly on the product.
Step 2. After this, mark the location of the shelf on the wall. Using a building level, we draw a horizontal axis on which we mark the position of the mounting holes, taking into account the center-to-center distance between them.
Step 3. Next, we attach the bracket to the resulting axis in the center of the shelf holes and mark the places for its future attachment to the wall. They must be located strictly along the horizontal axis.
Step 4. The next step is to drill a hole for attaching the brackets. They must be made strictly perpendicular to the wall, this will ensure that the shelf angle is 90 degrees relative to the wall. To simplify drilling, it is advisable to use a square.
Step 5. Next, remove the remaining drilling products from the holes and hammer in wood plugs or plastic dowels.
Step 6. Then we attach the brackets to the wall using self-tapping screws.
Step 7. Now we carry out the direct installation of the shelf. To do this, we put it on the steel axles of the brackets, alternately tapping it with a rubber hammer on the left and right sides in the front part. The shelf will be evenly installed on the fastening elements, eliminating distortions.
Step 8. The final stage will be to check the play and reliability of the fastening. After this, we remove the remaining debris and install a flowerpot with an orchid. The installation process is complete.
Another method of invisible fastening (metal rods)
Installation technology for fastening metal rods:
As a rule, reinforcing pins or threaded rods with a diameter of at least 10-12 mm are used.
First of all, we take our shelf and measure its length and width.
Then, using a ruler and a building level, we mark this length on the wall (not the entire distance, but a little shorter), at the location of the future location of the shelf.
We mark three board thicknesses on each side of the shelf and drill holes equal to the diameter of the pins; we make such holes in the shelf itself (you can use a template, since the holes in the wall and in the shelf must match exactly).
Then judge from the subsequent filling of the shelf, if there will be light souvenirs there, then these two pins will be enough, but if there will be heavier things, you can make more fastenings (even every 5 cm)
. We take the required number of long rods (their length should be approximately 1/3 of the width of the shelf, but keep in mind that there should be at least 10-15 cm of pin in the wall).
Insert the rods into the wall half their length, check with a level so that they are exactly perpendicular to the wall; the durability of the entire structure and the safety of the objects standing on it depend on this. Then fix the rods with synthetic glue or resin and wait until the glue dries.
After this, we place the shelf on the rods (you can additionally glue the pins to the shelf by pouring glue into the holes). One of the mounting options can be considered preliminary installation of a square block into the wall (usually used for narrow shelves). Fastening installation technology: To do this, a square block is attached to the wall, the side of which is equal to the thickness of the board for the future shelf.
It is attached using dowels, nails or plastic anchors with self-tapping screws. Then, round wooden pins (pins) are driven into the block into holes pre-drilled according to the template, which are lubricated with glue, after which the wide part of the shelf is put on them.
In order to place the board on pins or dowels, use a mallet with a rubber striker, which is gently struck on the outer edge of the board.
By varying the height, texture, color and thickness of the shelves, you can achieve an original and unique design and create a feeling of orderliness and completeness in the design of the room. Without limiting your imagination and taking advantage of all the advantages of the modern construction market, you should remember about safety, carefully manufacture and check all fasteners. In this case, the shelves, like any other element of the functional decor of the room, will serve for a long time, remaining a reliable, useful and beautiful element of the interior.
You can also watch a video of hanging a shelf on the wall
How to hang a wardrobe on a loose wall
Foam blocks and cinder blocks are classified as “loose” building materials to which it is difficult to attach fasteners. Also, adobe, adobe and wooden walls cause certain difficulties.
The choice of fasteners depends on the type of material and the planned load (weight of the loaded cabinet). It can be a screw fastener or a “butterfly” or “umbrella” type drop-down fastener. Long anchor bolts perform well in practical applications. You can drill with a thick drill bit (diameter from 8 mm) and strengthen the fastening point using wooden plugs or special glue for subsequent screwing in the self-tapping screw. Or immediately use “chemical” anchors.
There are plenty of options. Specialized construction stores will help you decide on the best solution. For any type of wall you can choose the best option. Combinations of several types also perform well.
Installing shelves
The shelves are placed on brackets and pencil marks are made through the mounting holes on the bottom of the shelves. Next, holes of the appropriate size are drilled at the marks on the bottom of the shelves.
The flat screws are threaded through the holes in the mounting bracket and into the pilot holes on the bottom of the shelves. During the work you will need the following tools:
- hidden wiring detector (Stud Finder);
- roulette;
- electric drill;
- drill of the required diameter;
- flat head screws;
- level (carpentry);
- shelf brackets;
- shelves.
It is recommended to use hollow anchors to attach shelves when the studs are not in the correct location to accommodate the length of the shelves. It is helpful to have a helper to hold the shelves in place while the holes are made in the wall. Be sure to wear safety glasses when drilling holes.
What information do you need to provide to start working on the project?
We need to receive your terms of reference, but if you don’t have it, then at least the following preliminary information:
- warehouse plan, which specifies the dimensions of the grid of columns, the presence of links to doors, gates, windows, and designated communications;
- information on permissible loads on floors, floor materials and their condition;
- description of the stored goods (container, dimensions, weight, packaging units, frequency of movements, etc.);
- data on existing warehouse equipment or planned for use (load capacity, lifting height, width of the working corridor, dimensions, model, etc.);
- information about the mandatory organization of areas for acceptance, packaging, shipment, and others (if such areas are already organized, then information is needed about their configuration and area);
- indicate, if any, specific requirements for the racking system.
What fasteners to use for glass furniture
Modern models consist of many glass and glossy panels. To fix them, special types of fasteners are used. Silicone and rubber gaskets help reduce friction.
They prevent damage to the glass panel during the assembly process. Most of the parts are glued with a special adhesive. The fittings consist of lightweight metals. Thanks to this, all the details are in harmony with each other. Hidden furniture fasteners are used here.
For larger models, corners, hinges and locks are used. Thin screws and self-tapping screws with plastic attachments help secure these elements.