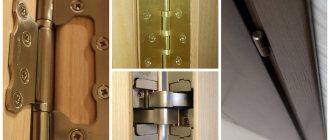
If you look at how craftsmen cut in hinges, it seems like a complicated matter. In reality, the work is simple, you just need to choose the right accessories. By designs The following types of products are most often used:
- Direct. The most common ones, consisting of a hinge with side mounting plates. Canopies are called card or butterfly canopies.
- Angular. The fittings are designed for interior doors with a “Euro-quarter” (a protrusion that hides the gap between the leaf and the door frame). Similar to the previous ones, only the side plates are made from angles.
- Screw-in. The hinge design consists of a rotary axis with pins welded to the side instead of mounting plates. Designed for lightweight fabrics.
- Hidden. The fittings are installed on expensive entrance doors. The design of hidden hinges is a hinge that is recessed when installed in the body of the door block.
- Italian. The fittings differ from hidden hinges in the design of the hinge. The mechanism is installed on expensive imported doors.
Based on the installation method, there are three types of hinges:
- Invoices. The fittings are simply fixed with self-tapping screws to the surface of the door and frame without first cutting out a recess.
- Mortise. Recesses are chosen for fittings. The fastening plates are flush with the surface of the door and frame.
- Screw-in. The fittings have pins instead of mounting plates. During installation, these pins are screwed into the body of the door block.
In the direction of door opening, hinges are:
- Left-handed. The door can only be opened to the left.
- Right-handed. The door can only be opened to the right.
- Universal. The door can be opened to the right or left.
Universal hinges can be attached to the right or left side of the door, which creates an installation advantage. The disadvantage is the difficulty of quickly removing the sash.
Selection of door hinges
Based on the material and design of the canvas and box, the initial selection of the hinges you need takes place. For doors with a wooden frame and frame, hinges that are used in models with an all-glass panel or with a plastic / aluminum profile are not suitable. Each case requires its own set of fittings: the differences lie not in the working part of the hinges, but in the fastening elements.
Hinges for glass doors have their own characteristics. So, you cannot simply screw the hinge wing to the glass sheet with screws. The “fist” is most often welded to a clip-on fastener in which the blade is already clamped.
Model Sinthesy swing S4 from the FOA factory.
For example, you cannot use a regular plate or pin in doors with plastic and aluminum profiles. Point fastening with screws will damage the frame. It is possible to install hinges to a leaf or frame with a plastic or aluminum profile only when making a door to order, since the frame requires reinforcement at the places where the hinges are installed. Therefore, the customer must select in advance the hinges he needs based on the method of fastening and the opening side.
Installation instructions
See also
Vanish for furniture: how to clean a sofa at home, instructions
Installing hinges that do not require insertion is quite simple. This eliminates the need for milling.
See also
DIY breakfast table in bed: what to make it from
You just need to follow the instructions:
- First, markings are made on the side of the door;
- It is better to retreat at least 25 mm from below and above;
- the loop is applied to the canvas to mark points for the screws;
- if everything is level, holes for fasteners are drilled;
- the door leaf and the furniture facade are connected;
- a control check of closing and opening is carried out;
- adjustment is being made;
- All screws are finally tightened tightly.
This completes the installation.
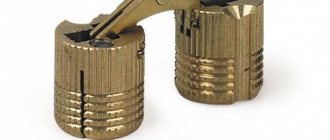
Screw-in
The so-called screw-in hinges are a new discovery in the field of door hardware.
They gained rapid popularity due to the ease and speed of door installation. Screwing into the door leaf and into the frame, they perfectly fix the door, and the presence of additional height adjustment allows you to install the door perfectly accurately. Screw-in hinges are universal and do not require prior determination of the door opening direction.
The screw-in hinge is used for frame doors made with quarters. Many door manufacturers are shifting part of their production specifically to these hinges.
The abundance of door hinges allows you to choose exactly those that are suitable for a specific apartment door. If you have any questions, you can always ask our consultant.
Correct marking
Installing door hinges by eye is unacceptable - even a small error can lead to distortion and deformation of the door leaf and structure. Marking is done with a pencil as follows:
- Attach the hinges to the intended installation locations. Hinges should be placed with a minimum distance of 20 centimeters from the edges of the door (top and bottom).
- Trace the hinges attached to the door end with a pencil, then set them aside.
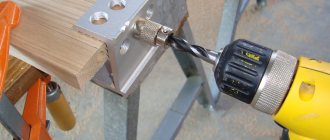
- Using a chisel and hammer, make the indentations in the marked areas necessary to install the mortise hinges.
General view of the cutout for the door hinge
Before installing hinges on the door, you need to mark the door frame. This operation will require skill and patience to correctly determine the location of the loop:
- Place the canvas in the box and secure it with wooden wedges in the way it should be in the installed state. To level the door leaf, use a building level.
- After aligning the canvas, mark on the frame where the door hinges come into contact with the door.
- As with the door leaf, use a hammer and chisel to make the required number of recesses for installing door hinges.
A hinge already embedded in the doorway
Common Mistakes
The most harmless thing is that it may be an incorrect indentation from the edge of the canvas. If the hinges are installed correctly, but too close to the edges, then you will simply ruin the appearance.
The next and most common mistake is when people confuse the installation locations: the small inner part of the hinge is attached to the box, and the large outer part is attached to the canvas. This setup is dangerous for several reasons.
If the outer part of the loop runs along the edge of the canvas, then the holes will be at a distance of a couple of millimeters from the edge, respectively, if you slightly skew the screw and it will come out from the side, or you may get caught in a knot and then the outer edge will break off altogether.
If installed correctly, the holes in the small part of the butterfly will be located almost in the center of the door leaf, which means there is no need to worry about any cracks or distortions.
Things are no better with the box. The photo shows that the holes are too close, and the thickness of the lightweight box is small, so it can burst under load.
In addition, the box is usually attached to the wall with anchors in 3 places - these are two points under the hinges and one in the lock area. If we do everything as expected, then we will have 2 places left where we can drive the anchor and cover it with a loop, otherwise the anchor will be visible, which is also not very good.
There is one more nuance: during installation, all hinges must be strictly parallel to each other. The slightest distortion vertically or horizontally will lead to the door starting to “play” and eventually the hinge will burst or the screws will break out.
Preparation
You need to prepare for the installation of overhead parts. Prepare the necessary minimum tools and free up your workspace. To install hinges on the sash and door frame, you need the following equipment:
- level;
- long ruler;
- a simple slate pencil;
- screwdriver or screwdriver;
- screws;
- wooden wedges.
Based on the list presented, the set is quite modest and affordable. You will not be required to incur unnecessary costs, complex manipulations or a high level of professionalism.
Types of canopies
A variety of door hinges allows you to choose which way the door will open. Therefore, in order not to regret the decision after its installation, it is important to decide in advance on the type and operating principle of the hinges.
Hinges are a fairly simple device that allows you to do all the work yourself.
Butterfly loops
They are the most practical for interior doors. Butterfly loops got their name because of their characteristic shape - when open, they resemble the wings of a butterfly. When folded, the canopy is one card thick. This is achieved thanks to a special shape ─ when closing, one “wing” of the butterfly is precisely marked into the cutout of the second.
Bottom line
Such fittings can hardly be called a choice for those who do not have installation experience. While eliminating the risk of damaging the surface of the door frame, another arises - the possibility of deformation of the hinge itself. But with precise markings, following the rules of how to install butterfly hinges on an interior door and using the tips from this article, you can enjoy aesthetic and original fittings that complement the design of the room.
Sources:
- https://news.tut.by/tamby/593500.html
- https://furmag.com.ua/dvernaya-furnitura/petli-dvernie/
- https://domzastroika.ru/dveri/mezhkomnatnye/ustanovka-petel.html
- https://v-dver.ru/articles/ustanovka/kak-ustanovit-petli-babochki-na-dver.html
- https://krutostroi.com/133-dvernye-petli-babochka-ih-konstrukciya-process-montazha.html
- https://openfile.ru/remont/
- https://openfile.ru/remont/butterfly-hinges-for-interior-doors.html
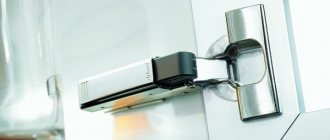
Overhead hinges
It is believed that door hinges are unreliable and are only suitable for light interior walls. However, today the most advanced and reliable materials are used in their manufacture: steel alloys, brass, stainless steel, which expand the scope of their application. In order to achieve smooth opening of the blade, as well as to increase service life, the product can contain from two to four ball bearings.
The butterfly loop is treated with high-quality galvanic coating. Available in the following colors: bronze, copper, chrome, matte. After installation, they take on the appearance of ordinary hinges. But still, some serious professionals are wary of such innovations and prefer traditional overhead hinges with a door insert.
How to install hinges on interior doors?
In order to install awnings on the door, you will need:
- pencil;
- loops;
- construction corner;
- cutter (not needed for butterfly loops);
- screws, self-tapping screws of the required sizes and diameters (often included with hinges);
- center punch;
- a metal drill of the required diameter (just in case; usually take a drill with a diameter of 2 mm);
- electric drill or hammer drill;
- Forstner drill with diameters of 35 mm and 26 mm (depending on the size of the loops).
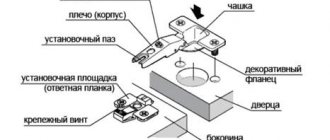
Loop installation diagram.
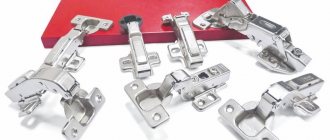
The next step is to choose the type of loops, material of manufacture, their quantity, and so on. As for the type of hinges, there are three of them: overhead (H), mortise (B) and screw-in (Vv).
The most commonly used are overhead loops. The prevalence of card canopies lies in their general availability, ease of installation, and ease of product design. The material of manufacture is either brass or steel. There are several types of overhead hanging parts: butterfly hinges, double-sided, with two regular plates.
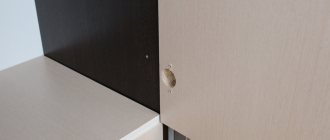
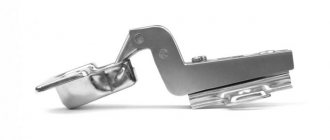
Design features and operating mechanism
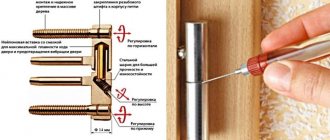
The loop consists of the following elements: cup (1), shoulder (2), striker (3). The cup is inserted into a blind hole in the door, which is drilled with a milling cutter and fixed with two self-tapping screws through holes located on the flange (5).
A counterplate is fixed to the furniture wall with self-tapping screws, which is attached to the arm (2) and the cup using a mounting screw (6) and a mounting groove (7). An adjustment screw (8) is located on the arm to adjust the height of the arm relative to the strike plate and align the door after installation.
Design features of furniture hinges
To work you will need:
- drill: thin drills, milling attachment with a diameter of 35 mm;
- pencil, tape measure (ruler);
- screwdriver or Phillips screwdriver;
- building level.