Present
- DIY wooden gift boxes
- How to make a wooden gift box from scratch?
- Types of wooden boxes
Even the most ordinary item can be packaged in such a way that it will cause admiration. Therefore, gift wrapping is of great importance. Wooden gift boxes are an excellent option for packaging certain categories of goods. Such containers will help preserve the quality of the gift, its integrity during transportation, and also become a stylish decoration later. Surely, everyone has heard about wooden gift packaging for wine. But wooden packaging can be useful for other gifts.
DIY wooden boxes: from simple to complex
The boxes were originally intended for storing jewelry and expensive things, so they were found mainly in the homes of wealthy gentlemen.
The variety of shapes, sizes and materials used to make the boxes was amazing. They were made of gold and silver, encrusted with diamonds and other precious stones. There were also simpler wooden boxes. Centuries have passed, but the fashion for these original and elegant products has survived to this day.
It is noteworthy that making a wooden box with your own hands is not as difficult as it seems at first glance. The main thing is to apply a little skill and use your own imagination.
- Where to begin
- How to make a classic box
- If you need a drawer
- How to decorate with carvings
- How to put a lock
Types of materials for creating a wooden chest
Wooden chests can be made from different types of raw materials:
- Plywood. Sheets of plywood are sold at any hardware store, are inexpensive, and you can choose any thickness. Plywood is easy to work with and retains its shape well. But products made from plywood alone look cheap and boring.
- Furniture panels made of solid wood of different types of wood. Expensive and noble material. They are very strong and allow you to create durable and reliable structures. However, they require some carpentry knowledge, are more difficult to find in stores, and are also very heavy.
- Furniture board. Cheaper material compared to shields. It’s easier to work with boards; even a beginner can handle them; they’re easier to cut into parts of the required size. Buying them in stores is not as easy as plywood.
- Furniture board + plywood. By combining these materials in one product, you can achieve excellent results and get a reliable, strong chest that has a beautiful and noble appearance.
Where to begin
Making any craft begins with a project, a diagram. The master imagines exactly what his masterpiece will be like, and, starting from the drawings, stocks up with the necessary materials and tools.
For many ordinary people, a wooden box appears as a rectangular box with a closing lid. This is true, but not entirely. A box is a real work of art, and even a handicraft made from scrap materials can look like an expensive antique.
Any box has its purpose in the house. Based on this message, the master thinks over the shape of the product. The following options are possible here:
- for jewelry. Such wooden models have a traditionally rectangular shape, but the internal surfaces are lined with velvet, and the lid is complemented by a mirror. As a result, jewelry is not scratched and is convenient to try on;
- for jewelry, trinkets. A characteristic feature of this product are drawers that move freely inside the case. The number of retractable elements is unlimited, and a tight fit does not require special guides;
- A small box for treasured, memorable items. Made in the shape of a heart and great for storing letters, cards, photographs and other things;
- Puzzle . A rather complex product that simultaneously serves as a decorative decoration and a children's toy. A system of wooden gears, reminiscent of a clock mechanism, is installed here, and the lid opens after rotating the handle or one of the wheels;
- to hide a small amount of money. It is made in the form of a rectangle, but the external decoration is made to resemble a book;
- for needles, threads. Such wooden boxes usually have several compartments where you can store sewing supplies. The case is often complemented by a carrying handle.
In addition, there are boxes with watches, locks and secrets, original boxes and drawers for storing cigars, and products that make melodious sounds when the lid is opened. The shape is not limited to rectangular. In fact, with modern tools for woodworking, it can be anything, including round.
It is noteworthy that all of the above options can be done independently at home. But it’s still better to start learning how to make wooden boxes with your own hands with simple designs, complicating the task as skills develop.
How to make a classic box
Even a teenager with minimal skills in handling woodworking tools can cope with this task. Such a box is made from multi-layer plywood, and the selected sheet should not have visible damage: knots, cracks.
At the initial stage you will need a pencil and a ruler. In order not to complicate the task, it is better to choose the correct geometry of shapes for the walls, lid and bottom, for example, a square or rectangle. On a sheet of plywood, draw the outlines of four walls: 2 side walls are shorter and 2 front walls are longer.
Note! The sides of the bottom are calculated in such a way that after gluing the sides, it is recessed inside the walls.
Then all the drawn elements are carefully cut out with a jigsaw, the irregularities are processed with sandpaper. To ensure that the end and side walls are beautifully connected to each other, small grooves can be made at the edges of the ends, corresponding to the thickness of the plywood sheet. This tip will help give the case a monolithic look and overall make the structure stronger. The walls are glued together, then the bottom of the box is placed. If the lower part enters with difficulty, the edges are processed with a file. The bottom should fit tightly.
After this, they begin to make the lid. To make the design more original, it is better to choose not a flat, but a deep lid. For this, the scheme described above is used. A large blank is cut out, which will directly serve as the lid, end and side walls. In essence, it turns out to be a smaller copy of the casket body. All parts are sanded and glued together. The lid is attached to the body using small hinges. After assembly, the finished product is varnished or painted in any color you like.
In a similar way, you can make a box from solid wood. A wooden board is used for this. It must be sanded and cut into pieces of the required size. It is more difficult to cut wood with a jigsaw; it is better to use a circular saw. Curly edges can be made with a router.
Decoupage
For work you will need the following materials:
- napkins, magazine clippings or scraps of fabric;
- PVA glue;
- acrylic paint;
- brushes;
- varnish;
- scissors;
- sandpaper.
At the first stage, the box is prepared for decoration. The surface must be perfectly smooth, as subsequently all defects may become more noticeable. When the product is prepared and dried, you can start decorating:
- Cut out and try on elements of the composition from napkins or fabric.
- Place the cutout on the surface and carefully apply glue, smoothing the paper from the center to the edges. If fabric is used in the decoupage technique, then glue will not work; it is better to take a stapler and attach the fabric to the inner coverings of the box.
- Dry the product.
- Apply varnish (if using fabric, this step is not necessary).
Using the decoupage technique, the box can be decorated both outside and inside.
Advice! For decoupage you can use various photographs. But first it is better to remove the bottom layer so that the paper is thinner.
Stylish vintage never goes out of style
A box with mohair fabric will be both practical and an excellent interior decor
If you need a drawer
In general, a wooden box with a drawer is made in the same way as the classic version, but there are a number of features.
A simple rectangular shape of the lid and bottom will spoil the appearance of the product. It is better to make the long sides of these elements wavy using an electric router. In addition, by choosing this option, the lid and bottom are not placed inside the body, but left outside.
The walls are made of different heights. In particular, the back part and ends are made of the same height and glued together. For the front wall, cut out a die half as wide as the back part. This element is not recessed between the ends, but is installed overlapping and fixed with glue.
The box consists of two parts: the box, which fits freely between the walls, and the front part, which is similar in size to the top die. The elements are also mounted on wood glue.
A partition is installed between the upper and lower parts, which will serve as the bottom of the upper compartment of the box. Inside the retractable and stationary drawers, you can make partitions from thin plywood, delimiting the internal space into several compartments. The lid is installed on decorative hinges, the wood is covered with several layers of furniture varnish.
How to decorate with carvings
Carved boxes look much more original and interesting, but such work requires certain skills and knowledge. For beginners who decide to try their hand at wood carving, experienced craftsmen recommend starting with simple geometric shapes and large patterns. With a certain amount of patience, even a novice master will be able to cope with such a task.
The drawing is applied to the surface with a pencil, each line is well drawn. After this, the pattern is carefully cut out with an oblique knife or chisel in strict accordance with the applied markings. Small flaws and irregularities can be corrected with a file or fine sandpaper.
Thinking through the design
First of all, you need to decide on the sizes. If you make a chest for yourself, then the dimensions are determined based on the place where you plan to put it and what will be stored in it. For example, if it is too bulky, it will look bad in a small room and interfere with movement around the room, and a small one may be inconvenient for storage.
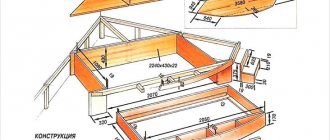
We make a drawing on a computer in any design program: Compass, AutoCad, Solidworks, etc. and print the parts in full size. If there is no experience in working with such programs, then we draw on paper, also in real size. Or take the drawing posted here.
How to put a lock
An interesting solution is a mortise lock, which will be opened with a small key, but such work is difficult to do even for an experienced specialist. Therefore, it is better to limit yourself to a padlock or a decorative hook.
To install a padlock, loops are placed in the central part of the side wall and lid, which are screwed with small screws. The location of the hinges must be calculated in advance: even a slight displacement will break the symmetry, and the box will lose its attractiveness.
Making a complex-shaped box from solid wood will take much longer. To do this, you must use a power tool, while parts from plywood can even be cut with a hand jigsaw. A large field of work opens up for the artist to design the finished product. You can paint it with paints, attach decorative fittings, decoupage or burn it.
Bottom and side walls
The cheapest option is to make the bottom of the chest from plywood, since anyway this element will simply be invisible when the product is ready. Making it from plywood with your own hands is not difficult, since it is enough to simply cut out a sheet of the required size and, accordingly, make tongues for it on all side walls.
The side walls will be somewhat more difficult to make; they are also shaped. But if you follow the drawings, you won’t have any problems; the most important thing is to just adjust all the details and make sure you don’t run away from the dimensions. Therefore, we do everything step by step and check their fit accordingly.
An equally important point is the correct tongue and groove on all walls so that the product can be folded correctly. After the side, front and back walls of the chest are ready, you can put them together and put them on glue so that the chest frame is completely ready.
How to make a box from solid oak
In this master class, we used a tool that we have in our workshop, but I can say with confidence that it can be replaced with another hand tool. You just have to show your imagination.
We tried to describe each stage, however, if you have any questions, we will be happy to answer them.
So, let's begin. Our box has external dimensions of 355*180*150 mm.
We prepared furniture panels from solid oak lamella in advance. In our case they are 20 mm thick.
We cut out the required size parts for our future box.
To connect all the edges of the box, you need to cut the sides at an angle of 45′.
We mill one side of the bottom (later we will insert it into the side parts of the box).
In the side elements of the box, using a hand router or on a milling table, we make a groove 8 mm wide, 10 mm deep, at a distance from the edge of approximately 8-10 mm.
Add glue to the groove. We use Titebond III Ultimate waterproof adhesive. We assemble the box, fasten it with a tie, and be sure to check that there is a right angle inside the box.
A little trick: so that the angle is even and the corners are well connected, we first prepared additional elements with an even internal angle of 90′.
To break up the homogeneity of the oak, we decided to make inserts from thermally modified ash in the corners of the box and on the lid.
We made the grooves using a Festool Domino, 10mm diameter cutter.
Such grooves can also be made with a hand router/on a router table.
We wedge a piece of thermal ash, cut off the excess and sand it with a machine (a grinder with a grinding wheel, depending on what you have available).
We repeat this at each corner 2 times.
Now let's prepare the lid. We make a groove in thermo-ash blanks and mill the lid. Next, we connect it in a tongue-and-groove manner with glue.
Now we thoroughly treat the surface and polish it. For manual sanding we use the most convenient sandpaper SMIRDEX on foam rubber, grain P120.
All that remains is to make the dividers for the interior space of the box. We made the grooves on the elements on a miter saw (or a hand router/milling table).
The accessories for the box were bought at the Leonardo hypermarket.
To correctly position the hinges, we fasten the lid and the main box of the box with a quick-release clamp, use a caliper to mark the same distance on both sides and attach the hinges. Next are the legs, the lock - I think additional photos are unnecessary here.
They decided to treat the box with Holz Antix 2008 Borma Wachs aging solution. We talked about coloring techniques in our previous master class. True, unlike this master class, we did not use white wax, but simply sanded the surface thoroughly, paying special attention to the corners of the box.
We apply a second protective layer with Danish oil from Borma Wachs (Italy).
The fittings were secured, and this is what we got


