Why is labeling necessary?
Bright stickers on cabinets not only perform a decorative function, but also help create harmony in the interior. Children like beautifully decorated rooms and evoke positive emotions. The purpose of the pictures is as follows:
- creating a good fairy-tale atmosphere;
- attracting the child's attention to his own locker;
- an organic addition to the decor in the kindergarten;
- creating a themed interior;
- stimulation of a positive attitude.
When choosing labels for cabinets, it is recommended to give preference to pictures rather than numbers. The fact is that children just starting to go to kindergarten do not yet know numbers, so they will not be able to fully navigate their new environment. Stickers vary in color, design, size, theme, and technique of attachment to the surface of furniture. Any variety of designs is designed to attract the attention of kids, allowing them to find their own among the many storage compartments.
Types of pictures
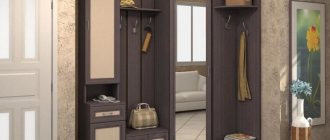
Furniture for children should be practical, safe, and multifunctional. The main design requirement is a catchy, original appearance. The same recommendations apply to small cabinets that are used to store outerwear, accessories, and spare shoes. You can decorate the designs using personalized and themed stickers.
With the baby's name
The marking must be supplemented with a special column for entering the child’s first and last name. Such stickers are suitable only for the middle and senior groups, where children with basic reading skills go. If the decor is selected for children, it is important that it is complemented by small drawings. This will help you quickly remember where the right locker is.
Personalized decor with the child’s last name is the most convenient option for parents.
Thematic
A variety of designs are used to decorate cabinets in kindergartens. Kids will very quickly remember cute, kind pictures. Several topics are the most popular:
- Heroes of fairy tales and cartoons, for example, a fox, Leopold the cat, a lion cub, a gnome and others.
- Animals: bunnies, cockerels, deer, dogs, cats.
- Vehicles: cars, airplanes, tractors, boats, rockets.
- Vegetables and fruits: tomatoes, pumpkins, cherries, apples.
- Flowers and plants: cornflowers, roses, birches, daisies, Christmas trees.
Images of cartoon characters and animals should be positive and kind. Aggression is unacceptable because it can upset the baby or cause fear. Forest and domestic animals bring magical, fairy-tale notes to the atmosphere.
By using a combination of different images belonging to the same theme, it is possible to create a harmonious interior of the room. The locker room in the kindergarten will turn out to be attractive and interesting. Thanks to bright drawings, children develop creative abilities, correct perception of colors, and develop artistic taste.
How to arrange a closet in a children's room?
Popular accommodation options.
Corner cupboard
Effectively organizes space, saves useful space and frees up space for games in the center of the room. Corner products are quite spacious and require storage of toys, children's clothes or shoes. Such structures can have a radius or rectilinear design.
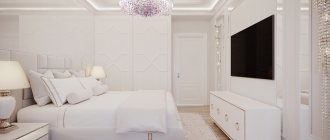
The photo shows the interior of a children's room in light colors, decorated with a semicircular corner cabinet.
Full wall
A large, tall closet covering the entire wall, thanks to the ability to accommodate a large volume of things, will free the room from unnecessary items and make the environment more neat and uncluttered.
Around the window in the nursery
How to choose depending on the child’s age
Cabinets for kindergartens are coated with varnish or an even layer of paint. Thanks to this solution, children will not quarrel over the colors of the furniture. Each compartment for things belongs to one child, so special stickers are used for identification, which are selected taking into account age characteristics:
- Nursery group. Kids who do not yet know numbers and cannot read can perfectly distinguish and remember animals and fairy-tale characters. Bright stickers will help the baby distinguish his own closet from others.
- Middle group. The simplest geometric figures are suitable: triangles, circles, squares, stars. A sign for parents is placed inside the locker room with signs for each child.
- Senior group. Numbers can be used to design lockers. You should first make sure that all children know the numbers and there will be no confusion.
Experts do not recommend choosing inscriptions and letters for marking. Not all kindergarten-aged children will be able to read what is written. If such a sticker is used, it must be supplemented with a small picture.
What materials are they made from?
Children's labels are made from a variety of materials. A mandatory requirement is complete safety for the growing organism. The content of toxins, radioactive substances and other dangerous elements that may be present in the stickers is unacceptable. Reliable manufacturers monitor the environmental friendliness of their products. The most popular options are:
- Paper. Decor made from this material allows you to label cabinets. The products are easily attached to the surface of the furniture, resulting in an attractive flat-shaped picture.
- Chipboard, plywood. Original markings can be cut out of sheet materials, then painted with bright colors. The products have an unusual appearance, protruding slightly above the surface of the door.
CATALOG OF SANDBLAST DRAWINGS IN VECTOR FOR A CLOSET WARDROBE MIRROR OR GLASS.
All templates for 100 rubles* in cdr format! Download Catalog in jpg
| Abstraction | Angels, fairies | Architecture | Arches | Butterflies |
| Bamboo in vector | Curbs | Vases in vector | Children's drawings | People |
| Trees | Animals in vector | Egypt in vector | Space, planets | China, Japan, East |
| Columns | Marine theme | Music | Inscriptions | Landscapes |
| Birds | Striped in vector | Miscellaneous | Drawings Frames | Transport in vector |
| Floral patterns | Flowers in vector | Corners in vector | Patterns, backgrounds | Muslim |
| For Bath Sauna | For doors | For mirrors | For the kitchen facades | Tabletops |
SANDBLASTING PATTERNS ON THE CLOSET WARDROBE
Beautiful and original designs on mirrors and glass are an opportunity to create an elegant and beautiful interior that will decorate any room or apartment. Thanks to modern matting technologies, it is possible to create patterns of any complexity on mirrors - these can be either ornate curls, corners, frames, or entire paintings and landscapes.
* Sandblasting drawings for 100 rubles. except for the exclusive section and those under which the price for the template is indicated and highlighted in red.
The design of the wardrobe and the appearance of the sides (stand-up)
The sides of the wardrobe are vertical racks from floor to ceiling (or roof of the box).
We advise you to read how to design the base of a sliding wardrobe in order to understand the principle of assembling the lower part of the body.
Most often, the sides of the wardrobe are made of the same material as the body - laminated chipboard with a thickness of 16.18 or 25 mm.
In built-in and partially built-in structures, the role of the sidewalls is replaced by the walls themselves. In this case, only a “panel” is made along the façade, framing the compartment doors around the perimeter.
From a design point of view, the panel allows the wardrobe to fit more harmoniously into the interior of the room. It covers the moving mechanisms that guide the sliding system. And also all the unevenness of the walls, if any.
There are other ways to decorate the sides of a wardrobe, by adding various beveled modules, corner shelves and other decors.
Types of cabinets by purpose
There are several options:
- For children's clothing. This wardrobe is equipped with drawers for shoes, hangers, hooks or a pantograph for clothes. The main thing is that the design is accessible and convenient. A very advantageous solution is a spacious wardrobe, which provides the opportunity to change clothes right inside.
- Bookshelf. Must be particularly durable and have shelves that can withstand heavy loads. The most convenient configuration for a child is considered to be a simple, narrower model, in which it is possible to arrange books and textbooks in only one row.
- Believa. Its interior space is divided into space for linen and a wardrobe compartment. This design is most often equipped with small retractable drawers, clothing boxes, shelves and rods.
- For storing toys. It can be a design with open shelves for plush toys or a product with drawers that are suitable for storing small game parts.
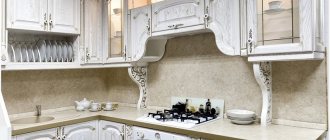
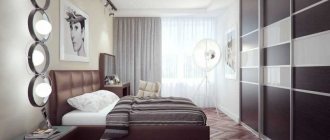
The photo shows a nursery for a girl with a white wardrobe decorated with mirrors.
Such models facilitate convenient storage and distribution of items, provide an opportunity to ensure order in the nursery and teach the child how to properly organize space.
The photo shows a blue bookcase in the interior of a boy’s nursery, located on the attic floor.
Options for corner shelves and beveled modules
Sliding wardrobes, as a rule, are made to be spacious; the depth of the sides of a standard cabinet depth varies between 600-700 mm. To visually make it smaller, use beveled corner shelves and various add-on modules. Which, however, are quite practical and functional.
There are a lot of design solutions for corner side shelves. They can be made of glass and chipboard, have a round and rectangular shape.
To design closed modules, both straight and radius facades are used. Most manufacturers of sliding systems also offer fittings that help produce hinged facades of the same design and design as sliding doors.
In hallways, the add-on module can be designed as an open hanger with shelves, a lower cabinet or a chest of drawers with a mirror.
For bedrooms, the design of classic wardrobes and side modules with hinged doors can be used.
Wardrobe options for children's wardrobe
Freestanding wardrobe
One of the simplest, most affordable and popular wardrobe options for a children's room is a free-standing module. The advantage of such a piece of furniture is its mobility. When the child grows up and the room needs reconstruction or rearrangement, the closet can be moved to another place. Among the disadvantages of non-built-in cabinets, we can only note that they, as a rule, take up more space than their built-in counterparts.
The rule “the less fittings the better” is ideal for decorating a child’s room. The fewer locks, handles, fasteners and levers, the less chance of injury. That is why models of wardrobes and chests of drawers that will be installed in children's rooms often do not have fittings on the facades - they are replaced by hand-friendly slots in the surfaces themselves. By using slots and holes instead of handles to design internal storage systems (drawers), you save space in the depth of the cabinet.
A custom-made free-standing wardrobe will fit perfectly with all the elements of the interior, but you can also find interesting design options among the ready-made solutions presented in online stores of goods and home furniture. An original choice of color or shape of the facade, unusual decor or connection to a specific theme will help create an original and attractive atmosphere for the child in his universe - the room where he spends a lot of time.
In a teenager's room, you can use larger and more laconic wardrobe options. For large storage systems, it is recommended to use light shades of design - this way, even a large-scale design will not look oppressively monumental and will not burden the image of the room.
Built-in wardrobe
Any built-in structure is the most efficient use of available space. The advantage of such cabinets is obvious - the lowest space costs and maximum space for placing items of clothing, shoes, sports equipment, toys and more. A built-in wardrobe can not only be located in a convenient niche, but also occupy a space with complex geometry that would be difficult to use for other interior items.
A closet built into a specially created or existing niche in the room is practically a pantry for storing a wardrobe. Even a shallow niche can become space to accommodate a spacious closet. Some parents prefer not to close such a built-in storage system with doors (as a last resort, use curtains). Others prefer to hang facades that will be easy for a child to open. It all depends on the age of the child and the amount of free space in front of the closet (for unhindered opening of the doors).
If you decide to use doors to close a built-in closet, then consider using interior door designs. If the front of the cabinet and the door of the room look the same, this brings balance and harmony to the interior.
For a large built-in wardrobe, you can use doors designed according to the accordion principle. Opening such a structure will require half the space than conventional hinged facades. Using slatted inserts in cabinet doors will allow air to circulate within the storage system.
An excellent solution for a child’s room is a wardrobe with built-in lighting. As a rule, a sensor inside the cabinet is triggered to open the doors, and the backlight turns on automatically. At any time of the day, in any room lighting, you can quickly and easily find the thing you need.
In order to make optimal use of the available space in the children's room, storage systems for wardrobes and more can be built “around the bed”. A pair of symmetrical cabinets are installed on either side of the headboard. Considering that structures are most often located from ceiling to floor, in the upper part it would be reasonable to connect two modules with a mezzanine or an open shelf.
Another way to save space in a children's room is to build a closet around the doorway. Shallow storage systems literally frame the door, creating a spacious complex with shelves and drawers, rods and cells.
A built-in wardrobe is the best option for using the useful space of a child’s room. Situated from the ceiling to the floor, the closet is a spacious storage system that will fit not only your child’s entire wardrobe, but also bedding, sports equipment and much more. Sliding doors allow you to install a wardrobe close to other pieces of furniture, thereby saving precious meters in a small room.
One of the innovations in the production of furniture for children's rooms is the use of black magnetic film for making facades. The child will be able to draw with crayons on a dark surface, attach their drawings, photos and crafts with magnets. Ample storage turns into a creative hub.
There are many ways to decorate the facades of modern cabinets - from the most expensive photo printing and laser engraving to affordable stickers. Such stickers can match the theme of the children's room and depict your favorite characters. Another advantage is that after time, if you get tired of the decor, you can get rid of it without damaging the surfaces of the facades.
If we talk about filling the cabinet, which will serve as a storage system in the children's room, then no special design ideas are required in this case. Hanging rods must be placed at a height “with a margin”, taking into account that the child will grow, which means that the clothes will take up more space in length. At the bottom of the closet, at the height of the child, it is necessary to place wardrobe items needed on a daily basis. Drawers and containers of various modifications (fabric, wicker or plastic) will help organize order in a children's closet.
Corner cupboard
Corner modification storage systems can be of two types - built-in and non-built-in. Each type has its own advantages and disadvantages. A ready-made solution for a corner cabinet, as a rule, is cheaper than a custom-made one, but the latter most closely matches the needs of a particular room and fits perfectly into its dimensions.
A corner wardrobe in a child’s room is a storage system that allows you to create the maximum amount of space for a wardrobe, while occupying the minimum possible amount of square meters. Corner designs allow you to make the most efficient use of space into which it is not easy to fit other furnishings - the corner of the room.
Wardrobe – part of the “loft bed” structure
A loft bed is one of the most popular options for organizing a sleeping space in a child’s room. This design allows you to save useful space in the room, which is very important for small-sized dwellings. The sleeping place is located at a certain height in relation to the floor, and the entire space under it can be used to organize storage systems or space for activities and creativity.
Another way to create storage and sleeping systems is to make functional pieces of furniture in an ensemble. A wardrobe can be part of a furniture block containing a bed, a workplace (usually a console) and other types of storage systems (chest of drawers, open shelves, mezzanines).
MDF overlays, tambourate and other ways to make the sides of a sliding wardrobe visually thicker
The massiveness of the wardrobe is associated with the solidity of the furniture design. To achieve the desired effect, different techniques are used.
In the most common case, a sliding wardrobe is built into an already prepared plasterboard niche.
You can also use MDF overlays on the ends of the sides of the wardrobe.
Overlay and mortise profiles are used less frequently, but also solve this problem.
If the thickness of the sidewalls and the canopy of the cabinet is required, a 25 mm thick laminated chipboard can be used to make the outer box. Or tamburat - a special honeycomb material 50 mm thick.
Features of choice
Considering the number of things that are increasing every year, as well as the abundance of toys, books, textbooks, and stationery.
Therefore, you need to approach the choice of storage location very seriously in order to take into account all the needs of your offspring. Layout features, purpose, age characteristics and design influence the selection and must be taken into account.
Baguette, pilasters and cornices for a classic wardrobe design
The sides of a wardrobe in a classic style are additionally decorated with special overlays - pilasters, columns and baguettes.
For their fastening, sidewalls are specially designed in the form of “sandwiches” of the required thickness according to the width of the decor.
This principle significantly increases the consumption of chipboard, and therefore the final cost of the product.
It is optimal to develop the design of the linings in such a way that the internal content of the wardrobe itself does not decrease. For example, in the form of columns.
Cabinet Design Ideas for Kids
The ideal piece of furniture is cabinets with a mirror, which not only represent a very impressive decor, but also help add additional light and spatial depth to the room.
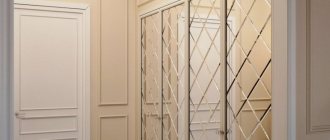
The photo shows the interior of a children's room with two cabinets with mirrored doors decorated with drawings.
It is considered a rather unusual design idea to decorate facades with beautiful drawings, stickers or photo printing, with cartoon characters, fairy-tale landscapes, racing cars, favorite animals and other images.
The photo shows a wardrobe decorated with drawings of animals in the interior of a nursery for a boy.
Columns with inserts of mirrors, glass and plastic
Using the method described above for designing columns framing the sides of a wardrobe, other design solutions can be implemented. It is not necessary to use them to attach “classic” overlays.
Light boxes made of frosted glass, mirror inserts and other decor can also be attached to the base of the column. And give the design of the wardrobe additional gloss and an exclusive image.
The sides of a sliding wardrobe can be an effective accent in the design of the wardrobe itself, if the front part is quite laconic in design. Moreover, this option will be much cheaper.
Lesson summary for the middle group on the topic: “Picture for our lockers”
How to organize distance learning during quarantine?
The Infourok project helps
09.11.17 Monday, 7-14.15
Lesson summary for the middle group
on the topic: “Picture for our lockers”
artistic and aesthetic development, drawing.
Visual activities in kindergarten. Middle group I.A. Lykova p.18
Target:
develop the ability to determine the design in accordance with the purpose of the drawing; cultivate interest in kindergarten; develop a sense of rhythm and a sense of color; evoke a positive emotional response to the created images.
Educational:
develop the ability to correctly position an object on a sheet of paper, distinguish and correctly name colors.
Developmental:
develop creative imagination, eye, sense of composition; develop children's constructive abilities; develop memory, logical thinking and attention; develop a sense of rhythm and a sense of color.
Educational:
to develop self-confidence, accuracy, perseverance; cultivate the ability to enjoy the overall result.
Preliminary work:
tour of the kindergarten, looking at pictures of flowers, animals, objects. Conversations about kindergarten, furniture, etc.
Individual work
: to activate inactive children: Gleba U., Kostya S..
Materials for the lesson:
a square of white paper measuring 10x10, colored pencils, sample pictures.
Educator:
“Children, the hero of the cartoon “Paw Patrol” Racer came to visit us, he wants you to tell us about our kindergarten, about our group. What do we have?
Children's answers:
“Locker room, group, sleeping places, washroom.”
Educator: "
Right. The racer wants you to draw pictures for the lockers, but first let’s listen to V. Shipunova’s poem “Pictures on the Lockers,” which our guest prepared for us: There are lockers in the locker room, In them are socks and T-shirts, Fur coats, jackets, coats, Sweatshirts, skirts, pants, Slippers, shoes, boots... And on the cabinets there are pictures: Antoshi has a pipe, Serezha has a duck, Cherry has Masha, Apple has Pasha. What are the pictures for? So that the kids don’t get confused about where and whose pants are. And the parents will come and they will find the closet from the picture.”
The teacher shows several sample pictures (sun, chicken, flower, car, cup, etc.).
Educator: "
Each of you come up with your own picture and draw it. The picture must show only one item. It should be drawn in the middle of the square, as in my pictures. Let's show the Racer how we can hold a pencil and draw neatly and beautifully."
Educator:
“Children, look how beautiful the pictures turned out.”
Educator: "
Now, when the Racer comes to visit us, he will immediately know which locker someone has, because he himself saw how you drew your pictures. Let's say goodbye to Racer! And we will still admire your pictures.”
Pictures of cabinets, what they are and mounting options
Bright and colorful pictures on the lockers will help your child recognize his locker and easily find it. Also, interesting illustrations will attract kids and will help them quickly memorize the names of various fruits, vegetables, animals, and letters.
Purpose
In the kindergarten there are special cubicles for storing children's things. Each child is assigned one locker. To prevent children from getting confused, they came up with the idea of attaching different pictures to the booths. This way, kids remember their illustration and easily find the right booth.
Pictures for cabinets using photographs have become widespread recently. An excellent choice if the child does not remember his own locker. He can easily find himself in the photo and thereby identify the desired booth.
Illustrations of letters glued to the booths help children quickly learn the alphabet. Pictures with letters on a bright background will appeal to kids no less and will attract attention. For example, sometimes they use the same shape for all booths. For example, the sun or a cloud are perfect for this. The best option is to use thematic templates depending on the name of the kindergarten or group. For a group called Sun or Bee, the best option is pictures with their image.
In addition, they often use pictures on booths with names. This option is ideal not only for children, but also for parents. Educators will also find personalized pictures convenient; they will not have to look for one or another booth if necessary.
Kinds
For many years in a row, in kindergartens, different images have been attached to storage cubicles. To prevent children from getting confused, the images are repeated on towel racks and cribs. The pictures on the cabinets are completely different. They are divided depending on the material of manufacture, shape, theme.
Material of manufacture
Popular materials for making templates for booths include: cardboard, paper. These can be pictures and photographs printed on plain or colored paper. Use special templates made of self-adhesive paper.
It is possible to make templates from plastic, wood, chipboard or glass. Plastic pictures will last a long time. Wooden templates are not only durable, but also environmentally friendly. Glass ones look very beautiful, but due to their fragility, they are not recommended for use in kindergartens. Children can accidentally break glass and get hurt.
Paper
Wooden
Plastic
Form
The form of illustrations can be completely different. Templates are often used in the form:
- geometric shapes;
- fruits, vegetables;
- colors;
- other items.
The most common geometric shapes are round and rectangular. In addition, images come in the shape of a diamond, square, or oval. Templates of berries and various fruits, such as apples and pears, look beautiful. These can be illustrations in the shape of a daisy, rose, cloud, house, ball, or other objects.
Personalized
Geometric figures
Alphabet letters
Cartoon characters