Furniture is an important element not only in the apartment, but also in other rooms. It is used in offices, educational and medical institutions, etc. Today the choice is quite large. Products differ in design, size, materials from which they are made, and more. Thus, choosing the option that you specifically need will not be difficult.
Based on what material is used in the manufacture of furniture, its cost is determined. If we talk about inexpensive products, they are mainly made from chipboard. This material is quite durable and wear-resistant. Excellent for furniture production.
But its interior does not look entirely aesthetically pleasing. To hide this, additional actions are carried out, which are called edging. They consist of installing special decorative panels on the end side. Various types of synthetic plastics cope well with these tasks. For example, melanin, PVC, etc.
Melamine edge with glue: advantages
The choice of edge materials that can be used in furniture production is large. If we talk about which one is the most popular, then this is melamine edge. Basically, this is what they prefer. No wonder. After all, it has a lot of advantages. The main one is the cost of the product. It is low enough that it is accessible to everyone. In addition, it is worth noting the simple technology of use. To carry it out, you need simple tools that are found in almost every home. At the same time, to perform edging with this material, no special skills or knowledge are required. Everyone can do it.
In addition, it is worth noting such advantages as reliability and practicality. It is resistant to moisture and other adverse conditions. Perfectly protects furniture from them. At the same time, its choice is huge. Different textures, colors, etc. will help you choose it for any type of chipboard.
Of course, like any other material, this one has its drawbacks. Firstly, it is very thin. Secondly, the drawing does not hold up well. Thus, you should not count on its long service life.
Melamine tape with glue: features of edging
Before you get started, you need to decide which tools will help you get the job done. If melamine tape is chosen for edging, an iron is required. It is better to give preference to a small device. It is important that the sole is thick and free of damage and stains. An iron that was produced 30-40 years ago is perfect for such purposes. These products meet these requirements.
Another tool you will need for this job is a knife. But an ordinary kitchen one will not work here. It must be shoemaker's or stationery. You can also use a planer knife. There are also special tools that are designed for these purposes. Such knives are produced by Virutex.
And, of course, a block of sandpaper. You can purchase it or make it yourself. If the second option is chosen, then you need to glue sandpaper to a block of a certain size. In this case, you can use different grain sizes. Glue paper on all sides of the block. The most suitable grit size is 150 units for these purposes.
Preparation
In order for the melamine end edge to stick efficiently and evenly, you need an iron with a flat and thick sole. The best option would be a Teflon coated iron. Also, its surface must be clean and smooth.
For convenient work, it is better to take a sharp knife with a thin handle or find an old knife blade and make a cutter out of it. You can use a spatula.
An ordinary chipboard piece with sandpaper glued to one side (grit size P120) is suitable as a block.
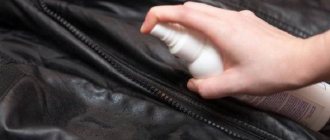
The melamine end edge comes with a pre-applied layer of adhesive. If it suddenly turns out that it does not have an adhesive layer, then it must be applied to the part.
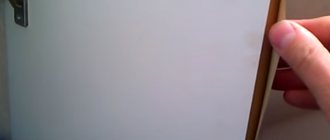
For this operation, we will also need a part holder, which can be made from the remains of chipboard. It looks like this:
How to glue melamine edge?
The process of gluing the melamine edge is simple. Therefore, there is no need to turn to the experts for help. You can do it yourself. You can see how to do this in the video below.
The quality of edging is influenced by various factors. The first and, perhaps, main thing is how the chipboard slab is cut. There are a number of requirements for the end that it must meet. So, it should be smooth, without steps or other defects formed after processing the sheet under the saw blade. Only in this case will the adhesion of the tape be strong and reliable.
When choosing an edge, you should give preference to the one on which glue has already been applied. You can find it in many construction stores. It is presented in the form of a bay of 200 pm. But this does not mean that you need to buy everything. You can take the size that you need.
What are used as solvents and fillers?
Before using glue, you need to become more familiar with the components from which it is made.
Chlorine compounds
Most rubber mixtures contain chlorine-containing compounds. Manufacturers try to add a minimum amount of such components, as they have a high level of toxicity. Therefore, when choosing an adhesive for further work, you need to familiarize yourself with its composition and make sure that it does not contain many compounds that contain chlorine.
Ethicelate with nefras
Many adhesive liquids are made with the addition of nefras and ethyl acetate. This chemical compound makes the mixture better and increases its adhesion. Therefore, experts recommend using glue that contains petroleum products mixed with acetic acid.
Latex with water content
Latex is added to almost all adhesives. However, in cheap rubber glue this element is not added in its pure form, but along with water. Adding liquid to latex negatively affects the adhesive properties of the product and makes the connection less reliable. Because of this, such applied rubber mixture adheres to the surface much worse.
Resin and polystyrene
Polystyrene with resin is often added to adhesive compositions that are characterized by increased strength. Therefore, in order to glue surfaces more reliably, it is recommended to use just such means. However, you should not buy glue that contains too much polystyrene and resin. A large number of these components negatively affects the elasticity of the connecting seam.
Sulfur, amines and metal oxides
Companies involved in the production of adhesive mixtures often add metal oxides, amines and sulfur to them. It is thanks to these substances that the vulcanization process occurs, during which plastic rubber turns into rubber. The amount of additives directly depends on how much rubber is contained in the glue.
Process steps
To glue the tape, you need to place the part correctly. That is, vertically. In this case, the end that is being processed should be at the top. Provide a stable position for the sheet so that it does not move. In this case, you can use a special device.
Then prepare the required piece of edge. To do this, it is carefully measured and cut from the general tape. Moreover, its length should be 3-5 cm longer than the side that is being processed.
You need to start gluing from the middle. The tape is laid on it, and the edges should be as smooth as possible. Then, holding it with one hand, iron it with the other with an iron that is preheated. You choose its temperature experimentally. As practice shows, a high one can lead to the appearance of bubbles on the edge, and a low one does not ensure adhesion.
Do not put too much pressure on the iron, as this may cause the edge to move out of place. As a result, the gluing will be crooked. But if you press weakly, it will not stick. Moderate force must be applied.
The quality of gluing can be determined during the process. When ironing the surface, the glue should be squeezed out from under the tape. Particular care must be taken at the ends of the product and the place where it comes into contact with the surface that is pre-laminated, since these areas adhere less well than others.
Now you need to leave the edge to cool. At this time, you need to smooth the surface with a rag. This way, the tape will not peel off when it cools. The duration of this procedure is short. As soon as the base reaches a temperature of 50 degrees, you can remove the excess that has formed around the edges.
Start from the edges. The ends that end up remaining must also be removed. Since the material has become hard, they break off easily. Then take a block of sandpaper and sand them down. This will give the timber an attractive appearance.
If you approach this work responsibly and carefully, the quality of its implementation will be at a high level. Moreover, it will be impossible to distinguish the result from the one obtained when using special edging equipment.
Chipboard is the most suitable material for the production of reliable and high-quality inexpensive furniture. In order to hide the not very aesthetically pleasing internal structure of the product, edging is performed on the end side - the installation of special decorative panels made of melamine, PVC or other available types of synthetic plastics.
Let's start gluing
We unwind the edge tape from the coil (it’s more convenient to unwind from the inside) and apply it to the end of the chipboard, first leaving a margin for trimming.
Its standard width is 21 mm, and the chipboard is 16 or 18, leaving a margin for trimming and rubbing. In order to avoid the need to cut on both sides, it is better to immediately align it on one side, and on the other side it will overlap.
After we have applied it, we begin to heat it right along the end and iron it with an iron. You need to iron the edges of the ends especially carefully.
Short parts can be ironed entirely, and if the part is long, we warm up 40 cm sections one by one. After that, cool the end with a slightly damp cloth.
The temperature of the iron is adjusted depending on the quality of our tape. It should glide quickly, easily and without friction, without scratching the surface or resisting movement.
High-quality heating will be indicated by uniform spreading of the glue under the edge. If it overheats, bubbles will appear and it will deteriorate, so monitor the temperature and do not overexpose the iron in one place.
If you suddenly damage the edge, it will need to be replaced. Using heat with an iron and a knife, remove the old one, clean the end of any remaining glue and start all over again.
In order to cut off the excess efficiently and evenly, you must first bend the edge with your finger, tap along the edge and rub it several times with a block until you see a white chamfer (this is the paper backing). And you can start cutting off the excess.
Next, carefully and slowly we rub the edges of the end with a block, check with our finger to see if there are any protrusions and burrs, and this completes our work on gluing the melamine edge.
Where should edging be done?
Furniture manufacturers often edge only the visible parts of the end surfaces. From the point of view of economy, this seems quite understandable, but taking into account the above facts, this approach can lead to certain problems - the protective edge must be present in all places where there is an open internal structure of the chipboard.
If you purchased furniture with unprotected edges, you can easily do their edging yourself at home. To do this, you do not need to have any special equipment - the edge can be glued with a regular iron.
Don’t be lazy to spend a few minutes on this operation - you will reliably protect yourself and your furniture and significantly extend its service life. Next, we will look in detail at how to properly glue the edge tape with your own hands.
How to glue an edge with an iron
In production, edging is done using tape with a clean base. The adhesive composition is applied to it during installation at a high temperature, ensuring the formation of a thin, even layer. In order to glue the edge, several rollers are used, pressing it tightly to the base of the chipboard. Then special cutters cut the tape to the size of the part, remove any remaining glue and base material, and sand the joint until a smooth and beautiful surface is obtained.
You can also glue the edge at home. To do this, you need to use tape with an adhesive composition already applied. Further, the process largely repeats industrial edging, since it is performed in a similar way:
You can learn more about the process of gluing edges on chipboard in the video below:
Gluing the U-shaped profile to the end of the chipboard is somewhat easier. We have already discussed this method earlier. This edge is much stronger than melamine, bends quite easily and reliably protects against damage.
The presence of microgaps between the U-profile edge and the front surface of the chipboard does not allow gluing it in the kitchen or bathroom, so edging with this material is mainly used for office furniture.
Edging chipboard, of course, is best done in the factory. At the factory, you can order tape from any materials, including plastic, PVC and other modern composite materials. Edging on a machine will ensure ideal evenness and accuracy of application of decorative cladding, but it requires certain costs. If the main task is to meet a predetermined small budget, applying melamine tape with your own hands will allow you to combine acceptable quality and the minimum price.
Making furniture with your own hands brings considerable savings in money. Basically, laminated chipboard, a material glued together from sawdust, is used for this purpose.
The main task of furniture edges is lining the end surfaces of laminated chipboards.
After cutting, its edges have an unattractive appearance and require further processing.
The tabletop is the most vulnerable element of furniture, and its edge must be given special attention.
At the moment, there are several ways to give the ends of the tabletop an aesthetic appearance. Only 2 of them are suitable for making edges at home:
Profiles for processing furniture edges
You can trim the edge of furniture not only with edge tape. There are also furniture profiles that are attached mechanically. They are available in two sections - T-shaped or U-shaped (also called C-shaped).
For T-shaped furniture profiles, a groove is milled in the edge being processed. The profile is hammered into it with a furniture (rubber) mallet. The edges are cut at 45° to make the angle look attractive. It is brought to perfect condition with fine sandpaper. This type of profiles is produced from PVC and aluminum; with the same installation method, they look very different, and the differences are significant.
T-shaped furniture profile for processing furniture edges
In width they are available for laminated chipboards of 16 mm and 18 mm. There are also wide ones, but they are much less common, since they work less with such material.
C- or U-shaped profiles are most often mounted with glue. They coat the edge with it, then put on a plastic profile, press it well and fix it. These PVC profiles are soft and hard. Hard ones are harder to bend and it’s difficult to paste them over curved edges. But they have great strength.
Gluing C-shaped furniture profiles does not cause problems
If you still need to “fit” a rigid C-shaped furniture profile onto a bend, it is heated with a hair dryer, then given the desired shape and secured with masking tape until the glue dries.
Applicable edges
Modern technologies make it possible to produce various edges. However, not all are suitable for gluing at home. Melamine tapes are produced in widths of 19-54 mm. With a thickness of 0.2-0.4 mm, they allow you to refine the edges of countertops of various shapes.
A large assortment of decors, which, in terms of color, closely match the chipboard.
A PVC strip of the same width may be slightly thicker. For gluing the ends of the tabletop, edges are produced with or without an applied adhesive layer.
PVC plastic obtained by extrusion is able to withstand temperatures from minus 10 to plus 50 degrees.
Tools
If you decide to glue the edge yourself, check that you have the tools. Prepare before starting work:
To fix the PVC edge, you can use a clamp and a wooden block. If possible, use a hand router to finish the edging.
The router is expensive and it is not profitable to buy it for one-time pasting.
Prepare your workspace, taking into account the space for turning the tabletop. And, most importantly, buy the appropriate melamine tape or PVC edge.
Choose a ribbon that matches the color of the countertop.
Melamine tape
The cheapest and most accessible way to improve edges. Does not require the purchase of glue or specialized tools. Everything you need can be found in any household, and the process will take a few minutes.
The edge processed in this way looks very neat.
Should be used for finishing hard-to-reach edges of table tops. At the same time, do not forget about dampness, which will penetrate under the edge and destroy the material.
The gluing technology looks quite simple.
PVC strip
A more progressive and aesthetically pleasing way. True, its implementation requires some skill, but after practicing on scraps, you can master this method.
The edge, resistant to abrasion and moisture, will ensure long-term use of the tabletop in any interior.
When gluing the PVC edge, follow the following sequence.
A properly selected and glued edge will give the tabletop an attractive appearance, and it will serve you for many years.
You can also get such a smooth and neat edge yourself.
Our offer
In the online store you can buy edge tape for furniture at reasonable prices. We sell this material wholesale and retail, providing discounts for large orders. Our catalog includes melamine edges. These products are paper tape impregnated with melamine resins. Hot-melt adhesive is applied to their reverse side. Edge tape can be purchased for lining furniture for the kitchen, living room, bathroom and other rooms. As a rule, it is used in the manufacture of laminated chipboard cabinets.
If you want to buy edging or other furniture fittings in our online store, simply add the selected products to your “Cart” and fill out the online application. If you have any questions regarding the assortment, current prices and terms of cooperation, call our company managers at the numbers listed in the “” section.
Why edge chipboard is done and how to glue the edge with an iron
Chipboard is the most suitable material for the production of reliable and high-quality inexpensive furniture. In order to hide the not very aesthetically pleasing internal structure of the product, edging is performed on the end side - the installation of special decorative panels made of melamine, PVC or other available types of synthetic plastics.
Installation procedure
You can only glue melamine tape and U-shaped PVC edging yourself. Let's consider the technology of how to glue the edge. This method will help restore old furniture or decorate new ones.
- Unwind the roll of melamine border. Apply to the end of the surface to be treated. Mark the length with any additional trimming allowance. The standard self-adhesive edge has a width of 2.1 cm, and the width of the chipboard is 1.6-1.8 cm.
- Apply tape, align edge along one edge, iron.
- Iron in small sections of 10-20 cm.
- Roll over heated areas with a roller or felt.
- Depending on the chosen material, you need to glue the edge using an iron at a certain temperature. With a properly heated iron, the adhesive base will evenly adhere to the end without swelling.
- After the tape has cooled, begin trimming and rubbing the protruding edge with sandpaper or a file.
You can see all the stages of work more clearly in the video below:
The stage of pasting the end surface is completed. The tape allows you to decorate edges of various configurations. If you follow all the recommendations, the end will be of high quality, without scratches, minor defects and glue.
Edge tape for furniture is used not only by craftsmen who make furniture, but also for the restoration of wooden structures by home craftsmen. Any type of edge that is applied to the end of the chipboard independently or by furniture manufacturers gives the product an aesthetic appearance. It also protects the structure from moisture, microorganisms, and insects that can destroy the internal or wood structure of the product, so gluing the edges to the chipboard is simply necessary.
Why else do they edge furniture?
In addition to the most obvious goal - to provide an elegant appearance, edging furniture performs several more equally important tasks:
- Moisture protection. It is known that when wet, chipboard swells and loses its original shape and strength. The plastic edge prevents moisture from penetrating from the ends. This is especially true for rooms where there are constant flows of water - kitchen, bathroom, dining room, etc.
The edge, in addition to giving the furniture a finished look, performs several other important functions.
- Protection against insects and mold. The porous surface of particle boards is well suited for the proliferation of various microorganisms that destroy the internal structure of the material. If you glue a protective film to the edge, the service life of the furniture will noticeably increase.
- Fight against harmful substances. As is known, in the production of chipboards, formaldehyde resins are used, vapors of which can be released during operation through the open ends. The edge tape prevents these substances from entering the environment.
to menu
Why do you need an edge on the tabletop?
The edge of the tabletop performs three main tasks:
- makes furniture edges attractive;
- protects the table from moisture, chips and scratches;
- adds completeness to the design of furniture and the room as a whole.
In addition, formaldehyde, which is contained in laminated chipboard, is not released into the environment if the furniture is covered with high-quality edge tape. With its help, owners are protected from substances harmful to health.
Where should edging be done?
Furniture manufacturers often edge only the visible parts of the end surfaces. From the point of view of economy, this seems quite understandable, but taking into account the above facts, this approach can lead to certain problems - the protective edge must be present in all places where there is an open internal structure of the chipboard.
If you purchased furniture with unprotected edges, you can easily do their edging yourself at home. To do this, you do not need to have any special equipment - the edge can be glued with a regular iron.
Don’t be lazy to spend a few minutes on this operation - you will reliably protect yourself and your furniture and significantly extend its service life. Next, we will look in detail at how to properly glue the edge tape with your own hands.
Edge materials
Edging the open surfaces of furniture can be done using various decorative elements that differ in the quality of the material, appearance and, accordingly, cost.
Advantages and disadvantages of melamine edging
to menu
Types of profiles
The edges of furniture are not only processed with edgebanding. One of the decorative and protective methods of finishing cuts is profiles - special linings that are put on the cut or inserted into pre-cut grooves in the chipboard. Profiles change the look of the furniture, serve as an additional decorative element, and effectively protect the inside of the chipboard from the effects of the external environment.
T-shaped
To process the edges with a T-shaped profile, a groove is pre-cut in the slab using a milling cutter. At the final stage of furniture assembly, the profile is inserted into the prepared hole (hammered with a soft hammer). T-shaped profiles are made with a girth or with simple overlays on the edge. Typically aluminum or PVC is used.
U-shaped
C- or U-shaped profiles do not require cutting a groove in the slab; they are simply put on the edge and secured with glue. It is important to choose a good adhesive and attach the trim tightly to avoid voids. U-shaped pads are produced from soft and hard materials. Rigid parts are stronger, but installation on rounded edges is more difficult. The profile will have to be heated to give it flexibility and secured with tape until the glue dries.
Important: the edges on the profile hide poor-quality edge cuts and small chips on the surface of the facades. The profile not only protects the chipboard, but also decorates the furniture.