Assembly instructions for Ormatek beds Como 1, Como 2, Como 3
ASSEMBLY DIAGRAM OF BED Como 1, Como 2, Como 3 with LIFTING MECHANISM
It is recommended that the assembly of the product and installation of lifting mechanisms with gas shock absorbers be carried out by qualified specialists.
Before assembling the bed, familiarize yourself with its completeness (Table 1), accessories (Table 2) and assembly instructions.
Bed contents
Side drawer (longitudinal)
Central drawer (transverse)
Lifting mechanism with gas shock absorber (made in Germany)
Eco-leather handle for lifting the orthopedic base
* One bottom part can consist of 2 parts, which are connected by a T-profile. Package No. 3 includes 3 bottom parts and Package No. 2 includes a T-profile and support strip.
Completeness of package No. 5 “Accessories”
Bed tie corner
Connecting the bed perimeter parts
Corner tie rod
Connecting the parts of the perimeter of the bed. Orthopedic base support.
Installation of the support bar.
Fastening the bed perimeter parts. Attaching the lifting mechanism to the side drawers. Attaching the middle drawer to the side drawers.
Attaching the middle drawer.
Installation of the metal frame of the orthopedic base to the lifting mechanism (4 pcs.). Attaching the back to the drawers (8 pcs.)
Installation of the metal frame of the orthopedic base to the lifting mechanism.
Installation of the metal frame of the orthopedic base to the lifting mechanism.
For the mattress. Insert into the metal frame of the orthopedic base.
To support the orthopedic base at the foot. Place on the central drawer.
For placing the bed on the floor.
Handle for lifting the orthopedic base
To facilitate lifting of the orthopedic base. Tighten the loop on the metal frame of the orthopedic base at the foot of the bed
Bed assembly instructions
Assembling the bed and recommendations for its use
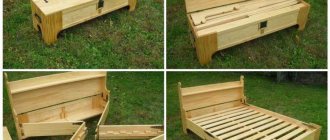
Assembling the perimeter of the bed . The perimeter of the bed consists of a head back (detail 1) and 4 drawers: left and right (detail 2), central (detail 3) and middle (detail 4). Lay out all the perimeter parts according to their intended purpose. (see Fig. 1).
It is recommended that the bed be assembled by two people on a flat and hard surface. Assemble carefully, without damaging the surfaces of soft elements.
Attach the corners of the bed tie (No. 10) and the brackets of the corner tie (No. 11) to the side drawers (item 2) using M6×25 screws (No. 12). To the platforms for attaching the legs (4 pcs.), attach the bases of the legs N-50 (No. 18) with a pin into the holes on the attached platforms. Attach the left and right lifting mechanisms (part 7) to the side drawers with M6×25 screws (No. 12). Fasten the side drawers to the central drawer with M6×25 screws (No. 12), and the side drawers with the back with M6×45 screws (No. 13), not tightening them completely.
Align the parts at right angles and tighten all the screws around the perimeter until they stop. Insert the middle drawer (item 4) in the middle of the perimeter of the bed. Install the support bar using furniture dowels (No. 11a) to the head back and middle drawer.
Fasten the middle drawer with the side drawers with M6x20 screws (No. 12) (the platform at the side drawer with M6x25 screws, the platform at the middle drawer with M6x20 screws). Place the bottom (part 5), consisting of 2 parts*, inside the assembled perimeter. First place the first part of the bottom, which is located at the head back, on the platforms of the side drawers. Place the 2nd part of the bottom, which is located near the central drawer, on the platforms of the side and middle drawers. You have built up drawers for bedding.
Attach the corner stop (No. 17)
in the middle of the central drawer with M6×25 screws (No. 12) (see Fig. 2).
Build process
Usually even a person without experience can handle the process - the instructions for assembling the bed contain a detailed sequence of steps with illustrations. It is advisable to read it first, and only then move through the stages. This will allow you to roughly understand the scope of work, correctly arrange the elements, and check the meanings of unclear terms.
Eco-friendly timber beds in modern interiors, selection criteria
There are several main difficulties that may arise:
- Requires drilling (some models have blind holes for screws).
- If the bed is lifting, you will have to additionally assemble the mechanism, and this is not an easy task.
- Lack of markings.
Because of the last point, distortions may appear, so a level and a tape measure will come in handy. For tightening furniture euroscrews, use a hex screwdriver. Confirmats can be dealt with with a screwdriver or an ordinary screwdriver.
It’s easier to assemble a bed with your own hands with an assistant so that he can hold the side elements and help with heavy parts.
Base
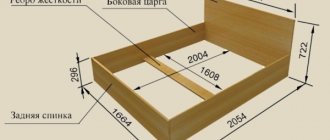
They begin to work on the base when the box (frame) is ready. Slats are fixed along its perimeter - from 15 for a bed for one and from 30 for two. The longitudinal bars are attached to the walls of the headboard with screws or self-tapping screws. Next, the transverse parts are installed.
The slats provide orthopedic properties and undergo additional strength testing. Their curved shape allows them to take the weight of the mattress along with the person lying on it without creaking or cracking. In the standard base, instead of them there is a continuous flat surface.
Thanks to their curved shape, the slats provide orthopedic properties of the bed
Some bed models have a solid base
Frame
The assembly of the box on which the mattress is located occurs first. These are usually laminated particle boards, which will require screws for fastening. However, if you have the opportunity to choose a model made of wood, it is better to do so - in addition to lower strength, chipboard has another serious drawback: the boards crumble, so it will not be possible to re-fasten the elements.
To strengthen the frame, you can fasten sheets of chipboard or MDF panels at the bottom.
If it is possible to choose a model made of wood, then it is better to give preference to it than beds made of chipboard
Headboard
Behind the base with slats comes the headboard with drawers (that’s what the side walls are called). In some bed assembly schemes, it is recommended to assemble this element first, since the base takes up a lot of space, and the backrest can be placed against the wall. Usually the mounting points are marked with holes; if not, you will have to drill them yourself.
Assortment of metal beds, advantages and disadvantages of furniture
The drawers and the headboard are connected at right angles, fixed with euroscrews or other fasteners. In rare cases, wooden pins are used, coated with PVA at the fastening points (this is more reliable). Remains of glue must be immediately removed with a dry cloth, then proceed to further work. Now you can connect the drawers and the back.
The drawers are connected at right angles, fixed with euroscrews or other fasteners
Lifting mechanism
Assembling a bed with a lifting mechanism begins with the headboard. Then a central beam is installed to support the base, legs are attached (if any), and slats are laid. Only after all these stages comes the turn of the lifting mechanism.
For a high mattress, the device needs to be lowered slightly, for a low one - vice versa. The lower bar is connected to the drawers with self-tapping screws or euroscrews. Next, guide holes are drilled and the lifts are fixed. Now you can return to installing the base and attach the upper part of the mechanism to the longitudinal parts of the mattress pad.
The process is determined by the type of device:
- mechanical;
- spring;
- on gas cylinders.
In the case of a gas mechanism, the bolts are tightened so that the stock can smoothly lower and fold without tension. For spring mechanisms, the springs are also adjustable so that it is convenient to lift the bed. The last step is to stretch the fabric over the grid and place the mattress.
Differences in bed sizes in different countries, generally accepted standards
Spring
Gas
Additional equipment
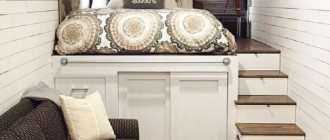
Sometimes the bed has additional elements - shelves at the head or drawers for bedding. There are other options - for example, instead of legs, you can install wheels to move the structure to the side for cleaning. Plus, it looks more airy this way. In cribs you can often find an adjustable frame that allows you to fit mattresses of different sizes. And cradles usually have a pendulum for swinging.
It is better to install drawers only when it is clear that the bed is assembled smoothly. Otherwise, a distortion will form.
It is better to install drawers after the bed has been assembled and installed
Final stage
When everything is ready, the final assembly stage begins. A base is placed on the box and secured with fittings. The process is best done from the bottom up. It is important to ensure the symmetry of the lifting elements in the assembled bed - this way it will last longer.
The last stage is checking the quality of fastening, final tightening of self-tapping screws. The accuracy of horizontals and angles and the correctness of proportions are assessed. If all is well, you can move on to decorative parts and fittings.
After the purchase, the owners are faced with the question of how to assemble the bed. Contrary to fears, simple steps are enough for this: study the instructions in advance, prepare the necessary tools and space, follow the plan. The main thing is to double-check at the end that all parts are installed smoothly, and that the fastenings are securely tightened and will not come apart under pressure.
After the bed is assembled, all that remains is to tighten the fasteners and check the correct proportions
How to assemble an orthopedic bed
It would seem that it could be simpler than assembling a bed with an orthopedic base. But if you don’t have the skills to work with furniture, difficulties may arise, even if the product has detailed step-by-step instructions. There are nuances that can only be learned through trial and error. Every craftsman should know about them, especially if it’s your first time assembling furniture.
How to assemble an orthopedic bed with a collapsible base according to the instructions? First you need to check the availability of all parts and components. The set includes:
- head back (headboard);
- two longitudinal side drawers;
- central king;
- furniture clamping corner;
- set of M6x25 screws;
- dismountable orthopedic base with fittings. The driver recommends assembly on a hard, flat surface, preferably not alone, but together. You need to act carefully so as not to damage the integrity of the soft elements of the bed. To make it convenient to connect parts, when installing on site, it is necessary to ensure the stability of the structure.
What you will need
Before you begin installation work, you should prepare the necessary equipment. To assemble the bed you will need a set of tools and additional materials.
Tools
The standard configuration of the bed includes various fasteners, to work with which you will need screwdrivers, ring wrenches and a screwdriver with a set of attachments. Since modern types of bedroom furniture often use Euroscrews with a hidden head and internal hexagon, it is also worth preparing keys for confirmation.
In addition to the basic tools, during installation work you may need a tape measure and a building level.
Materials
The assembly kit consists of fixing elements, body parts, lifting mechanism, mattress and decorative components. Before starting installation, it is worth checking the availability of all materials and laying them out at the work site.
Instructions
To properly assemble a bed with a lifting mechanism, you must read the instructions. As a rule, installation instructions are included with the bed. Having previously studied the manual, you will be able to get a general idea of the work ahead and calculate your capabilities. If necessary, assistants can be hired for further assembly.
How to assemble the base
How to assemble an orthopedic bed base? To make it convenient to attach it to the furniture body, first the assembly is carried out without slats. First, a metal rod is assembled into a single whole, and legs are attached to it along the way. Then the assembled structure is inserted into the perimeter of the structure and attached at the corners with 6.3x13 self-tapping screws, focusing on the tattoos.
Install plastic lath holders at the ends of the lamellas, and then attach them one by one into paired holes on the longitudinal rods of the base. Finally, check the stability and rigidity of the structure, and if necessary, make adjustments immediately.
Almost the same scheme is used to assemble furniture with an independent orthopedic base.
Instructions on how to assemble a structure purchased in a store
Below: instructions for assembling single and bunk wooden beds, as well as features for assembling Neiden from solid pine from IKEA.
Single bed and one and a half bed
First, lay out 4 parts in front of you: a footboard, a headboard and 2 drawers. Examine the mounting holes and check the location of the fittings with the instructions. To assemble the frame you will need:
- wooden dowels;
- euroscrews;
- plugs;
- bearings.
How to assemble a single bed - step by step instructions:
- Install thrust bearings at the lower ends of the headboard and footboard, drive in the pegs with a hammer;
- Install Euroscrews using an adjustable wrench into the mounting holes along a vertical line on the headboard and footboard;
- Install wooden dowels along the side ends of the drawers - 2-3 pcs. on each side;
- place bearings in the round holes on the drawers: they will cover the Euroscrews;
- combine the frame parts: insert the drawers into the headboard, then fix the footboard to form a box;
- adjust the bearings with a hex wrench, scroll the parts until they stop;
- if the headboard has separate slats, install Euro screws on the top panel;
- wooden dowels are installed on the bottom panel, the parts are connected, the euroscrews are hidden with plugs;
- install the plugs in the round holes on the bottom bar of the headboard, close the screw with a nut, tighten;
- on the inside of the drawers there are holes for fixing a metal profile - it is fixed according to the height of the mattress;
- place the profiles at the desired height, secure with screws (7–8 in total in accordance with the holes);
- take 2 brackets: in the middle there is a hole for a bolt that prevents the part from moving;
- placing the bolts in the middle of the brackets, from the side of one drawer, install them with the holes on each other;
- the beams will be arranged in the shape of a compass, fix the brackets with bolts along the holes on the profiles;
- Place a grid of slatted lamellas on the profiles, tighten the bolts with plastic plugs to secure the lamellas.
Attention
In common types of assembly, the parts are already ready for connection: just insert the drawers into the grooves on the footboard and headboard. Instead of a grating, it may be necessary to lay chipboard. The plates are fixed with self-tapping screws on protruding bars from the inside of the drawers. After placing the mattress, the bed will be ready for use.
Video of assembling a wooden bed purchased in a store:
two-tier
To assemble a bunk bed frame from solid pine, you will need:
- 4 support beams;
- 4 longitudinal (long) and transverse (short) drawers.
At the ends of the support beam there are metal elements with grooves - these are the junction points of the structural parts.
Assembly instructions:
- Install 2 longitudinal strips at the bottom and top at the ends of the support beams;
- Thus, it is necessary to connect 4 longitudinal frames and 4 support beams along the grooves;
- as a result, two slats are formed - these are the back and front of the bed;
- connect the walls with 4 transverse drawers, you get a symmetrical box;
- Fix the lamellas on the bottoms of the lower and upper tier with self-tapping screws;
- lay the lamellas end-to-end, and then remove them one at a time: this way you will correctly calculate the step for fixing;
- Install Euroscrews into the holes at the junction points of the drawers and tighten with a hexagon;
- on the footboard and headboard of the upper and lower tiers, 4 more transverse drawers are fixed in the same way;
- on the front side of the bed at the level of the upper tier, a longitudinal drawer is fixed, which is shorter than the others;
- install the staircase support beam perpendicular to its end, place the steps (short bars) along the holes;
- Install Euroscrews into the holes on the stairs and adjust them with a hexagon.
Advice
Having connected the frame parts, tap them with a hammer (preferably wooden). This way you will securely fix them in the grooves before the adjustment stage.
Video about assembling a wooden bunk bed:
How to make a canopy yourself or paint a bed a different color? What are the rules and schemes for assembling such structures as a lift-up, children's, with an attic, pendulum bed or playpen bed? What does it mean to strengthen or strengthen a sleeping place? You can find all the answers to these questions on the pages of our website.
Features and installation diagram of Ikea pine
The kit for assembling the Neiden double headboard contains longitudinal and transverse drawers: they need to be connected to each other with fittings according to the diagram. First, the drawers are formed using wooden dowels, and Euroscrews are installed in the holes.
Wooden dowels are also located at the ends, as well as in the holes of the transverse crossbars. Support bars are attached to the bottom side, as in the figure.
The parts are connected to each other, Euroscrews are installed in the mounting holes at the ends and adjusted with self-tapping screws.
Wooden dowels are installed at the outer ends of the transverse drawers: 2 pieces on each side.
The side drawers of the main frame are attached to the headboard. Euroscrews are inserted into the mounting holes on the back side and adjusted with a hexagon. Plugs are placed in the round holes on the inside of the drawers, which are screwed in with a screwdriver.
Now you need to install a longitudinal crossbar, which will serve as a support for the mattress pad. Wooden dowels are driven in at the ends.
The crossbar is combined with the headboard; on the reverse side, by analogy with fastening the drawer drawers, long Euroscrews are installed, which are closed with plugs and adjusted with a hexagon. Bushings are placed in the holes at the outer ends.
The footboard is a transverse bar. It is fixed in a similar way using euroscrews and plugs along the outer ends of the bed. Euroscrews are placed on the outside of the footboard, which are screwed into bushings.
The frame is strengthened with additional fittings.
The bed is turned over to install the brackets. They are fixed with screws and connect the middle base and side drawers. Two rays are formed in the middle, as in the figure. It is important that the axes are placed exactly in the middle. Screws are pre-tightened on the brackets to prevent them from sliding.
At the last stage, wooden dowels are placed around the perimeter of the frame. They are necessary for fixing the lamella grid.
The video shows the process of assembling a wooden Ikea bed:
Assembling a wooden bed bought in a store with your own hands is quite simple. This will require a minimum of effort and tools. At the assembly stage, do not forget to check the instructions from the manufacturer. First check the package for compliance with the delivery list, and also make sure that the parts are intact.
How to assemble an orthopedic bed with a lifting mechanism
The instructions for assembling an orthopedic bed base with a lifting mechanism are somewhat different from those described above.
- First, they assemble a closet or box where the laundry will subsequently be placed. First, metal corners are attached to the sidewalls and transverse boards with self-tapping screws, and assembly begins from the lower corners.
- After assembling the frame, you need to carefully check that all angles of the structure are equal to 90°. If there are distortions, they are eliminated immediately, on site.
- Using bolts, the bottom is attached to the lower part of the frame, sequentially screwing it to the lower corners.
- After this, the upper corners are attached, and to them - the longitudinal partition of the inner part of the bed.
- The lifting mechanism and its position are adjusted taking into account the distance from the head of the bed. After this, it is attached to the side walls of the frame, and then shock absorbers are mounted on the same fastenings.
Common problems and errors
Possible problems or violations of the assembly technology include:
- Errors in marking or the need to drill holes. Some models come with pre-made holes, but in most cases you prepare them yourself. The backrest requires special attention; the slightest mistakes when attaching it lead to distortion of the entire structure.
- Errors when installing gas lift. Replacing the right side with the left or lack of symmetry makes the load on the lifting mechanism uneven, which ultimately leads to its rapid breakdown.
- Excessive pressure on the slats during installation.
- Strong tightening of fasteners.
- Assembling a bed on an uneven place or fluffy carpet.
- Using fasteners of the wrong length. The supplied kit may contain hardware of different sizes similar in appearance or purpose. Accidentally replacing long fasteners with short ones is considered a mistake; as a rule, assembling a bed with a lifting mechanism will not work in such cases.
Popular models of soft beds, design options for headboards
Most of the above errors are typical, appearing both when connecting parts of a bed without a lifting mechanism, and when assembling models with a gas lift. Separate problems arise when it is necessary to use special tools to tighten countersunk bolts, the initial laying of the lifting mechanism in disassembled form (low, but not zero probability), or the presence of blind holes in the design. The latter are indicated in the drawing, but are actually absent in order to preserve the integrity of the panel during transportation. Such holes are drilled independently at the initial stages of installation.
Bed Ormatek Life 2
Appearance
A modern bed with a headboard decorated with decorative stitching, made in a laconic style. An abundance of color options will help you choose a bed that suits your interior.
Materials
The model is made of chipboard. The bed upholstery has two versions: from eco-leather of the “Lux” class and from furniture fabric. When choosing combined fabric colors, the pattern will be on the headboard. Please note that the reverse side of the headboard is upholstered with spunbond. The base frame is made of metal, the lamellas are made of birch.
Base
The bed base with elastic birch slats is specially created to enhance the orthopedic effect of the mattress. The model is also available with a lifting mechanism.
Assembling the bed - 1,790 rubles. (to be ordered in advance)
Assembly is carried out on the day of delivery
| Basic properties: | |
| Material | Chipboard |
| Upholstery | Eco-leather Luxury, furniture fabric |
| Base | Orthopedic lattice |
| Headboard height (cm) | 101 |
| Footboard height (cm) | 39 |
| Side height (cm) | 39 |
| Mattress recess (cm) | 11 |
| Linen box | Eat |
| Guarantee: | |
| Warranty (months) | 36 |
| Service life (years) | 7 |
Write a review
Note: HTML markup is not supported! Use plain text.
Rating: Bad Good
Enter the code shown in the picture:
Dear visitors! We are pleased to inform you that delivery of goods from the Ormatek factory is carried out throughout the Russian Federation! Delivery within Moscow is free, depending on the order amount. The cost of delivering goods to the region depends on its dimensions and the Transport company that will carry out the delivery. We will be happy to answer all your questions, help you choose the best delivery option, and advise you on the timing - call! Toll free line: 8-800-500-69-01.
Please note that when delivering large cargo, the use of rigid lathing is required. You can check the dimensions and weight of the product with our specialists at 8-800-500-69-01. They will also be happy to calculate the total cost of transportation for you!
Approximate cost of delivery of mattresses from Moscow to cities of the Russian Federation. Prices offered by the transport company PEK:
Source