From the first days, you want to surround your child with everything that is best, safe, reliable, and most importantly, something that will serve faithfully for many years until the baby grows up. For this purpose, as a rule, they choose natural materials that are not capable of laying a “mine” for future oncological diseases, thereby protecting the child from the first days.
Parents always want their children to grow up in a healthy atmosphere.
Requirements for homemade furniture
New furniture, especially a children's bed, should correspond to the age and height of the child. In addition, there are a number of requirements that must be observed when building a bed:
- Cribs should be comfortable for a child of any age.
- Reliability of fastenings.
- For bunk models and loft beds, there must be a durable ladder (and the best option is to make a ladder with handrails).
- All materials used in the work must be environmentally friendly and not emit harmful toxins during operation. Compositions for decorating surfaces must also be safe for humans.
- After assembly, there should be no sharp edges protruding above the surface of nails, screws, or jagged edges.
All work on the construction of a children's bed with your own hands should be carried out strictly according to a pre-prepared drawing.
Tree
Wood is the most preferred material for the production of children's furniture. This is a strong, durable, breathable material. It is easy to clean and disinfect and does not emit harmful substances.
When choosing wood for making a crib, you should avoid soft wood, in particular pine. This material is so susceptible to physical impact that as the baby’s teeth grow, he can simply chew off small elements of the crib.
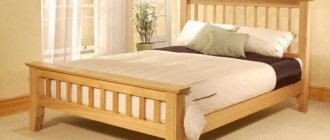
It is better to choose alder or birch. The strongest and most durable product will be made from beech, but the price of such a product will be much higher than average.
Materials required for work
To make your own children's bed, you will need the following set of materials and tools:
- Wood or chipboard panels. Plywood and wooden pallets are not suitable for construction work. In this case, we are talking, first of all, about safety and convenience for the child, which means that only durable materials should be used. A wooden crib is an example of the most reliable and safe furniture.
- Accessories for drawers (special grooves, handles, movable rollers).
- Compositions for impregnating surfaces: antiseptic, antipyretic, moisture-resistant and antifungal solutions.
- Decorating materials (stain, transparent acrylic varnish, veneer).
- Fasteners.
- Tape measure, building level, pencil.
- Jigsaw.
- To manufacture and install the stairs you will need metal pipes and a grinder. The staircase frame can also be made from metal structures, which should be coated with an anti-corrosion compound and then paint.
You will also need drawings and diagrams, step-by-step instructions on how to make a children's bed with your own hands.
What material are beds made from?
When constructing children's furniture yourself, you need to decide on the materials that will be used in the work process. The main requirement is that the raw materials used must be environmentally friendly and not harm the baby’s development. Let us dwell on this issue in more detail, consider the optimal option for all components of the structure:
- Mattress. It is recommended to purchase it in a specialized store, since purchased models are produced taking into account the recommendations developed by orthopedic doctors. If you plan to use the bed for more than one year, then it is better to choose double-sided products with different degrees of hardness. For children under three years of age, a hard, rigid covering is required, which helps support the back and the proper development of the body. The filling should be wool; you should not take models that contain cotton wool and foam rubber. The upholstery should also be made of natural fabric and have an antiseptic coating.
- Frame, slats, legs, sides. For your beloved child, you should choose only a tree. Coniferous species are suitable for work: pine, spruce. Natural wood breathes, it is quite durable, and will suit any interior. Those who decide to use MDF or chipboard should remember that the boards contain phenol and formaldehyde resins, so it is necessary to take only models with emission class E-0.
- Protective means. To extend their service life, wooden surfaces are treated with special compounds, painted and varnished. For these purposes, nitro enamel, acrylic, and water-based paint for children's rooms are used. An excellent option would be to use wax. To preserve the wood texture, you can use acrylic varnish; other options are highly toxic.
Wood for bed
Solid wood is the most optimal material for the construction of beds. The types of wood chosen for work are alder and ash. Wood of such species is particularly durable, absolutely safe for humans, and does not contain toxins or allergens.
The tree needs special treatment with moisture-resistant and antiseptic compounds to prevent the development of pathogenic fungus. For decoration you can use veneer, stain, acrylic varnish.
Craftsmen with the proper artistic skills can use stencil painting or wood burning as an additional decoration. A children's bed, made by hand from wood, has an advantageous design and special practical properties.
Blanks and dimensions
Before you start making a crib with your own hands using drawings or photo examples, it is important to understand what the structure consists of. Figured crib
Figured crib
- The base or frame determines the dimensions of the entire bed and sleeping area for the baby.
- Lamels are slats, elastic parts of the base on which the mattress is placed, the distance between them is about 5-6 cm (for strength, uniform load and ventilation).
- Product backs. The headboard is made higher than the part that is located at the feet, with interesting decor and a device on which a canopy can be attached.
A crib for a young princess.
The front and back sides are fenced with gaps for easy observation of the child. The front panel can be mounted on special fittings - for the convenience of lowering the front side. The low side is not suitable for a child standing on his feet; he may fall out.
Beautiful crib
It is better to buy a ready-made mattress - according to the size of the crib and the age of the child. Sometimes the dimensions of the cradle are made to fit its format. Products come on different bases - there are orthopedic (good for health) and regular mattresses.
Classic crib
Attention! Ordering ready-made parts for a baby crib assembled with your own hands from a carpentry workshop is a significant saving of effort and time. Assembling furniture from ready-made elements (wood or plastic pipes) takes about 1 day, and you can do it right in your apartment
It takes approximately 3-4 days to produce parts.
Elegant crib
For the simplest design you will need:
- boards of the same size for the sides and backs;
- bars for frame construction made of durable wood;
- slats or perforated plywood for the bottom.
Attention! If you use untreated wood for self-production, it is important to choose harmless impregnations and carry out the processing according to all the rules. The stain, varnish or paint is chosen according to the design of the decor. Remember that the child will handle, lick and bite the wooden parts of the bed with his teething
Because of this, they often choose to carefully sand hardwood rather than varnish or paint.
Remember that the child will handle, lick and bite the wooden parts of the bed with his teething teeth. Because of this, they often choose to carefully sand hardwood rather than varnish or paint.
Children's bed in soft colors
A wooden crib for a mattress size of 1200mm by 600mm is most often made with dimensions of 1250mm - 1300mm in length, 650mm - 700mm in width. The height of the headboard is 1100 mm and the foot part is 900 mm. For a large baby, the sizes can be adjusted. The cradle “for growth” is made longer and lower so that an older child can climb in and out of it independently.
Bed for the brave lion
Beds by type of construction
Depending on the structural features, the following types of beds are distinguished:
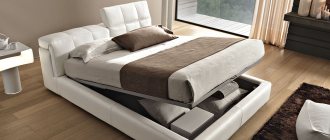
- Classic children's bed with drawers for storage.
- Double with stairs.
- Loft bed.
- Do-it-yourself bed-house.
- Transformable children's bed.
Each of the presented models has a number of advantages and difficulties in independent work, however, you can do any option yourself.
The benefits of a self-made bed
When you go to a furniture store, you can find a lot of options for children's beds made of various materials (plastic, fiberboard, chipboard, wood). The best material is, of course, wood, which provides safety, durability and is the most durable option.
A finished wooden crib is quite expensive. Not every family can afford such costs, especially since it will only last a few years.
The cost of a hand-made design will be several times less and has the following positive aspects:
- reliability in use of the design. Children often love to play and jump on the bed, and you won’t have to worry that it will break under the load;
- You can make a strictly individual bed. Which will suit the style and interior of the children's room and has individual sizes;
- The creation process will help you spend time with interest with your child, who will probably not refuse to help his parents.
Classic bed with drawers
Single beds with a small border are the most common model of children's furniture.
Additional decoration includes the production of original headboards in the form of fairy-tale characters, interesting painting on wood, PVC films with imitation of various materials and surfaces (stone, brickwork, wood).
A distinctive feature and advantage should be considered the presence of built-in drawers for storing bed linen, pillows, and blankets.
Note!
Do-it-yourself screen: a step-by-step master class for creating it yourself. Types of screens, manufacturing materials + design ideas- Do-it-yourself installation of interior doors - preparation of the structure, selection of doors, installation step by step + instructions from professionals
- DIY shoe rack - types of designs, manufacturing materials, step-by-step master class with simple diagrams and drawings
Plywood
When choosing plywood for making furniture, you must pay attention to its brand. Sheets of plywood that look no different in appearance can have completely different properties.
FK grade plywood is moisture resistant, durable, and is usually used for interior work. The ends of such plywood are light in color.
Plywood marked FSF has increased moisture resistance due to the phenol-formaldehyde resins included in the adhesive base.
It is strictly prohibited to use this material indoors, and even more so for the production of children's furniture, since formaldehyde vapors are compounds hazardous to health.
Check it out here too!
- How to make book shelves with your own hands: drawings and step-by-step photos. Wall shelves, floor standing, portable, Montessori book shelf
We make a kitchen countertop with our own hands: design, methods of application, design options and decor ideas (135 photos and videos)
How to make garden furniture with your own hands: the best ideas for making unusual and simple outdoor furniture projects (95 photos)
To distinguish FSF plywood from others, look at its ends - their color has a reddish tint.
FKM grade plywood does not contain phenolic compounds and has good moisture resistance. This material can be used to make furniture.
Double bed with ladder
For a bedroom with two children, you can purchase a bunk bed with a ladder located in the foot area. This design allows you to optimally save space in the room.
The upper floor is equipped with a restrictive side to ensure the safety of the child. Often, production models are equipped with built-in drawers designed to store bedding and sleeping accessories.
Main parts and their preparation
The blanks from which the sleeping place is assembled must be sanded so that the child does not injure himself. The standard bed layout includes the following details:
The production of parts is carried out in a certain order:
- first, wood is selected for blanks of appropriate sizes;
- then, after all the parts have been carefully polished, a base is marked on them (a sign for the correct assembly of the product);
- Marks are placed for the grooves, cut into the trim and under the slats;
- spikes are made.
To assemble finished parts, special carpentry joints are used without the use of nails or self-tapping screws. The main purpose of using this method is its quality and decorative features. The surfaces are smooth and beautiful, and the joints are invisible. The fastening elements are made as follows:
- the workpiece is marked with a pencil at the border of the shank and groove;
- The length of the shank is marked with a cut;
- the groove is drilled with a drill;
- excess wood is removed using a chisel;
- Use files to smooth out the edges of the product.
This fastening resists mechanical damage better and is less loose. Its essence boils down to the following:
- the connection consists of a shank (tenon) and a solid or blind groove into which it fits freely;
- Wood glue is used to secure the parts.
Tenon joints secured with wood glue are firmly fixed due to the swelling of the wood.
Loft bed for children
A children's loft bed is another model used to save space. The lower tier is limited by a wooden frame and is intended for installing a desk, chair, and organizing a play area.
The side walls can have additional open shelves for placing souvenirs, books, or a miniature lamp. On the top floor there is a limiting edge that prevents the child from falling from a height.
We determine the overall dimensions and draw up a drawing
The starting point is the crib mattress, or rather its dimensions. Spare no expense and buy your baby a high-quality mattress with a “complex filling” made of coconut fiber with layers of latex. The usual size of a children's mattress is 1200 x 600 mm. You will find out what other children's mattresses there are from the table below.
Spring mattress
Springless mattress
Latex and coconut fiber mattress
Cotton wool mattress
Foam mattress
Polyurethane foam mattress
The dimensions of the mattress are fundamental to determining the size of the crib. The height of the bed from the floor should be such that an older baby can climb into the crib on his own. It is recommended to make it equal to 350 mm.
The distance between the lattice and the solid wall of the crib is 12 mm, and between the rods - no more than 9 mm. Such indicators guarantee the safety of the baby. Based on these points, you can prepare a schematic drawing, which will make it much easier to work with.
Model house for the bedroom
A beautiful and stylish option for decorating a children's bedroom. The model has a wooden frame in the form of an open house and a classic single bed. Like any modern furniture, it is equipped with retractable systems for storing things, linen and toys.
Note!
Do-it-yourself sliding wardrobe - manufacturing manual with a full description of the stages, types of structures, choice of manufacturing materials (photo + video)- Do-it-yourself carriage screed: step-by-step instructions for creating it yourself, diagrams and drawings for beginners, selection of materials and tools (photo + video)
- DIY stool - types of stools, manufacturing materials, step-by-step master class with simple diagrams and drawings for beginners
The additional superstructure has aesthetic value; it can be used as a base for a canopy and decorated in various ways. Drawings of a bed-house for work can be found in the public domain on the pages of practical design and interior magazines.
Crib - oval
Drawings of such cribs can be found online, or you can make them yourself. The standard width of cots is 60 cm, length – 120 cm, height – 85 cm.
When making such a piece of furniture, it is better to adhere to standard sizes - if they are reduced, it will become impossible to use the modules that form a round crib.
Furniture with transformation function
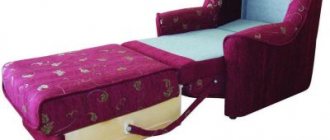
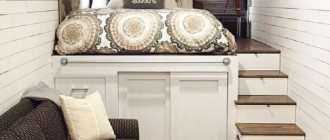
Owners of small spaces, for example, studio apartments, can place a transforming bed (a production model or a do-it-yourself model) in the children's bedroom. This can be a sofa bed, a chair-bed, a children's bed-wardrobe (depending on the design features).
These types of furniture fit optimally into any interior style, allow you to save the available space as much as possible, and are suitable for a schoolchild or student.
Teenage beds for two children
Are two children in one room a nuisance? Not at all, if you correctly calculate the space of the room and the needs of each child. Bunk beds for teenagers are made taking into account all age characteristics.
There needs to be enough personal space for both. During the period of growth, children are very sociable and at the same time require solitude. They need their own space, privacy and maximum comfort while sleeping. All this is taken into account when creating beds with two floors.
The design may look like one large bed, but it is not. These are two hotel teenage beds connected by a comfortable staircase, which is absolutely safe and adds an element of play to everyday chores. Each of these sleeping places is separate from each other and if your child wants to be alone with himself, he will not be disturbed.
The work sections are divided equally, so it doesn't matter whether the teen bed is used by older children or not. None of the children will be deprived of space and comfort. The bed models are prefabricated and consist of convenient parts that cannot injure the child. In the form of parts, delivery to your home and, if you wish, assembly are carried out.
DIY bed construction
Having chosen a model and decided on consumables, you can begin to work independently. The entire construction process can be divided into several stages:
- Preparation of the drawing.
- Processing of parts.
- Assembly of the structure.
All stages are strictly required, because only through strict consistency can a positive result be achieved. The most optimal and interesting option would be to build a children's bed-house with your own hands.
Advantages and disadvantages
When making children's furniture, you need to consider several factors:
- Children will taste the furniture. The wood itself is soft, and a child’s teething will encourage him to damage the furniture even more often. The crib should be made from environmentally friendly materials.
- Until the age of one year, the baby will constantly defecate in bed. And not every diaper or diaper will retain this amount of moisture. There will definitely be leaks. The wood will absorb liquid, which may cause the crib to become deformed. The wood can also rot, which will affect the health of your child.
- Child's age. If the crib is made for a newborn, it is worth considering the possibility of “transforming” it into a cradle.
Based on the above points, we can highlight the advantages of making a crib on your own:
- The bed can be made to individual parameters, with optional functionality.
- Making home furniture will require a much smaller budget.
- All processes are controlled by the parent. The end result will be an environmentally friendly and high-quality product.
Despite the obvious advantages, there are also disadvantages of home production:
- You will need a sufficient amount of free time to search for good material, as well as to progress the work process.
- It is necessary to carefully process each piece of wood so that there are no chips or protruding chips on it.
- To work, you must have minimal metalworking skills in working with wood.
Processing parts before assembly
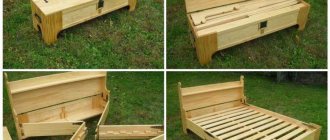
According to a pre-prepared drawing, parts for the bed are cut out of wood or chipboard (supporting structures, plateau for the base, parts for assembling drawers, headboard, elements of the house installation). The edges of the cuts are carefully sanded using sandpaper.
The next step is special impregnation of the surfaces with an antiseptic, antipyretic, moisture-resistant and antifungal solutions.
How to make a cradle from a child's bed for rocking a baby
From the resulting crib you can make a cradle for a newborn. To do this, you will need to modify the legs from the remnants of a chipboard sheet.
What will you need?
A cradle is a small bed for newborns and its exceptional feature is that the cradle is a hanging cradle, a crib that is suspended in the air.
In the old days, it was the most common furniture for newborns and, by the way, the most dangerous, both before and now. All this is due to the fact that if you do not follow the technology or make a mistake in the fastening, or in the material that allows the cradle to hang, then it and the child may simply fall, causing the child to be injured or even break. Before placing your baby in the bassinet, check all parts for strength.
To make a cradle, no additional visit to the hardware store is required. All the necessary materials will remain from assembling the crib itself. The cradle will differ only in the runners attached to the legs of the crib.
Tools
To make runners you will need:
- meter and ruler;
- pencil for marking;
- a piece of twine or rope, no more than 2 m;
- large format paper for drawing the runner layout;
- jigsaw;
- screwdriver
Materials
The remains of a chipboard sheet, as well as 4 metal corners 50 by 50 mm and self-tapping screws for fastening, are suitable as a basis for the runners.
As a consumable, you will need a large sheet of paper on which to draw a pattern for the runners.
Step-by-step instructions for designing and installing runners
Before you begin installing the runners, it is worth considering their design. They are made from leftover chipboard. To fasten the runners to the legs of the crib, 4 metal corners are used, as well as self-tapping screws from 2 to 3 cm.
Sizing
One of the most important points is determining the size of the runners. The main thing here is not to make mistakes in sizes and proportions.
Otherwise, the cradle may tip over or not rock at all.
To do this, it is important to calculate the radius along which the runners will be cut, as well as their lowest point relative to the legs of the crib. For this project, the lower point of contact of the runners with the floor relative to the beginning of the legs is 5 cm
Drawing
For convenience, the drawing should be drawn on wide-format paper. The following parameters must be taken into account:
- The base of the triangle is the distance from the outer edge of one leg to the outer edge of the opposite leg.
- Its top is the lowest point of the runners, located 5 cm below the level of the legs.
After the figure is drawn, you can start drawing the runners:
- To do this, you need to take a pencil and tie a piece of rope to it. It will look like a compass.
- After this, measure out such a radius that the pencil passes through the corner of the base and its top. This will be the required value.
- The length of the rope is fixed and the lower edge of the runners is drawn.
- After this, step back 20 cm and make another top edge.
- Measure the length of the arcs. Usually it is within 25 cm “outside” the legs.
- The paper blank is drawn and cut out again.
An example diagram can be seen below:
Manufacturing of parts
The runners consist of two parts, which are cut out on a paper pattern using a jigsaw.
For beauty, you can make several holes in them using a drill or screwdriver.
Do not drill too many holes, this will affect the overall rigidity of the structure.
Attaching the skids
These elements are installed symmetrically to each other, on opposite sides of the crib. They are attached using metal corners to the legs on the inside of the crib. In this case, the lower arc of the runners should overlap the vertical posts so that the lower corner of each of them is flush with it. Also, for reliability, you can fasten the runners and crib posts from the outside. To do this, you need to carefully drill the runners through the legs and secure them with 72 mm self-tapping screws.
Assembly of the structure
Instructions on how to make a children's bed with your own hands:
- Work begins by assembling the frame and supporting structures.
- Screws, self-tapping screws and metal corners located along the internal contour of the parts are used as fasteners.
- In the building, the lower floor is separated from the upper floor by a horizontal plate.
- Special plastic or metal grooves are laid along the side surfaces, which can be purchased at any construction supply store.
- Storage boxes are assembled based on the dimensions of the corresponding compartment.
- Movable rollers corresponding to the grooves in size and length are laid along the outer contours.
- Screw on a wooden plate for the headboard and restrictive sides.
- Install a second tier or assemble a loft bed.
- The staircase for a two-tier model is made from metal pipes, coated with an anti-corrosion compound and paint (it is necessary to monitor the quality of the paint used to ensure the absence of toxins and harmful fumes). An alternative option is to build a wooden staircase with additional handrails.
- If necessary, assemble the roof for the model in the form of a house. Wooden slats are used for work.
After assembly is completed, all fasteners are carefully checked, the reliability of their installation, the strength of the ladder and the restrictive sides. The final stage is to decorate the surfaces.
This could be painting with stain and acrylic varnish, interesting stencil painting (fairy-tale characters, cartoon characters) or wood burning. The craftsman also has the opportunity to finish the surface with decorative veneer.
Cozy cradle
In order to start making a crib, you first need to take measurements in order to know the correct dimensions of the future product. After all, it happens that the crib will be in the parents’ room, and there is not much space there. The second step is to create a drawing.
Advice! It is very important to adhere to the drawing in order to obtain a sufficiently durable and high-quality work. You can download it on the Internet and adjust the desired size for yourself.
What will be needed for production?
- 2 side parts 85.4 by 134 centimeters;
- two pieces of top strips measuring 6 by 134 centimeters; upper and lower parts 71.1 by 71.2 centimeters;
- the bottom of the crib measures 130.5 by 71.1 centimeters;
- slats that will support the bottom of the crib;
- blocks 3.2 by 3.2 by 60 centimeters - 2 pcs.;
- slats, for the side parts measuring 3.2 by 3.2 by 120 centimeters, also two pieces;
- 38 fencing strips with a diameter of 1.2 and a length of 61.4 centimeters;
- screws 4 by 45 millimeters.
Related article: Brocade fabric: description, production and application (photo)
Now that everything is prepared, we assemble the crib. Let's start with the side parts. To do this, you need to take the prepared parts and draw a line, stepping back from the top edge by 20 centimeters. The width of the resulting product should be six centimeters. Now, looking at the photo of the drawing, we cut it out.
We form the legs, for this we need to make marks at a height of 15 centimeters and 11.5 cm, draw a smooth connecting line between them. In the same way we draw the inside of the leg, while retreating six centimeters. And we do this with all the legs. Next, we mark the locations for our planks. We retreat to a distance of 4.96 centimeters and make a mark, then by the width of the bar 1.2 centimeters and again retreat by 4.96 centimeters. And so we do along the entire perimeter at the bottom and top, then cut it out.
Next, simply fill the holes with PVA glue and carefully insert the strips. It is important that everything fits tightly and does not wobble. Leave to dry on a flat surface. Now we attach the remaining panels to the side parts using screws. It is important that the screws do not peek out, but are well hidden at the level with the base.
Let's start working with the bottom. To do this, we attach the prepared planks to the side parts, stepping back one centimeter from the bottom. All that remains now is to attach the bottom of our crib and everything will be ready. As you can see, everything is quite easy and simple. Mom needs to buy a mattress, protective panels for the crib and bed linen. The baby's crib is ready.
Photo of a children's bed with your own hands
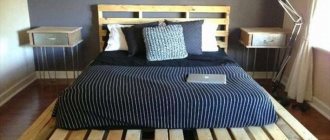
Bed made of MDF, chipboard, OSB, chipboard or plywood
Budget furniture is made from MDF or laminated chipboard in factories, but if you set a goal, you can make such a design yourself, which will be much cheaper, and the range of materials can be expanded. The modern market offers a large selection of slabs and modifications that have proven themselves in the creation of furniture. The only thing that cannot be done is to save money when choosing the thickness of the material, because the design of the bed must withstand a fairly large load.
If you decide to do such an experiment, then first you need to make a detailed drawing and think in advance about the position of the parts on a sheet of chipboard, laminated chipboard, OSB or plywood (furniture board) of the required size. This will help avoid errors when cutting and reduce material waste. In the case when there is no jigsaw at home, then it is better to send the material to a special workshop for cutting, which can do this carefully, and if it is chipboard, laminated chipboard, then process the ends with a special edge.
To ensure maximum strength of the bed when creating the frame and legs, the authors of Novate.Ru advise using natural wood or metal construction, then the bed will last a long time. If the first 2 materials do not require additional finishing, then experiments with the rest also involve creative work, because the bed should also be beautiful.
If it was thick plywood, then it can be opened with varnish or painted in a suitable color. Often craftsmen cover all the parts with fabric or leatherette, sometimes they make a soft carriage screed. They like to decorate the headboard in this style when the bedroom interior is decorated in a palace style.
Making a bed: step-by-step instructions
Making a crib can be divided into many small steps:
- Marking wood. Using a regular clerical pencil, draw the location of the parts. When all work is completed, traces of stylus are erased from visible surfaces with an eraser or washed off with alcohol. To draw complex decorative elements, you can use objects that come to hand (for example, to draw a circle, just circle the bottom of a glass).
- Sawing. Performed using an electric jigsaw. While working, you need to ensure that the cuts are neat and even. Finished parts should be numbered if the design involves a structure consisting of many elements.
- Preparation of fastenings. You need to cut out the spikes and nests for them in the parts that will be connected to each other. Also at this stage, you should cut off two pieces of metal corner for attaching the slats, from which the bottom of the bed is formed. Mark holes for screws on the cuts and drill them.
- Sanding parts. Use a grinding machine or sandpaper to process all cuts and the surface of the boards if it is rough.
- Varnishing and other types of decorative processing. If the parts are expected to be painted, varnished, covered with film or upholstered with fabric, this work should be done when the bed is disassembled.
- Assembly. By gluing tenons into the grooves and using metal ties, the structure is assembled, starting from the main frame. Wheels are attached to the drawers, and slats are attached to the bed walls. When everything is ready, put on the mattress and cover the bed with linen.