- home
- Garden
- Seedling
Irina
0
(0)
Reading time: 19 minutes
Not every window sill is suitable for growing seedlings at home, but only one that receives sunlight for a long time.
Typically, gardeners grow a lot of seedlings, and therefore a lot of space is required for them. This problem is solved by anyone, as best they can: they place tables and shelves next to the window, and install additional lighting on other window sills.
We suggest the best option: a rack for seedlings, or, as it is also called, a rack.
- Why do you need a seedling stand in your home?
- Types of racks for seedlings
- Basic requirements for racking
- Material selection
- Types of structures
- Backlight
- We'll tell you how to make LED and fluorescent lighting Installation of LED lighting
- Illumination from fluorescent lamps
- DIY plastic rack
- Metal cutting
Why do you need a seedling stand in your home?
Even if placing seedlings is not a problem, a rack will help free up additional surface space. And a real housewife will always find a use for them. At least for growing even more seedlings.
Let's look at the advantages of the stand:
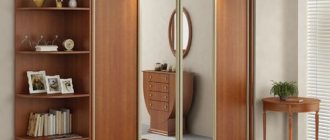
- there is an opportunity to organically fit into the interior, decorating at your own request;
- can be moved and installed in a convenient place at any time;
- compactness of the structure;
- will protect window sills from stains of dirt and rust, from yellow spots that remain after containers with seedlings;
- the main thing is to create the most comfortable conditions for the growth and development of seedlings.
This structure will serve faithfully for many years; it is easier to add lighting on it.
The design can be chosen according to individual capabilities and needs. And make a rack for seedlings with your own hands. Thanks to the design of the rack, all plants are evenly illuminated by sunlight or an additional illumination lamp, a phytolamp. If necessary, the rack along with the seedlings can be moved away from the glass if it has become a source of cold or, conversely, the sun has become hotter.
It happens that seedlings get sick because the window sill is too cold or begin to dry out due to hot heating radiators. This does not threaten plants installed on racks.
Phytolamps for plants
To be honest, I don’t use phytolamps and don’t see the need for it. My experience shows that seedlings and plants grow well under “ordinary” lamps, incl. under the fluorescent lamps that I had before.
I have heard about some restrictions associated with the use of phytolamps:
Has a negative effect on the eyes;
There is no need to be in the room where the phytolamps are turned on.
Considering that phytolamps are very expensive, I have not yet decided to use them.
Types of racks for seedlings
Based on location, racks are divided into:
- window, installed on the window sill;
- floor
The first type is used for installation on windows facing south. The downside is that such stands do not allow for growing tall seedlings on them. But for small specimens it will be possible to arrange 3 or 4 floors.
Rack for seedlings on the windowsill
Floor options are universal; they can be placed in front of a window, against a wall, on a loggia, and even, if desired, in the middle of the room. Equipped with a lighting source, they will solve the problem of providing the required duration of daylight for seedlings.
Floor rack for seedlings
Their height is presented in stores in different sizes.
The advantage is that in most designs you can remove some of the shelves if they interfere with the placement of tall plants.
Rack of children's shelves
In the apartment of the user FORUMHOUSE Shkurep there is a very narrow window sill, it is impossible to properly place trays with seedlings on it. The solution to this problem was a rack of laminated children's bookshelves. The shelves protrude 10 centimeters beyond the window sill - thus, there is more space for seedlings. The battery under the windowsill has been disconnected all winter.
Children's shelves 80*30 laminated, tied to brackets for blinds. The brackets were purchased at a hardware store. The height of the shelves is not adjustable.
Basic requirements for racking
The owner will receive all the amenities, advantages and comfort if the rack is successfully chosen. If it is fragile or defective, then instead of joy, problems will arise. Homemade racks for seedlings of any kind will be 100% reliable.
In addition to strength, racks must have the following qualities:
- reusability;
- convenient for caring for seedlings and watering;
- have a beautiful appearance that is in harmony with the overall decor of the house.
The following parameters are considered universal:
- 3-6 shelves;
- distance between shelves – 40-50 cm;
- the length of the rack is more than 50 cm, so that it is possible to place fluorescent lamps of a standard size;
- The minimum clearance between the bottom shelf and the floor is 10 cm.
Rack drawing
With floor-mounted shelving, the bottom shelf is often used to store gardening tools, containers and pots.
Material selection
The material is selected so as to create a reliable and durable rack for seedlings. Let's look at some of them and find out the advantages and disadvantages.
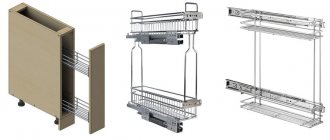
- Metal: durable, reliable. Profiles or pipes are suitable for racks, and shelves are made of mesh or sheet metal. Disadvantages: high cost, special skills, devices and tools for manufacturing will be required. Corrosion may occur, so stainless steel is recommended.
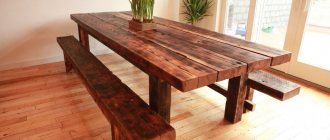
- Wood: environmental friendliness, beauty, strength. To improve the latter quality and protect it from moisture, the rack is coated with impregnation, which protects the wood from getting wet. Hardwood materials absorb liquid the least: maple, oak, ash.
- Plastic: affordability, durability, easy to clean, resistance to external influences (light, water). To assemble the racks, plastic sheets and pipes are taken.
- Plexiglas: strength. An original stylish shelving unit is made from this material. The transparent design will fit into any interior. In addition, you can use plexiglass of different colors.
- Plywood: easy to work with. But not the most suitable material. The shelves swell quickly when exposed to water. To prevent this from happening, you will have to additionally use film.
Rack for seedlings made of plywood
Of the listed materials, plastic and plexiglass are considered the most suitable. Racks made from them are immediately ready for use. And there is no need to impregnate them with protective agents against pests, moisture, and corrosion.
If you decide to make a rack for seedlings with your own hands, in addition to the material you will need the following tools:
- saw,
- drill,
- screwdriver,
- screwdriver and others.
Types of structures
Racks according to their design are divided into stationary, collapsible and window.
- Stationary racks are installed in a permanent place and fixed in several places for reliability. They are distinguished by their strength and durability. They are installed in rooms where plants are supposed to be grown for more than one season.
- Collapsible racks for seedlings are convenient for limited space spaces. This rack can be easily and quickly disassembled and moved to another location. When the seedlings are planted, the stand is dismantled and put away.
Window racks are installed on the windowsill. They are suitable for planting a small number of seedlings. These devices allow you to grow greens all year round
The advantages of using each type of structure are confirmed by many years of experience of gardeners and gardeners.
Backlight
Sowing seeds for seedlings begins in winter, when daylight hours are short. Natural light is not enough for seedlings to develop. Therefore, for growing, a seedling rack with lighting is used to increase the photoperiod.
Lighting requirements:
- bright light;
- minimum heating.
Do not use incandescent lamps in the system, as they become very hot and can burn the seedlings.
Sodium lamps with light yellow light are suitable, which have a beneficial effect on the seedlings. They are rarely used for arranging shelving due to their high cost. When installing, it is required to be equipped with a power regulator.
Special phytolamps have a spectrum optimally suited for plants. They are set up from above, at a distance of at least 10 cm from the tops of the plants, slightly to the side of them. Cons: Harmful to people's eyes.
A common option is fluorescent and LED lamps. They give good results, their cost is not high and you can equip a rack for seedlings with such lamps yourself
Regardless of the type of lighting, its installation requires strict adherence to safety precautions:
- Be sure to turn off the electricity while performing work.
- Insulate the ends of electrical wires and do not leave bare ends in accessible places.
Making a shelving unit for the windowsill
Having initially calculated the number of floors of the rack (in our case there will be 4) and its parameters, we proceed to construction. For simplicity and convenience, we take ready-made furniture panels in the size of the window sill, 1200 mm by 200 mm long. For the side racks we install furniture panels 1500 by 200 mm long. We fix it using the format. The height of the shelf in our case is 350 mm. If desired, for greater stability, the structure can be additionally secured to the slope or frame. You can make a rack for seedlings with lighting by attaching lighting to a ready-made structure.
Why do seedlings need lighting?
In winter, plants especially lack natural light. As a result, photosynthesis proceeds sluggishly, normal development and biomass growth slows down. The lack of light is compensated by installing artificial lighting. In stores you can buy lamps of various designs and powers. But how many lamps and what power is suitable for growing plants? First, let's decide which lamps are suitable for lighting.
Choosing the right lamp for seedlings
Suitable for illuminating seedlings:
- Incandescent lamps (17 Lm/W) are a simple, affordable, but not the most effective way of lighting. They provide little light and heat up a lot.
- Fluorescent lamps (70 - 100 Lm/W) type LBT or LB daylight with low power. Provide cold light. Have a low proportion of red light.
- LED (80 – 110 Lm/W) – durable, economical lamps. With them it is easy to select the required spectrum and intensity.
- Sodium metal halide lamps (up to 100 Lm/W) are easy to use, economical, efficient, but they lack the blue spectrum.
- Domestic sodium gas-discharge lamps (200 lumens per watt) emit a yellow-orange glow that does not cause eye irritation. Requires additional installation of a control device.
- Mercury . They have the largest “cross section” in the area of daylight.
- Phytolamps are economical, environmentally friendly, efficient, compact and durable. The most popular for lighting seedlings. Even close proximity of such lighting will not lead to leaf burns.
- Others : halogen (25 Lm/W), linear (47 – 93 Lm/W), xenon gas-discharge lamps (100 Lm/W), neodymium.
We'll tell you how to make LED and fluorescent lighting
Installation of LED lighting
Experienced gardeners claim that seedlings grown with such lighting produce a rich harvest.
LED lights combine red and blue spectrums, which are most needed by plants.
To install this type of lighting you will need:
- tapes with red and blue diodes;
- transparent glue “Moment”;
- plinth with cable channel or plastic base;
- screws and screwdriver;
- plug, switch, electrical wire;
- reflectors (mirrors, sheets of foil, stainless steel);
- insulating tape.
The process of equipping a rack with lighting:
- Attach the LED strip to the plinth or plastic base.
- Connect the tape to the switch.
- Attach a wire with a plug to the switch so that its length is sufficient to reach the outlet.
- Secure the base (or plinth) with tape to the bottom of the shelf using Moment glue or self-tapping screws.
- Attach reflectors to the side walls of the rack.
The LED lamp can be equipped with an automatic timer and can be set to any amount of time. Optimal – 14 hours
Illumination from fluorescent lamps
Fluorescent lamps are sold in specific sizes. Therefore, when constructing a rack for seedlings, it is important to provide for this point during design.
The lamps are mounted on special brackets, and they, in turn, are attached to the underside of the shelves. Each should have two lamps. It is important to ensure that there is at least 1.5 cm of space between the shelf and the lamp.
You can use metal wire to attach the lamp to the rack. If desired, the lamps can be hung on chains or hooks and the illumination intensity can be adjusted.
The height is adjusted depending on the increase in seedling growth.
Regardless of the type of lighting equipment, there are general rules for additional lighting:
- It is not recommended to leave the lighting on overnight, as plants also need a period of rest;
- on sunny days, additional lighting is not required on south-facing windows;
- The need for the length of the photoperiod is individual for each crop.
Things to consider
In central Russia, pre-prepared seedlings are necessary to obtain a generous harvest. Otherwise, many heat-loving plants will not have time to bear fruit in the short summer. The seedlings must be strong, ready for rapid acclimatization, resistant to pests and diseases.
This is only possible with good lighting and watering during indoor growing. In addition, the seedlings should, on the one hand, be protected from cold and window drafts, and on the other, from dry hot air that rises from the radiators. All these nuances are taken into account when arranging any racks for plants on the windowsill.
Related article:
How to use biological products for seeds and seedlings
To ensure maximum lighting, the depth of the shelves is made no more than 60 cm, and the height - from 40 to 50 cm. For narrow window sills, cantilever structures that partially protrude into the room are suitable. Deep shelves (over 30 cm) are best made from transparent materials, such as plexiglass and polycarbonate. They are lightweight, resistant to mechanical stress, easy to care for and transmit light well. Glass is more expensive, more difficult to process and can create a traumatic situation.
Another interesting option is metal shelves with perforations or fine grids. The shadow from them will also be minimal. However, in the second case, the plants must be in stable containers; the cups may fall between the base rods.
Related article:
On what day do seeds germinate?
All shelves, regardless of size and material, provide for mounting lamps - without them, even on a south window, the sprouts will be frail, pale and painfully elongated. The sun in February - March, when seedlings are grown, is still weak, and window glass absorbs up to 30% of the rays. Therefore, every day for 14 hours, young shoots are illuminated artificially. It is advisable to mount the lamps not permanently, but on adjustable cables, ropes or chains and lift them as the crops grow.
To increase brightness and heat transfer, “caps” made of foil are put on the lamps or the entire structure is covered with a sheet of foam foam from the side of the room.
DIY options
There is a lot of information in the media on how to make a rack for seedlings yourself. There are complex designs that require special skills and financial investment.
We talk about affordable and simple options. They are not inferior in strength and convenience to their expensive counterparts.
DIY plastic rack
Lightweight, convenient racks for seedlings can be made from plastic pipes.
They can be installed anywhere, adjust the height, and, if necessary, completely disassemble and store them. To work you will need:
- PVC pipes,
- adapters (tees),
- corners,
- corner crosspieces,
- hacksaw,
- marker,
- roulette.
Ready-made drawings of racks for seedlings can be found on the Internet, or you can draw them yourself.
We offer instructions for making a stand with a height of 180 cm.
- Cut blanks from pipes: supports - 4 pieces, 180 cm each, crossbars - 6 pieces, 50 cm each, crossbars - 4 pieces, 150 cm each, short crossbars - 4 pieces, 30 (40) cm each.
- Place two tees at equal distances on two crossbars.
- Cut the supports in half. Connect the two halves with a corner cross.
- Place the two connected supports parallel to each other.
- Insert the crossbar with the tee into the crosspiece of the support. The result will be something like the letter “N”.
- Using corners, secure the top and bottom of the resulting structure along the crossbar. It turns out two rectangles with one common side.
- Repeat the process with the remaining two supports.
- Place the two resulting side walls parallel to each other.
- Install crossbars into the free holes of the crosspieces to connect the sidewalls to each other and give the structure stability.
- To build shelves, short ones are secured at the end of a long crossbar with corners. The result is a kind of brackets.
- Insert the pipe brackets into the hole of the tees parallel to each other.
- Lighting fixtures are installed above the shelves, securing them to racks.
- For convenience, sheets of plywood or plastic are placed on the shelves.
For the second option for making a plastic rack, you will need PVC pipes, angles and tees, a hacksaw and hot glue. It’s easy to calculate the dimensions yourself.
- Cut two long tubes and two short ones. Place the same number of T-shaped fasteners on the long ones, depending on the desired number of shelves.
- Connect them into a rectangle with a corner tee.
- Make another exactly the same rectangle.
- Cut 4 identical tubes and connect the two side panels with them, inserting the tubes into the free holes in the corner joints.
- Cut tubes for the shelves that are equal in length to those that connected the long racks. Each shelf will require two pieces.
- Insert the tubes into the T-shaped fasteners.
- Cut shelves from chipboard or other material and install.
A convenient rack for seedlings is ready!
Plastic is easy to clean and disinfect. Pathogenic bacteria do not live on it and mold does not develop. This is the safest material for plants.
Stable timber shelves
If you need to make a stand very quickly and from available material, then this is the option.
Required:
- drywall;
- beam;
- corner profile;
- tools and screws.
Manufacturing procedure:
- The crossbars for the shelves need to be attached to two long bars. Their number depends on the length of the bars. The recommended size between shelves is 60 cm. From the floor to the first shelf is 20 cm.
- Make the second side to the same dimensions as the first.
- Between the supports, attach shelves made of plasterboard or, if it is not available, from 3-4 bars to the crossbars with nails or self-tapping screws.
- Instead of the top shelf, install two crossbars to secure the additional lighting lamps.
- Internal surfaces can be covered with foil to increase light output.
The rack is not very presentable, but quite durable and convenient. If desired, it can be decorated or painted.
The simplest mini-garden made from pallets
When there is a shortage of space, a compact pallet rack will help out. It is mounted on one of the walls and is a vertical narrow structure.
To make such a rack for seedlings you need to prepare:
- pallet,
- tools: hammer, nails, crowbar, scissors, pencil, tape measure, construction stapler,
- woven bag or geotextile.
How to make a stand:
- Using a crowbar on a pallet, tear off the boards one at a time. The remaining boards will contain pockets for soil.
- Measure the dimensions of the pallet and cut out a piece of burlap that matches them.
- Secure the fabric to the back wall with a stapler.
- Trim any protruding edges, if any.
- Measure the dimensions of the remaining boards: depth, width. Cut pocket pieces from burlap according to size.
- Use a stapler to attach the pockets into place.
- Secure the resulting structure to the wall with anchor bolts.
This mini-vegetable garden can be placed on a balcony or outside wall of the house.
DIY window sill rack
If the apartment has windows facing south or southeast, then it is best to place the seedlings on them. A small amount of it is removed from the windowsill. Make a rack for seedlings on the window with your own hands, and the placement problem will be solved.
Window racks are made collapsible, foldable and solid. You can take any materials: plastic, metal. Wooden parts are most often used. They are durable and inexpensive.
Wooden racks are environmentally friendly, convenient and easy to assemble, and practical to use. Their manufacture does not require specialized tools, as, for example, when working with metal
To make a rack for seedlings on the windowsill you will need:
- wooden beams,
- plywood,
- screws or nails,
- hammer or screwdriver,
- tape measure, pencil.
Take the dimensions: width and height of the window. Based on the height, calculate the number of shelves. The distance between them is usually 50-60 cm. Plus space for installing a lighting system.
Two identical sidewalls with crossbars for installing shelves are made from the beams. The shelves are cut out of plywood. It must be remembered that when liquid gets in, the plywood becomes deformed and subsequently begins to fall apart. Therefore, pallets are placed under containers with seedlings or shelves are covered with oilcloth.
Collapsible rack
In the case when the stand is required only for the period of growing seedlings, it is more rational to make the structure collapsible. Especially collapsible racks for seedlings are suitable for small apartments.
The best material for such a stand is metal. The wooden structure is not so durable, and the plastic ones do not withstand frequent assembly and disassembly List of materials:
- perforated metal profile or wooden beam for side posts, frame parts;
- corner, profile, beam for fastening shelves;
- boards, chipboard, plexiglass, sheet metal for shelves.
Manufacturing instructions:
- on four parts for racks, drill holes for installing shelves and a diagonal tie;
- drill holes for brackets or bolts in the shelf frames;
- install the shelves one by one, starting from the bottom;
- secure diagonal ties for structural stability;
- install lamps if desired.
The rack is lightweight and takes up little storage space.
Balcony design
An excellent place to place seedlings is a glass balcony. There is enough light and space here. Shelves for seedlings are also installed on it.
Material for manufacturing: metal profile, corners, sheet iron, wooden beams, board, plastic or glass.
The drawing and production are the same as for the manufacture of a rack for a window sill. The only difference is that the stand is attached to the ceiling and floor with special anchor bolts. If the structure is not intended to be stationary, then care must be taken to ensure its reliability and stability.
Wooden rack for seedlings
Let us tell you in more detail how to make a rack for seedlings from wood, the most common stationary design. This model turns out to be heavy, so zealous owners attach wheels to the legs. In this case, their height should be taken into account when constructing the drawing.
For the rack you will need:
- Materials:
- Beam 4.5x4.5 cm for support posts - 3 m;
- Beam 3x6 cm;
- Plywood (or plexiglass);
- Tools:
- Grinder (or jigsaw);
- Screwdriver and screws;
- Hammer and nails;
- Chisel;
- Roulette;
- Sandpaper.
Cutting parts
During manufacturing, you need to carefully align the cuts so that the rack is stable.
Cut the timber for the racks into 4 equal parts. Cut out as many crossbars from a 3x6 beam as needed for the shelves in accordance with the drawing.
On the supports, mark the places where the shelves are attached, laying 50-60 cm from the top surface of the bottom shelf to the bottom plane of the shelf above it. In the marked places, indentations are made with a chisel.
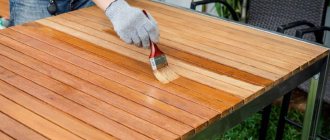
The next stage is treating the wood with a special impregnation that protects it from moisture.
Assembly
After the wood has dried, the crossbars are inserted into the grooves and screwed with self-tapping screws.
The required dimensions are drawn on the material for the shelves and cut out with a jigsaw. The edges are sanded.
The shelves are placed on crossbars and secured with self-tapping screws.
This rack can be coated with varnish or paint. It is recommended to use water-based, latex or alkyd formulations. They have no smell.
A rack decorated with self-adhesive film looks original. All these coatings provide additional protection against destruction.
Metal structure
Metal corners make a convenient and durable rack for seedlings with lighting. For production you will need:
- metal corner 40x40;
- boards;
- saw;
- self-tapping screws;
- drill;
- electric drill;
- roulette.
The footage and quantity of materials are determined based on the drawing.
Metal cutting
From the corner, cut 4 long posts, 4 crossbars of 50 cm each and 4 fastenings for shelves. Calculate the height of the racks and the length of the shelves taking into account the location.