Often, owners of sliding wardrobes are faced with problems of doors being unbalanced, not fitting tightly, or coming off the rails or guides. All this can be easily adjusted with your own hands, without wasting time and money on paying a specialist.
How to adjust the doors?
Let's look at the most common problems that require adjustment
The door is not tightly adjacent to the wall, moving away from it
This often occurs due to damage, displacement or absence of the so-called stopper. It is a thin double metal plate, the upper part of which is divided in half and the ends are slightly bent upward, as in the photo. This part is installed in the middle of the bottom of the groove in which the door is held.
- To work with the stopper, you will have to remove it - otherwise you won’t be able to get it out.
- When restoring the location, replacing and installing in the absence of this important part, it is enough to fix it in the right place using reliable glue; more often, superglue is used.
How to fix doors that aren't closing tightly enough
Sooner or later, you will notice that when closing the cabinet, the door no longer fits tightly against the side wall and rolls back slightly. This defect is most likely caused by a slight slope of the floor surface, which is not visually detectable. In order for each sliding wardrobe panel to take its place, you will need to adjust the locking stopper. To do this you need:
- install each door so that it fits tightly to the side surface of the cabinet;
- on the lower guide, make marks with a pencil in the place where the center of the roller falls - either left or right, depending on the location and orientation of the adjustable blade;
- move the door to the side, and then use a knitting needle or screwdriver to move the stopper so that its center coincides with the previously made mark.
If the stopper is installed correctly, the door roller that runs over it will be locked in the desired position. In this case, the door will fit tightly to the side of the cabinet.
Some models of sliding wardrobes have several door panels in their design, which during operation displace the initially installed stoppers. You
You can set the correct stop for each leaf relative to the width of the cabinet in the same way as described above.
How to remove a wardrobe door
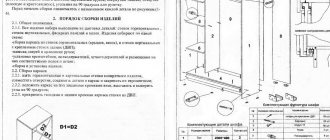
Let's consider the features of analyzing several variants of models: economy class, mid-price category and expensive models. Most of the doors of such cabinets, usually located in the middle price category, have stoppers on the sides that limit movement. Before carrying out work, we find them on every door that requires replacement or removal.
- Unscrew the upper and lower stops.
- We put the screwdriver aside; we won’t need it for now. We close the doors and approach the one that needs to be removed.
- Holding it by the side, lift one of its upper edges up, and use a screwdriver to remove the lower edge from the groove and pull it towards you.
- Gradually, lightly pulling, we release the entire lower side from the groove and lower it to the floor, thereby freeing the upper edge.
- We take the top edge out of the groove and remove the entire canvas.
- Economy class models are rarely equipped with stoppers: as a rule, the rollers simply ride on guides, which have movement limiters on the sides. Therefore, in such models it is enough to remove the stops with a screwdriver and roll the door off the rails.
- Very expensive models are equipped with closers, so before you take on the main work, unscrew the closer mechanism on one side, leaving it attached to the wall or ceiling of the cabinet. This will save time on assembling the entire structure after completion of the repair work.
- Be careful when working with mirrors and never hold a screwdriver in your hands or teeth, so as not to injure yourself, damage the mirrors or leave scratches on the furniture.
Features of adjusting sliding wardrobes with rail running
To close tightly and freely move the door leaf along the rails, you need to make sure that the end part is vertical. At the slightest shift to one side, it is recommended to debug.
Features of the adjustment:
- Inspect the bottom of the door leaf. At the very bottom you can find a built-in bolt.
- To raise the angle, the bolt is turned to the left. Accordingly, to lower the sash, you will need to turn it to the right.
- To roughly understand how many turns you need to make, know that a turn is 1 mm.
Next, proceed to debugging the side connection. To do this, you need to test closing the door. If there is insufficient contact with the sidewall, proceed to adjust the horizontal stroke.
To perform the steps yourself, follow the following sequence:
- At the end of the door there is a bracket with bolts. It can be placed at the bottom or in the middle of the canvas.
- The door position is adjusted by turning the bolt to the right or left.
- After completing the steps, check the quality of the work done. If extraneous sounds are detected, the possibility of incorrect debugging cannot be ruled out.
To understand the specifics of door adjustment, you need to familiarize yourself with its structure and the operating principle of the mechanical part.
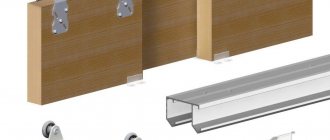
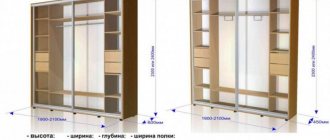
Door leaf structure
Let's look at the structure of doors for compartment furniture with the Raumplus system:
- The profile is vertical. It also replaces the handle. The shape and location can be symmetrical or in violation of symmetry. The optimal placement of an asymmetric profile is in a wardrobe with three doors on the middle door leaf.
- Top guide. Depending on the type of construction, it can be single-row or double-row. Acts as a limiter against sideways movement.
- Bottom guide. Similar to the previous option, there are single-row and or double-row. The main function is to create a direction of movement.
- Bottom connecting profile. Necessary for connecting vertical profiles. Rollers are mounted on the inside.
- Upper connecting profile. Use screws to connect the left and right vertical strips. To ensure smooth movement, rollers are attached at the top.
- The separator is horizontal. Located at the bottom above the profile. Used to create combined structures.
- Seal. Necessary to ensure a safe fit in place, glass filling. Made from silicone.
- Breaker brush. Location – end part of the doors. The main function is to provide a soft vestibule.
- Stopper. The element is necessary to softly stop the sash and fix it at the end point. Thanks to the stopper, spontaneous rollback of the door is not possible. It has compact dimensions and is installed inside the rails.
Door structure
Having familiarized ourselves with the structure of the door structure of the sliding wardrobe, we move on to studying the operation of the mechanism.
How does the coupe mechanism work?
The compartment opening system is sliding. The opening of the valves is ensured by rolling rollers located only at the top or at the top and bottom. The number of roller mechanisms is determined depending on the type of structure. There are two types of mechanisms: support and suspension.
- Support. Movements are carried out due to the rotation of rollers located in the upper and lower parts of the sashes. Thanks to this, the doors move smoothly. To maintain a vertical position, the mechanism is equipped with guide bars. Due to this, the movement occurs in a certain trajectory. The vertical profile installed in the end area has a characteristic recess for easy grip with your fingers. This advantage allows you to reduce the amount of effort required.
The disadvantage of the design is the open lower part. This leads to unwanted accumulation of dust and dirt. In this regard, the number of wet cleanings carried out is increasing.
- Suspension. The main difference from the first option is the number of roller mechanisms located per sash. In this case, the sash is held suspended on the upper guide bar. The door leaf moves on rollers located in the upper part of the structure. Also, the disadvantages include complex installation. Unqualified installation will lead to problems - distortions, difficult movement and other similar difficulties.
Further descriptions of adjusting doors for sliding wardrobes will be carried out exclusively for support mechanisms.
The door came off the guides, the rail
This is quite common. To eliminate the problem, just slightly lift the door, insert the roller into the groove, and lower the door.
To prevent further slippage from the door guides, inspect the stored items, remove those that touch it and interfere with opening and closing. Don't use too much force to move it.
The door extends from the wall of the wardrobe at the top or bottom
What to do if one of the ends of the door does not fit tightly against the cabinet wall? In this case, you need to adjust the tension of one of the furniture bolts that secures the door.
- To eliminate the distortion, we find two holes on the aluminum door frame. Please note that they may be hidden with furniture tape.
- We need the hole that is closer to the bottom edge of the door. There is a hex screw hidden there that regulates its position. The second screw is responsible for fastening the door frame.
- Using a furniture wrench or a hex screwdriver, we begin to adjust the position: if the top edge comes off, gradually turn the screw counterclockwise, if the bottom edge moves clockwise. Before our eyes, the distortion disappears, the gap disappears.
When should you repair your sliding door?
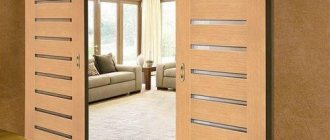
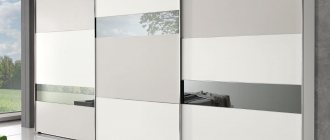
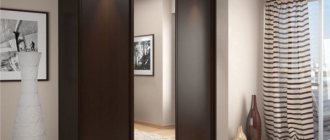
Sliding doors are doors with rollers that slide between two horizontal tracks. The lower rails guide the movement of the panels, and the upper ones hold the sashes and prevent them from falling out. Roller door structures operate silently, save space and decorate the interior.
Repair of sliding interior doors is inevitable if the device is not promptly prevented. Cleaning the guides, lubricating the rails and adjusting the movement of the shutters will extend the life of the structure. Signs of faulty roller doors:
- subsidence of the canvas with subsequent damage to the floor covering;
- extraneous noises, creaks and knocks during operation;
- loosening of fasteners;
- deformation of the valves;
- tight fit into the door frame.
Common problems
Operating the sliding system without regular maintenance leads to wear of the parts. The following problems appear:
- The movement of the doors is accompanied by clicking, knocking or creaking. The reason is worn out rollers or a bent rail. To eliminate noise, you need to remove the canvas and inspect the structure. The guide is bent so that the space for the door expands. If the problem is in the wheels, they are changed.
- The doors were deformed. When the structure becomes warped immediately after installation, it must be replaced. This is a factory defect. After long use, the sashes sag due to the divergence of the holding screws. They are twisted, and the canvases are placed in a horizontal position.
- The door opens on its own. The reason may be loose fasteners or a curved floor surface.
- Preventing contamination of the device (dust, hair, small objects) will extend the life of the sliding system.
The door doesn't close tightly
Due to uneven floors, the door structure may become skewed. When closed, the doors do not fit tightly together. Gaps form near the vertical posts through which extraneous odors and sounds pass through. Using a level, adjust the clamp, securing the blades in the desired position.
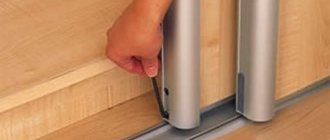
If the door does not close due to one-sided sagging of the sash, adjust the rollers. There are 2 holes at the bottom of the canvas. Through the upper hole, access is provided to the fastening screw, and through the lower hole, to the adjusting screw. Use a hex wrench to turn the screws to raise or lower the wheel.
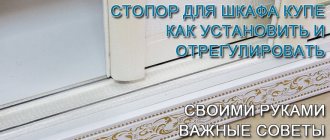
The structure may not close completely due to a broken stopper. The dropped or displaced latch is returned to its place. For reliability, fix it with durable glue.
The door does not slide on the guide
In order for the sliding door to open easily and stop jamming, you need to improve the operation of the rollers and grooves. Dust, hair and other debris prevent normal sliding. The doors are removed, all parts are cleaned with an alcohol-soaked cloth and reinstalled. If the situation has not changed, the reason is worn out wheels. They should be removed using a hexagon and replaced with new ones.
To improve sliding, do not lubricate the mechanism with oil. Machine oil contributes to the accumulation of debris and dust. Sunflower - gradually thickens and makes it difficult for the canvas to move. The rollers and rails will have to be replaced.
Grinding noise when door moves
This is due to the weakening of one of the upper rollers of the wardrobe. You need to remove the door, adjust the roller or squeeze the profile handle from above, which will allow you to achieve the same overhang on both sides.
The closet door has stopped moving smoothly and is sticking
It's easy to adjust. There may be several reasons for this:
- Dirt has accumulated in the guide or the roller has threads, hair and dust wrapped around itself, so it is difficult for it to roll.
- It may break, become deformed, or lose edge support during prolonged use. This is more common in economy class products with an aluminum profile.
- You can adjust the cabinet roller yourself. It is enough to unscrew the hexagonal screw located under the brush at the very bottom of the door, remove the roller, inspect and fix the problem.
As you can see, adjusting the wardrobe door mechanisms is not such a difficult task; you can fix everything yourself. It is important to find the cause and eliminate it. And if you have any questions, watch the video, which explains everything clearly and clearly.
See also:
- Types and where MT series blowers are used
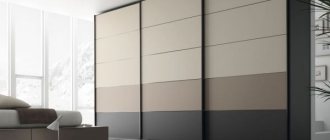
Types of doors for sliding wardrobes
Review of products from the Metal Profile company
Types of breakdowns and ways to fix them
When a wardrobe with sliding doors breaks, there is no need to rush to call a repairman. Most often, you can find the cause and solve the problem yourself. In most cases, furniture repair is needed due to the following:
- elements of the body or its filling are broken;
- parts of the valve opening mechanism are deformed, worn out, torn off, or loose;
- glass and mirror elements of the facade are broken or damaged.
Premium sliding wardrobes are often decorated with carved decor and various moldings. If furniture is not used carefully, they chip, scratch, or break off. After this, their restoration is necessary.
How to create a wardrobe design on your own, stages and nuances of work
Frame defects
During long-term use, the furniture body warps and becomes deformed. It begins to wobble and squeak when the doors move. Sliding door leaves and drawers open with difficulty or become completely jammed. The problem is a broken or loose fastener. Here you need to inspect the wardrobe box and find problematic screws, screws, bolts. Then replace or tighten them with a screwdriver or screwdriver. Additionally, it is recommended to securely fasten the frame iron corners fixed at the joints of the rear wall of the cabinet and both side walls.
The most common cases of failure of wardrobe filling elements:
- Deflection, breakage of shelves, formation of large cracks on them. The cause of these defects is excessive mechanical stress. It occurs if the base of the storage system is too wide and not reinforced with racks. Panels that are sagging or broken in half cannot be repaired; only their replacement is possible. The new shelf needs to be divided into two compartments and placed in the middle with timber supports to reduce the load.
- Chips and small cracks on shelves and drawer fronts. These small damages are restored. All defects are covered with wood putty, sanded with fine emery cloth and covered with paint to match the furniture.
- Deflection, separation from the walls of clothes rails. This happens due to strong mechanical loads. First you need to strengthen the pipe in the middle, this is done using a pass-through holder. It is fixed to the inside of the cabinet lid with screws. Then a rod is threaded through the fittings ring and secured with two flanges on the sides of the furniture.
When using the product, the filling elements break: hangers, hangers, hooks. The fittings also fail: handles, latches, awnings. One of the furniture legs may give way. When repairing wardrobes, these elements are completely replaced.
To prevent the shelves from sagging, you can install timber supports in the middle, which will reduce the load
Chips and small defects on the surface of the shelf can be covered with wood putty, treated with fine sandpaper and coated with paint to match the furniture
If the clothes rail breaks, reinforce the pipe in the middle using a pass-through holder
Damage to mechanical components
If the furniture door moves with difficulty, and there are gaps between it and the body when closing the door, this means that there are problems with the sliding system. They arise due to:
- dirt in the frame groove;
- unreliable fastening of the guide on the box;
- incorrect location of the stopper;
- deformation, wear of wardrobe wheels.
Purpose of profiles for sliding wardrobes, overview of varieties
First of all, the lower frame of the sliding system is inspected for contamination. If they exist, they are removed like this:
- First, dust is collected with a vacuum cleaner;
- then the stuck dirt is removed with a scraper;
- Lastly, the gutter is wiped with a rag soaked in soapy water.
Gaps often form between the doors and the frame of the furniture. This indicates deformation of the case or problems with the stopper. When a gap appears at the junction of the canvas and the central section of the structure, this indicates that it is overloaded. Sometimes the retainer falls out of the groove of the bottom guide, in which case it just needs to be inserted back into the profile. It is advisable to secure the stopper additionally. This is done using screws or Moment construction adhesive.
In some cases, the frame of the sliding system lags behind the frame. Here you need to remove the sash from the guide, then screw the profile with self-tapping screws to the body through new holes drilled with an electric drill. Next, the canvas should be put in its place.
Dirt accumulated in the groove of the frame can lead to problems in the operation of the sliding system
If the retainer has fallen out of the groove of the lower guide, then you just need to insert it back into the profile
If the frame of the sliding system lags behind the frame, you need to remove the sash from the guide, and then screw the profile with self-tapping screws to the body
Door deformation
A sash that creaks, rattles, or jams when moving indicates that the roller has become deformed or the rubber layer covering it has worn off. In this case, the wheel needs to be changed. Before doing this, you can try lubricating the sliding mechanism with technical oil. If this does not solve the problem, drastic measures are needed.
If the doors no longer close completely, are skewed, or deformed, the source of the problem is first determined. It may be that the furniture is overcrowded with things and some of them interfere with the door, so it is necessary to inspect the structure. If the assumption is not confirmed, the wardrobe is repaired with the replacement of rollers and guides. This is done as follows:
- Lift the door, pull out the lower wheels from the guide, then move the lower part of the canvas and pull it out of the upper profile.
- Turn the screw at the bottom of the facade using a hexagon.
- Remove the rollers and install new ones using a hexagon.
Variety of models of two-door wardrobes, examples of placement
Remove the door by pulling the wheels out of the guides
Using a hexagon, turn the screw at the bottom of the facade and remove the roller
Install new components
Return the door leaf to its place
The procedure to follow if gaps appear between the canvas and the furniture body:
- the buffer tape in the corner of the facade comes off;
- the screw rotates clockwise, thereby removing the lower gap;
- when the gap is at the top, the fastener rotates in the opposite direction.
Wardrobe doors may not close tightly due to a broken stopper or latch. If the latch falls out or moves, it is inserted back. To ensure reliable repair of wardrobe doors, it is mounted on quick-drying glue. A broken lock is completely replaced.
Retainer repair
Mirror replacement
Over time, fragile decorative elements of furniture facades are scratched, cracked, broken, and their amalgam is peeled off. In this case, the wardrobe mirror changes. The procedure is as follows:
- The sash is removed from the guide and laid on the floor.
- Using a screwdriver or screwdriver, the insert frame is disassembled. It is made from an aluminum profile and is fastened with four screws located at the end of the blades. Also, the frame is made of iron and is held in place by roller clamps, which are located on the inside of the sash.
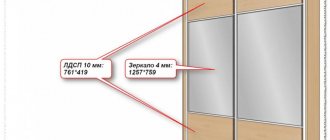
- The dimensions of the insert are measured. This must be done precisely down to the millimeter.
- The part is ordered from a furniture shop or glass factory.
- When the item is delivered, they begin replacing the mirror in the closet. To do this, it is inserted back into the frame, which is screwed to the door.
- Lastly, the blade is mounted on the guide.
You must work slowly and carefully with the fragile insert. If handled carelessly, it may break. It is advisable to immediately stick a special protective film on the back of the mirror.
Despite the reliability, strength and rigidity, the wardrobe often fails during operation. If the breakdown is simple, then it is easy to repair it yourself. The main thing is to do everything according to the rules.
Disassemble the insert frame, measure its dimensions and order a similar part
Install a new mirror into the frame and install the door leaf on the guide