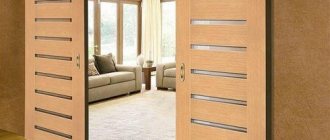
How can you restore furniture made from laminated chipboard?
Furniture made from laminated chipboard is found in every home and office. This is the most budget-friendly and quite decent-looking furnishing option. In more expensive versions of furniture, only the body is made from chipboard, while the facade part is made from MDF with various types of cladding (PVC film, veneer, enamel) and solid wood. MDF and solid surfaces may also require restoration, but we will not talk about them. This article contains information on how to restore chipboard with a laminated surface with your own hands .
Do-it-yourself chipboard restoration can be of several types:
- Restoring the color of a worn (worn) surface.
- Masking chips and scratches on the surface.
- Restoration of chipped ends of chipboard furniture.
- Restoration of places with torn fasteners and hinges.
Each of the defects requires its own approach to restoration and a different set of available tools.
New loop
You can get out of this situation in another way - you don’t need to glue anything. Door hinges now come in a variety of sizes and with different distances between screw holes. In this case, you don’t even have to seal the holes from the fallen fasteners.
It is better, of course, to do this by covering it with furniture wax - any unnecessary hole reduces the strength of the entire structure. So seal the holes using one of the suggested methods, and then proceed as follows:
- Using a special cutter with a diameter of 30 mm, make grooves in the door for the hinge higher or lower than before.
- Screw the hinge to the door with self-tapping screws.
- Screw the second part of the loop to the side.
Important! For greater reliability, you can immediately place the screws on the glue - this will increase the strength of the fastening.
Restoration of chipboard furniture: what you might need
- Soft furniture wax (wax putty). Used to seal chips, scratches, cracks on wooden and laminated surfaces of cabinet furniture, interior doors, laminate and parquet. Provides moisture resistance to the restored surface.
- Hard furniture wax (melt putty). Requires melting before use (for example, using a lighter, soldering iron or gas torch). Application is similar to soft furniture wax. Recommended for restoration of chipboard surfaces with high intensity of use (countertops, shelves, floor coverings).
- Retouching agents - felt-tip pens or alcohol-based markers, valve and fiber. With their help, the texture of the material at the restoration site after waxing is completed to make it less noticeable. Ordinary felt-tip pens in shades that match the furniture, strokes, paints, even shoe polish and iodine will also work.
- Fixing varnishes, polishes (best in the form of sprays and aerosols) for surface treatment after restoration. For coating after restoration of defects, returning surfaces to their former shine, masking abrasions and minor scratches.
- Melamine edging with adhesive for replacement trim.
- Two-component epoxy composition, PVA, dowels (chops), wooden plugs for filling holes from torn hinges and other fasteners.
- Tools – plastic spatula, sandpaper, abrasive sanding sponge (fine), utility knife, hair dryer or iron, chisel, non-woven wipes and rags for finishing.
Materials and tools needed for work
At the initial stage, furniture and necessary materials and tools should be prepared. The quality of the repair depends on this. After all, incorrect installation is fraught with loss of time and repeated work.
Preparation of products consists of wet cleaning and cleaning the surface of dirt. This procedure is carried out especially carefully if do-it-yourself cabinet repair involves the use of varnish.
The door needs to be removed. Check the quality of fittings and fasteners: hinges, handles, locks, bolts. Metal products are cleaned of rust and coated with an anti-corrosion agent. The wooden surface is sanded.
Depending on the material used to make the canvas, the following materials and tools will be needed to repair furniture at home:
- varnish;
- polyethylene film;
- machine oil;
- glue;
- putty;
- decorative material;
- accessories and fasteners;
- sandpaper;
- paint brush;
- syringe with needle;
- screwdriver;
- jigsaw;
- hex wrench;
- putty knife;
- Screwdriver Set;
- awl;
- pencil;
- roulette;
- square;
- level;
- hammer;
- pliers;
- chisel;
- plane;
- stationery knife.
Restoration of faded and worn chipboard countertops
Often, during use, chipboard countertops and cabinet covers wear out.
A tabletop that has faded from abrasion without severe defects on the surface (deep scratches, cracks) can be restored as follows:
- Select the coloring agent according to its shade. It is best to use felt-tip pens - you can moisten a rag with them and rub in soft circular motions and walk across the tabletop until it acquires an even color. Then fix the tint with a fixing varnish.
- In some cases, it is enough to treat a chipboard tabletop with polishing mastic with pigment (available for sale for light and dark furniture) or polish for laminated furniture. After applying the product, the surface must be polished with special lint-free wipes.
Mortise furniture nut and screw.
It happens that the self-tapping screw breaks so that the hole is not showered with chips. Then we drill out this hole and screw the furniture nut into it.
Then, instead of a self-tapping screw, we install a loop on the screw. This type of fastening is characterized by higher strength due to the larger engagement area of the mortise nuts. As a result, the loops will hold tight and for a long time.
Restoration of chips and scratches on tables, cabinets and cabinets made of chipboard
Chips at the ends of lids and table tops, especially at radii, are not uncommon for children's and office furniture.
They can be removed altogether if the end of the furniture is covered with melamine edge. To do this you need:
- Purchase a new melamine edge with glue of the desired shade and thickness (it is usually sold in strips in the same place where chipboard and furniture fittings are sold).
- Remove the old edge by heating the end with an iron.
- Sand the end using a chisel and sandpaper until the chips disappear.
- Apply the new melamine edge using an iron, carefully cut off the excess with a utility knife and sand with a sponge or fine-grained sandpaper.
- If necessary, tint along the edge - with a stroke or felt-tip pen.
If the chips are deep enough and it is not possible to grind them off, then such defects can only be masked:
- Process the chips, clean them from dirt and give them a more regular shape with straight edges using a chisel.
- Select the shade of furniture wax. Sometimes you have to mix several different crayons; in its pure form it is unlikely that you will be able to find the right color.
- Using a plastic spatula, lightly fill the chip with furniture wax and compact thoroughly.
- After the wax has dried, carefully cut off the excess using a spatula or a utility knife until the surface is level and the edge is straight.
- Sand with a rag, if necessary, restore the texture close to the overall chipboard pattern using retouching felt-tip pens (short thin lines, smearing the borders with a napkin). Afterwards, fix the result with a fixing varnish.
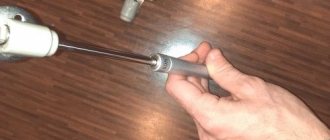
Epoxy glue and a pin.
In the place where the self-tapping screw came out, pour the required amount of epoxy glue and tighten the pin.
You can get a stud simply by taking a bolt and cutting off the head from it. To be able to rotate such a pin, use a screwdriver to make a corresponding cut at the end.
When the glue hardens, put the loop on the pin and tighten it with a nut.
Restoration of a chipboard cabinet
Do-it-yourself restoration of a cabinet made of chipboard may also be necessary in cases where hinges and other fasteners are pulled out of the side walls due to excessive load.
Since the hinges cannot be moved to another location, they have to be strengthened somehow, the place of the torn fastener restored, and screwed in again. This can be done in the following ways:
- Drill out the joint with a drill with a diameter of 8 mm and drive in the chop. You can then screw a self-tapping screw with fasteners into it, but only after drilling with a thin drill - otherwise the chop may burst. If the edges of the chip do not overlap with the fittings, by analogy with the cases discussed above, fill them with furniture wax of a suitable shade and polish them.
- After drilling out the joint and cleaning the chipboard from crumbling parts, you can fill it with a two-component epoxy compound or glue mixed with shavings. After hardening, you can screw in the fasteners.
Wooden “chopik” + glue
I think this method is the best. After such a repair, the door in my kitchen worked for several years, and nothing was torn out again.
The principle is this: Remove the sash - door, then you need to take a drill and drill out the torn holes.
We take a drill with a diameter slightly smaller than a wooden “chopik”, for example, my chopstick is 9 mm in diameter, and the drill is 8 mm.
We do not drill to the full depth of the door, usually 80% is enough, the main thing is not to drill further, because the drill will come out on the other side of the door, which is not always necessary. To do this, there is a special limiter on the drill, or at the required depth, you need to screw electrical tape onto the drill and not go beyond its limits.
Next we pour glue into the hole, I take “MOMENT” which glues the wood (you can take any other one; there are now dozens of different ones). Well, we hammer in the “chopik”, do it carefully so as not to break the back wall!
Let it set for about 15 minutes. Then in our wooden inserts, I drill another hole in the center, also not to the full depth. This is done in order to tighten the “screw” freely, but do not overdo it. For example, I have a “screw” with a diameter of 4 mm, and I take a drill with a diameter of 2 mm.
I tighten it on the removed door, try it - it holds perfectly! Now you can hang it on the closet .
This third method, I think, is the best for repairing chipboard doors. Moreover, it is suitable for frequent openings.
Now we are watching the video version
This is where I end, I think my materials were useful to you. Read our construction blog, there will be a lot more useful.
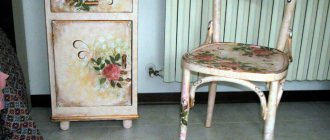
Restoration of chipboard facades
The front part of furniture made of chipboard can rarely be restored. Similar procedures for filling scratches, cracks and dents with furniture wax turn out to be ineffective. Because light hits the surface differently, it is impossible to make defects less noticeable. Usually they resort not to the restoration of damaged chipboard facades, but to the actual renovation of the entire facade part of the furniture:
- They are covered with wallpaper or covered with artificial leather. To do this, it is recommended to remove the facades and twist the handles - this will make it neater.
- They use photo printing, hand painting and decoupage techniques. The pattern can be applied exactly to the location of the defect, and not over the entire surface of the chipboard facade.
- The facade is decorated with self-adhesive moldings and various overlays. You can find out more about furniture decor here.
- Glue strips of melamine tape of a similar or contrasting shade. If you think through the concept, this disguise of damage can look like a design technique.
Dowel and self-tapping screw.
With this approach, the cutting nut can be replaced with a wooden dowel. For the dowel, drill a hole, then glue it in using wood glue.
We cut off the protruding part of the dowel. When the glue dries, drill a hole in it for the self-tapping screw and install the hinge in place.
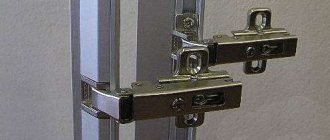
How to repair a chipboard door if the hinges have broken loose
Published by admin on 01/03/2019
Sooner or later, this situation happens to everyone: he was in a hurry somewhere, opened a cabinet door made of chipboard or MDF, pulled it too hard or inaccurately, as a result of which the door broke. A torn loop is not a reason for frustration. If you don't lose heart, the door can be repaired relatively easily and quickly.
When a hinge breaks, most owners decide that the only repair method available is to try to put the broken hinges in a new place. If the damage to the chipboard is significant, then it can be very problematic to make sure that everything turns out smooth and beautiful again. However, there is one reliable repair method.
Experienced craftsmen have already guessed that we will now talk about the method of preparing “porridge”. To implement the method, we will need PVA glue, sawdust and wood dust. So, we take our door, a brush, glue and begin to smear PVA over the entire broken area. After the “primer” we begin to prepare the putty by mixing our glue with sawdust and dust.
The whole procedure takes a few minutes, the main thing is to get the necessary ingredients. It is best to cook the “porridge” on a plate. All materials can be obtained by sawing a dry wooden plank. Dust can be easily obtained using a file. The ratio of dust and sawdust should be approximately the same. Add glue by eye to form a thick, homogeneous mass.
Now all that remains is to apply the adhesive mass and leave the board to dry for a day. If the putty shrinks after drying, it must be removed with a second layer. When the mass has completely dried, you can reinstall the loop.
radiofree · 01/03/2019 at 19:44
In principle, you can fill it with epoxy, it definitely won’t vomit.
sochiweekend-1 · 01/03/2019 at 19:55
Epoxy is more expensive. More difficult to use. And PVA is identical to the composite that is used in the production of chipboards. Doesn't get dirty. And absolutely harmless.
Correcting the magnet
Another problem that you may encounter is that the closet door constantly opens and cannot be closed. Previously, people took a piece of newspaper, rolled it up and put it under the door. Now you can solve the problem yourself by first determining the type of structure:
- With magnet.
- Without magnet.
If the cabinet door is on a small magnet and is held closed by a metal strip, then it is enough to adjust the magnetic fastening using a screwdriver. Procedure:
- Loosen the screws holding the magnet (do not remove).
- Move it forward a little.
- Tighten the screws back.
- Completely replace the fastening if the desired result is not achieved.
If the door does not have a magnet, you will have to make a gasket using a piece of rubber of small thickness. In addition, the following will also be useful:
- Knife.
- Ruler.
- Pen.
- Hammer and nails.
- Glue.
To fix the problem, you need to cut a rubber gasket (2*3 centimeters) 1-5 millimeters thick and glue it to the bottom bar of the box. You can ensure a more secure fastening by replacing the glue with a hammer and small nails.
Furniture repair - examples
- We remove the doors.
- We unscrew the old rollers and guides.
- We cut in the lower rollers.
Using a hacksaw, we cut the aluminum guides to size (in my case, 1460 mm). We insert the doors and try. - If necessary, we adjust.
How to repair a shoe section for a hallway set?
The photo shows that the facade was skewed to one side due to a breakdown.
The most common breakdown of this section is the failure of the plastic bushings of the opening mechanism of the section with doors (facade).
They are usually divided in half - external and internal. You can, of course, turn new bushings on a lathe, but not everyone can do this.
A more accessible and simpler way is to attach the outer part of the mechanism bushings using self-tapping screws (4x25 mm).
From this “set” we use only self-tapping screws with a press washer and a larger plastic ring, and throw away the rest. After the work has been done, everything will be as it was originally.
Repair and replacement of guides in drawers
It happens that the guides quickly fail because the box is large and heavily loaded. Telescopic (ball) guides allow installation in two rows. In this case, the drawer will be endowed with greater load-bearing capacity and will last longer.
With such an “upgrade,” it is quite possible to replace the bottom made of flexible fiberboard with chipboard or plywood in order to store, say, tools in such a box.
It is better, of course, to replace the metal guides. They don't cost that much. However, if upon visual inspection the rollers are intact, have an even shape, and only the metal of the runners is bent, you can try to return it to its original shape. To do this, use a vice, pliers and other hand tools.
Source: shkaf-info.ru
Repair of frame MDF facade.
As a rule, a frame facade has one drawback - it diverges at the connection in the corners.
This misunderstanding occurs due to the fact that the corners are simply not glued, but are fastened dry using a dovetail joint with plastic clips, the so-called “butterflies”. So, over time, these “butterflies” dry out and break, which leads to separation of the corners of the entire facade (door). This damage is not difficult to repair. Simply, you need to purchase “butterflies” in furniture fittings stores to match the color of the facade frame. In general, I think that you can buy any color, because... “butterflies” are placed inside and are visible only when the doors are opened.
- We remove the façade. If it doesn’t come off, then you don’t have to take it off. Right on the weight and do it.
- Pick out broken butterfly clips.
All the frame is ready.
With such a Euro-screw you can fasten a fallen hinge (canopy) on the door. But, if there is nothing to fasten it to at all, i.e. everything is torn out by its roots, then you will need to rearrange the entire loop lower or higher. First, rearrange one half of the hinge on the facade (door), and the second half on the body.
Please note that in general, in furniture joints that are broken, in most cases, when remodeling, it is better to move them to another place where the chipboard is intact (not broken).
Well, the old mounting holes can be covered with a special decorative round cover to match the color of the product on a sticky base.
Problems with furniture hinges and their effective repair
Any furniture is created for human convenience, but over time it tends to break. Often this phenomenon manifests itself in the form of broken furniture hinges. The reasons may be different: from frequent moves to incorrect initial assembly of furniture.
- What problems can happen with furniture hinges?
- Causes of problems
- How to repair a broken furniture hinge?
- How to replace it correctly with your own hands
Removing scratches.
I think many people have also encountered this problem.
- So, if the furniture is wooden, then the scratches can be disguised with an ordinary colored pencil to match the color of the product. Of course, manufacturers have created a special furniture pencil for such cases. But why overpay if a regular pencil will have almost the same effect? The most difficult thing is to find a pencil of the right shade. After you fill the scratch, simply wipe the surface.
- If the furniture is made of laminated chipboard, then you can try it with a regular colored felt-tip pen. After filling the scratches, wipe them with a polish with a matte finish.
- If the scratch is deep, then it is necessary to apply a layer of putty in a color as close as possible to the color of the product. I described this method in detail in this article about the restoration of laminated doors.
- There is a good folk remedy for caring for polished furniture: In a glass of the cheapest beer you need to throw a piece of wax (beeswax can be used). Boil. After the mixture has cooled and become warm, apply it to all polished surfaces. After this, rub them with a piece of woolen cloth.
Probably that's enough on this topic, otherwise it's very tiring to read. I will continue in future articles. Please write in the comments and share on social networks. I will be very grateful. It will be given.
Mechanical damage to the door or handle
If there are deep scratches on the cabinet door, spoiling the beauty of the furniture, then there are only two options: restoration or complete replacement. As for the door handle, it is easier to replace it by purchasing a similar one or exactly the same one. To install a new handle, you need a screwdriver, which is used to perform the following procedure:
- Open the doors.
- Remove the screws.
- Remove the handle.
- Attach a new handle.
- Install the screws, but do not tighten them.
- Adjust the handle so that it takes the desired position.
- Tighten the screws.