During water treatments, a lot of water gets on the panels, especially on the walls adjacent to the bathroom, and condensation forms in quite large quantities. For plastic panels, water, of course, does not pose any danger. But, if moisture gets through the seams into the poorly ventilated space between the panels and the wall, then this, in the absence or poor ventilation, will certainly lead to the appearance of mold there, which is not at all good for health. In addition, moisture getting into the joints between the panels will flow down them onto the floor and seep into the lower apartment. Therefore, all joints/seams between the panels must be treated with sealant. A layer of neutral sealant is applied to the shelf of the cut panel along its entire length. After joining and securing the panels, excess sealant that appears is carefully removed with a wet rag. The junctions of the corner profiles with the panel also need to be sealed. However, it is better to do this at the very end - after finishing the cladding. We insert a narrow spatula into the joint between the corner and the panel (the spatula must be used, that is, with smooth edges, without burrs, so as not to damage the front surface of the panel) with which the corner is slightly bent (by 1.5-2 mm ). Then, sealant is pumped into the resulting gap. This operation is best done together. While one, bending a corner a little, slowly and smoothly moves the spatula down to the end of the joint, the second, following the spatula, calmly pumps sealant from a gun into the gap that appears.
End panel installation
This operation when covering walls with panels is one of the most difficult. The cut panel must first be pushed into the corner profile, then inserted into the upper profile, and then pulled out and joined to the previous panel. In this case, of course, the cut edge of the panel must remain inside the corner profile.
In order not to make a mistake in size, it would be good to make a template from scraps of panels and rehearse the whole technology with it. Again, due to the slope of the walls, you will have to cut out not a rectangle, but a trapezoid from the panel, so you will have to make two templates - for the top and bottom of the panel. And, nevertheless, it will not be easy to carry out this operation even with a correctly cut panel. What was quite easy to do on a small template, whose contact surface with the wall and with the corner profile is relatively small, is difficult to do with a long panel, because and the friction force will be greater, and there will be nothing to grab onto. A rubber plunger (the same one for clearing blockages in pipes) can come in handy here. It is used as a vacuum suction cup, with which you can move the panel by slightly pressing it away from the wall. For those who find this technology for installing a closing panel too complicated, we can recommend a simpler alternative option that can make the work much easier. Its essence is to completely or partially abandon the use of corner guide profiles, and cover the junction of the panels in the corners with self-adhesive curb tape for bathtubs. It should be noted that such a tape costs 8-10 times more than a standard corner plastic profile.
Holes in panels
Large diameter holes for the faucet outlets and the heated towel rail pipe are cut out in the panels using a special drill (crown). Difficulties usually arise when you have to install panels around a permanent pipe. In this case, the panel will, of course, have to be cut. The cut site is then closed with a special joining profile. Not very aesthetically pleasing. Although for horizontal cuts this is perhaps the only way. For small vertical cuts, you can connect and seal the cut as follows. A piece of plastic (no more than 1 mm thick) is first nailed or glued to the wall, then, after the panel is put in place and a pipe is inserted into the hole, the panel is glued to this piece of plastic, and the chamber through which the cut passes is completely filled with sealant. After fixing the panel, the cut location must be pressed against the wall (for example, with a spacer) until the glue and sealant dry. To make the hole look neater and prevent water from flowing inside the panel, the edges of the hole also need to be closed. To do this, you need to take any plastic cup of a suitable color with a side at least 2-3 mm wide. A ring 2-3 cm wide is cut from the top of the cup, which is then cut. A piece of the required size is cut from this strip. The strip is rolled into a ring and inserted into the hole, having previously applied a layer of sealant along the edges of the hole. This part also needs to be pressed against the panel and fixed until the sealant “sets.”
How to hang, shelves, hooks, shower holder, etc.
When tiling a bathroom with panels, the question will inevitably arise: how to attach various hooks, shelves, sink brackets, curtain rails and other fittings to these walls? After all, when screwing this or that part to the wall, it is very easy to deform the panel. Therefore, the curtain guide installed in the spacer cannot be mounted as required by the instructions, since the force created by the spring located inside this guide is more than enough to deform the panel. It is better to fasten it in another way. Make a hole in each of the suction cups and screw them to the wall. And then put the guide pipe on these parts. In this case, the spring will compress much less, therefore, the force acting on the panel will be very small. Towel hooks and wall-mounted shower holders are attached to the wall in the usual manner. A hole is drilled in the wall through the panel, a plastic dowel is inserted into which a screw or self-tapping screw is screwed. In this case, of course, in order not to deform the panel, you need to control the force with which the screw being screwed in presses the part against the panel. The situation is more complicated with heavy shelves, with brackets for the sink, glass toilet shelves, which are supported on the wall by two so-called. shelf holders, i.e. in cases where the fastener is under heavy load and the object must be pressed tightly against the wall. (shown in the figure with red arrows). All this will have to be attached to the wall through spacers (made of plywood or plastic), which are inserted inside the panel, under its front surface. It is most convenient to do this in advance, i.e. even at the stage of installation of panels. In the right place, you need to cut out a piece of plastic from the underside of the panel, then carefully remove (or fold) the stiffeners and insert the gasket. Sometimes gaskets have to be inserted into the panel after the walls are covered. For example, for shelf holders of glass shelves. In this case, a cross-shaped or T-shaped cut is made on the front side of the panel, the internal partitions are removed and a gasket is laid. Then all this needs to be filled with sealants and the cut closed. The work requires accuracy and some skill. Therefore, before starting this operation, it is better to rehearse the entire technology in advance on one of the panel scraps.
Mounting methods
Let's start with the fact that you can only get by without a drill or hammer drill as a tool for installing shelves when installing light decorative structures on soft walls, which can simply be penetrated with a self-tapping screw and a screwdriver.
But usually you need to use an auxiliary power tool. Especially when you need to install a heavy shelf that will be subject to a significant load on the wall:
- from plasterboard;
- made of concrete;
- brick;
- from aerated concrete;
- from foam blocks;
- wooden, etc.
The first thing you need to pay attention to is the material from which the walls are made. Here it will become clearer to you whether you can do without drilling the wall or not.
When planning how to mount shelves on a wall, the type or method of fixation plays a key role. To do this, you need to study the installation options to choose the most acceptable and suitable for you.
- No visible fastenings. This is a hidden fastener that allows you to make the fastenings invisible, and make the shelves themselves light and elegant. Suitable for brick, concrete, foam and aerated concrete walls. If this is a plasterboard partition less than 10 cm thick, it is better not to use installation with invisible fasteners;
- On brackets. It will not be possible to hide them, and therefore the brackets will remain visible. To save money, some are mounted on plastic or metal corners. But to create a beautiful interior, it is better to use appropriate brackets. Visible brackets do not suit all interior styles;
- Using holders. Relevant for shelves made of glass. There are rubber or silicone based gaskets that protect the glass from destruction. Shelf holders have different types and configurations, including suction cup options;
- On hinges and corners. The most common and easiest to implement method. Using hinges and corners of certain sizes, you can reduce or increase the load that the shelf can withstand. Fastening is carried out using guides or on metal stands;
- Through the bar. Relevant for hollow walls, where it is not possible to fix the shelf directly to the wall. First, a metal or wood strip is mounted, and the shelf itself is fixed to it. Suitable for those whose walls are made of thin plasterboard, hollow brick and other similar materials. Here it is important to fix the bar at the maximum number of points. Some fasteners will go into the void, but others will definitely catch. It will not be superfluous to know in advance about the location of the partitions.
The greatest number of questions are raised by fastening with invisible fasteners, as well as working with plasterboard walls. They are proposed to be considered separately.
The nuances of invisible fasteners
It makes no sense to talk in detail about this method of installing wall shelves if you carefully understand only 3 main issues.
- Thickness of the wall used. Installation with invisible fastening is possible in situations where it is a brick or concrete wall. Moreover, the concrete partition must have a minimum thickness of 105 mm, and the brick partition - 250 mm. If the parameters are smaller, you will have to use additional elements. Cinder block and plasterboard walls with a thickness of less than 100 mm are suitable only for hanging decorative shelves on which there is no load or it is minimal;
- The thickness of the shelf itself. It is not recommended to use shelves that are too thin or too massive. The material should not sag, must be dry and have a high-quality finish. If the load on the shelf is minimal, the thickness is selected from 30 mm. If the shelf is for books and other heavier objects, the thickness is taken in the range of 45-60 mm;
- Fastening. Fasteners are selected based on point 2 and the purpose of the shelf itself. Invisible fastenings are made in the form of a hinged loop and a rod. The loop is mounted on the back of the shelf and markings are made. A hole is made in the wall and a plug is inserted inside. Next, all you have to do is screw in a screw or self-tapping screw to the desired depth and attach the hinges to them.
Be sure to consider the expected load to avoid unnecessary problems. The higher the load, the more hidden fasteners need to be used. Remember to have a sense of proportion.
Working with plasterboard walls
Installing a shelf, and even one heavy enough to accommodate heavy objects in the presence of plasterboard walls, is not so easy. But you can also find a way out of this situation.
Experts offer several options for installing shelves on such walls.
- Using embedded beams. Considered the best option. Mounted directly to plasterboard sheets when mounting to the wall. The bars are fixed in the area where the shelves will be placed;
- Wall mounting. The option is not the most difficult. Here you will need to purchase Molly fasteners, umbrellas or butterfly dowels. They fit easily into the wall, do not scroll and allow you to hold a shelf with additional weight on them;
- Through profiles. Through holes are made in the area where the metal profile passes. Self-tapping screws are chosen approximately 5-6 mm longer than the sheet of drywall. Next, the shelf is installed on the wall;
- Using anchor reinforcement. This option is suitable for those who need to install shelves that will withstand heavy loads. Here you will need to make a hole, insert a plug and thereby secure the reinforcement.
How to hang kitchen cabinets?
What kind of pendants were used to hang cabinets on the wall?
Let's look at an example of how to hang kitchen cabinets on the wall based on our own experience. For hanging, we used adjustable right and left white awnings.
| Rice. 23-24. Adjustable canopies right and left white |
We attach awnings to the sides of kitchen cabinets
We attach the canopies using self-tapping screws to the side walls; select the length of the screws so that they do not come out on the other side of the chipboard side wall.
When fastening, we retreat from above by the thickness of the chipboard, and align the front edge of the hinge along the inside of the groove.
| Rice. 25. Adjustable canopy attached to the side of the cabinet |
Determine the height at which we will fix the mounting rail
To determine the mounting height of the slats, so as not to bother with calculations, first apply the slats to the bottom of the protruding hooks of the canopies. We take a tape measure, hook it to the bottom of the cabinet and determine the distance from the bottom of the cabinet to the axis of the through holes in the mounting rail.
We use the resulting distance to determine the drilling location for the dowels, if you have already decided at what height to hang the kitchen cabinets.
In our example, we ended up with a value equal to 740 mm (Figure 26). We tilt 10 mm so that the cabinets slide onto the tile apron and measure 730 mm up from the edge of the tile, this will be the mounting axis of our rail.
Nowadays, it is very common to find thin walls in a room. This is due to the fact that builders often use plasterboard sheets as the main material. This popularity can be explained by the fact that with the help of a set of metal profiles and the plasterboard boards themselves, you can quickly and effectively level any walls and eliminate visible defects. You can also bring to life the most daring design ideas.
If we ignore all the advantages of the material, some questions arise. Many people think that drywall is very fragile and not reliable enough, and because of this, residents often doubt: is it possible to hang cabinets on such walls and what to do if such a wall is in the kitchen?
Advantages of PVC panels
There are quite a lot of them, these are objective data that you can trust.
- Light weight. The additional load is so insignificant that it is not taken into account during the design of the building. Finishing can be done on fragile surfaces; the coating is not afraid of minor temperature fluctuations in the linear dimensions of the room.
- Manufacturability. Plastic panels are very quickly mounted on metal or wooden frames. The former are more expensive, the latter are much cheaper. When it comes to quality and durability, there is no practical difference. An important advantage is that the panels can be installed on uneven and unplastered walls. Finishing masonry materials to level them requires a lot of time and money. Another quality related to manufacturability is that when decorating walls with PVC panels, there is no need to use special expensive devices and tools. The complexity of the installation is accessible to beginners.
Fastening the panels does not require much effort
PVC panels are often used in bathroom decoration
Disadvantages of PVC panels
Each building material has its drawbacks, and panels are no exception.
- Low physical strength. The panels are made of thin plastic and have a hollow structure. They hold static and dynamic forces very poorly. Moreover, the damage cannot be repaired; the coating has to be completely replaced.
- Evaporation of harmful chemical compounds. There is a particularly high concentration of unlicensed goods. In addition, during combustion, toxic smoke is released, a person loses consciousness even after two or three breaths.
- Negative reaction to hard ultraviolet radiation. Under the influence of UV rays, the intermolecular bonds of polymer plastics are significantly weakened and they become brittle. Even with little effort they crack.
The panel can be damaged by a sharp blow
Unfortunately, the domestic building materials market is oversaturated with fakes. Low-quality PVC panels are almost completely devoid of real advantages, and the negative sides appear even more noticeably.
Tips for choosing
Universal advice is to ask the seller for a package of accompanying documents. But it always works: either the seller does not show invoices and certificates, then substandard goods are sold under the guise of one batch of good goods, or the consumer is embarrassed to defend his rights. There are several external signs by which you can most likely distinguish a counterfeit from a licensed product.
It is best to buy PVC panels in large construction stores, where all products are licensed
Table. The main differences between high-quality and low-quality panels
| Name of criterion | Quality panels | Low grade panels |
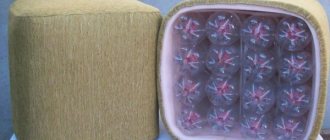
| Number of stiffeners | 29 pieces at perfectly equal distances from each other | 20 pieces, you can notice the unevenness of the step by eye |
| PVC thickness | 2 mm | 1.5 mm |
| Linearity Options | All surfaces are smooth, the planes do not have depressions or bumps | Traces of shrinkage are clearly visible on the surface. Excessive shrinkage is explained by the use of low-quality secondary raw materials for production. |
| Mechanical strength indicators | The panels bend and can withstand relatively heavy physical loads. After removing the stress, the panels completely restore their original performance. | The strength of the panels does not allow them to bend; the thin side strips for fixing the lamellas are very fragile and often crack when driving in staples. The plasticity of the panel surface is minimal. |
Good quality panels have a uniform pattern, straight cuts, stiffeners are located at the same distance from each other
How to hang a wardrobe on a loose wall
Foam blocks and cinder blocks are classified as “loose” building materials to which it is difficult to attach fasteners. Also, adobe, adobe and wooden walls cause certain difficulties.
The choice of fasteners depends on the type of material and the planned load (weight of the loaded cabinet). It can be a screw fastener or a “butterfly” or “umbrella” type drop-down fastener. Long anchor bolts perform well in practical applications. You can drill with a thick drill bit (diameter from 8 mm) and strengthen the fastening point using wooden plugs or special glue for subsequent screwing in the self-tapping screw. Or immediately use “chemical” anchors.
There are plenty of options. Specialized construction stores will help you decide on the best solution. For any type of wall you can choose the best option. Combinations of several types also perform well.
Panel fastening methods
The technology of finishing walls with panels provides three methods of fastening, each of which has its own strengths and weaknesses.
- On glue. Special compounds with high adhesion to plastic surfaces are used. The advantages of the method are that there is no need to prepare a special sheathing. Disadvantage - the wall surface must be flat; differences of no more than five millimeters can be eliminated with glue.
Gluing PVC panels to the wall
Mounting on clamps
Fastening panels to slats is the most convenient way
In this article we will give detailed instructions for attaching panels to the wall using wooden slats.
Stages of work production
None of the professional builders begins work without prior preparation. What activities are included in this list?
- Careful inspection of the premises. Pay attention to the condition of the walls, the purpose of the room, microclimate parameters and operating conditions of the building. Decide on the fastening method, prepare tools and devices taking into account the fastening technology.
- Counting the number of panels and additional elements. In addition to the surface area, you need to know the footage of starting, connecting and end profiles, baseboards, internal and external corners. Some manufacturers of plastic panels produce universal profiles, but in practice they do not live up to consumer expectations; professionals do not recommend using them.
Accessories for PVC panels
How to calculate the number of PVC panels
If you have made the final decision to install plastic panels, we recommend that you study the instructions and advice of professional builders.
Brick and concrete
Hanging on a brick wall is a relatively simple and reliable installation option. Sequence of actions for installation on hinges:
- On one side of the wall, mark the position of the hole for fastening;
- Using a level (water, laser, precision construction with a rule), we outline the remaining sides and connect all the marks with a straight line;
- We screw the hanging fittings to the furniture (make sure that the top of the slots is at the same distance from the panel);
- If there are several elements in the set, we immediately drill holes for the ties in the side panels of the cabinets and check the accuracy with preliminary assembly;
- We mark the drilling locations for wall mounting in accordance with the distance between the canopies on the cabinets.
- We make holes in the wall with a Pobedit drill, hammer in dowels and screw in self-tapping screws;
Now you can hang the cabinets and connect them with side ties.
3 different types of dowels for bricks
Step-by-step installation instructions
The installation process is divided into several stages, pay due attention to each of them.
Step 1. Installation of the sheathing. The structure is made of wooden slats with a cross-section of 20×40 mm, the walls are lined with foil polypropylene foam insulation 4 mm thick. By using this layer, it is possible to reduce heat loss from the premises and provide additional sound insulation. Additionally, the foil reliably protects the wooden elements of the sheathing from the negative effects of high humidity.
Installation of plastic panels in the kitchen
Such elements are very beneficial to use for kitchen aprons. These areas have previously only used ceramic tiles, but installation of such materials requires experience. In addition, the tiles are installed for many years, and the panels can be changed at any time, this can be done using simple technology. It does not require the use of fasteners; the low height of the apron makes it possible to save installation time.
An apron made of plastic panels looks no worse than tiles
How to install slats?
- Accurately measure the distance between the tabletop and wall cabinets.
- Add 2-3 cm to it and cut the required number of panels.
- Place the lower end of the lamella on the desktop, bend it slightly and place the upper end under the hanging bedside tables. They need to be tilted; after installing all the slats, the bedside tables are put in place.
- Screw the plinth onto the table.
Installation of an apron made of plastic panels
This simple installation technology allows you to remove outdated panels at any time and replace them with new, more fashionable and beautiful ones. To guarantee, the lamellas can be glued, but this technology does not have any noticeable advantages. But there are several disadvantages: the complexity of the technology, the impossibility of performing repair work and increased cost.
What you need to hang cabinets on walls made of different materials
The main thing you need to understand is that all construction and finishing work must be completed before hanging the cabinets, and the walls must be as level as possible.
Start of work
It is worth mentioning some rules that everyone understands, but do not always follow:
- It will not be possible to hang cabinets neatly on crooked walls . Some types of canopies allow you to level out the curvature of 1-2 centimeters, but no more. If the wall is a concave or curved lens with a difference of several centimeters, the task may be impossible. The same can be said about cases when the corner of the kitchen diverges by more than 1-2 degrees, and you need to hang cabinets on both sides of the corner. As a way out, you can use various linings for fasteners. But all these tricks negatively affect the strength and reliability of the hitch.
- When all the cabinets are already hanging, it will be problematic to hang wallpaper, lay out an apron or install wiring . You will have to re-disassemble the cabinets, which will most likely be pulled together, remove them from the awnings... This is quite energy-intensive. Therefore, do not do double work - finish all the finishing before installing the furniture.
- Correct marking is the key to successful installation . It’s no wonder that experienced kitchen installers acquire laser levels. Experience is experience, and it is better not to do marking accuracy “by eye”. Carefully measure the level, correlate it with the position of the floor, ceiling and vertical wall. This is especially important if you need to hang a row of cabinets.
What tools do you need to hang a closet?
In order to hang cabinets on the walls with your own hands, you will need a simple set of hand tools:
- Power tool. A hammer drill or drill for drilling, drills with a Pobedit tip and a drill (for drilling more than 15 cm in depth) included. A tool with a quick-release chuck and smooth speed control makes it easier to hang cabinets on the wall.
- Measuring tool. Level, plumb lines, tape measure, square and other measuring tools. Special jigs are useful for evenly marking holes along the same level and the same depth. You can make them yourself using available materials. To align the drill bits, a piece of plywood with marked holes will do. To maintain the depth, use special attachments for the drill (or marks, for example, using electrical tape).
- Additional fittings, depending on the type of fastener . Cabinets can be hung on furniture canopies (various types of hinges, hidden, “ears” and R-shaped) and on special rails with adjustable canopies. The latter greatly facilitate the adjustment process.
- Hardware and fasteners, depending on the type of walls . These can be dowels, anchors, screws, “butterflies”, “snails”, hooks and other types. As well as intersectional couplers (kitchen wall cabinets are connected to each other after leveling in height and depth, forming a monolithic structure).
- Handy tool . Screwdriver, screwdriver, hammer, pliers, metal file, etc. Everything that any home craftsman has.