For convenient use of kitchen cabinet doors, you need to choose the right quality and comfortable fasteners. An interesting choice is a gas lift, which guarantees ease of opening and closing doors, as well as ease of operation of the structure. An element such as a gas lift for kitchen cabinets is represented by a simple and reliable device that can be used for almost any furniture. The main advantage of such designs for many buyers is that there is no possibility for the doors to warp, and they will never open or close spontaneously.
What is gas lift
Installing gas lifts on kitchen cabinets provides a modern improvement to the space in the kitchen. To avoid any problems with the installation and operation of products, it is important to choose them wisely for the existing box.
The gas furniture elevator is represented by a special lifting device, which is used to hold and open the doors of various cabinets. The main purpose of this product is the ease of opening the doors upward.
The operation of the mechanism is based on its simple design. When creating gas elevators, a special gas spring is used together with a hydraulic shock absorber. As soon as the door opens literally 10 degrees, it then automatically opens up to 90 degrees.
The design includes elements:
- cylinder-shaped body;
- special piston of optimal size;
- sleeve;
- valve;
- bearings for easy sliding of doors;
- stock;
- sealing elements;
- stuffing box;
- finger
The design is hermetically sealed, so there is no possibility of dust, dirt or moisture getting into its various elements. A non-separable mechanism is necessarily created, so it cannot be disassembled and repaired if necessary.
How to install?
Correct installation of a gas lift on cabinets should begin with preparing tools and drawing markings for clearer fastening.
The selection of a gas lift for a kitchen cabinet is determined by two important indicators: device parameters and spring compression force. First of all, it is necessary to install the device, the dimensions corresponding to the dimensions of the cabinet. To do this, you need to measure the height of the door and the depth of the cabinet and, according to the obtained values, select a standard gas lift. Usually you have to choose from three standard sizes: 164, 244 and 355 when extended. In addition, it is imperative to check the following dimensions of the gas lift: folded length with and without fasteners, as well as the maximum extension length of the rod.
An important indicator for reliable fixation of the door in the open state is the compression force. This value is standardized and must be indicated in the passport and on the mechanism body. To accurately select a gas lift, it is necessary to determine the weight of the door, taking into account all the fittings, coatings and decor. According to the standard, furniture gas lifts are produced with a force of 60, 80, 100, 120 and 140 newtons. The calculation when choosing is made from the condition: 1 kg per 10 newtons.
When choosing equipment, you should consider the system for attaching the mechanism to the surface of the furniture. The most common fasteners are flat platforms, which allow installation on the surface of the cabinet sides and doors using screws. If the cabinet body is made of wood, then it is possible to use fastenings in the form of a screw-in element.
Advantages and disadvantages
The main purpose of gas elevators is the correct, free, silent and easy opening of the top drawers of the set, in which the door opens upward. The positive parameters of installing such a device in the kitchen include:
- the doors are always held at the top when they are opened;
- there is no possibility for spontaneous opening of the door;
- installing a gas lift is quite simple, so if you understand the instructions in detail, you can perform the procedure yourself;
- long service life of the structure due to its high-quality design;
- cabinets open without the need to exert significant effort, and there is no unpleasant sound or noise;
- cabinets get rid of unattractive handles, which guarantees a stylish and modern interior;
- Opening the door is incredibly simple, for which you need to press it with your hand with a little force.
If you order such fastenings from special companies, then the same materials that were used to make kitchen furniture can be used to create them.
The disadvantages of the products include their rather high cost, so they are often inaccessible to potential buyers. If they break for any reason, it will be impossible to make repairs due to the sealed housing, so you will only have to replace the structures.
Types of gas shock absorbers
There are the following types of furniture gas lifts:
Most often, shock absorbers of direct action are used in the manufacture of furniture.
By installing the device in different ranges, it is possible to ensure that the door opens at different angles. This is especially true for cabinets that are located very high, or, conversely, low.
What are the main advantages of using gas elevators over other fastening fittings?
Let's look at the main stages of installing gas furniture struts on horizontal opening doors.
Purpose and device
Properly installed designs can be used for different kitchen furniture. They apply:
- It is optimal to install them on kitchen furniture that is used quite often, so it is required that the doors open silently and also remain intact for a long time;
- often used for installation in the living room, bedroom, children's room or other rooms where it is advisable to install spacious drawers equipped with doors with gas lift;
- office furniture is often used with such elements, and it is not only considered multifunctional, but also looks stylish;
- gas lifts are optimal for installation during the installation of bar facades;
- often used to create poufs or various boxes.
The range of applications of gas lifts is considered wide, so they are truly popular structures. They can have different sizes and even colors.
Laziness as the engine of progress: installing gas lifts with your own hands
Manufacturers are increasingly offering us devices designed to make life more comfortable. Relatively recently, we lifted the door of a wall kitchen cabinet manually, after which the latch was activated. Today, in a review by Pyotr Sergeevich Mashkovsky from the city of Veliky Novgorod, we will talk about the installation of devices such as gas lifts on cabinets, which replaced old mechanisms.
When purchasing a new kitchen set that was ordered from a workshop, I ran into a problem. The craftsmen told me that they can only install regular stops with a latch on a wall cabinet with a door that opens upwards. The reason given was the lack of gas lifts available. I was very surprised, but didn’t show it. After a conversation with their superiors, I was asked to purchase gas lifts myself and even, using their tools, install them myself. At the same time, I received a good discount, which suited me quite well. An hour later, gas lifts in hand, I was in the workshop.
Load calculation depending on the dimensions of the furniture
Before installing this structure, you should pay attention to proper calculations. They depend on the weight of the facade. In this case, the following basic conditions are taken into account:
- on the body of the selected gas lift for furniture you can find information about its marking;
- N indicates that the unit of measurement is Newton, represented by pressure force;
- in front of this letter is a number representing the force available in the body;
- In order to correctly carry out the installation, it is necessary to have information about the weight of the facade equipped with a handle.
Incorrect calculations lead to the fact that the design is used in difficult conditions, therefore the service life is reduced by approximately half.
Gas lift load calculation
Installation Rules
A properly installed gas lift will be pleasant and safe to use, and will also last a long time. If you plan to deal with this issue yourself, then be sure to study the instructions first. How to install the structure? To do this, follow the following steps:
- gas lifts are purchased, and two of these elements are required for one façade;
- installation is carried out together with hinges, and they can be overhead or internal, as well as semi-overhead;
- two shock absorbers are being prepared for one façade;
- if the gas lifts used are marked more than 100N, then reliable and reinforced fastening of the cabinet to the wall of the room is required;
- gas lift installation is carried out only after attaching all the fittings;
- it is not allowed to carry out work if the cabinet is already attached to the wall;
- installation is carried out in horizontal independent furniture;
- if it is necessary to increase the opening angle, then the special hole intended for the main fastening is shifted;
- First, a loop is installed in the desired area;
- The gas lift itself is installed in accordance with the location of the furniture hinge.
To take into account all the features of this process, it is recommended that you first carefully study the installation video instructions.
Gas lift collection
Fastening parts
Installation of gas lift on a cabinet
Gas lift power calculation table.
Equipment installation begins with securing the mounting base to the side of the cabinet at the marking location. The two most commonly used options are a bracket with a spring and a plate. The bracket is usually screwed into the sidewall material at a marked point and the lift head is simply snapped into the bracket. If the mounting base has the form of a plate with a hole, then it is attached with three or four screws to the sidewall so that the center of the hole coincides with the marked point. The hinged head of the elevator is inserted into this hole and fixed. In this case, it is important that the base plate is not deformed - if it is bent, the elevator will not work.
Similar operations for mounting the device mounting base are performed on the inner surface of the door. Here it is important to ensure the angle of inclination of the hinge, which should be about 8 degrees.
It is best to check the direction in a practical way - by installing the rod in the maximum extended position.
Using the described method, gas lifts are installed on both sides of the cabinet.
Adjustment
After high-quality and correct installation, it is necessary to adjust the correct opening of the facade using a gas lift. It is taken into account that the distance from the top of the wall cabinet to the ceiling of the room must be greater than the dimensions of the door, since it will open upward, so it is not allowed to touch the ceiling.
After installing the structure, the gas lift begins to be adjusted so that the opening and closing of the doors is carried out quite slowly and silently. To do this, the main fastening elements of this product are tightened.
Thus, gas lifts are considered an interesting solution for kitchen cabinets. They have many advantages and are easy to install. Their use significantly increases the service life of the furniture, and it will be really pleasant to use. Constant opening and closing of doors will not cause destruction or damage to the facades or the drawers themselves. The disadvantage is the high cost of gas lifts, but this is due to their high quality, protection of expensive furniture, stylish appearance and long service life.
How to assemble a kitchen gas lift?
This structure is completely sealed. Nitrogen penetrates the cylinder during production, but if the element is damaged, it will simply be impossible to restore it. Proper installation of the device in a cabinet under the sink should begin with the preparation of tools that may be needed in the work. You should also draw the contours in advance to ensure the most accurate installation.
When choosing wall closers for kitchen cabinets, you need to take into account two indicators that are of particular importance: the parameters of the device and the spring compression force. As a rule, you need to choose between several standard sizes
In addition, you need to check several gas lift parameters: folded length with and without fasteners, as well as the length of the retractable rod
As a rule, you need to choose between several standard sizes. In addition, you need to check several parameters of the gas lift: folded length with and without fasteners, as well as the length of the retractable rod.
When choosing equipment, one cannot fail to take into account the system through which installation is carried out. Most often in practice, flat platforms are used, which make it possible to install them on the side surfaces of kitchen cabinets through the use of screws. If the furniture has a wooden body, then it is better to use screw-in fasteners. When working, you will need tools such as: screwdriver, pliers, screwdriver, hammer, electric drill, ruler.
The assembly of the cabinet under the sink itself occurs in several stages:
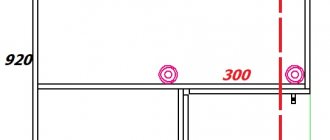
- Marking wall cabinets in the kitchen. Watching the video will help you understand how to do this job correctly. First, the middle fastening points on the side surface are marked. Then the middle of the fastening on the sash is marked. The marking is done on both sides of hanging furniture or floor cabinets under the washbasin.
- Installation work. The base is attached to the side element in the place where the marks were placed. Here you can use two simple methods known to professional assemblers. The first involves using a bracket with a spring, and the second - a plate. Typically, the bracket is screwed into the side piece where the mark is made, with the elevator head snapping into the bracket. The second option involves using a plate with a hole made in it. It is fixed with 3-4 screws to the side, and in such a way that the middle of the recess coincides with the mark. The gas lift head is inserted into the recess and secured in it. It is necessary to ensure that the plate has no visible flaws, since if deformed, the finished device will not work as it should.
- Perform the actions described in the previous paragraph when working with the inner surface. An inclined joint angle of approximately 8 should be ensured.