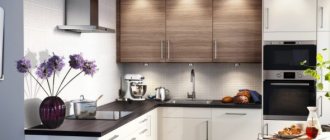
The kitchen is the heart of any home or apartment. The condition of this room determines how cozy the entire living space will seem. The design of a kitchen set must be approached very responsibly, since this part of the house is not as easy to change as, for example, a sofa or a closet. There are ready-made designs of kitchen sets that are freely available, which you can use if your kitchen needs renovation. However, they are not suitable for everyone: the owner of the apartment may have complaints about design solutions, the project budget or the dimensions of the furniture. In this case, the best solution is to independently design the kitchen unit and assemble the cabinets yourself.
By developing a kitchen project yourself, you can save up to half the cost of a finished kitchen
Preparatory stage
Before drawing up a kitchen design project, you need to gain knowledge in this area. There is no need to become a guru in drawing and carpentry. It is enough to know basic information.
We recommend obtaining information from the following sources.
- Video tutorials on kitchen design from professionals. They detail the stages and features of the work. Since this is a preparatory stage, you should not immediately try to repeat what is described in the video. You just need to understand the principle of the upcoming actions.
- Friends who recently renovated their kitchen. Ask them how they solved the problem of small footage, what program they used to draw, and whether they encountered any problems. A live interlocutor will give the most complete answers to the above questions.
- Kitchen workshops and furniture stores. Any client can get a free consultation and even make an approximate kitchen design in the department of a furniture hypermarket. To do this, it is not necessary to use other services of the company (buy furniture, etc.). Organizations charge a fee for detailed consultation, but it is limited to only 1 thousand rubles. For this money you can get advice on arranging furniture, electrical appliances, and choosing a style specifically for your room. Individually tailored recommendations are always more useful.
- Magazines, TV channels, and other media sources that provide access to information about repairs. By casually looking through texts or programs, you can glean several useful ideas - how to save space, arrange furniture more conveniently, etc.
Below are general instructions for designing a kitchen unit on your own. Remember that when developing a drawing, you must take into account the specific features of your specific room (footprint, presence of unevenness on the walls, location of communications, and so on).
Material selection
Materials for making kitchen furniture with your own hands must best meet the conditions for the further use of the set. What do you plan to use for the furniture body:
- the solid wood version is a classic of the genre;
- from chipboard - budget;
- Repairing old furniture with the right skill can be practically free, not counting the cost of new fasteners and fittings.
Whatever materials you agree to use as the basis for making furniture, before starting work, be sure to study the instructions on how to make furniture items from this particular material. Everywhere has its own specifics for each type of furniture.
| Material type | Peculiarities | Advantages | Flaws |
| Solid wood | Natural, eco-friendly material with unique texture and color. | Durable—depending on the type of rock, the service life ranges from 15 years to several dozen. | The material is sensitive to changes in humidity and temperature. Requires treatment of all parts with impregnations and antiseptics. |
| Chipboard | The density of European samples is superior to domestic samples. Contains more glue and paraffin. | A budget option for the material, easy to process. It's easy to cut out parts from it. | If the quality is low, it may have low strength and emit an unpleasant odor. |
| laminated chipboard | The surface is covered with a protective film during the production process (laminated). | Cheaper than MDF, resistant to harsh operating conditions. | If the moisture-resistant layer was applied by caching, the film may lag behind. |
| MDF | Density can exceed natural wood. | Superior to chipboard in terms of strength and flexibility. Convenient for molding. Suitable for decorative elements. | Requires painting, more expensive than chipboard. |
| Drywall | It is a sheet of layers of construction paper with a layer of gypsum dough with various additives. | Practical, resistant to loads, long service life of structures. A wide variety of designs can be manufactured. | Fragile, may crack during operation. Not intended for very heavy weights. |
Having decided on the material from which you will make kitchen furniture with your own hands, carefully approach the choice directly on the spot.
Solid wood should have a uniform, dense pattern of annual rings. Be sure to make sure there are no cracks, chips, or fiber delamination. Avoid wood with knots. In the future, this material defect will affect the quality of the parts.
Wood particle boards must be smooth and free of defects. Do not take excessively thin sheets, as the frame of the furniture box will bear sufficient load. If there is a protective film, then it is better to choose lamination rather than a cached version. The ideal option is MDF.
Do-it-yourself kitchen furniture made from plasterboard can be an excellent option, since moisture-resistant sheets have been produced for a long time. Furniture made from this material can become a real decoration of your home. However, this material requires a wooden or other frame on which the metal profile and parts will be attached.
Drywall
Chipboard
laminated chipboard
Array
Kitchen design
First, a kitchen project is drawn with rough sketches and ideas, then all this is transferred to a drawing with exact dimensions
The development of a kitchen set occurs in stages. The first step is to carefully measure the room in which the furniture will then be installed. Next, the budget is calculated, which determines how many pieces of furniture will be included in the project.
Correct room size
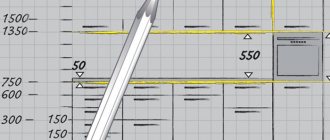
The most important step is measuring the room
Measure the following parameters necessary to create a kitchen set:
- ceiling height;
- distance from window to floor and from window opening to ceiling;
- width and length of the room;
- evenness of the corners (they should be 90 degrees; if this indicator does not correspond, alignment is necessary).
The distance is measured at three main points: bottom, middle and top
If height differences are noticeable in different places on the wall, either eliminate the defects or take this factor into account. Bulges in the top plane of the kitchen can prevent cabinets from being installed correctly. In order for them to fit properly, in case of any unevenness between the sections you need to make a small gap. Be sure to measure the angle between the wall and ceiling. If it turns out to be less than 90 degrees, calculate how much you need to lower the upper cabinets.
If your kitchen has a non-standard layout, then you need to develop an individual project, since standard sets will not fit
Calculate the total footage of the room. Based on it, choose the principle by which the cabinets will be arranged (see section “Arrangement of furniture and household appliances”).
Budget calculation
The final appearance of the kitchen depends on material limitations. If you have a small budget, you should replace standard cabinets with narrow ones, which are on average 25% cheaper. The differences between regular and small-sized cabinets are discussed below. If you have a small supply of funds, you should also limit the number of cabinets and exclude niches for a dishwasher and other expensive built-in appliances.
Please note that cheap sets are made from MDF, the average wall thickness of which is 1.6-1.8 cm. For natural wood, the parameters may be different.
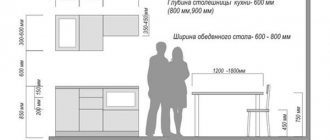
Furniture dimensions
Symmetrical arrangement of upper and lower kitchen cabinets
In order not to make a mistake with the installation of furniture and to eliminate the possibility of gaps or inconsistencies, you need to take into account not only the parameters of the room, but also the characteristics of the cabinets.
Layout of lower kitchen cabinets for the kitchen
Scheme of upper wall cabinets for the kitchen
Standard indicators of kitchen furniture.
| Tabletop | Depth – 60 cm, 3-5 cm more than the depth of the cabinets, thickness 28-40 mm |
| Floor stands | Base 10-15 cm, main part 72, depth 55 cm, width 15-90 cm |
| Wall cabinets | 45 cm from the tabletop, depth 30, height 70-90 |
| Narrow floor sections | The depth is reduced to 45, then the tabletop should be no more than 50 cm |
| Corner cabinets | 60 cm in length from each corner, front 38 cm |
Basic configurations of corner cabinets
The height of floor units is usually 80 cm, however, not all devices can be built into such cabinets. It is better to take the parameters with a margin: 85 cm, because... many washing machines and dishwashers are 82 cm in height. If the owner of the apartment is tall, the cabinet should be 90 cm.
Size range of kitchen units
First step: design
Most often, homemade furniture is needed for non-standard kitchens, where conventional kits simply cannot be installed or combined with household appliances. In order for the new set to fit neatly into the interior, first of all you need to take measurements of the room and sketch out a plan for arranging the cabinets. After this, drawings of kitchen furniture are made - separately for each element.
It is important to take into account the functional load of all zones, as well as the height of the owners, so that using the new kitchen is comfortable.
To simplify the task, online design programs are suitable. Most of them allow you to make a sketch of the furniture yourself in 3D format - the printed drawing will replace the photo of the future set and will make it easier to select decor in the future.
You can begin calculating the amount of materials needed, drawing up estimates and purchasing as soon as all the dimensions and ideas for decorating the facades have been transferred to paper. If you have an old kitchen set made of wood or intact chipboard, you can also take it for remodeling. This will allow you to update your kitchen at a lower cost and do all the work much faster.
Additional rules for furniture arrangement
Detailed design plan for kitchen cabinets indicating specific elements and types of their installation
Consider the location of gas and plumbing pipes. It is not advisable to hide the former behind the fronts of cabinets. But water pipes need to be hidden from the eyes of household members and guests. Calculate the required holes in the cabinets. If the sink is not located right next to the pipes, you will have to make through passages in the walls.
A plasterboard box, under which the pipe is hidden, can become an independent piece of furniture
Do not forget that additional space needs to be allocated for cabinets (to open the doors). It is equal to the length of the section, 45-70 cm. Do not place kitchen islands and bar counters closer than this distance.
Gas pipes are hidden in a decorative cabinet
Recently, the microwave oven and coffee machine have been moved to the top line of cabinets. The lower half of the section is replaced by an open niche where one of the devices is installed. Do not place such niches above the stove or sink, because... this may cause a short circuit. When calculating the height and length, take into account the parameters of the device: usually microwave ovens are produced with dimensions of 50 by 40 cm, coffee machines - 45 by 60.
Drawers
Actually, the manufacture of the boxes themselves from wood or particle boards does not raise any questions, as does their decor. It is much more difficult to accurately install the rollers and guides. An error of 1 mm - and the alteration will no longer look as beautiful as in the photo in the magazine, and the drawers themselves will not last long.
To do everything right, you will have to remember mathematics and work with the drawings of the cabinets that were drawn up at the design stage of future kitchen furniture. As initial data, you will need the height of the frame and the number of boxes for the project. The main task is to determine the center lines of the roller guides:
- From the height of the cabinet, subtract the lower plinth (70 mm) and the total height of all 3 mm gaps left between the outer panels of the drawers.
- Divide the resulting figure by the number of retractable elements - the result is the height of each facade.
- Determine the width of the runners and divide it by 2. For the most common rails with a width of 36 mm, the central axis will be located at a distance of 18 mm from the edge.
- Add to the resulting figure a gap of 2 mm, which prevents contact of the bottom with the heads of the screws - this will be the height of the mounting of the guides above horizontal surfaces.
- Make a corresponding mark on the side walls of the box (in our example – 20 mm). Using a level, draw a horizontal line from it, which will need to be aligned with the center line of the runners.
For other drawers, the guides are mounted at the same height in relation to the horizontal rigid lintels or shelves to ensure complete interchangeability of the pull-out elements.
Recommendations for arranging electrical appliances
A convenient and practical kitchen set can be divided into three zones
The center of the kitchen should be the “work triangle” - the area where the sink, refrigerator and stove are located. The distance should be such that the owner can move from one zone to another in two steps without encountering any obstacles on his way.
The optimal location of the "triangle".
- Fridge. Close to the window - the coolness from the street allows you to increase the life of the unit, besides, the device located in the corner does not block the view of the kitchen and does not interfere with moving around the room.
- Washing. It is advisable to make a gap of one section between the refrigerator and the sink, although it is not necessary. Simply, this distance can be used to defrost food or cut it. The sink should not be too far from the plumbing pipes.
- Plate. Be sure to maintain a distance between the sink and the heating element - at least 70 cm. This will protect the stove from splashing water, which can lead to a short circuit in the wiring. For the same reason, it is advisable to move the sink away from the refrigerator.
Possible options for arranging zones in the kitchen according to the triangle rule
It is better to use the lower section of cabinets for household appliances: dishwasher, washing machine, oven, etc.
Distribution of five functional zones in the kitchen
Facade preparation
When purchasing chipboard for facades, it is better to order them to be cut to your size at the nearest furniture shop. There, all the elements will be made with precision and after cutting, the ends will be laminated with film - to protect the chipboards from swelling.
To simply update an outdated kitchen, you can purchase ready-made doors made of wood or post-forming already with decor and adjust the dimensions of the frame to their parameters.
It is important to take into account that the width of the hinged elements should be 3-4 mm less than the cabinet frame. Then the door will not touch the adjacent module and damage the decor.
You can make the facades yourself, but such delicate work will require skills and special tools. The edges will have to be purchased separately, taking into account the color of the front surface of the chipboard. The edge strips are glued to the pre-polished ends using an ordinary iron. By the way, it is better to buy them with a reserve so that in a few years the cabinets can be updated.
Useful tips
Before bringing an electronic drawing to life, visit a kitchen furniture store with it. For a small fee, review your headset project in detail with a consultant. He can notice errors and shortcomings that the owner would not have noticed in time.
During the implementation of the project, use some of the services of professionals. For example, trust them to mill holes for sinks or other devices. With this approach, the furniture will be more aesthetically pleasing, without gaps, and will last longer.
Installation of canopies
Tools you will need to update your kitchen furniture with new fronts:
- end mill;
- drill;
- screwdriver;
- T-shaped template.
The number of attachment points will depend on the weight and size of the doors. As a rule, each of them is attached to 2-5 loops. In this case, you need to ensure that the canopies do not coincide with the position of the shelves and jumpers of the body.
Work order:
- Make markings on the doors, indicating the place where the canopies are attached with a distance of 70-120 mm from the edge of the product.
- Use an awl to mark the central points and cut out a 12-13 mm deep seat with an end mill at a right angle (pictured below). In this case, care must be taken not to make a through hole in the 16 mm panel.
- Place the canopy on the resulting groove and check how freely it moves. Use an awl to make marks on the surface of the wood through the hinge ears for precise seating of the screws.
- After installing all the canopies, the homemade door is attached to the assembled cabinet, and the attachment points are marked on its side walls. Having marked the resulting points, you can screw on the fittings and move on to installing the next door.
Basic mistakes
Most beginners forget to measure the angle of inclination of the wall or the ratio of the side and top planes of the room. Because of this, problems arise: the cabinets either do not fit or form an uneven line. Such a defect can be corrected by major changes: creating a new cabinet or leveling the wall. To avoid this problem, it is necessary to study the evenness of the wall, ceiling and floor in advance.
Another mistake is the lack of “allowance”. When calculating the dimensions of furniture, an error of about 10 mm should be taken into account. That is, the total length of the cabinets should be 1 cm less than the same wall parameter. Then all sections will fit into the required niches easily and quickly.
Required Tools
Making a kitchen out of wood with your own hands is not an easy task. It’s good if you already have skills in working with such material. If you don’t have any, you should first try to make something simple, for example, a shelf.
Tools for making furniture
A home craftsman usually has a set of the necessary tools. To make furniture you may need:
- Construction level for leveling surfaces;
- Pencil, tape measure, square for precise measurements;
- A jigsaw or hacksaw for cutting materials yourself;
- Drill with drills for making holes;
- Screwdriver or screwdrivers for fastening;
- Sandpaper or sander to clean surfaces.
Tools necessary for making a kitchen out of wood with your own hands
Each home master can add to the list at his own discretion.
Important! If you are not sure that you can cut the materials smoothly and clearly, you should turn to professionals. In addition, they will make the necessary holes for the handles.
The eyes are afraid, but the hands are busy: let’s start taking measurements
The production of a kitchen set begins with measurements. First you need to decide what type of headset it will be. In fact, kitchen furniture can be divided into two types: corner and straight. As for direct kitchens, it’s a little simpler here. Along one wall there will be several bedside tables and hanging cabinets. In some cases, the headset is placed parallel to each other on two walls. Here the measurements are quite simple. It is necessary to measure the length of the wall.
When taking measurements, it is important to take measurements with a tape measure in several places, for example, at a height of 200 mm from the floor, at chest level and under the ceiling. This is due to the fact that slight deviations may occur due to the curvature of the walls.
As practice shows, the discrepancy between such measurements can be up to three to four centimeters. Using modern building materials, these discrepancies can be leveled out. Start taking measurements when the old furniture is already dismantled, then you will have free access to the wall.
Cabinet for hob and oven
When taking measurements you often encounter difficulties. For example, there may be gas or water pipes on the walls - all this will need to be taken into account when installing the kitchen, cutting out the appropriate holes. The easiest way to do this is with an electric jigsaw. As for the sink, the cabinet usually comes without a back wall, since this is where the sewer and water pipes meet. The main rigidity of the cabinet is achieved thanks to the metal corners.
Among other things, it is important to take into account the presence of a gas stove in the measurements. Based on the measurements, you will need to make appropriate adjustments in the design configuration of the cabinets and cabinets. After all, the gas pipes will be connected to the gas stove. This is especially true when you want to make a single tabletop.
Fastening cabinets to install a solid countertop
The hood is closed with a specially made cabinet. To do this, you will need to make a special cutout in the back panel of the cabinet. As for measuring the corner kitchen, the whole process follows the same principle.
We give the blanks a finished look
When all the blanks are cut, it is not yet time for assembly. It is important to carry out a series of preparatory work, which includes edging. What it is? This is one of the key finishing elements of each workpiece, which reliably protects the edges from the penetration of moisture, chemicals and other liquids into the workpiece. Edgebanding also protects against chips and other mechanical damage.
Edge processing
Thus, each end of the kitchen set must be processed with a special edge. There are several varieties of them. But when it comes to practicality and durability, then it is best to use a plastic edge.
If this stage of work is difficult for you, then seek help from professionals!
When purchasing an edge, select a color that matches the body. Until installation, the edge should be stored in a dry place, since the back side is treated with a special glue that melts under the influence of temperature. Its gluing is done using a household iron. Under no circumstances should you use a hairdryer due to unstable temperature supply. And in general, the hair dryer will not withstand the length of the period of gluing the edge.
Now we’ll take a step-by-step look at how to glue an edge using an iron with your own hands.
So, to work you will need:
- Iron.
- Two pieces of fabric.
- Small file.
- Stationery knife.
- Edge.
Edging
- First of all, set the thermostat on the iron to medium mode.
- The workpiece can be placed horizontally on the table, end up, or rested with one end against the wall. Next, with a margin of two to three centimeters, cut off the edge and attach it to the end.
- Fold the first piece of fabric several times. You should heat the edge through it. This technique will prevent overheating of the edge and prevent its damage. Accordingly, the iron will be protected from accidental contact with glue on its sole.
- It takes a few seconds to heat up. After heating, the edge is pressed with another piece of fabric; all that remains is to wait for it to cool.
- As mentioned above, the thickness of the chipboard is 16 mm, and the edge has an average of 20–23 mm. For this reason, after gluing, protruding residues should be trimmed with a utility knife.
- At the final stage, file the joint between the part and the edge. Thanks to this simple operation, the angle will not be too sharp.
This is the sequence in which the edges are glued.
Stainless steel panels produced by Kamik:
Our company can develop stainless steel panels of any size for your kitchen according to your drawings, or we will take all the measurements ourselves.
The production capacity of the Kamik plant will allow us to produce panels for ceilings, floors and walls, and our professional assemblers will quickly and efficiently carry out the installation. Stainless steel panels
The appearance of stainless steel panels for the kitchen is a breakthrough in the field of construction and decoration. When they combine all the necessary, unique qualities, the price for them is considered very low. Many construction companies prefer them.
More details
Chromium is used in production, which creates an invisible oxide layer on the surface and protects the material from damage, thereby extending the service life of the metal. The metal, which is partly composed of nickel, is resistant to corrosion and high temperatures. Therefore, stainless steel panels are resistant to oxidation.
Despite containing dangerous elements, they are harmless to health. Therefore, such lining can be used in food factories.
Various types of panels can be created to order. Be it mirrored, corrugated, textured or colored metal sheets. If you need a high-quality material that will be stable in rooms with high humidity and constant condensation, stainless steel products are your ideal assistant!
Order a kitchen cost estimate:
ORDER
We come down from heaven to earth
After admiring the creation of your own hands, hanging majestically on the walls of the kitchen, begin assembling the floor elements of the set.
We start dancing from the corner
We connect the lower cabinets - the corner one for the sink and the one next to it for the drawers
And there is a corner cabinet with a sink. Typically this is a design with a bottom consisting of two parts, a horizontal drawer that replaces the second back wall to provide access to plumbing, and two perpendicular to each other (large and small) under the tabletop. Build it according to the following plan:
- Screw the composite bottom to the rear post and secure the rear drawer with one of the ends;
- screw the side posts and tighten them with drawers;
- tighten them together with screws;
- install the legs to the bottom of the cabinet according to the markings;
- hang and adjust doors.
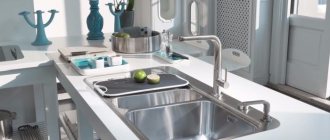
Insert sink
Installed sink in corner cabinet
The sink is often sold separately from the set. Please note a few important points during installation.
- The hole for it is cut out before assembly from the epigastric side.
- The edge of the sink has two perimeters. The outer one corresponds to its edge, and the inner one corresponds to special loops for fastening.
- When marking the hole, step back at least 10 cm from the edge of the workpiece. Outline the outer boundaries of the sink with a pencil.
- Measure the distance from the edge to the fastening loop with a ruler.
- Place this distance inside the outline of the mark. Draw a line through them that limits the inner perimeter.
- Drill several through holes for the jigsaw on it;
- Place several strips of tape on the underside, covering the outlined area - this will prevent damage to the front surface when the piece being cut sag.
- Use a jigsaw to cut a hole for the sink.
- Apply sealant to the space between the inner and outer perimeters and wait until it thickens.
- Insert and secure the sink with special clamps.
Assemble Base Cabinets
We mount the legs for our floor stand
The assembly of floor cabinets follows the same principle. But first, adjustable legs are attached to the bottom of the cabinet according to the holes made in it. After assembling the cabinets, be sure to carefully align the top edge and inter-sectional tie.
Assembly sequence of the lower kitchen cabinets
Start assembling the drawers by installing the guides on the sides. Fit them to the back wall, insert the bottom, install the front cover, check the diagonals for distortion, tighten the fasteners, screw on the handles.
Installing guides for the drawers of the lower cabinet
Install the countertop
Worktop for kitchen unit with cutout for sink
Most often it is made from laminated fiberboard. It is quickly installed, lightweight and easy to process. Assembly consists of the following steps.
- Mark the fiberboard with an allowance of at least 1 cm in all directions, taking into account a gap of up to 5 mm for the “apron” and the thickness of the metal strip applied to the ends.
- Cut the workpiece with a jigsaw or furniture saw.
- Apply sealant to the ends, press the strip tightly with self-tapping screws, and remove excess silicone with acetone.
- Place the countertop on the base cabinet racks and secure with self-tapping screws.
- Fill the gap between the edges adjacent to the apron with sealant and cover it with a furniture border.
IMPORTANT! Take waterproofing of ends and joining surfaces seriously and follow all manufacturer's requirements.
A corner tabletop consists of two or more parts connected using special ties. Assemble it according to the following scheme:
- Apply the special glue included in the kit, which has high adhesive properties, to the upper edge of the joint;
- carefully lubricate the rest of the joint with ordinary wood glue;
- insert the lamellas into a special slot cut along both sides of the joint;
- install the ties from the underside into mirror-matched grooves made perpendicular to the joint surface, tighten using a wrench;
- Remove any glue that has come out on the front surface using white spirit or acetone.
FOR YOUR INFORMATION! We recommend sticking masking tape onto the edges of the joints for careful application and quick removal of glue residues.
Congratulations! You have done it and assembled and installed a kitchen set with your own hands, which will last for many years and will be a source of pride for you.
Ready-made kitchen, assembled with your own hands
Own production of kitchen modules in industrial style.
We present to your attention industrial-style kitchen modules of our own production for country houses, residences, luxury residential premises and restaurants with open kitchens.
We can produce modules of any size and functionality (wall-mounted, island-mounted) according to an individual design, or we can develop it ourselves to suit the needs of your premises, following the example of the world’s best analogues. We build into our modules barbecues with automatic spits, any household or professional kitchen equipment, as well as ventilation and water supply systems of the required level of complexity. Our designers will help you develop a kitchen design of any complexity to suit your concept.