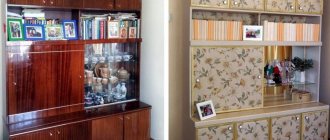
Furniture is a mandatory piece of furniture for any home. If handled carefully, it can serve its owners for a very long time. However, nothing is eternal in the world. Over time, furniture also ages. Cracks and abrasions appear on it. Its paint will peel or fade in the sun. Unsightly stains from spilled ink, wine or other liquids appear on the surface of tables, chairs and cabinets. The doors begin to creak. The drawers don't slide in or out easily. The fittings are fading.
All these are signs that it is time to change the furniture. However, do not rush to part with it, because it can be easily restored, returning it to its second youth.
Furniture is expensive. If you really want to spend money and definitely buy a new wardrobe, bedside table or chairs, this article is not for you. We want to tell you how you can update old furniture by spending mere pennies on it.
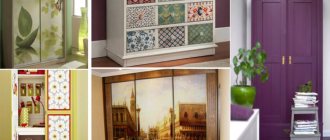
We use self-adhesive paper
Each business has its own characteristics and secrets. Furniture restoration is an interesting and useful activity, but painstaking. If you just want to return it to its original appearance, then repair the doors and drawers, replace the fittings, and varnish the damaged surfaces.
Stain helps to refresh the color. The composition must be diluted with water to the desired concentration, tested somewhere on the inner surface, and the shade adjusted if necessary. Be sure to apply 1-2 layers of clear varnish on top of the stain.
If there are stains and cracks on the furniture that cannot be removed or painted over, use self-adhesive tape. This material is sold in all construction stores.
Choose a color and pattern that matches your furniture. You can buy a completely different one if you want to update the design of cabinets, bedside tables, and so on. At home, take careful measurements of the item you are going to restore. Mark the dimensions on self-adhesive paper and cut out. Without removing the protective film, apply the pieces to the surface of the furniture. Make sure there is no error.
Before gluing, clean the surface to be renewed from dust and grease. Please note that it must be completely dry. If there are large cracks, they can be covered with wax or putty, which must be allowed to dry. It is advisable to remove the fittings.
After this, carefully (centimeter by centimeter) apply self-adhesive to the furniture. Try to immediately press it to the surface and level it. If folds are created during the process, they must also be removed immediately. Press down the self-adhesive tape in the corners with a blunt object. Press at the corners and carefully level it with your hands. At the last stage, install the fittings.
After such an update, the furniture will look as if it had just been delivered from the store. Self-adhesive can have a matte or glossy surface. It can easily withstand the effects of water and detergents. If desired, it can be coated with clear varnish.
Stick rivets
To create a brutal effect for a loft or steam punk, cabinet doors can be decorated with metal rivets or staples. Nails with decorative heads will also work. Let the chest of drawers look like an old chest, and the wardrobe look like a door to a submarine. You can use other metal fittings for decoration, and support the style by painting or covering it with fabric.
Creating a new design
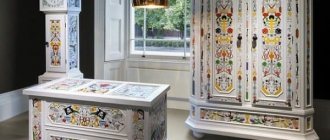
If you decide to update not only the furniture, but also the design of your entire home, you need to use other restoration methods. There are several techniques for this, each of which allows you to fully use your imagination. You can create a completely different appearance for your furniture, decorate it in different styles, decorate it with patterns, colors, various drawings or photographs. However, it is necessary to take into account the features of the interior of the living space. The furniture should look good, but at the same time fit perfectly into the overall design theme.
A Brazilian travels 36 km by bike every day to take his loved one home.
"Dad is offended." Agata Muceniece about her relationship with Priluchny after the divorce
The money tree pleases with lush flowering: my secret is in caring for the leaves
If you want dramatic changes, think about what kind of wallpaper, curtains, and interior items will be in your room. Based on these parameters, select the furniture design. In a room where harmony is disturbed, a person feels uncomfortable and even begins to get sick. Furniture can be decorated in the following styles:
1. Provence. Pastel colors dominate. On a white or beige background, grass and grapes are depicted in lavender color. You can do without drawing. The main thing is to maintain color shades.
2. Victorian. They use gilding, burgundy, pink, brown, beige colors. Draw animals and natural motifs.
3. Country. This style is otherwise called rustic. The highlight is the “aged” surfaces. Use blue, beige, white, brown colors.
4. Shabby chic. Pastel colors dominate. Mainly used on furniture in golden tones. The drawing is made blurry, with frayed edges.
5. Simple City. The name encodes the essence of the style. Furniture is decorated with photographs or drawings of city landscapes.
6. Military. They use military paraphernalia and any pictures related to the army theme.
7. Ethno. Based on folk motifs. Japanese, Indian, African styles are popular. Russian ones, such as Khokhloma and Zhostovo, are also often used.
Make the doors mirror
Mirrors not only expand the space and add light to the room, but also hide surface imperfections. Any closet can be turned into a mirrored one by attaching one full-height or several small mirrors to its doors. This technique will help you create an Art Deco style cabinet.
An alternative option is a mirror mosaic, which will create wonderful highlights.
Decoration methods
Don't be afraid to radically change the appearance of your furniture. Nothing is impossible for creative people. Restoration techniques have long been developed. Follow the instructions and you will succeed. To update furniture use:
“We are still friends”: Derevianko commented on the breakup with his wife
It’s good to wash often: myths about shampoo and hair care that only harm
Smooth and fresh skin: dermaplaning, or why a woman needs to shave her face
- decoupage;
- painting;
- templates;
- mosaic;
- artificial aging.
Below we will look at each of these techniques in more detail. Before using any of them, you should definitely repair your furniture (if necessary). It is also advisable to remove the fittings so that they do not interfere with creating beauty.
Furniture decor with fabric
Instead of wallpaper, furniture can be decorated with fabric and even lace. This option is a little easier for several reasons.
- Fabric is a more mobile and pliable material, and since the glue dries for a long time, you will be able to eliminate all irregularities and defects.
- To decorate external surfaces, corners are easier to wrap. They can be additionally secured with a stapler.
- Fabric, especially cotton, does not react so clearly with varnish and therefore is easier to work with.
Decoupage
This method is used not only to update furniture, but also to create creative household items. There are several types of decoupage:
- Classical. It involves gluing drawings onto the surface and covering them with a special composition.
- Back. Performed on glass surfaces. In this case, the design is pasted on the inside or bottom side of the glass, which depends on its location on the furniture. If you have a glass table, then you need to stick the picture from below, and if you have a cabinet door, then from the inside.
- Art. In this case, not only drawings are used, but also paints, with the help of which a complete image is created.
- Decopatch. This technique involves using a variety of materials, not just paper. An interesting design is created from the cut out pieces, you just need to choose them harmoniously.
- Volume. This is the most difficult technique. It is usually performed by professionals. Using various techniques, they create three-dimensional images of flowers, animals, geometric shapes, and so on on a plane.
Let's look at how classic decoupage is done. This is the basis of all its other varieties.
Classification
There are various frame cabinets made of fabric. In addition to colors, type of material, sizes, they differ in purpose and method of closing. It’s not always possible to quickly navigate the wide range of models in the store, so it’s worth understanding the classifications in advance.
What to store in the closet under the stairs, the advantages of such furniture
By purpose
The purpose of furniture depends on where it is located and for what purpose. The following options are available:
- Clothes. Traditional model for bedroom, dressing room. It is a design with a crossbar for hangers. In addition to compartments for dresses and suits, there may be shelves, drawers for linen, bedding, bath accessories, and wrinkle-resistant clothing. Fastens with a zipper, Velcro, and can be closed with curtains.
- Shoe. An option for both the hallway and the loggia for storing seasonal, unused shoes. For production, waterproof, dirt-repellent, impregnated fabric is used. The cabinet can be open (shoe shelf) or zippered (for seasonal storage or as protection from pets).
- Children's. Bright colors and easy-to-clean fabric are its distinctive features. There are many design options - wardrobe, toy rack, combined. Can be open or closed. Often equipped with additional pockets for small items.
The most versatile is a shelving cabinet, also known as a pencil case. Used in different rooms. Suitable for storing linen, bedding, home textiles, toys, books, papers and other household items. It can be open and closed, rectangular and cylindrical. Depending on the material, filling, color, it is used in the kitchen, children's room, living room, hallway, bathroom.
Children's
Shoe
Clothes
By closing method
According to this parameter, a fabric cabinet can be:
- Completely open. For the kitchen, living room, hallway, children's room. They store things there that need not be hidden from prying eyes.
- With curtains. This model can be quickly opened and closed. It comes in the form of a wardrobe, kitchen rack, wardrobe. Curtains can be additionally equipped with ties or Velcro. Models are available with regular or roller blinds.
- With ties. A cozy option for a Provence style kitchen or cottage. Suitable for the bedroom too.
- With a zipper. Practical modification. In the bathroom, such a cabinet made of waterproof fabric will reliably protect things from moisture. A coat with a zipper will prevent dust and sunlight from getting on your clothes.
- Velcro. Practical, but will not protect against moisture. It is convenient for children to open and close the structure.
There are combined models of fabric cabinets, for example, when the upper part of the pencil case is completely open, and the lower part is closed with a curtain.
With strings
Velcro
With a zipper
Open
With curtains
Materials
You can use a variety of ideas for your creativity. But to bring them to life, the materials and tools will be needed approximately the same. This:
Rare shot: Viktoria Isakova showed her grown-up daughter from Yuri Moroz (new photo)
Lost weight: what Sofia Tarasova sacrificed for the sake of “VIA Gra” (new photos)
A student at the Vietnam Police Academy shared how she takes care of her facial skin.
- drawings on paper (it should be well saturated with glue);
- acrylic paints;
- PVA glue;
- acrylic primer;
- glue varnish for decoupage;
- putty;
- several brushes;
- foam sponges;
- sandpaper (it is better to take both coarse-grained and fine-grained);
- putty knife;
- roller;
- rags or rags.
Preparatory work
If you are going to create a new decor on a polished surface, you need to follow these steps:
1. Remove the top layer of polish. To do this, you need to treat the surface with sandpaper. If you don't do this, all the beauty will quickly peel off.
2. Cover the surface to be treated with a layer of putty to smooth out any unevenness.
3. Apply acrylic primer.
If the furniture is matte, simply use putty to smooth out all the bumps and holes, cover up the cracks, and apply a layer of acrylic primer on top.
If you are decorating plastic furniture, do the following:
1. Degrease the surface with an alcohol-containing preparation.
2. Roughen the material by treating it with fine-grained sandpaper.
3. Apply a primer to ensure better adhesion of the designs to the surface.
Wallpaper
Wallpaper provides more options than film, since it comes in matte, textured, and generally suits every taste. If you wish, you can choose photo wallpaper that will visually expand the space. Wallpaper is applied using PVA; the surface must be prepared in advance for better adhesion. You can decorate not only the front doors with wallpaper, but also the interior shelves or the back wall of a cabinet or rack.
Work algorithm
It is better to use thin paper for decoupage, but wallpaper will also work. First you need to take measurements of the surface on which you will apply the drawing. Using the obtained parameters, cut out fragments of the design from paper. If it is dense, it needs to be soaked before gluing. To do this, dilute PVA glue with water in a 1:1 ratio and apply this liquid to the paper.
Apply glue to the surface of the furniture. Next, place the drawing on it, smooth it with a roller and let it dry completely. This may take several hours. At the final stage, coat the surface with acrylic varnish. This should be done in 3-4 layers.
Many people want to place only a separate small fragment, for example, a flower, on the furniture. Then there is no need to apply glue to the entire surface. It is enough to cover only the drawing on the reverse side.
Painting
This technique is only suitable for those who have a talent for drawing. Artists can create entire paintings on furniture and decorate it with unique patterns.
The preparatory work for performing artistic painting is exactly the same as for decoupage. The furniture needs to be repaired, the surfaces should be leveled and coated with acrylic primer. Apply latex or acrylic paint of the selected color on top. It is better to do this with a spray bottle to cover the surface evenly.
Next, pick up a brush and start creating. Painting is done with acrylic paints. The top of the design is coated with matte or glossy varnish.
Templates
This is a type of artistic painting for those who do not know how to draw. You need to apply a design to thick paper (for example, cardboard) and cut it out. Prepare the surface of the furniture in the manner described above. Wait for the acrylic coating to dry. Next, apply the stencil to the surface and use a sponge sponge to paint over it. Decorate the entire surface of the furniture in this way.
Instead of cardboard, you can use lace fabric. It needs to be dipped in paint, placed on the surface of the furniture, pressed down, and then removed. The pattern will be imprinted on the surface.
Using templates allows you to quickly apply a design. However, you won’t be able to create something unique with their help. As a rule, templates are used to apply very simple motifs.
Make a slate surface
Chalkboards are all the rage right now, so why not make one out of cabinet doors? The slate effect can be easily achieved in two ways: buy a film or paint the chest of drawers with chalkboard effect paint.
Mosaic
This is a rather complex technique that requires certain skills, concentration and attention. It is easier to decorate horizontal surfaces, such as a table, with mosaics. Only after getting your hands on it can you start updating the doors and sides, but even in this case, you need to place them horizontally during work. Classic mosaics are made from pieces of glass or ceramics. You can prepare this material yourself by breaking some dishes. Please note that you need to select mosaic pieces so that the surface to be treated is as smooth as possible.
The work algorithm is as follows:
1. Prepare the surface as described above.
2. On a piece of paper, draw what you want to depict. It is advisable to do this in duplicate. Color the drawing on one. This will be your sample, which will help you not to make mistakes when creating mosaics on furniture. The second copy of the drawing needs to be cut out and the contours transferred to the surface to be decorated using a marker.
3. Apply cement-based tile adhesive to the surface. Using tweezers, carefully lay out the outlines of the picture first, and then gradually fill in all its parts.
4. Let the glue harden. After this, fill the gaps between the pieces of glass or tiles with cement mortar.
DIY cabinet design methods.
Decoupage an old wardrobe with fabric
When approaching interior design from a combination of colors of furniture, wallpaper and curtains, you can use the technique of decoupage with fabric. The cabinet will find harmony and grace in combination with other decorative elements.
When choosing a fabric texture, preference should be given to dense options; they are less deformed when stretched. To make the fabric lie smoother and not bunch up, you can use a foam base. Fixing the fabric can be done with liquid nails or using a furniture stapler.
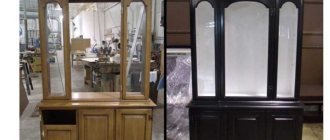
Antique cabinet decoration
You can easily decorate the cabinet with your own hands to make it look antique. Using a grinding machine, you need to remove the paint from the surface and degrease it with a solvent. Next, the primer base is applied. After the surface has completely dried, you can begin the aging process. The effect of scratches and cracks is created by craquelure varnish. If the cabinet is made of coniferous trees, then the aging technology is modified. It is necessary to create stripes on the surface of the wood, characteristic of aging, using an iron brush. After cracks appear, the furniture is covered with dark paint. Remains of paint, without waiting for drying, are removed with a cloth. The finishing touch is to apply varnish to the surface.
Is it possible to decorate a cabinet with chipboard?
Chipboard cabinets have been preserved in many homes. Their long period of operation will not affect the ability to decorate the cabinet with your own hands. They can still serve as a necessary piece of furniture or space decor. When decorating furniture made of chipboard, the technology is similar to that described above. Initially, the fittings are dismantled and cleaned of rust and dust. Surfaces to be covered are wiped with soapy water and degreased with a vinegar solution. This process requires care; if degreasing is done in bad faith, the subsequently applied self-adhesive film may peel off. Next, the film is cut according to the dimensions of the cabinet. To ensure that the film can be moved and moved when gluing when correcting distortions, the application surface is sprayed with water. When the film is applied and all dimensions match, you can smooth it with a soft cloth with smooth movements from the center to the edge. When smoothing, air is released from under the film and no bubbles remain. If bubbles do appear, they can be pierced with a thin needle and smoothed out with a soft cloth. The next stage is the assembly of cabinet parts and installation of fittings.