Glue review
Among domestic glues, compositions 88 and Moment are more popular.
The first of them is distinguished by sufficient strength when gluing parts made of leatherette to other surfaces. Disadvantages include a sharp and unpleasant odor that does not disappear within several weeks. The cost of glue varies around 230 rubles.
Another popular domestic glue is Moment. This universal composition has good adhesion. If you apply it to both surfaces to be joined, then after 10 hours it will be difficult to tear them apart. At the same time, manufacturers guarantee maximum effect within 24 hours. Another advantage is the absence of a specific odor 24 hours after completion of work. The budget price of the composition is also attractive: 190 rubles.
In addition to the common glue for repairing leather products or its substitute, you can find other compositions in stores. Thus, “Mars” glue is sold in 50 ml tubes at a price of 70 rubles. It retains its properties at temperatures from -40 to +80. But it should be used in work at temperatures from -10.
Glue that reaches store shelves from European countries often has better characteristics than domestic analogues. However, you will have to purchase it on order, and taking into account delivery, the price will be much higher.
Thus, GTA Botern glue, produced in Poland, can be ordered for 1,500 rubles in quantities of at least five cans. When purchasing 10 or more, the cost will drop to 1200 rubles. Although it is difficult to find in Russia, in other countries it is widely used for working with products made of leatherette and other materials.
High levels of strength and reliability and German adhesive Mah. You can order it at a price of 1,500 rubles per half liter. It retains its qualities at the highest temperature of +160 degrees. This is how it differs from most of its analogues.
"Liquid skin" for repair
In the modern sense, “liquid skin” is a polymer mixture based on alcohol and water. The product contains an adhesive base, rubber resin and dye. You can use the finished product, but difficulties may arise.
Firstly, such a product still needs to be found, and then it may turn out that there is no “liquid skin” of the desired color on sale. And why pay for a whole bottle if you only need to fix one scratch?
Let's try to make “liquid skin” that will ideally suit your product. Shoe repair shops used this method long before ready-made “liquid leather” appeared on the market. We can say that this is a professional secret of shoemakers. Let's take it into service!
How and what to glue the skin with
You can repair an item if it is torn using universal glue (for example, “Moment”) or liquid leather. Before starting work, it is necessary to tear off the section of the lining opposite which the damage is located. It is advisable to flog along the seam. The skin around the break is degreased with a solvent. Traces of the solvent itself are washed off with water and wait until the surface dries.
To repair a leather jacket at home, in most cases a patch is used. Jackets are often sold complete with a piece of leather, which is intended for installing patches. If the product was sold without a patch, use dublerin or artificial leather. After installing the patch, the lining must be sewn up.
How to seal a hole in a leather jacket
To seal a torn leather jacket, prepare a flap whose diameter is 1.5-2 times greater than the diameter of the hole. Glue is applied to the edges of the front side of the flap and a patch is applied from the back of the product so that its front part is visible from the outside.
The repaired area is placed under a press (weight, thick books) for at least 12 hours. It is not advisable to wash the jacket after repair. You can clean it with a damp cloth.
How to seal tears
If there is no skin, minor damage can be repaired using a fabric patch. It is advisable to choose fabric of the same shade as the leather product. But if this is not possible, the material is repainted. Preference should be given to synthetic dense fabrics.
How to seal a cut on a leather jacket
The patch should have an oblong shape. As in previous cases, the flap is glued from the inside out. If a cut appears on your jacket, you need to take immediate action to prevent it from getting even bigger. But since it is not always possible to use special material for repairs, it is permissible:
- Cover the damage with adhesive tape. Repair tape should not be used. It comes off quickly. Using an adhesive plaster is a temporary measure. The jacket needs to be repaired as soon as possible. It is worth sealing the skin both from the inside and from the front side.
- Sew it up with thread. This measure is considered an extreme measure: after stitching, there remains a seam on the jacket that is difficult to miss. It is necessary to use threads that match the color of the jacket. Only a thick needle is suitable for stitching.
Repairing the collar
If there are loose areas of skin, they need to be cut off. Repairing the collar is complicated by the large amount of dirt that accumulates on this part of the jacket. To clean dirt, you should wipe the collar with gasoline (preferably aviation gasoline). To completely remove dirt, the procedure is repeated at least 2 times. Then the collar is cleaned of gasoline residues with a sponge and soap solution.
Since it is inconvenient to place a patch on the collar, paint is applied to the damaged areas. It is advisable to do this with a sponge. To ensure that the paint sticks, it is recommended to apply varnish on top. If you don’t have a special one, you can use a transparent manicure.
How to fix a gap with your own hands
It is believed that leather is a fairly durable material, but it can also tear. Although, of course, holes appear less often on such products than on fabric and canvas ones. If this has already happened, then the instructions for bringing the jacket into proper shape depend mainly on the form of damage that has occurred. There are situations when the material is torn by a “corner”, and there are situations when a piece of skin flies off completely.
In the first case, the sequence of actions is as follows:
- Provide access to the tear from the inside of the leather jacket. It is necessary to rip the jacket lining along one of the seams.
- Carefully, as far as possible, smooth out the torn corner. Now you need to fit it back and secure it with tape on the front side.
- We glue a patch made of leather, thick fabric or suede from the inside. We make sure that the overlay is larger than the tear site and protrudes beyond each of its edges by 10-15 mm.
- Having smoothed the surface from the inside, we install something heavy on the front side. Leave the load until the patch is completely dry.
- We remove the tape. Apply a thin layer of glue along the entire joint of the gap from the outside (it is convenient to use the tip of a toothpick for this).
- We mask the damaged area with a special leather paint to match the product or a regular cream.
- Sew up the inner lining.
In a situation where the hole in the jacket is obvious and a piece of material is completely torn out, repairing the product is somewhat different.
- We rip the lining from the inside in order to get to the place where the skin is torn.
- We level the damaged area as much as possible, glue a patch from the inside, and place a weight on it.
- After the glue has completely dried, we repair the front part of the product. If the “original” torn piece is lost, you need to cut another one from a flap of leather, which is as similar in characteristics as possible to the material of the jacket. We make sure that it is identical to the shape of the hole. We put this piece into the hole.
- Carefully fill the resulting joint with glue along the entire perimeter of the outer patch.
- After everything has dried, paint over the damaged area. Sew up the ripped lining.
If the gap is large and is in plain sight, then repairing it with your own hands will be quite problematic. It is better to contact qualified craftsmen for help in the studio. If an area of skin needs to be replaced, specialists will be able to select the most suitable flap and carefully stitch it in the right place.
We suggest you read How to remove felt-tip pen from skin
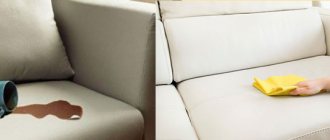
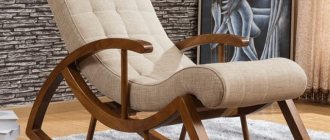
How to restore eco-leather on a sofa
Leather furniture looks impressive and stylish. People are increasingly refusing to buy expensive sofas and armchairs upholstered in natural leather due to high costs and ethical principles. An inexpensive alternative has become eco-leather, which in appearance is practically no different from natural leather, and in some respects even surpasses it.
Liquid leather is rightfully considered the best material for the restoration and restoration of ecological leather. The polymer material fills cracks, cuts, marks from teeth and claws.
Restoration work is carried out in several stages:
- the surface is leveled, threads and fibers are removed;
- the edges of the cut or hole are carefully stitched or glued from the inside;
- eco-leather is wiped with liquid detergent and dried;
- the desired shade is selected by mixing several basic colors;
- liquid skin is applied with an art brush or foam rubber;
- The repaired sofa is left to dry for a day.
Attention! You can remove smudges and level the layers using a student’s ruler or ordinary plastic card.
How not to ruin your sofa completely
If abrasions and damage occupy a large area, then the furniture cannot be restored. It is also unlikely that a sofa upholstered in eco-leather in an exotic color (light green, turquoise, coral, terracotta, lilac) will be able to return to its original appearance. At home, it will not be possible to recreate a complex and ornate design using a napkin or a piece of old leather.
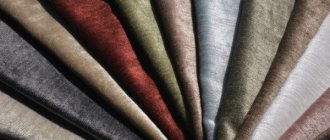
A little about the choice of materials for repairs
The leader among manufacturers of restoration pastes is the French company Saphir. Restoring cream extends the service life of damaged, worn and discolored products. The product is suitable for smooth surfaces; when applied, it creates a durable and elastic layer that repels water. Saphir does not stain clothes and dries quickly.
Precautions during repairs
When working with liquid leather, you should wear plastic gloves. These gloves are used by hairdressers when coloring hair. Rubber products are not suitable.
How to fix a collar
If this section of the fabric is torn, then the damage can be repaired using any of the previously described methods.
Owners of leather jackets note that one of the most common problems they encounter is the appearance of greasy marks on the collar. This happens if the product is worn for a long time and is not cleaned in a timely manner. There is a way to deal with this problem:
- We treat areas of the skin that have lost their attractive appearance with gasoline. Let the material dry and check the result. If necessary, repeat this manipulation several times.
- After removing all traces of fat, a special paint will allow you to restore the original color of the skin. Using a sponge, carefully paint the collar. Make sure that the product spreads evenly over the entire treated area.
Remember that at home there is always a risk of damaging the product due to careless actions. To prevent this, test the described method in an inconspicuous place. And only then boldly get to work restoring the proper appearance of the collar.
The question remains: if the leather on the jacket is cracked in this area, what should I do? To eliminate such defects, it is advisable to use special dyes that match the color. However, it is better not to use those that come in the form of sprays. Such products are usually sprayed from a distance of 30-40 cm, due to which the dye goes beyond the collar and falls on a larger area.
Common Mistakes
How can you ruin the appearance of a jacket:
- seal the gap with PVA glue - the patch, held on by a water-soluble compound, will fall off after rain;
- sew on a machine with a thin needle - to work with leather in the studio they use a special machine and needles;
- overuse glue - marks will remain on the front side;
- To paint a patch without testing - you need to try on a small whole area of skin to see how the paint or cream will look.
Leather stitched on a regular sewing machine stretches and wrinkles. Dried excess glue can be wiped off with a dry cloth. You cannot wash off traces with water, as the moisture will cause the patch to come off.
How to repair a leather jacket: effective methods and useful tips
Leather products look very stylish, but due to the nature of the material they require constant care. If the inevitable happens and your favorite item is damaged, you need to know how to repair a leather jacket and return it to its former glory.
Of course, you can contact a clothing repair shop, but professional services tend to be quite expensive. You can deal with the most common problems and defects on your own. It is enough to allocate some time for the recovery procedure and strictly follow these recommendations. This way you “reanimate” the product, giving it a second life.
What to use to repair tears
It is possible to repair a leather jacket with your own hands, but it is necessary to adequately assess the risks. When there is a possibility of damaging the product even more, and it is expensive for a person, the best solution would be to contact a workshop with craftsmen who have experience working with leather, who will repair a jacket made of natural material quickly and without negative consequences for the item of outerwear.
But, if you have confidence in your abilities, before starting the repair you need to prepare all the consumables and tools that may be needed during the restoration of a leather outerwear item. The basic set of tools and consumables that will be needed when repairing a jacket when the leather has burst or a hole has formed by accident:
- art or paint brush;
- sewing needles;
- leather glue;
- tweezers;
- scotch;
- sewing threads of the appropriate color;
- leather dye;
- material that can be used as a patch;
- degreaser.
The items listed may potentially be needed when working with leather. When the damage is minor, there is an option that only glue will be enough, but more often you need to sew up the holes in the jacket using a patch. It is recommended to prepare the entire list of materials and tools, since during work it is not advisable to be distracted by searching - it is better when every necessary item is immediately at hand.
Liquid skin as an alternative to glue
In some cases, a decision may be made to correct a defect in a product using liquid leather. This product is used to repair cracks and cuts in shoes and other leather items.
This method is not recommended for repairing things made from dermantine. The vinyl included in this fabric does not allow liquid skin to be absorbed. Therefore, the surface treated in this way will peel off after a short time.
If the car cover or jacket is made of a higher quality leather substitute (polyurethane, nitrocellulose or other coating), using liquid leather will give better results than with cheap leatherette. But it still cannot compare with the natural skin for which the product is intended.
Useful tips
Before starting to repair a leather or faux leather jacket, write down the algorithm of actions on paper and place improvised instructions in front of your eyes. This approach will help you focus on the process and reduce the procedure time. To make the repair successful, you can use a number of recommendations for working with materials and nuances of decorating leather products:
- When using adhesive tape, it is recommended to first check the adhesiveness on the inside of the jacket near the zipper. The tape should adhere firmly to the surface.
- If glue is used, it works quickly. If the composition dries on things prematurely, the process will have to start all over again, with cleaning and degreasing the area being repaired.
- When deciding to install an external patch, you need to pay attention to the design of the clothing. If there is no similar decor, then the patch is made from the lining side or several similar ones are placed.
How to seal a leatherette jacket?
Replacement jackets can be repaired in the same way as leather ones, but not any glue will work in this case. For example, if you lubricate a leatherette jacket with “Superglue”, it can ruin the product - instead of repairing it, a new hole will appear, since the glue can corrode the material. Therefore, we need to look for safer methods.
It is best to use non-woven tape as it is a very thin material.
The tape is used like this:
- Apply the material to the inside of the leatherette.
- Place a layer of gauze on top.
- Use an iron.
Tools and materials for work
Before starting work, you need to prepare tools and consumables.
These include:
- Pieces of leather, selected according to the desired color and size.
- Adhesive composition.
- Scissors, mallet.
- Awl, sandpaper.
- Brushes for applying sticky mass.
- Double-sided tape.
- Any heavy object as a press.
- A few scraps of paper.
The workplace must be cleared of unnecessary things so that nothing interferes with gluing. To ensure that the seam is the desired color, you can use a special adhesive paint for leather.
Sealing process, preparation for work
Before gluing artificial leather or natural material, it is necessary to carry out preparation.
Step-by-step instruction:
- Cut a patch from the same material as the product. Its size should be at least 1 cm larger at the edges.
- Align the hole with a sharp blade, trim off threads and uneven surfaces.
- Using a damp cloth, wipe the surfaces, remove dirt, dust, and any debris from them.
- Degrease them after cleaning. Wait until completely dry, do not touch with your hands.
- Use fine sandpaper to sand the areas to be glued.
The preparation process directly affects the final result.
How to avoid damaging a genuine leather jacket during repairs
Failure to comply with the repair technique causes new defects. To avoid them, you should:
- use only special adhesives;
- degrease the area being repaired;
- Make patches only from leather or thick textiles.
During repairs, it is strictly not recommended to use a hair dryer, hot iron or lighter. By trying to speed up the cure of the glue, you are more likely to burn the fabric.
Leather patches are used to disguise holes in visible places. If you don't have a sewing machine, don't try to sew on a chevron by hand. If the distance between stitches is not maintained, the work will not look neat.
Repairing leather jackets is a labor-intensive process that cannot be rushed. If you want to give things a second life, take the procedure responsibly. Those who are not confident in their own abilities should turn to professionals in the studio.
High-quality artificial leather is a durable, practical and incredibly beautiful material. It is very durable, but no one is immune from cuts and tears. What to do when faced with such a problem? Don’t rush to say goodbye to your favorite item or run to the studio. You can always seal the faux leather yourself. This will cost much less and will also save valuable time. However, not all means are suitable for gluing dermantine.
How to seal a hole in a leatherette jacket
For example, let's look at how to repair a torn leatherette jacket. To tidy up a torn item, a patch is often used, which is attached either to the front or back side of the item.
In the first case, the surfaces to be joined are cleaned of dirt and degreased with acetone. For ease of work, the lining is ripped open, and the damaged area of the product is leveled and smoothed.
The patch must be larger than the damage it will cover. The allowance is approximately a centimeter on all sides. A small piece of material is usually included with the jacket along with extra buttons. If not, you can take any thick fabric of a similar color. If the process is performed on the reverse side of the jacket, the surfaces can be sanded to enhance adhesion.
Most compositions require application in 2 layers. First, the surfaces are covered with an even layer of glue for the first time and left for 20 minutes to dry. Then the second layer is applied. Now you need to wait a couple of minutes for a thin film to form on top of the treated leatherette.
Now all that remains is to connect the patch to the jacket, aligning the edge of the tear and pressing the edges of the cut. Finally, all that remains is to process the seam from the front side. To do this, its edges are slightly pushed back, additionally lubricated with glue, and then pressed back. The remaining composition can be carefully removed with your fingers.
When attaching a patch to the front side, the operating principle is the same, only the requirements for the fabric used in this way increase.
General recommendations for performing the work
Before you start using the selected composition, read the manufacturer's recommendations, since application methods and glue drying times may vary. Also, do not ignore the general safety rules:
- the room in which work is carried out must be well ventilated;
- You should not leave the tube open, as the substance will retain its properties longer.
To apply the composition in an even layer, a brush is often used. If this tool is planned to be used in the future, it will need to be cleaned of glue immediately after finishing work. Otherwise, it will be impossible to do this later.
Did you like it?
Loading…
Found a mistake? Select it and press Ctrl + Enter. We'll fix everything!
Restoring a torn leather jacket in specialized studios: ideas
A better repair of a torn jacket will be done in a studio by replacing a separate part or sewing an overlay on top of the flaw. Below in the photo see examples of restored leather jackets.
Restoring a leather jacket using applique
Replacing a damaged part on a leather jacketReplacing a damaged part on a leather jacketReplacing a damaged part on a leather jacketReplacing a damaged part on a leather jacketReplacing a damaged part on a leather jacketReplacing a damaged part on a leather jacketReplacing a damaged part on a leather jacketReplacing a damaged part on a leather jacket
Restoring a damaged part on a leather jacket
Restoring a damaged part on a leather jacket
Types of leather repairs
In order to understand how to repair a leather jacket at home, you will need to know what leather repair options are available. Having decided exactly how you will carry out such repairs, you will be able to plan it and also select the necessary material for this. As a result, you will receive an updated leather product that will serve you for many years to come.
A cut on a jacket can be carefully sealed by placing a piece of leather patch on the lining
Today, there are 3 options for solving the issue of how to repair a leather jacket:
Sealing a tear or cut on a jacket. In this case, any damage on it will need to be sealed using a special glue that can glue the skin together. In this case, a strip of thin leather will need to be glued to the inside of the product to reinforce the damaged area. The advantages of this method of skin restoration include its low price, as well as the speed of repairs performed with its help. In addition, you can repair damage with glue right at the place where the damage occurred. If the tear is small in size and compact in shape, and your jacket is made of high-quality leather with a regular structure, sealed in this way, the damage will be practically invisible while wearing the jacket.
Stitching or sewing patches onto a cut or tear. In this case, the hole formed as a result of mechanical damage to the skin is sutured or a patch is sewn onto it. The disadvantage of this method of repairing leather products is its complexity, as well as the fact that the patch in this case will be very noticeable. At the same time, if you combine it with the decorative elements of your jacket, this problem can be solved quite easily.
Complete replacement of the damaged jacket element. This rather complicated operation is performed when for some reason it is impossible to seal or sew up your jacket. This replacement is carried out in a workshop, and if you don’t know where you can have your leather jacket repaired, it makes sense for you to go there. At the same time, the studio’s specialists select leather that is as similar as possible to the one that was used when sewing your clothes. As a result, your jacket will look exactly the same as before the repair. It is worth remembering that the cost of such a service is quite high.
Replacing a damaged jacket element Before and After
In any case, the first thing you can do if your jacket is damaged is to seal it, because glue for this is sold almost everywhere, and the time for such repairs is limited to minutes.
Tape or sew, which is better
As a rule, they resort to sealing leather jackets.
But sometimes it will be better to sew or darn. This process is advisable if you have a sewing machine at home and the ability to sew on it. There is no way to sew it beautifully with your hands and a needle. It happens that a piece of leather is missing. In this case, a patch is placed: a suitable piece of leather is taken, and a piece of fabric of the same size is taken. A fabric one is applied to the inside of the tear (to do this, the lining along the seam is torn off), and leather to the outside. Their dimensions must exceed the dimensions of the hole. After application, stitch. If there is excess material sticking out, carefully trim along the line.
How to restore a peeling jacket
As a result of excessively long use or after unsuccessful washing using aggressive powders, a leather jacket may begin to peel. If the damaged areas are small and not in the most visible places, special dyes can be used to disguise them. By being able to choose the most suitable color, you can hide the defects that appear and extend the life of the leather product.
The shabby area can be disguised by gluing decorative elements on top that match the style of the jacket. Such modernization not only restores a pleasant appearance, but also improves it, making it unique.
Tip: It's best to avoid washing your jacket at home. Regular dry cleaning carefully removes various contaminants, maintaining the presentable appearance of the leather product.
Using the above tips and recommendations, you can ensure quality care for your outerwear. If your leather jacket is frayed or cracked, you now know what to do. The main thing is to notice the defect in time, react and apply the right remedy.
Did you like the article? Save it to your Pinterest! Hover over the image and click “Save.”
How does the leather on a jacket tear?
The most common types of damage are:
- Corner break
- A piece of skin was torn out.
Important! The way to close the gap in each of these situations will be different. Read them carefully so that the result of the problem, how to seal a leather jacket at home , is of very high quality.