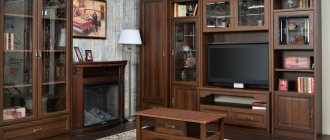
Wardrobes, walls, chests of drawers from Soviet times, vintage sideboards, inherited, wear out over the years of service, but remain strong. After a little restoration, good-quality items turn into masterpieces that cannot be bought in a store or made to order. They impress with their original decor, reminiscent of childhood or youth. An unpresentable and shabby appearance can be corrected with your own hands.
Painting furniture is a simple procedure; you need to be patient, study the surfaces, and purchase the necessary materials. Creative freedom is not limited; you can create patterns and radically change the shade. If you use your imagination, wooden tables, chairs, and headboards in beds will look no worse than designer ones.
Selection of paints and varnishes for furniture
The paint is chosen depending on the desired effect and the condition of the wood. Matte and semi-matte paintwork materials mask roughness and unevenness well, dry quickly, but fingerprints are visible on them. Glossy and semi-gloss paints do not hide the imperfections of the base and create a beautiful mirror effect. The satin coating shimmers, is not afraid of mechanical damage, and attracts less dust. The degree of gloss and wear resistance are indicated on the label. The natural structure of wood is emphasized by transparent paints and varnishes (varnishes, glazes, wax).
Varnish layer renewal technology
The process of restoring wooden furniture with your own hands consists of several stages. As an example, the restoration of a crib will be given:
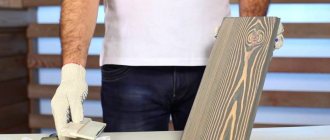
1. Preliminary preparation. Before refinishing polished furniture, it must be disassembled. Next, apply a cleaning solution to the surface, then rinse thoroughly with warm water. This procedure will soften the old polish, the varnish will crack and peel off in some places. Its remains must be removed using a scraper. Next, sanding is carried out with sandpaper. You need to start with a coarser abrasive and finish with a fine one. The surface should become matte and uniform. Next, remove the dust with a brush or damp cloth.
Related article: What is the best way to paint wooden products?
2. Application of paint and varnish composition. Depending on the chosen varnish material for the furniture being restored, the number of layers to be applied is determined. Each subsequent layer is applied after the previous one has completely dried (drying for at least 8 hours). If acrylic varnish is used, then to apply the first layer the composition must be diluted with white spirit. Further restoration of the furniture is accompanied by sanding the surface, after which another 2-3 layers of undiluted varnish are applied.
3. Stage of grinding the restored layer. Sanding of the restored areas is carried out carefully with sandpaper with the finest grit until a uniform matte surface is obtained. Next, everything is thoroughly wiped with a rag. Repairing an old item allowed us to get a completely new bed.
On video: restoration of a crib.
Paints vary according to the type of base
| Type | Properties | Note | |
| 1 | Acrylic | Easy to remove if mistakes are made, covers the color of the surface well, resistant to moisture and abrasives | Suitable for children's furniture |
| 2 | Water-based | Latex-based paint penetrates deeply into the base, and there are no drips when painting. | No odor, dry quickly |
| 3 | Silicone | Covers scratches, covers cracks up to 2 mm, does not attract dust, is not afraid of dampness, steam | Suitable for painting furniture on the balcony, bathroom, kitchen |
| 4 | Alkyd | Create a durable, wear-resistant film and are impervious to moisture | Contains chemical components that evaporate upon application and drying. |
| 5 | Oily | Forms a waterproof, scratch-resistant layer. They fade quickly even when not exposed to the sun. | Strong odor, long drying time |
| 6 | Cretaceous | They fit well on a varnished surface without sanding or priming and cover uneven areas. From the first layer, the previous color is covered, creating a velvety surface | To maintain the brightness of the shade after drying, they need a topcoat. |
Applying paint
The main stage - coloring - is the most enjoyable process that even Tom Sawyer enjoyed. It's nice to watch how furniture is transformed.
If the structure is painted disassembled, the walls are laid horizontally so that the paint is distributed evenly, without drips. Furniture as a whole is painted more slowly, carefully monitoring the uniformity of the resulting layer.
First, they make the background, then let it dry for half an hour, after which they paint twice more, pausing for drying.
If you wish, you can play with color to enhance the decorative impression, for example by painting the tabletop in a light color and the side walls in dark tones. To enhance the effect, furniture is varnished, making from one to several coatings on different parts. With great desire and careful attention, the effect will exceed expectations.
Required materials and tools
To remove the old layer, you need a spatula or scraper, a medium-hard metal brush, an emery sponge or grinding equipment, and a rag. Paintwork can be easily removed with a hair dryer. Masking tape is required to protect surfaces. The fittings and decorative elements are removed and screwed back in with screwdrivers or a screwdriver.
To paint furniture you need to prepare:
- small trays;
- brushes with natural bristles for oil and alkyd compositions, made of artificial fibers for acrylic or latex paint;
- paint rollers for painting facades and countertops;
- A paint sprayer will reduce work time and apply an even layer.
It is advisable to apply acrylic paint with a painting brush. Elastic nylon bristles leave no marks and create an even layer.
Painting the bed
For the main work process you will need a sponge, brush and roller. A roller is needed to apply a layer on large, flat surfaces. The posts and rods of the crib are treated with a brush. The sponge is used for small parts. There is paint in aerosol packaging, that is, the crib can be painted by spraying. But this method is too expensive and increases paint consumption.
During the dyeing process, care must be taken to ensure that drops do not collect in inappropriate places. Do not put a large amount of paint on a roller or brush.
It will take very little time to work. Let us highlight its main stages:
- First you need to remove the mattress from the bed and disassemble it, if possible. Move the parts to the place where the crib needs to be painted.
- If there is an old layer, it must be removed. In this case, you will need a hair dryer, a spatula, and an angle grinder with a wire brush.
- Using fine-grit sandpaper, polish the wood surface to make it smoother.
- Large parts must be polished using a drill with a special round attachment with emery pads.
- Remove dust from all treated surfaces in order to apply as even a layer as possible.
- Small parts must be washed in soapy water and dried.
- Treat all sanded elements with stain.
- After drying, assemble the bed, connecting all the parts tightly.
- Apply paint to all parts in two layers.
- Next, use a cloth or sandpaper to clean the areas where drops have accumulated.
- After painting, the bed must be placed outside (for example, on a balcony) so that the paint can completely dry.
It covers all cracks, chips and flaws. Next, all parts, similar to the first method, are sanded with sandpaper. Primer is applied. Then everything is repeated from point 8.
How to prepare furniture for painting
The adhesion of paint, the quality and appearance of furniture depend on the thoroughness of removing the old coating. There should be no grease stains, dust or moisture left on the base. Before work, bedside tables, cabinets, and chests of drawers are disassembled into separate elements so that there are no unpainted areas left in hard-to-reach places. Stained glass windows and fittings that cannot be removed are protected with masking tape. The place where painting work will be carried out is protected from contamination.
Removing old paintwork
The most affordable processing option is sanding. A sander speeds up the process, but without experience, you can affect the veneer layer. The varnish is removed with a metal scraper, brush, or coarse sandpaper. To make the surface smooth, movements are made along the fibers. For initial processing, you need paper with a grit of P40, 60, final sanding is carried out with a grit of P150, 180. Minor irregularities are removed with abrasive P120. To ensure uniform contact of the paper with the surface being treated, sanding pads with clamps are used. They can be replaced with a small block of foam wood, onto which the sanding paper is attached with nails. The surface is polished to perfect condition and cleaned of dust.
During heat treatment, the varnish and paint are softened with a construction hair dryer, removed with a spatula, and cleaned with an abrasive material. You need to work carefully so that the wood does not turn black. If the varnish chars but does not peel off, chemicals are needed.
Special removers for wood are sold in the form of powder, gel, or liquid. You need to read the labels before purchasing. There are universal removers and special removers for certain types of paintwork materials. It is easier to work with jelly-like pastes that are quickly absorbed and do not spread over the base. If the furniture has fine carvings, a liquid remover will do. Apply the product with a brush, cover the furniture parts with plastic wrap for 3-4 hours. Layers of varnish are removed with a spatula along the grain. The remaining solvent is neutralized with water and vinegar in a ratio of 5 to 1 or white spirit. The remaining areas of varnish can be treated again with a remover or removed with sandpaper.
It is convenient to remove varnish from carved parts with a wire wool. It is recommended to treat the oak surface with a nylon sponge.
Surface treatment
Cracks, pores, and chips on furniture are repaired with wood putty. Defects are carefully processed and cleaned after drying. The putty areas should be level with the rest of the surface. You can prepare the leveling mixture yourself from PVA glue and the waste remaining after sanding. The consistency of the putty is adjusted by increasing or decreasing the amount of glue.
To prevent dust and dirt from reducing adhesion, the surface is degreased. The napkin is impregnated with special products or acetone, white spirit, and the base is thoroughly wiped.
The primer promotes adhesion, strengthens the wood, and evenly distributes the paint over the surface. The primer composition glues the fibers together and reduces the absorbent properties of wood materials. Experts recommend choosing a primer and paint with one type of binding component, but there are also universal compositions. The label indicates the properties and purpose of the coating. For example, acrylic primer is not suitable for pine and cannot be used under oil paint. Resinous substances are blocked by alcohol shellac, which is compatible with oil and water-based paints. Old loose wood and porous materials are covered with deep penetration soil. It will strengthen the surface and prevent the formation of bubbles and stains.
Coloring methods
Tinting is done when they want to preserve the texture of the wood. The result depends on the paintwork materials used.
- The stain gives solid wood furniture an expressive shade and does not form a film on the surface. The product is applied in 2-3 layers with a soft brush or roller with short pile, foam rubber. It is easier for beginners to work with an oil composition. It does not lift fibers and does not form stains after drying.
- After application, the mordant reacts with tannins, emphasizes the pattern, and gives inexpensive species an interesting look. To protect it from moisture, the array is varnished after etching.
- Tinting dyes penetrate deep into the fibers and give a more saturated color than stain. Concentrates are sold in liquid and powder form and mixed with a solvent.
Continuous painting is used for different materials; it allows you to obtain furniture facades in bright colors and create two-color coatings. Thixotropic paint forms a plastic-like surface on chipboard and MDF. Furniture can be given an antique look, decorated with gold and painting.
Varnishing enhances shine and contrast, protects against moisture. Transparent varnish emphasizes the beauty of valuable wood species. Colored compositions give a rich shade and renew pine, birch, and linden. Craquelure varnish creates an imitation of cracks.
Kinds
It may be easier to list paints that are absolutely not suitable for painting wood and furniture made from such materials. However, in general, coloring compositions that are used for application to such products can be divided into the following types:
- materials based on organic solvents;
- water soluble;
- transparent.
Transparent
This group includes various waxes, varnishes, impregnations, glazes, and stains. They can be tinted or have no color at all.
Distinctive features of such materials:
- The presence in their composition of elements that reliably protect the surface from exposure to UV radiation. The bases do not fade or collapse.
- Increased vapor permeability. Under such a coating, wood “breathes”; it takes in liquid from the environment and releases it.
- The ability to emphasize the beauty of the structure of a wooden surface (other paints and varnishes hide it).
Old transparent coatings do not have to be removed when it becomes necessary to renew the paint layer (unlike conventional paint compositions). Simply apply a new coat to the base.
Water soluble
Dispersion paints and varnishes consist of polymer resins and water. Today, such paints are becoming more and more popular, because they have many advantages.
The following main advantages of water-soluble coloring compositions can be highlighted:
- When this coating dries, it becomes very resistant to low temperatures.
- Water-soluble paints can be either glazing or covering.
- The compositions can also be either glossy or matte.
- They do not have a negative impact on human health.
- The color of the coatings can be changed by tinting.
- Such coatings are resistant to liquids and vapor permeable.
- They are able to become dry in the shortest possible time.
On organic solvents
Previously, consumers used mainly paints and varnishes based on organic solvents, but now they are inferior in popularity to more natural water-soluble coloring compositions.
Organic solvent paints have become less popular because they:
- takes a long time to dry;
- have an unpleasant pungent odor;
- fire hazard;
- are toxic.
However, such paints and varnishes also have advantages. Compared to soluble polymer coloring compounds, they are more inexpensive. The film that appears on the base after the paint has hardened has remarkable water-repellent properties. Products painted with such compositions are suitable for use in rooms with high humidity.
At the same time, the wooden surface does not “breathe”, since the coating does not have the ability to pass air. However, this property is not mandatory for furniture items. However, the wood must be absolutely dry, otherwise the paint will peel off over time.
Painting furniture made from different materials
Solid wood boards differ in structure and require an individual approach to coloring. Old children's plywood furniture and kitchen stools are coated with acrylic paint, and after drying and decorating, they are treated with acrylate varnish. After sanding, objects laminated and coated with paper-resin film are primed with a polyurethane-based compound or automotive primer in a can. Then they are painted with a velor roller with compositions based on polyurethane and alkyd, and epoxy enamels. An old Romanian wall can be updated with chalk paint without removing the varnish layer. The surface must be degreased, primed, and leveled with a sanding sponge. If the base differs slightly from the paint tone, two coats are sufficient. To radically change the shade, you will have to paint the furniture 3-4 times. To maintain velvety and color, the coating is treated with wax.
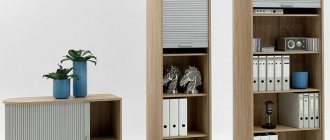
Painting chipboard furniture
Chipboards are well painted with alkyd and acrylic enamels. After drying, a dense film with water-repellent properties is formed. The old layer of chipboard is difficult to remove; it is advisable to use a gel remover. After cleaning, you need to create a rough surface with P150, 180 paper. For reliability and economy of enamel, apply 2 layers of primer.
Cabinet painting workshop
You will need:
- Screwdriver Set;
- 3-4 sheets of fine sandpaper;
- white spirit, rags;
- brushes with artificial bristles, 2 pieces;
- tray;
- fur roller 3 pieces;
- masking tape;
- can of OTEX Akva primer;
- 2 cans of acrylic paint.
The doors must be removed from their hinges and placed on a table or bed covered with film. The surface is sanded with light circular movements without removing the laminated layer, and thoroughly degreased. The primer is applied with a roller, the ends are treated with a small brush. To obtain a uniform surface, chipboard should be painted in 2 layers. To make them thin, the roller rolls out in a tray. It takes an hour to dry one layer.
The paint dries quickly, but it is better to wait 2 days before final assembly of the cabinet.
Painting MDF furniture
The choice of paint and surface treatment depends on the type of decorative coating on the wood board.
Panels are produced in four types.
| Finishing | What paint is suitable | How to process | |
| 1 | Laminated | Polyurethane and alkyd enamels | Melamine impregnation is removed with coarse, then fine sandpaper without pressing hard so as not to crumble the slab |
| 2 | Veneered | Oil, alkyd paints, varnish, stain | The old varnish is removed with fine-grained sandpaper P240 very carefully so as not to damage the pattern of the wood cut. |
| 3 | Painted | Polyurethane, oil, alkyd, acrylic enamels | The base is sanded and sanded |
| 4 | Laminated (lined with paper-resin film) | Alkyd, polyurethane paints, alcohol- and oil-based varnish | The paper layer and glue are completely removed with sandpaper or an iron through a cloth |
Painting natural wood furniture
It is easier to work with natural wood; all types of cleaning, paint, and furniture varnish are suitable. Wood often develops cracks and chips that need to be carefully treated. Defects are sanded so that there are no burrs, primed, and puttied. After applying the primer, a pile rises on the wood, which is sanded with R-320 sandpaper. The surface is cleaned with a rag moistened with solvent, primed, painted or varnished. Well-preserved furniture can be painted with tinting varnishes and stains. Antique cabinets and bedside tables made of boards are covered with opaque enamels. It is convenient to paint small objects with acrylic-based aerosols in cans. Quick-drying nitro enamels give a beautiful gloss, but are toxic and are not suitable for work in an apartment.
How to paint a pine bed
A bed made of solid pine is chosen by lovers of eco-friendly, natural materials. Pine has a pleasant appearance, relatively low cost, and products made from this type of wood will suit almost any interior. Another advantage of pine products is that you can paint them yourself to give the desired look to your bedroom. When purchasing a new smooth sanded pine bed, you can increase the durability of the surface yourself by simply coating it with oil, varnish or wax. There are a number of general rules and steps on how to paint a pine bed, which are presented below.
If the bed has complex elements and difficult-to-paint areas, disassemble it and paint the parts separately. It is allowed to paint the entire product if the design of the bed is quite simple. Lay newspapers, film or any other protective covering on the floor, provide access to fresh air and ventilate the room during the process.
If you want to preserve the texture of the wood, you will need stain and/or varnishes. They will give the desired shade, and the natural grain of the wood will remain. To repaint a bed a different color, you will need paints that will hide the natural grain of the wood. The tools you will need are gloves, a roller, a brush for painting small parts and corners, a paint tray and sanding paper.
2. Surface cleaning
Before painting, the old surface must be prepared, cleaned of the previous coating, grease or dust, putty on uneven surfaces and sanded. It is advisable to deresin surfaces made of coniferous wood with a special solution; the resin may interfere with further absorption of the coatings. Since we're looking at the process of painting a new pine bed with a smooth sanded surface, we're omitting these steps, but otherwise they're required. To prepare our bed, just wipe the surface with a damp cloth.
Stain (stain), in addition to giving the wood tone and expressiveness, protects against rotting and pests, improves the moisture resistance of the material and the service life of the product as a whole. There are alcohol, water, acrylic, wax and oil stains. They all differ in their properties and have application features, so carefully read the characteristics of the substance before purchasing.
The stain is applied along the wood fibers; it can be used as a base before further painting the bed, or as an independent coating if you want to preserve the natural pattern of pine. After application, the stain must dry completely. If you are using stain as a stand-alone coating, you can add a layer of varnish on top to add shine.
In the case where the stain is used as a basis for further painting and if there are recommendations from the bed manufacturer, the next step is to apply a primer. It will reduce paint consumption and improve surface adhesion. When choosing a primer, check with your paint retailer to see if it is suitable for pine. Wait until the primer is completely dry before applying the next coat. The dried primer can be lightly sanded with sandpaper.
It is important to consider the compatibility of all coating layers, so it is recommended to choose a primer, paint, and varnish from the same manufacturer that match each other
When choosing paints and varnishes, give preference to safe, environmentally friendly compositions, use odorless paint. Acrylic paints are the most popular and health-friendly option, convenient for home use. Alkyd paints can emit toxic compounds, oil paints take a long time to dry and are more suitable for painting in a professional environment than at home. Do not try to apply one thick layer of paint; it is much more effective to apply the composition in thin layers on top of each other, allowing each to dry.
Varnishes are used to fix the result over paint or on their own to add shine and tint over a previously prepared product. Varnishes can be made on a water-based, polyurethane, acrylic, or alkyd base. There are also resin, oil, alcohol and other varnishes. Choose a varnish that matches the other layers of the coating and the type of wood of the bed, carefully read the information on the packaging and consult with the seller of paint and varnish products.
Features of repainting furniture white
Dark wood is difficult to repaint white or lighter shades. But wood can be bleached well with bleach. In 5 liters of water you need to dilute 1 kg of lime and 125 g of soda. Surfaces are treated with a roller or spray, after 5 minutes they are neutralized with vinegar. It is convenient to treat small items with a 30% hydrogen peroxide solution and wipe with vinegar after bleaching. For sale is a professional wood bleach with ethanol acid, which brightens red and yellow surfaces, dirt, and blue stains. After bleaching, the tone is evened out and a uniform coating is obtained.
To paint furniture to look like bleached oak, apply a thin layer of enamel with a roller or spray. Using a wide flat brush, parallel strokes are applied to the dried base in only one direction. After drying, sand and coat with water-based varnish or wax.
Factors influencing the choice of coating
When it comes to restoring old furniture, many consumers are faced with the problem of choosing the right paint. A wide variety of products with different technical characteristics does not always allow you to choose the correct and most optimal composition. To ensure that wood products are reliably protected and last a long time, when purchasing material you should pay attention to the following factors:
- Operating conditions - if the interior items will be used in wet areas, it is necessary to buy moisture-resistant paint for wooden furniture.
- Type of wood – for the manufacture of light furniture, hardwood is usually used; for massive cabinets and cabinets, coniferous varieties are more often used.
- Surface preparation methods - the choice is made based on whether the furniture can be repainted and how the base will be prepared.
If you find it difficult to choose a paint, when you contact the TBM-Market store, our specialists will provide detailed advice on any product and help you choose the material according to your needs.
Decorative painting of furniture
Traces of time give sideboards, chests of drawers, and tabletops an antique look. Aged items complement interiors in Provence, fusion, and shabby chic styles. To imitate shabbyness, wood or chipboard is coated with chalky or matte paint, then abrasions are made in the corners, near the handles, with fine sandpaper.
To create a buffet or chest of drawers in the Provence style, individual places on the facade, corners, and decor are painted with brown or blue enamel and, after drying, rubbed with wax. The entire surface is painted 2-3 times with white enamel. Wax-coated fragments are wiped with a knife or spatula.
To highlight the beautiful texture of the wood, the facades are covered with two shades of stain. A light background is created with a composition based on water or alcohol, which penetrates deeply into the fibers. Then a dark oil-based stain is applied, settling in the recesses.
It's easy to achieve the patina effect yourself. The facade is painted with acrylic enamel, for aging, sanded in some places with sandpaper and polished with a rag. The second layer is painted with enamel of a different shade, and again sanded. The furniture is coated with matte acrylic varnish.
Using plastic stencils, self-adhesive paper, and lace napkins, designs and ornaments are made on the base color. The stencil is secured with tape so that the image is clear, and the paint is sprayed with a spray bottle.
Cabinet and children's furniture, painted with bright thixotropic paints in different colors, looks modern. Masking tape will help create zigzags and geometric patterns.
Benefits of DIY painting
Painting furniture made from chipboard involves a lot of positive aspects:
- accessibility (after all, for this you do not need to buy new furniture, which is expensive, and also contact specialists who charge a lot of money for their services);
- simplicity of the process (if you strictly follow the special instructions below, you can achieve a result that will exceed absolutely any expectations);
- originality of design (with the help of furniture painted with your own hands, you can update and enliven the interior, making it more original);
- creative process (indeed, painting chipboard products allows you to realize your potential and give free rein to your imagination, emphasize your individuality and demonstrate excellent taste to family members and guests).
All these benefits can be achieved only if you follow a certain algorithm of actions.
Useful tips
A few tips will help you achieve an even coat and quickly paint large surfaces.
- Study the furniture material, imagine what effect you want to achieve, calculate the area to be painted. The packaging shows an approximate calculation of paints and varnishes.
- To better navigate the store, you can look at paints on websites to better learn about their properties, hiding power, and drying times.
- After sanding, carefully inspect the base from different angles; a missed scratch or dent will be very noticeable after painting.
- Apply the paint in long strokes with even pressure. To even out the freshly applied layer, lightly go over it with the tip of the brush.
- Start painting the doors from the ends, then move to the base.
How to paint children's furniture: possible options
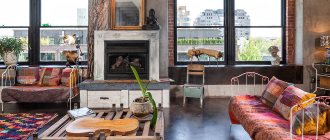
The reason for repainting old wooden furniture may be not only the need to update the coating, but also the desire to change its appearance. Even an old, out-of-fashion Soviet or Romanian wall can fit into a modern room and become a functional and stylish part of the interior if it is properly redesigned. First you need to decide what the new interior of the room will be like and what style it will be in.
Look at examples of furniture arrangement using an old wall. Here it not only fits into the overall color scheme of the room, but also looks quite modern and relevant. By the way, both wooden walls from the examples in the photo were repainted.
Look for inspiration in examples and choose new colors and decor to update old wooden furniture.
Painting wooden furniture, like any other job, has its own specifics and tricks. The tips below will help you not only paint furniture faster, but also save paint while achieving high-quality results.
Buy products - varnishes, paints, putties, primers - from the same manufacturer. This guarantees their compatibility, since manufacturers of finishing materials usually specialize in certain types of surfaces and take into account their operating conditions. This will simplify the selection of suitable paint and other products. Experiment with shades and color combinations. A well-chosen color scheme refreshes the room and visually enlarges it. In interiors of different styles, contrast is a very popular technique: furniture is painted in a color that contrasts with the walls. Before you start applying paint to wooden furniture, prepare a roller and several brushes of varying thicknesses. A roller is useful for painting large flat surfaces, but small relief parts - furniture ends, trim, convex decor - are best painted with brushes. Use masking tape to protect areas that have already been painted and dried from paint splatter. The solvent will not help in this case, but will only ruin the base layer of paint. While painting, wear a respirator mask or ensure that the room is well ventilated
Many of today's wood furniture paints are odorless and non-toxic, but it is always best to be careful when working with construction chemicals.
Varnish coating
Used to give an elegant look to products. There are several types of it. Using stain, you can change the color of the varnish, giving it the desired shade. The drying time of this substance is not long. Care should be taken when carrying out work. What are the advantages of varnish:
- protects furniture from wear;
- gives the paint a deeper shade;
- enhances gloss and matte finish;
- the design becomes pleasant to the touch and looks aesthetically pleasing;
- creates shine.
Pay attention to: Painting walls in the kitchen: choosing paint, step-by-step instructions and painting options
You can apply varnish only when the paint is completely dry. Apply at least two layers (in some cases three), using a brush. The walls and bases of the cabinet, varnished furniture, wear out less and do not become damp.
Attention! A pattern or ornament on the surface is prepared in advance. Immediately before applying the varnish coating.
The varnish coating will protect the surface from damage