Crocheting a sofa cover
Any knitted items, be it rugs, runners, sofa covers, armchairs, chairs, evoke certain associations associated with childhood. I remember the moments when, when you come to visit your grandmother, you see knitted products - napkins, rugs and curtains.
Beautiful soft crocheted bedspread in soothing colors
This is not just beautiful, but also practical, because this is how furniture was previously preserved from abrasion. Now the fashion for hand-knitted decoration items is returning, such things are becoming popular.
An unusual bedspread made of small multi-colored crocheted ornamental squares
Crochet sofa cover: design and manufacturing ideas with photos
Any knitted items, be it rugs, runners, sofa covers, armchairs, chairs, evoke certain associations associated with childhood. I remember the moments when, when you come to visit your grandmother, you see knitted products - napkins, rugs and curtains.
Beautiful soft crocheted bedspread in soothing colors
This is not just beautiful, but also practical, because this is how furniture was previously preserved from abrasion. Now the fashion for hand-knitted decoration items is returning, such things are becoming popular.
An unusual bedspread made of small multi-colored crocheted ornamental squares
The benefits of making it yourself
A cozy handmade blanket for a sofa with an interesting pattern based on 1 base and several additional colors
Knitting with your own hands is a fascinating and interesting process, it has many advantages.
| 1 | Such things are in great demand. You can give them as a gift or sell them, people are happy to buy them, sparing no expense |
| 2 | They add warmth and comfort, creating a unique atmosphere in the home. |
| 3 | You can independently create not only original things, but also toys for the delight of children, as well as various accessories, for example, handbags, jewelry |
| 4 | By spending a small amount on yarn, you can independently knit not only clothes, but also lampshades, pillows, bedspreads, capes, and runners. While in stores such things are not cheap |
| 5 | This type of needlework can be mastered by absolutely anyone, even a child. |
| 6 | You can, if you want, of course, turn this activity into your main source of income by building a business on it. Knitted items will never go out of style |
| 7 | These products are high quality and can last for years. |
Knitted blanket “Wave” for a sofa or bed
Deciding on design and construction
A beautiful small blanket knitted with love with your own hands
Knitted capes can cover the back of a sofa or chair and armrests, or just the seat and back - at your discretion. When choosing the color of the threads, take into account the interior of the room, or, using a catchy color scheme, refresh it by creating a certain contrast.
Original unique blanket knitted for a corner sofa
For example, for a room in white tones, capes made of blue or golden threads are amazingly suitable, for light brown tones - green and dark red colors.
For styles: boho, Provence or country, a patchwork style bedspread with original floral motifs and fringe is perfect
Hand-knitted items are used in interiors of different styles, be it country or Provence. Cotton capes in neutral tones are ideal for modern style.
For modern modernism or minimalism, a bedspread of restrained colors and not too pronounced texture is suitable
For a classic style, it is better to use metallic yarn.
A crocheted square blanket is a universal item that can harmoniously combine with almost any style in the interior.
There are many patterns and patterns for knitting, both simple and complex. Choosing the right one, whether you are a beginner knitter or an experienced one, will not be difficult. If you like to crochet, knit capes from squares.
Interesting design of a blanket made from granny squares of different sizes
It's not difficult, even a beginner can do it. Knit them in any way you like. Having mastered knitting squares, then move on to complex patterns. For work, you can also take leftover yarn of various colors, so you can knit capes in the patchwork style.
A small rectangular blanket will allow you to hide on your favorite sofa and watch your favorite TV series.
Furniture covers are mostly rectangular in shape. Their dimensions depend on the length and width of the sofa, and also take into account the height of the legs. It is more difficult to knit throws on a corner sofa. They will be irregular in shape; you should carefully calculate the dimensions. In this case, it is better to divide the sofa into two different parts and determine the dimensions separately. Then choose a method for connecting two connected canvases.
On a note. Any needlewoman can knit such a thing as a cape on her own. There are many magazines on sale that contain diagrams and patterns. Also visit handicraft sites on the Internet. This can be a model connected by a whole canvas or individual elements - squares, triangles, circles.
An interesting combination of floral elements and squares for a bright handmade summer bedspread
A blanket or modern throw is considered the ideal solution for any sofa.
Required materials and tools
Materials and tools needed for manual work
For the sofa cover you will need:
- about 11 skeins of yarn, 100 g each (100% acrylic, 100 g/210 m);
- if you decide to knit for chairs, then another 4 skeins per cape
- a complete motif requires approximately 55 g of yarn;
- Along with decoration you need about 2 kg of yarn.
For knitting a cape, a hook of medium thickness, for example, No. 5, is better suited.
Multi-colored patterns with knitted patterns
Manufacturing process: step-by-step instructions
Patterns of knitted squares for beautiful and original bedspreads
Let's start knitting the first fragment
Let's look at how to make a cover for a standard sofa. The pattern is simple, for example, squares.
Ready green square for our blanket
- They need to be knitted in 40 pieces, then tied with double crochets. We begin to knit the second fragment - a triangle. The finished triangle is yellow.
- They are connected when knitting the last row. We connect our parts - insert a hook through the back loops of both parts to create almost invisible connections
- If you knit from leftover yarn, you need to have a combination of colors. Connect the next pair of squares
- For the cape you need to knit 18 full hexagonal fragments and 4 half fragments.
- For the chair – 6 full fragments and 4 halves. The diameter of the steamed complete fragment, knitted according to the pattern in circular rows, should be about 40 cm.
- Finally, make the brushes. One will need 30 threads, each 30 cm in length. When finished, the length will be 15 cm. For a sofa cover you need to make 21 pieces, if for an armchair - then 9 pieces for each.
Connected elements from the wrong side
Connected elements from the front side
Attention! When choosing yarn by color, be guided by the general situation, the main thing is that everything is harmonious. Take scraps of various yarns you have at home to work with.
Ready-made multi-colored bedspread “Kaleidoscope”
The final stage is decoration
Soft, cozy and incredibly beautiful, this crocheted bedspread will be the perfect warm refuge for you to relax after a working day.
Here, show all your imagination and bring all your ideas to life. This, of course, can be done by experienced craftswomen. Beginning needlewomen who are not confident in their use of knitting tools can “disguise” their creation by choosing “grass” or boucle yarn for work, thereby brightening up all the unevenness and imperfections in the finished product. An original item can be created from thick yarn with a loosened knitting, and they knit quite quickly.
Capes made from multi-colored threads look great. Take one color as a basis, choosing halftones for it. The main product can be trimmed with fringe, tassels, a jagged edge, a voluminous canvas - there are many options.
Whatever model you choose, it will perfectly refresh your interior and bring a feeling of real home comfort.
50 beautiful and original hand-knitted blankets and capes:
We recommend articles on the topic
The benefits of making it yourself
A cozy handmade blanket for a sofa with an interesting pattern based on 1 base and several additional colors
Knitting with your own hands is a fascinating and interesting process, it has many advantages.
| 1 | Such things are in great demand. You can give them as a gift or sell them, people are happy to buy them, sparing no expense |
| 2 | They add warmth and comfort, creating a unique atmosphere in the home. |
| 3 | You can independently create not only original things, but also toys for the delight of children, as well as various accessories, for example, handbags, jewelry |
| 4 | By spending a small amount on yarn, you can independently knit not only clothes, but also lampshades, pillows, bedspreads, capes, and runners. While in stores such things are not cheap |
| 5 | This type of needlework can be mastered by absolutely anyone, even a child. |
| 6 | You can, if you want, of course, turn this activity into your main source of income by building a business on it. Knitted items will never go out of style |
| 7 | These products are high quality and can last for years. |
Knitted blanket “Wave” for a sofa or bed
How to crochet a cape with your own hands
Before starting work, you need to decide on the shape of the future product. It can completely cover the entire sofa or without armrests; it can be intended only for the seat or, conversely, only for the back of the sofa.
Knitting with your own hands is a fascinating and interesting process.
In addition, the cape may not be attached to the furniture in any way or may have an elastic band around the perimeter. An option with Velcro fastening is also possible. You also need to choose a fabric and color that suits your interior.
High-quality knitting threads provide good results.
Some designers advise, on the contrary, to play with contrast - for example, for a white interior, knit a blanket from gold or blue yarn, and for a light brown interior, use dark red or green threads.
A modern throw is considered the ideal solution for any sofa.
Preparing for knitting
Search online on websites or forums for patterns for crocheting a sofa cover and you will see that you can use different patterns. Their choice is quite wide - from the simplest to the quite complex. Therefore, both experienced and novice needlewomen will be able to choose an ornament that is suitable for their level of skill.
For crocheting, the most universal pattern is considered to be squares. Firstly, it is not difficult and can be performed by a person with any level of skill and technique. And secondly, this pattern is suitable for interiors of most styles.
For modern modernism or minimalism, a bedspread of restrained colors and not too pronounced texture is suitable.
First, we recommend trying to knit a rectangular-shaped throw for a standard sofa.
Important! When you measure the sofa, take into account its height along with the legs.
A more complex option is a cover for a corner sofa. With this option, we recommend knitting two rectangular parts first, and then connecting them.
Knitting motifs are the most popular.
If you compare some description for a sofa bedspread with crocheting patterns for a chair cover, you will see that the difference is only in size.
Knitting technology
Let's look at how to crochet a sofa cover with a pattern of squares for a regular rectangular sofa in stages:
- Choose a type of yarn. In our example, it will be 100% acrylic with a nominal yarn thickness of 100 g / 210 m;
- More beautiful products are obtained when using multi-colored threads, so for our cape we will take threads of two colors - green and yellow;
- Calculate the required number of skeins. For our cape you will need 14 skeins of 100 g of each color;
- Choose a suitable crochet hook. To make a cape, it is best to use hooks of medium thickness;
- Tie 32 squares according to the pattern (16 pieces of the same color), tie each of them around the perimeter with single crochets. The number of squares (motifs) depends on the size of the sofa and the size of the side of the motif itself. In our case, its side is 25 cm. Thus, the length of the cape will be 8 motifs, and the width will be 4 motifs;
- With exactly the same pattern, you need to knit 4 triangles of each color with the side of the base of the triangle equal to the side of the square;
- It is necessary to connect all the motives with each other. To do this, fold them in pairs with the right side out and connect them using a single crochet hook, resulting in a beautiful ribbed seam on the front side. To connect with an invisible seam, fold the motifs with the right sides inward and connect them with half-columns. Combine the triangular motifs with the squares at the bottom of the cape, forming a scalloped edge.
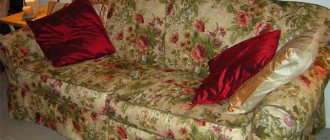
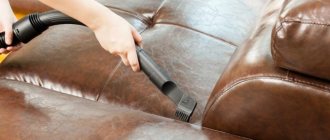
A cover for a sofa or chair not only decorates the furniture, but also protects its upholstery from damage, dirt and wear.
Exactly the same principle is used to crochet a chair cover. This completes the main part of our bedspread.
Final stage
At the final stage of work, it is necessary to decorate the resulting cape. For example, you can decorate it with fringe or make decorative tassels.
Decorative tassels will decorate your blanket.
In our example, triangles were made at the bottom of the cape, to the tops of which we will attach tassels made from threads. Making fluffy and short tassels is very simple. To do this, take a regular book and wrap yarn across it. On one side of the book, cut the yarn, and on the other side, pull the resulting bundle with thread and tie it beautifully.
There are many patterns and patterns for knitting, both simple and complex.
When knitting, you can use bouclé threads or grass yarn. Their special texture will help hide unevenness or mistakes made while knitting. This is especially useful for beginner knitters.
Deciding on design and construction
A beautiful small blanket knitted with love with your own hands
Knitted capes can cover the back of a sofa or chair and armrests, or just the seat and back - at your discretion. When choosing the color of the threads, take into account the interior of the room, or, using a catchy color scheme, refresh it by creating a certain contrast.
Original unique blanket knitted for a corner sofa
For example, for a room in white tones, capes made of blue or golden threads are amazingly suitable, for light brown tones - green and dark red colors.
For styles: boho, Provence or country, a patchwork style bedspread with original floral motifs and fringe is perfect
Hand-knitted items are used in interiors of different styles, be it country or Provence. Cotton capes in neutral tones are ideal for modern style.
For modern modernism or minimalism, a bedspread of restrained colors and not too pronounced texture is suitable
For a classic style, it is better to use metallic yarn.
A crocheted square blanket is a universal item that can harmoniously combine with almost any style in the interior.
There are many patterns and patterns for knitting, both simple and complex. Choosing the right one, whether you are a beginner knitter or an experienced one, will not be difficult. If you like to crochet, knit capes from squares.
Interesting design of a blanket made from granny squares of different sizes
It's not difficult, even a beginner can do it. Knit them in any way you like. Having mastered knitting squares, then move on to complex patterns. For work, you can also take leftover yarn of various colors, so you can knit capes in the patchwork style.
A small rectangular blanket will allow you to hide on your favorite sofa and watch your favorite TV series.
Furniture covers are mostly rectangular in shape. Their dimensions depend on the length and width of the sofa, and also take into account the height of the legs. It is more difficult to knit throws on a corner sofa. They will be irregular in shape; you should carefully calculate the dimensions. In this case, it is better to divide the sofa into two different parts and determine the dimensions separately. Then choose a method for connecting two connected canvases.
On a note. Any needlewoman can knit such a thing as a cape on her own. There are many magazines on sale that contain diagrams and patterns. Also visit handicraft sites on the Internet. This can be a model connected by a whole canvas or individual elements - squares, triangles, circles.
An interesting combination of floral elements and squares for a bright handmade summer bedspread
A blanket or modern throw is considered the ideal solution for any sofa.
Materials and colors
Most often, synthetic raw materials are used for sewing. Artificial fibers give the fabric elasticity and strength, and this is very important for the manufacture of products of non-standard shape. In addition, such fabrics are usually quite resistant to dirt and have increased strength. Natural materials also have their advantages, for example, such fabric breathes, does not cause allergies, and gives a pleasant tactile sensation.
Whatever option you choose for sewing, take into account the specifics of further care. It is best to wash covers in the “delicate” washing mode. Before placing your copy in the washing machine, turn it inside out. Remember that these covers get dirty quickly, the material must withstand numerous treatments, however, synthetic fabrics fade faster when washed frequently.
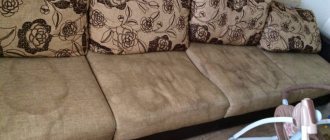
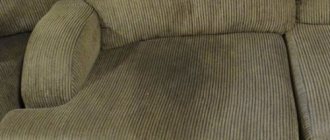
Anti-vandal fabrics deserve special attention. Most often they are chosen by cat owners. Animal lovers know that a cat's favorite place on the sofa is the armrest. It is comfortable to lie on and sometimes sharpen your claws. Covers made of anti-vandal materials cope with exactly this task.
They have increased strength and density, and the hooks are invisible due to their resistance to thread pulling and tearing. This fabric does not dry out or wear out for a long time, as it is impregnated with Teflon coating or adhesive tape. This protective impregnation prevents the absorption of moisture and fat and allows air to pass through well. The sliding effect prevents the cat from damaging the surface of the armrest with its claws.
Anti-vandal materials are non-woven and woven. The first category includes flock, relaxation, artificial suede, and the second group includes chenille, microfiber, jacquard, tapestry. The first option has a longer service life, washes well, and is pleasant to the touch, so it is more popular when sewing covers for armrests.
Separately, it is worth mentioning the possible colors of the covers. When choosing a shade, focus on the overall color scheme of the room’s interior. Armrests should be made to match the finish and decorative details. If children and animals live in the house, then give preference to dark covers or products with a pattern.
Most often, covers for armrests are made from a material that matches the main upholstery, but lovers of everything new and modern can try sewing covers for armrests in a contrasting color. For example, a black sofa with white armrests will look beautiful, and in an eco-style interior you can choose beige or brown covers for a green sofa.
Required materials and tools
Materials and tools needed for manual work
For the sofa cover you will need:
- about 11 skeins of yarn, 100 g each (100% acrylic, 100 g/210 m);
- if you decide to knit for chairs, then another 4 skeins per cape
- a complete motif requires approximately 55 g of yarn;
- Along with decoration you need about 2 kg of yarn.
For knitting a cape, a hook of medium thickness, for example, No. 5, is better suited.
Multi-colored patterns with knitted patterns
Crocheted chair covers
Such elegant crocheted capes are suitable for leather upholstered furniture or other beautiful upholstery.
I have selected several patterns of beautiful chair covers made using the fillet knitting technique. I will make a small explanation about them.
Fillet knitting is such a simple and beautiful creativity, you just need to know some nuances and rules that you can see.
I just like such counting schemes, just like , the principle of reading schemes in them is the same.
The fillet technique produces especially elegant and delicate products, and so are the crocheted chair covers.
It is better to use cotton or linen as a material. Hook No. 1.5.
Chair cover with roses and butterfly
This cape pattern is quite simple.
A small empty cell in it: 1С1Н, 2ВП, 1С1Н.
Long empty cell: 1С1Н, 5ВП, 1С1Н.
Filled cell: 3C1H.
Knitting a cape starts from top to bottom, if you read the pattern. The first 34 rows are knitted straight, and in the next rows, decreases are made on both sides according to the pattern.
The two toes in the last two rows are knitted separately.
You can even knit such a napkin; it will turn out to be a very interesting napkin with an unusual shape.
Crochet butterfly cover for a chair
A very original cape: a butterfly knitted with a fillet pattern, in it by itself, without an additional background.
The pattern is designed for knitting napkins with this pattern. For a chair cover, it will be enough to knit one half, and for a napkin, naturally, two identical parts.
The diagram is quite large, you can open it by clicking on.
First, we knit the two lower wings separately (18 rows each).
In the 19th row we combine the knitting into one fabric. To do this, we connect the wings with 15 chain stitches and continue crocheting the chair cover according to the pattern.
From the 65th row we decrease 6 stitches in every 6th row.
Manufacturing process: step-by-step instructions
Patterns of knitted squares for beautiful and original bedspreads
Let's start knitting the first fragment
Let's look at how to make a cover for a standard sofa. The pattern is simple, for example, squares.
Ready green square for our blanket
- They need to be knitted in 40 pieces, then tied with double crochets.
We begin to knit the second fragment - a triangle
Finished yellow triangle
We connect our parts - insert a hook through the back loops of both parts to create almost invisible connections
Connecting the next pair of squares
Connected elements from the wrong side
Connected elements from the front side
Attention! When choosing yarn by color, be guided by the general situation, the main thing is that everything is harmonious. Take scraps of various yarns you have at home to work with.
Ready-made multi-colored bedspread “Kaleidoscope”
We crochet chair covers: diagrams and descriptions
Handicrafts and chairs did not escape attention. How beautiful they are with the capes. It's just a holiday and why doesn't every home decorate its chairs with such exquisite knitted items. Even old wooden models with such wonderful capes can shine again. Several models for chairs that a craftsman can make for himself and his loved ones. Descriptions and diagrams accompany each product.
Crochet chair back cover
Charming and such bright chairs. This flower is just something. Lace adds tenderness. You immediately see a happy family in this house, rich in children's laughter. No one will refuse to have breakfast next to such a flower garden.
To work you will need:
The base is the colored fabric of the cape. It is made with pattern number 1. These are openwork elements. It is necessary to measure the back of the chair and the height. Knit the fabric along the width of the back and 2 heights. Fold the product and sew with side seams. Make the flowers according to the given pattern in white.
Then, along the edge of the fabric, without pulling it too far, knit lace.
There is little left: moisten and dry, smooth the product. You can decorate the chairs and drink tea.
Crochet chair seat cover
Elegant seat covers. Capes with tassels. Each tassel adds weight to the product, and it does not slide off the chair.
To work you will need:
- red cotton yarn;
- hook No. 3.
Attractive models become even more attractive after studying the pattern. This is an ordinary fillet mesh, on which lush columns are then created (bumps along the diagonal of the figure). Two flowers, one in the center with rather lush leaves and a large flower. These flowers are created using single crochets. Therefore, they have practically no holes. Separately create flowers and mesh, then sew them on and decorate with tassels.
Important!
The brushes should be heavy. You can put metal balls at the base of the brush.
One-piece chair cover
The case is in dark blue with a common pattern. A very convenient product. Knitting it is quite simple. And you can easily be convinced of this after reading the description.
To work you will need:
- It is necessary to measure the width of the seat and backrest. In this chair model, these indicators are the same.
- You need to cast on air loops of the required width.
- Next, knit according to the pattern - these are simple double crochets.
- It is necessary to knit the length from the hem along the seat, then through the seat, across the back and to the hem at the back. That is, the canvas should spread across the entire chair.
- Separately, cast on air loops equal to the width of the hem and knit three sides of the hem using the same pattern.
- Sew along the sides and back. So the one-piece chair cover is ready. Two parts and one long seam and the product is ready.
For the ornament, you can choose any design you like.
The final stage is decoration
Soft, cozy and incredibly beautiful, this crocheted bedspread will be the perfect warm refuge for you to relax after a working day.
Here, show all your imagination and bring all your ideas to life. This, of course, can be done by experienced craftswomen. Beginning needlewomen who are not confident in their use of knitting tools can “disguise” their creation by choosing “grass” or boucle yarn for work, thereby brightening up all the unevenness and imperfections in the finished product. An original item can be created from thick yarn with a loosened knitting, and they knit quite quickly.
New thing for a stool
Stools are an excellent solution for cottages and country houses. They are light, portable and do not take up much space, and paired with a beautiful cape, they are also a great addition to the interior. For beginners, the technique may seem complicated, but everything comes with experience, and for needlewomen who have dealt with crocheting, everything will be easy.
To get started, you will need the following materials: black, gray and blue yarn, take two skeins of 100 g, hook No. 3.5, scissors and the stool itself.
Start knitting with blue yarn, according to the pattern:
On the third row you can switch to gray. Do not knit the square completely, but only on both sides.
From the fifth to the ninth row, knit them in black, similar to the previous technique.
Alternate rows and colors according to the pattern.
When you reach the twelfth row, only a “three” of double crochets will be tied in the corners. This means it's time to start knitting the border.
Weave arches from air loops according to the pattern in two rows.
If desired, you can further decorate the cape with tassels, which we will make from blue yarn. Cut pieces of equal length from a skein of thread.
Now we fix the brush into the arch of the cape, as shown in the photo.
That's all. Your ottoman is fresh, beautiful and ready to use. In this way you can make capes on any surface, the main thing is to correctly calculate the required number of loops.
Color selection
In order for your bedspread to harmoniously match the color of the room, you should take into account the following details:
- First of all, pay attention to the combination of shades of curtains and carpets; the color of the bedspread should match them
- For large rooms, a red or other bright blanket is perfect
- For a cozy and comfortable environment, choose shades of warm tones.
- If the living room is sunny, give preference to green and blue colors.
When knitting yourself, it is recommended to make products of two different colors from different sides. This will allow you to change the exterior of the room to suit your mood.
Openwork cover for a computer chair
A computer chair on wheels that is comfortable for working, usually has a separately attached back and seat. You will need two covers for it. You can take as an example a motif called “granny square” and knit an item based on it.
The sequence of knitting an openwork cape-cover based on a “granny square”:
- Close 5 VP into a ring SS.
- 3 VP for lifting, 2 treble dc in the ring, 2 ch, 3 treble dc in the ring, thus knit 4 groups of loops of 3 treble dc. Finish row 1 VP and close St.BN to form an arch.
- 3 VP for lifting, 2 St. CH in the arch. Work into the next arch 3 dc, ch 2, 3 dc. Then 3 dc, 2 ch, 3 dc in the next arch and so on. Close row 1 VP and St.BN.
- 3 VP for lifting, 2 treble dc in the arch, 3 treble dc in the gap between groups of 3 treble dc 3 rows, then tie 3 treble dc, 2 treble dc, 3 treble dc into the arch. Then continue in the same way until the row is completed. Close row 1 VP, 1 St.BN.
- Knit in this way to the desired fabric size.
It is necessary to knit two openwork square fabrics according to the size of the back and seat, with an allowance on the reverse side of approximately 15 cm. Using a pin, you need to insert a linen elastic band of a suitable color into the holes formed along the edge of the motifs. Place the knitted covers on the computer chair and tighten the elastic band. The main thing is that the product tightly covers the surface of the chair. Cut the elastic and sew the ends together.
Steaming can be done directly on the chair so that the shape of the cape exactly matches the design of the back and seat. Even a novice craftswoman can easily make such a case. For more experienced people, you can take a pattern of an openwork napkin or tablecloth.
We collect air loops and close them into a ring
We knit double crochets and form an arch
By analogy, we knit groups of loops until the desired size is obtained.
Add a thread of a different color
We knit two fabrics: for the seat and the back. We put a pin on an elastic band.
Along the edge of the fabric we thread the elastic through the openwork holes
Openwork cover for a computer chair is ready
Crochet. Armrests for sofas and armchairs
Sunday, February 09, 2014 16:42 + to quote book
Crochet. Armrests for sofas and armchairs
A cozy idea for sofas and armchairs with wide armrests. These crocheted covers can be removed and washed from time to time, which is much easier than cleaning upholstery. After all, these are the places, the armrests, that get dirty the fastest. If you think the idea is too bright and colorful, the armrests can be knitted with yarn of the same color, matching the upholstery of the sofa or armchairs, or use a combination of several threads, the colors of which will complement the interior (for example, match the carpet or curtains). You can also knit pillows or a blanket with the same pattern and using the same yarn and you will get a set. Rate the idea, it is worthy of your attention) I think you understand the main pattern? The fabric is knitted in rapport: 3 double crochets + 2 chain stitches, and see the pattern for the square below. Well, as for the yarn itself, it is advisable to take it thicker
This pattern uses only chain loops and double crochets.
Models and size
In order to make a product yourself, you must first determine what size and shape your blanket will be.
When choosing a size, you should take into account the shape and dimensions of the upholstered furniture; the bedspread should be knitted a little larger than the sofa itself. The blanket can be knitted in the following shape:
- Round
- Square
- Rectangular
- For a corner sofa
You can also knit a blanket from squares. When making a product, you need to take into account several nuances:
- All elements of the future bedspread must be knitted in one size
- Consider the composition and density of the yarn
- Choose threads that match in color
- Knitting a baby blanket should only be done from natural yarn.
What shape and material the blanket will be knitted from depends on your individual preferences.
Step-by-step master class
To sew a cover for a chair or sofa from thick, practical fabric, you first need to take measurements of the furniture.
Only knowing each size of upholstered or frame furniture can you design the correct pattern. And since we are talking about sewing a full-fledged cover, it is necessary to cut out each detail separately and only then sew all the elements into a common fabric.
Classic model
The easiest way is to cut out and sew a cover for classic sofas and armchairs that have strict rectangular shapes. If the armrests and back of the furniture are streamlined, the sewn cover will need to be supplemented with fixing ribbons, which can be tied with a bow or fastened with large decorative buttons made of natural wood.
If we return to the issue of cutting and sewing, then step by step this process will be carried out according to the following scheme:
High-quality slippers made of natural felt
- The height, front width and length of the soft seats are measured without taking into account the lower part of the sofa (relevant when the design includes a frill), or together with it if the cover has a straight silhouette all the way to the floor.
- The dimensions of the armrests are measured (heights of the inner and outer side parts, width and thickness). The pattern for this part will have a rectangular shape, while the cover can be either straight or streamlined (depending on the configuration of the armrests).
- Measurements are taken from the back of the sofa. In this case, it is necessary to measure not only its outer and inner height, but also its width, minus the areas where the armrests adjoin.
- Based on the measurements taken, a paper pattern is constructed separately for each part, except for the armrests, since in this case one pattern and its mirror use for opposite sides will be enough.
- The resulting patterns are applied to the sofa to check the coincidence of the seams of the furniture and the paper edge (as well as the accuracy of the patterns).
- The finished patterns are pinned to the back of the fabric and outlined with soap or chalk, after which tolerances are made (the larger, the more reliable the seam will be).
- The products are cut, after which they are basted and stitched together on the wrong side in the same joints as for upholstered furniture.
- A frill is made separately and sewn to the already sewn cover around the entire perimeter.
DIY sofa armrest stand
An overhead stand for the armrest of a sofa is an excellent solution if you are going to sit on the sofa and want to have a laptop, tablet, phone, TV remote control, book, glasses and a glass of water next to you.
We offer a master class on how to make a comfortable wooden stand that is attached to the armrest of the sofa. Its stylish design will complement the interior, and its functionality will make sitting on the sofa even more enjoyable.
Necessary materials:
The amount of materials and the final size of the stand depends on the width of the armrests on your sofa. Take measurements of the armrests and make the stand in the manner described below, but adjusting the dimensions to suit your specific case.
- Wooden board measuring 80 cm x 50 cm with a thickness of 1.8 cm
- Screws measuring 4 mm x 35 mm (you can use others you have at home)
- Sandpaper (we used 240 grit here)
- Corner brackets (here measuring 40mm x 40mm x 17mm)
- Wood putty
- Wood glue
- Brushes (here there is one 50mm wide and one 25mm wide for finer areas)
- Wood paint (white here)
- Cork fabric size 45 cm x 30 cm
- Aerosol glue
- Decorative nails for furniture
Before implementing the project, make a small sketch to find out how many individual pieces of boards will be needed for production. THE DIAGRAM shows how the stand should look when finished. After this, you can go to a hardware store for materials and immediately cut the boards to the desired size.
Scheme of the design of the armrest stand
The dimensions may vary for each sofa, but in any case you will need the following boards:
- a) a board corresponding to the width of the sofa armrest;
- b) a board corresponding to the height of the armrest (inward);
- c) a board defining the size (height) of the additional compartment; For example, in this case the size was calculated for a laptop: the width of the laptop plus 5 cm.
- d) a board that determines the width of the compartment and is its lower part;
- e) a board that limits the separation on the second side.
Step 1: Connecting parts a + b
Using wood glue, we connect parts a and b together, following the diagram below. After the glue has dried, additionally secure the boards together with screws for a more durable fastening.
Note: Alternatively, if you want to leave the outside of the stand intact, secure the boards together from the inside with corner brackets and screws.
Step 2: Connecting parts c + d + e
Similar to the previous step, we connect parts c, d and e with glue, and then with screws, following the diagram given.
Step 3: Connecting all the parts together
Now you need to connect the parts assembled in the previous two steps. For this we also use glue and screws from the outside or corner brackets from the inside.
Note: You can also optionally add a board to cover the compartment at the front, that is, attach it to boards c, d and e.
Knitting with knitting needles
Knitting needles are often chosen to get the job done. This tool allows you to knit a blanket quickly and easily. When knitting, you need to consider the following factors:
- Choosing the right yarn
- Competent selection of tools for the job
- Choosing a clear and simple scheme
- Carefully knitting all elements of the blanket
If you complete all the points, you can easily create a unique and inimitable product for your interior.
Making an overhead stand for the armrest of upholstered furniture as a bookmark
An overhead stand for the armrest of upholstered furniture, a sofa or an armchair, a convenient thing. It takes up practically no space, but you can put a mug of coffee, a glass of wine, and, for football fans, even a bottle of beer with a plate of chips on it. To make a stand, the following Tools and materials are required: - Board: - Circular machine; -Roulette; -Pencil; -Jointing machine; -Epoxy resin; -Dye; -Sandpaper; - Fasteners; -Screwdriver; -MDF; -Scotch; -Glue gun; -Putty knife; -Burner; -Plane; -Pliers; -Hacksaw; -Insulating tape; -Carpentry glue; -Varnish; Step one: preparing parts To make the stand, the master used a red cedar board. Sawed into two parts.
Then he passes the halves through a jointer and evens them out in thickness. Cuts to size.
Step two: preparation for pouring A box is made from MDF.
The bottom of the box is sealed with tape. Places the workpiece inside. Now you need the distance on both sides of the workpiece to be the same. Levels workpieces. Use a glue gun to fix the workpieces and close the cracks of the drawer.
Step Three: Pouring Mix the epoxy resin according to the instructions. Pours into two glasses.
Adds a different dye to each glass. Add pearlescent flakes (decorative) to one of the glasses. Stirs the contents.
Levels the box.
Pouring epoxy resin between the workpieces.
To remove air bubbles, heat the epoxy with a torch.
Step four: processing The resin has hardened, and the craftsman removes the workpiece from the box, planes it and grinds it.
Step five: making a stand Measure the width of the sofa armrest.
Sawing the workpiece into three parts. The angle was 45 degrees.
All three parts of the stand are connected using flat dowels and glue.
Step six: processing, finishing Wet the stand and let it dry. This technique raises the fiber and then you just need to sand it. To add shine, rub the surface with shavings.
Now you need to wipe the surface and apply four layers of varnish.
Idea: covers for the armrests of a chair or sofa
Such covers will both help protect the armrests from damage and dirt and hide existing ones.
If the armrests of a sofa or chair are soft and covered with fabric, like the entire sofa, then, as a rule, they get dirty or suffer mechanical damage first. Covers that are placed on the armrests can protect them from dirt and damage or hide existing ones. You can sew the covers from a material that best matches the material of the main sofa cover, or you can make them contrasting, supporting them with decorative pillows or a blanket.
Chair cover with square motifs
This is a great way to use up leftover thread. There are motives:
- round;
- square;
- triangular;
- hexagonal and octagonal.
The square shape is considered the most favorite among knitters. Such motifs are simple to make, easy to stitch and help create a dense, continuous fabric without large holes. They are made in any color, often combined. An undoubted advantage of knitting with motifs is that the craftswoman does not have to hold the entire fabric in her hands (which becomes heavier over time). To knit a chair cover from squares, it is better to choose yarn of two or more colors. You can use leftovers, but the threads for tying fragments should be of the same type and shade.
Knitting is done according to a simple pattern:
- Close the chain of 12 VPs into a ring.
- Knit 1 ch for lifting, then 23 sc in the ring. Close the row SSt.
- Make 3 ch for lifting, 2 dc from the same loop, 1 ch, then 3 dc in the third sc in the second row, 5 ch, 3 dc in the third sc in the second row. Knit this sequence until the row is completed. Finish with an arch of 5 VPs and close the row of SS.
- Perform 3 VP for lifting, 2 Dc, 1 VP, 3 Dc in 3 Dc of the third row, 4 VP, 1 Dc in the middle of the arch from 5 VP of the third row, 4 VP, 3 Dc in 3 Dc of the third row. Knit this sequence until the row is completed. Finish with an arch of 4 VPs, close the row of SS.
- Make 3 VP for lifting, 2 Dc, 5 VP, 3 Dc in 3 Dc of the fourth row, 4 Ch, 3 RLS so that the middle one matches the RLS of the 4th row, 4 VP, 3 Dc in 3 Dc of the 4th row. Knit the sequence until the row is completed. Finish with an arch of 4 VPs, close the row of SS.
- Knit 3 VP for lifting, 2 DC, 1 VP, 3 DC in the arch, 3 VP, 3 DC in the same arch, 1 VP, 3 DC in 3 DC in the fifth row, 5 VP, 1 DC in the middle SC in the 5th row, 5 VP, 3 dc in 3 dc in row 5. Knit the sequence until the row is completed. Finish with an arch of 5 VPs, close the row of SS.
To calculate how many such squares need to be knitted, the length and width of the intended product are divided by the length of the side of the resulting motif. After a sufficient number of elements have been made, they are steamed and covered with a damp cloth, through which they are treated with steam using an iron. All squares must be the same so that the product does not bubble.
Related motifs are sewn together with a needle or hook, which should be smaller in diameter than the main one. You can connect the squares while creating the last row. The edges are tied around the perimeter to visually combine the motifs into one composition. A beautiful crocheted chair cover is ready. It can decorate an armchair, a chair, or a stool.
Schemes We collect a chain of chain stitches and close them into a ring We knit single crochets and close the row with connecting stitches For the second row we tie a thread of a different color and knit according to the pattern
Add a thread of a different color to the next row and knit with double crochets
Add air loops to the last row and close with a connecting loop
Ready-made square motif
Using the same pattern, we make many square motifs.
Sew the squares together
The chair cover with square motifs is ready
Idea: covers for the armrests of a chair or sofa
Such covers will both help protect the armrests from damage and dirt and hide existing ones.
If the armrests of a sofa or chair are soft and covered with fabric, like the entire sofa, then, as a rule, they get dirty or suffer mechanical damage first. Covers that are placed on the armrests can protect them from dirt and damage or hide existing ones. You can sew the covers from a material that best matches the material of the main sofa cover, or you can make them contrasting, supporting them with decorative pillows or a blanket.
For example, here the armrests were exposed to the cat’s claws:
The covers helped hide the damage.
For covers, it is better to take a dense, durable material that holds its shape well.
Life hack: how to restore elasticity to sofa cushions
You will need:
- paper, pencil, paper scissors for the template;
- fabric for covers;
- fabric scissors;
- pencil, marker or fabric chalk;
- sewing machine and thread.
How to sew a sofa cover: 3 master classes
Step 1
After placing the paper on the armrest, make templates for the parts for the cover.
Cut out the parts, adding allowances of 1.5 cm (the diagram shows the required number of parts for one cover).
If the armrests are rounded, then part B must be modified accordingly.
Step 2
Here the parts are joined with a French seam so as not to leave any open sections of fabric. How a French seam is made is described in detail here.
You can connect the parts with a simple stitch, and zigzag the edges, or sew them on an overlocker.
So, first we connect two parts B and part C along the long sides.
Perform the following seams in the sequence shown in the diagram.
Scope of application
Knitted products create a unique comfort and warm atmosphere in the home. Blankets are used not only to protect your furniture from external factors, they can be used for any purpose.
NOTE!
- Knit a tunic - simple patterns and recommendations for choosing models for children and adults (130 photos)
- Knitted overalls for newborns - knitting pattern and description of sewing the best modern models (105 photos)
Jacquard knitting patterns: knitting patterns and tips for choosing the best patterns for beginners and professionals (115 photos)
If you decide to do handicrafts, you can create products not only for the sofa, but also for the bed, armchair, knit a tablecloth or even curtains for the room.
Knitted interior items are currently gaining particular popularity. After all, with their help you can decorate not only any room, but also just read a book, covered with a warm blanket.
Assembly process
Varnish is applied to wooden surfaces in 2 layers.
Assembly is extremely fast. All pre-prepared holes are adjusted to each other, and then assembly takes place using self-tapping screws. The main thing is that all structural elements are firmly installed in place. This is the only opportunity to get a truly high-quality connection. After the assembly is completed, you can begin to coat the material with varnish.
Related article: Which impregnation to choose for concrete floors
The surface should be made as smooth as possible for this procedure. The varnish is applied in two layers. The first one must be pre-dried before the other one is laid on it. You can apply the varnish using a paint brush. If desired, the armrests can be additionally decorated with painting or wood carvings. This can bring the interior of almost any room to life as much as possible.
Everything should look as neat and natural as possible. If you can do this, then the job is done perfectly.