Recommendations for selection and placement
In order for the bed under the ceiling to be comfortable and fit organically into the interior, you need to take into account a number of factors:
- The ceiling height should be more than 2.5 meters, this will allow profitable use of the space on the lower level. For psychological comfort, the distance from the sleeping place to the ceiling is recommended to be at least 70 cm.
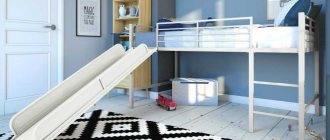
- For safety, the bed under the ceiling is fenced with railings at least 30 cm high.
- Good ventilation in the room is desirable to avoid lack of oxygen on the upper tier.
- Before installing the product, it is necessary to check the strength of concrete floors or ceiling beams.
Advantages and disadvantages
A bed under the ceiling can be a necessity in a one-room apartment or a design idea for decorating a spacious room.
| Advantages | Flaws |
| The vertical arrangement of furniture saves usable space. | Difficult to install and dismantle. |
| The upper tier can be combined with a work office, sports complex, relaxation area or wardrobe. | A bed under the ceiling will visually narrow the pencil room. |
| The multi-level setting looks spacious and creative. | Non-standard furniture has a fairly high cost. |
Types of designs
Beds can be rigidly fixed at the desired height or slide up on wall rails.
- Stationary. The stationary model is attached to the ceiling, to the wall, or based on a steel or wooden base. For reliability, two types of fastening are usually combined.
- Movable. The movable bed rises along the wall due to the mechanism of separating counterweights, which is controlled from a remote control.
Stair options
The staircase should be in harmony not only with the bed itself, but also with the interior of the room as a whole. The main classification divides bedside ladders into stationary and attached. The second, to be safe, must be stable and have a wide base. There are different types of staircase structures:
- Vertical - this ladder is placed on the side of the bed or at the end. It is completely flat, without any protrusions. Climbing up and down it, especially in the dark, can be dangerous. Between flat and round steps, you should choose the former, since it is easy to slip on the round ones;
- Marching - here boards serve as steps. They are attached to the strings of the structure at an acute angle, parallel to the floor. The marching structure is suitable for children, because it is almost impossible to trip on it;
- “Chest of drawers” - there are drawers in the flat steps of such a staircase. They can move forward or sideways. A staircase with cabinets is a godsend for a small room;
- “Rack” - in this case, the steps are protruding parts of open shelves, which can be used by entering from the side. To preserve the appearance, the edges of such a rack must be covered with polyvinyl chloride;
- Podium – the structure is a staircase, the top step of which is a platform. You can easily climb onto the bed from it. The podium can also be the lower stage of the structure;
- Corner - differs in that it forms a turn. It can be either radius or at an angle of 90 degrees. The smaller it is, the less area such a staircase occupies.
Types of beds under the ceiling
- Hanging. A suspended sleeping bed is attached directly to the ceiling with steel cables, ropes or chains. This type of fastening creates the illusion of floating in the air, so that the space under the bed can be left free to maintain an atmosphere of lightness.
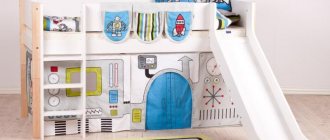
- Loft bed. The upper sleeping tier of a vertical furniture complex is called an attic. For children and teenagers, the attic is made in the form of a house, a ship, an airplane.
- BedUp bed (rising to the ceiling). The BedUp rises like an elevator. During the daytime, it serves as upholstered furniture, and in the evening - as a full-fledged sleeping place. The lighting built into the base of the transformer will replace the overhead lighting in the living room. Despite the high cost, models with a lifting mechanism are in demand among owners of studio apartments.
Which lifting mechanism to choose?
All lift beds can be classified by the type of lift they use. And it could be:
- manual mechanical;
- spring;
- or on gas shock absorbers.
For making your own bed with a lifting headboard, the best option is, of course, a manual lift without any additional equipment. The remaining two types are still difficult to install with your own hands. Especially if you lack experience and relevant skills. But you should understand that to operate the manual mechanism you will have to make some effort, so it is not suitable for children's beds, only for adults - one and a half or double. But the manual mechanism is reliable, strong and durable, and this is important.
To make such a bed yourself, you will still need to purchase a manual mechanical lifting device at a furniture store or order it online. Some people decide to make their own lift, but here, in addition to knowledge, skills and experience, you will need professional tools and even equipment, so few manage to do everything efficiently.
The finished mechanism is fastened in the following order:
- first, the top strip of the device is mounted (to the base of the box, the sheathing of the sleeping plane);
- then (for fastening reliability) a bar made of rolled angles is installed;
- then the next two slats are assembled, allowing you to control the height of the grate;
- then the lower (support) bar of the mechanism is attached to the main box, facilitating the sliding of the hinge supports;
- As soon as the installation of the device is completed, you need to carefully check all fasteners for their strength and reliability.
It will take an untrained person several months to make a bed equipped with a lifting headboard with his own hands. Therefore, everyone decides for himself whether to engage in large-scale applied creativity or limit himself to creating a beautiful headboard for a finished bed (perhaps already equipped with a lifting mechanism), choosing from the mass of ideas the closest in spirit and strength.
( 60 votes, average: 5.00 out of 5)
Provence style in the interior - design features
Small kitchen design: layout options, finishing
Related Posts
Photos in the interior of the rooms
When placing furniture at a height, the purpose of the room is not important. To save precious square meters, a bed under the ceiling can be installed not only in the bedroom, but also in the attic, on the front door in the hallway and even above the dining area.
Bedroom
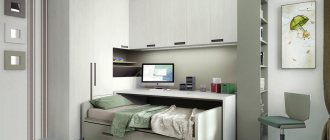
A sleeping place raised to the ceiling frees up space below for a work or play area. A square room is more than 25 square meters. meters, you can make a spacious corner mezzanine, which can accommodate not only a mattress, but also a bedside table, table lamp or flower pots.
In a narrow room, it is recommended to place the bed between opposite walls. When positioned transversely above the door, the bed will be invisible at the entrance; moreover, asymmetrical furniture makes the room visually wider.
For a married couple, a double French bed with a width of 180 cm or more is suitable. The design of the hanging model is more restrained compared to the floor version, but the soft headboard with a carriage frame remains unchanged.
Kitchen-living room
In a small apartment or country house, the bed can be installed directly above the kitchen area. To make the sleeping area aesthetically pleasing and secluded, the bed is decorated with a canopy or slatted panels. Such a sleeping place is only possible in a kitchen with silent ventilation, because the heat from the stove, extraneous odors and sounds can interfere with enjoying your rest.
Children's room
In a small nursery, it is problematic to place a place to sleep, a desk, or a play area, especially if the room is divided between several children. In this case, you can organize an upper berth for teenagers, and place younger ones on the lower tier. Children are generally enthusiastic about the idea of sleeping at height.
In a single children's bed, the bed is combined with other furniture depending on the desire and age of the child. Adults need to take care of a reliable fence and a comfortable staircase with wide steps.
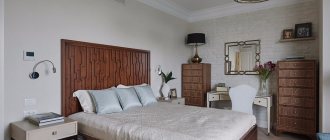
Upholstered headboard
This type of headboard is most loved by many designers because it makes the room very cozy . And if you like to spend a little time reading before bed, then it will be much more pleasant to lean your elbows on a soft, pleasant-to-the-touch headboard made by yourself. To make it you will need a few materials, but enough patience and free time.
You will need a base, upholstery fabric and buttons with a loop of your choice for the front part and the most ordinary buttons with four holes for fastening on the back side, packaging foam rubber, glue, a furniture stapler, a drill and strong threads with a needle. The base must be strong and not necessarily beautiful - it will not be visible. Its length can be exactly equal to the width of the bed, or it can go beyond it, it depends on your preferences. You also choose the height based on your desires. Some people like to fill the entire wall behind the bed with a solid low headboard. It looks very cozy and unusual.
You can use what you have in your home as a base. For example, an old pantry door , the wall of an old closet, a piece of chipboard, several small doors, just wooden boards, in general, everything that would be a pity to throw away, but would be just right here.
as a filler . Why not furniture? Because it's cheaper. To achieve the required thickness, you can lay it in several layers. The piece of fabric should be 20-30 cm larger than the base along its entire perimeter. Place the base on the floor, apply glue, apply foam rubber and trim off all excess around the edges. You can attach the foam rubber using a stapler, as you wish.
We will make a very fashionable soft headboard that imitates carriage upholstery . To do this, you need to make holes in the foam rubber and the base for future buttons. To do this you need to make markings.
If you want to end up with
squares , then place the holes one below the other; if you want diamonds , then in a checkerboard pattern. At equal distances, mark on the foam rubber the points where the future buttons will be located. Using a sharp knife, make holes at the markings in the foam rubber, then using a drill, drill small holes in the very base.
3-4 mm is enough for a needle with a strong thread to pass easily. Before you start drilling, place something under the base to avoid making holes in the floor. Now we take the fabric, a stapler, and begin to fit the headboard. Here you may need a helper to hold the base and hold the fabric while attaching.
Fasten the edges well, do not spare the staples, but do not pull too tightly, otherwise it will be difficult to tighten the fabric with buttons and the headboard will not be as voluminous as we need. Now we take an ugly button for fastening on the back side, thread a needle and thread into it and firmly fix it, to do this you can sew it into all the holes, as if you were sewing it, so it will not slip off when tightened. We pass the needle with a button on the end of the thread from the back side and carefully feel its end on the front part. The needle should come out through the hole in the foam. Next, we thread the needle through the loop of a beautiful button, make one turn of the thread around the button and thread it through the loop again, after which we pull the thread well. The button at the back will help hold the thread, and the front button will press the fabric, creating beautiful folds. If the folds appear too shallow when tightening the thread, arrange the fabric as you like. Now cut off the needle, wrap the remaining thread around the button and tie it several times, hide the rest under the hat. You need to start working from the first hole in the upper corner. Why do we use two buttons ? Because after some time, the tension will weaken a little and the pattern will become less pronounced. To avoid having to redo everything all over again, it will be enough to pull the back button, resuming the tension, and secure it a little lower by a piece of the freed thread with a stapler. The back of the headboard can be slightly transformed by covering it with any fabric or thin plywood. When the headboard is ready, you need to hang it. To do this, you can use special hinges that are attached to self-tapping screws screwed into the wall. You can make the headboard an attached one; to do this, at the first stage, you need to attach the legs of the desired height to the base, and then simply lean it against the wall.
An important point - when you tighten the fabric on the base, form small folds with your hands on top of each hole in the first row, otherwise they may not work out, which will slightly spoil the look of the entire product.
Examples of beds in various styles
When choosing a bed under the ceiling, take into account the overall style of the house.
- A bed on a metal frame with a transparent glass railing is ideal for styles such as loft and industrial.
- High-tech is also “friendly” with modern materials; shiny chrome parts and unusual forms of furniture will create a futuristic interior.
- A bed frame made of natural wood, varnished or painted in restrained natural colors will be at home in an eco-friendly interior.
- The abundance of decor in small rooms creates a feeling of clutter and crampedness. Simple lines and neutral colors are characteristic of minimalism, which “unloads” the modern person from the bustle of the city. A laconic-shaped bed with monochrome textiles will harmoniously fit into a calm interior.