How to make lemon and olive oil polish for lacquered furniture
This polish recipe works well for lacquered furniture. It is made from olive oil and fresh lemon. “Edible” polish will clean the surface of furniture and renew the shine of the varnished surface.
- Pour two tablespoons of olive oil into a suitable container.
Add half a tablespoon of freshly squeezed lemon juice to the olive oil.
- Mix the oil and lemon mixture thoroughly. Lemon juice will clean the wood, and the oil will give it shine.
- Before polishing, wooden furniture must be cleaned of dust and grease - this is a general rule for all types of polishing. If the surface is dirty, wipe it several times with a damp cloth. Only then start polishing. Do not spray or pour the prepared product onto a wooden surface.
- Soak a napkin or soft cloth in the oil mixture. It should be moist, but not wet. Wipe the surface of the furniture with a cloth or napkin using circular rubbing movements.
Furniture is transformed before our eyes. Its surface begins to shine. Wipe off excess oil mixture with a dry cloth or clean dry cloth.
Primer
It is necessary to prime wooden and veneered surfaces so that the varnish lays more evenly. When sanding, we opened most of the pores and released some of the fibers. If you immediately coat them with varnish, it will be absorbed unevenly, causing the surface to become stained. The primer closes most of the pores, so the varnish will lay more evenly.
Priming veneered furniture can be done in two ways. The first is quick, but accompanied by a strong odor. You need to take nitro varnish or polyurethane varnish, dilute it by 10-20% (depending on the initial thickness), and cover the surface.
A primer is necessary so that the varnish goes on more evenly.
The second method of priming is long, but correct and almost odorless. We take epoxy glue and a soft cloth swab. It’s better to use flannel, preferably white, so that it doesn’t fade or change the color of the furniture. Use this swab to rub the epoxy into the veneer.
While everything is drying, dust will definitely stick to the surface. It needs to be removed. This again can be done in two ways: scraping and grinding. If using a scraper, take a sharp blade (you can use a wallpaper knife) and use it to clean off all the excess. To avoid damaging the veneer, move the blade along the grain. With sanding everything is known: sandpaper with 320 grit and water. The prepared surface is cleaned of dust, washed with water, and dried. After drying, you can apply varnish.
In fact, further polishing of the furniture may not be necessary. Already at this stage the product looks decent.
Furniture polish with ammonia
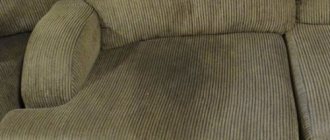
A mixture of water and ammonia has excellent cleaning properties. This polish is suitable for countertops, kitchen facades, and any painted wooden surfaces. At the same time, this solution will have a beneficial effect on exquisite pieces of furniture made from noble species - oak, cedar, walnut. It will bring out beautiful shades of wood color.
Ammonia solution is sold in pharmacies. It's inexpensive.
It’s easy to make the mixture: add half a tablespoon of ammonia solution to a liter of water at room temperature and stir. You need to work with ammonia carefully. To avoid inhaling its pungent odor, put a mask on your face. Protect your hands with household gloves. It is convenient to store the finished solution in a wide-neck bottle with a screw cap.
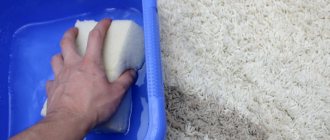
- Prepare a liter bottle of water, ammonia solution and a soft cloth. In our example, an old wooden chair and a viscose napkin were chosen for the ammonia polish.
Pour the required amount of ammonia solution into a spoon and add it to the water bottle. Don't forget to wear a mask. Cap the bottle and shake the mixture.
Moisten the cloth with the ammonia mixture and polish the piece of furniture in a circular motion. It is better not to use a spray bottle so that ammonia vapor does not spread into the air of the room. Carry out all manipulations with the solution with the window open.
How to make your own wax furniture polish
Beeswax is a real balm for furniture. It is so good that the wax polish is called royal.
Advantages of beeswax:
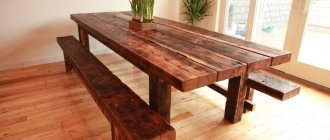
How to polish furniture with your own hands. Advice from the experts
The condition of the furniture deteriorates over time. Regardless of operating conditions, the finishing coating loses its strength, becomes covered with a network of small cracks, and becomes dull or cloudy.
Scratches and abrasions appear, which spoil the appearance of the furniture and make it unsuitable for use in the interior of residential or public premises. However, in most cases the condition of the surfaces can be restored, and sometimes it is possible to make the furniture more attractive than it was before.
What is polishing
Polishing is a process of finely treating a surface, giving it shine. As a rule, the varnish layer is polished, but the procedure can also be performed on the paint or the material itself. The processing technique is close to grinding, but the fineness of the abrasive in this case is an order of magnitude higher.
There are different degrees of surface gloss. There are glossy finishes that are highly shiny and reflective to surrounding objects. Furniture finished in this way looks elegant, bright, and glares when exposed to light.
Matte surfaces do not reflect light, their shine is very soft. As a rule, matte types of varnish are used for modern furniture, but ancient samples were coated with a special composition (classic shellac), or the wood was simply impregnated with oil, followed by processing with cloth swabs.
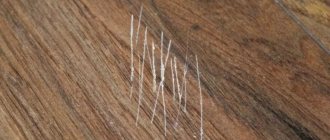
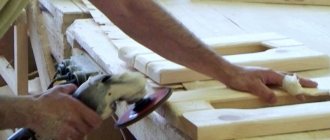
Sanding the varnish
The process is the same as during preparation, only we use sandpapers with a finer grain - starting from 400. Be sure to sand with water - moisten the surface and sandpaper. Having finished processing, we attach sandpaper with 600 grain, then with 1000 and 1200.
This stage is the last one before actual polishing. After this treatment, the surface should be absolutely flat, uniform, without defects.
What materials can be polished?
As a rule, furniture coating is a varnish layer of one composition or another. In Soviet times, the main type of coating was polyester varnish. It was applied in a thick layer (0.5-0.8 mm), ground and polished on special production lines.
Modern furniture has a varnish coating made on the basis of the same polyester. Or other materials. there are many of them, but the general properties are approximately the same.
The most common coatings are:
- polyester;
- polyurethane;
- nitrocellulose;
- impregnation with oil of natural or synthetic origin.
Almost all varieties can be polished. The softer the varnish, the easier it is to polish, but its abrasion resistance is much lower.
Paints and varnishes that are sold in retail chains are of little use for creating high-quality furniture coatings. They do not meet standards for hardness and load resistance. For restoring furniture coverings, they are suitable only in certain cases and require proper use.
Durability of home methods
In fact, there is no way to hide a scratch “forever” as such - you will probably continue to use the treated furniture, and you may well damage its surface again or gradually remove the layer of the seal. To make the removal of unevenness last longer, you can resort to coating with furniture varnish. In any case, there is a very obvious rule here: in order for your furniture to look beautiful and well-groomed for a long time, you need to treat it with care and precision. And in extreme cases, all of the above methods will again be at your disposal to quickly remove a scratch.
How to make your own furniture polish that is as good as store-bought
If there is wooden furniture in a house, it means its owners have good taste and prefer only natural and high-quality materials. Wood has always been in great demand due to its environmental friendliness and the absence of harmful substances. But it is quite difficult to keep such furniture in proper condition, because over time it loses its original beautiful appearance. The constant accumulation of dust on the surface and improper care, on the contrary, aggravate the situation and spoil not only wooden elements, but also cleaning substances can harm all household members. Many housewives often wonder how to clean dust from wooden furniture using improvised means that can be found at home.
Cleaning becomes enjoyable
If, reading the previous lines, you recognized yourself in them, then it was not in vain that I started writing this article. If, on the contrary, you wanted to urgently come to my house to put things in order, then this article is also for you. I believe cleaning can be an enjoyable experience for everyone by applying a few simple tips.
680,000 doses in stock: Europe reluctant to use AstraZeneca vaccine
Timati personally invited the first participant to “Bachelor”: this is Dasha Pogadayeva
How to Clean an Iron: Unexpected Uses for Regular Aluminum Foil
The first thing that helped me make cleaning more bearable were principles taken from the book “The Magic of Tidying Up” by author Marie Kondo.
This book focuses on the need to get rid of unnecessary things that do not bring you benefit or joy. Now I will give a few principles told by Marie Kondo that will help bring order.
With ammonia
It is perfect for kitchen furniture, for example, a countertop, and will also not spoil the bar drain and painted surfaces. You will not only get rid of dust, but also protect the furniture from possible contamination in the future, or more precisely, from the penetration of dirt into microcracks in the wood. Ammonia does not leave cloudy traces, providing maximum shine to the surface. Due to its accessibility, it is enough to mix the solution with water, wipe the contaminated surface, and pour what is left into something and hide it out of the reach of children until next time. The solution will have good cleaning properties even after a long time. Do not forget that to use this product, it is necessary to ventilate the room, because ammonia has an unpleasant odor.
The magic of cleaning
The basic principle of magical cleaning: for effective cleaning, you need to divide all things into unnecessary and necessary, and then get rid of the first and decide where to store the second. Don't be afraid to throw away things you don't intend to use anymore. There is no need to store these things on the balcony, in closets or in your parents’ house.
Also, for high-quality cleaning, it should be done by category. You should not generalize by saying that today you will clean a specific room. It is better to decide on the category of things. For example, do only clothes, and wipe off the dust tomorrow.
Teaching children to help their neighbors: qualities that help a student’s success
Big cat Wilford, an Instagram star, captivates followers with his appearance
KamAZ celebrates the 45th anniversary of the release of the first truck in the series
Another important principle that makes cleaning easier is sorting. It is necessary to sort all the things in your home, from socks to dishes and groceries. This will avoid chaos in the drawers.
If you put all these tips into practice, cleaning will turn from a daily and boring process into a special and enjoyable event.
Risk from modern chemical cleaning products
These include:
- allergies - human skin is very sensitive to chemicals and if you buy a professional detergent, the manufacturer will definitely indicate on the label that special gloves are needed;
- aggressiveness - not every furniture is suitable for one or another cleaning product. The surface may simply fade or the varnish may fade altogether. Always read what kind of furniture the solution is suitable for;
- harmful - technology does not stand still and now it is enough to have a can of cleaning aerosol and a dry cloth. But the spray can enter the respiratory system. The label may indicate that the substance does not pose any danger, but it is better to use an ordinary medical mask and ventilate the room.
Regardless of what detergents you use: based on natural ingredients or purchased ready-made, always ventilate the room. Do not forget that the substance evaporates and enters the air, which can cause health problems.
Source
How long after applying the last coat of varnish can I polish it?
After applying the last coat of varnish, there is no rush to polish. You can begin work only after making sure that the varnish has completely hardened. Otherwise, stripes or lines may form on its surface. How long should you wait? When calculating the holding time, you need to take into account the drying period indicated on the packaging for a particular paintwork material.
However, the actual polymerization period may be longer than indicated if, for example, the room is cool or the varnish is applied in a thick layer. Experienced craftsmen recommend adding an additional 36–72 hours to the exposure period specified in the instructions, and only after that begin finishing treatment.
Some varnishes, such as piano varnish, have a dark tint. They should begin to be polished at least a week after painting, because if they are not completely dry, polishing defects on a dark surface are more noticeable than on a light one.