How to restore a mirror at home
A mirror is an integral household item in human life. It is impossible to imagine the interior of an apartment or a handbag without it. But over time and improper care, the appearance loses its reflective ability. Chips, scratches, and amalgam peeling often appear on the inner surface of the mirror.
It is impossible to imagine the interior of an apartment or a handbag without it.
Often in antique mirrors the glass itself is already so cloudy that it simply does not make sense to repair, preserve, or polish it.
Although all the ingredients for restoring a mirror surface are freely sold in pharmacies and stores, you will not be able to create a smooth mirror surface on your own the first (or even the fifth) time.
If the mirror is badly broken, then, of course, it is better to dispose of it. Because it is simply impossible to restore a broken mirror at home - this is a labor-intensive and hazardous technological process using mercury. But you can repair minor damage with your own hands.
A mirror is an integral household item in human life.
The original table accessory is ready; it will last for many years and will be a worthy part of any interior.
If the frame of the mirror is wooden and has lost its shine, you can update it by applying varnish of the required color.
Is it possible to look into a broken mirror?
Many people remember the superstition from childhood: looking in a cracked mirror means depriving yourself of happiness for 7 years. According to esotericists, when a person looks at his reflection in the fragments, he loses his vital energy. All human strength at this moment falls apart. Possible deterioration in health, the beginning of a black streak, a series of endless troubles. This belief also applies to fragments from broken glasses and glasses.
Currently viewing → Why break the chain with the cross, break the pectoral cross
According to one of the signs, when the mirror itself cracks, the energy that has been accumulated for years can come out of it. It will most likely be negative. Part of it is able to inhabit the person looking at him or his family. This will lead to a sharp loss of strength, problems in your personal life and at work. Through the fragments, evil spirits and restless souls can enter the house. Such a “neighborhood” will only bring failure and illness.
Also, a cracked mirror can destroy the mirror double of the person looking into it. According to this superstition, a wounded double will bring dire consequences in the form of an accident, loss of a job, separation from a loved one, or even death.
However, positive signs regarding this mystical subject are still found, although quite rarely.
- By looking into an odd number of fragments, you can get married successfully.
- In ancient times, some magicians forced seriously ill people to look into a cracked mirror. With the fragments, the person’s illness went away.
Benefits of DIY restoration
What are the advantages of restoring a mirror with your own hands?
- Not every city and town has a restorer who knows how to restore damaged amalgam.
- Repairing a mirror coating is labor-intensive and requires investment, so mirror restoration will probably not be cheap.
- Time is wasted in searching for a restorer, delivering the item to him and back home, and on the way the mirror may break due to improper transportation. Therefore, it is easier to repair minor damage at home using improvised means.
Chips, scratches, and amalgam peeling often appear on the inner surface of the mirror.
Restoring a mirror with your own hands is quite accessible to a home craftsman.
Or change the look of the mirror by decorating it with jewelry, shells, bamboo sticks or broken dishes.
Video bonuses
Video tutorials will be a great addition to the above ideas, thanks to which you can gain inspiration to create something new and original.
DIY mirror decor.
6 DIY mirror decor ideas.
Mirror decor in the shape of the sun.
Decorating a mirror is easy and simple.
Continuing the creative activities, here are some ideas on how and what to make a lampshade from, as well as tips on how to revive old things using decoupage.
Did you like the article? Then support us, click
:
Sometimes the mirror bursts or cracks in the most visible place. And if the product is especially dear to its owners, then you don’t want to throw it away and buy a new one. In this regard, the question often arises - how to decorate a crack in a mirror with your own hands. There are several simple ways to do this that anyone can do.
Methods for restoring a mirror surface
Depending on the damage to the amalgam, different methods and materials for restoration will be used. For minor damage, silicone sealant is used, and large areas are restored using foil and glue.
If the mirror is badly broken, then, of course, it is better to dispose of it.
A simple mirror restoration can be done at home; this will eliminate minor scratches, or at least make them less visible.
It all depends on the owner’s imagination.
Repair
It is possible to restore a mirror surface even if cracks appear , and the repair can be carried out in such a way that no defects will be visible even with the naked eye. But it is better to carry out this process only with those mirrors that have historical value. Thus, it is not advisable to restore a simple household mirror on the wall - such repairs can be quite expensive.
Do-it-yourself restoration work is carried out only if it is justified, for example:
- minor scratches;
- small chips;
- abrasions;
- cracks in amalgam.
Let's look at some methods that can be used for recovery at home.
Tarnished surface
If a mirror hangs for a long time in a damp room or during prolonged use, its surface may become dull. If a similar situation occurs, then there is no need to throw away the piece of furniture; it can be returned to its original state, or rather polished.
This is a universal restoration tool that is used very often. The process will remove dark stains, minor scratches and abrasions from the surface. Polishing can be done completely or partially ; in some cases, preliminary polishing is allowed.
When polishing, it is important to choose the right special products and their dosage, otherwise the mirror surface may darken even more.
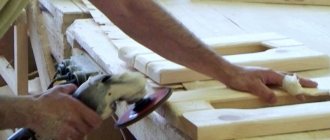
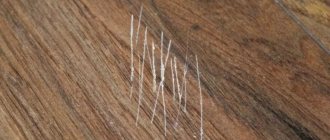
Scratched canvas
If there are scratches on the mirror, you can get rid of them by sanding the surface using abrasive materials. The process works as follows:
- remove the mirror from the frame;
- wash well with soapy water;
- clean surfaces with a degreasing chemical;
- take an abrasive material with optimal particle size, it all depends on the depth of the scratches;
- After this, polishing is used to add shine.
But when carrying out this operation, you need to be very careful, as you can wipe the canvas to holes and the mirror will be damaged.
Attention! If you are not confident in your skills, it is better to look for an experienced craftsman who will bring the piece of furniture into proper shape.
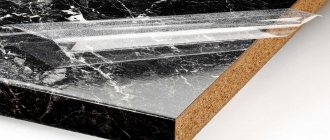
How to restore amalgam?
Amalgam is a metal layer that creates a reflective surface that can peel off or crack over time. This damage looks very unsightly - bald spots all over the surface.
It is worth immediately noting that the restoration of amalgam is a long and multi-stage process, which is carried out using foil, special tools and chemicals.
We invite you to watch a video of how amalgam restoration is carried out using foil:
Required materials and tools
There are two sets of tools and materials for restoration , for minor damage and significant defects. In the first case you will need:
- alcohol;
- water;
- napkins and soft rags;
- sponge;
- silicone sealant.
In the second you should prepare:
- brush;
- rags;
- glue for glass and metal;
- wiper;
- alcohol;
- tassels;
- foil;
- sponge and scissors.
Once everything is prepared, you can start working.
Step-by-step instruction
Let's look at how to restore a mirror surface with your own hands if the amalgam is damaged:
- remove the mirror from the frame and carefully place it on a surface previously covered with a soft cloth;
- Clean the defective surface well with a brush;
- wash the mirror with glass cleaner and dry;
- degrease areas with defects with alcohol;
- cut a piece of foil that should be slightly larger than the damaged area;
- apply glue to the defective area and lay it down with the shiny side down;
- press it with a napkin and level it from the center to the edges;
- Carefully remove excess adhesive with a sponge;
- leave the canvas until completely dry;
- install into frame.
The mirror has been restored and is ready for further use.
How to remove scratches and chips?
The algorithm of actions is as follows:
- wash the surface and degrease with alcohol;
- dry the surface with soft cloths;
- fill the scratches with sealant; for convenience, you can use a toothpick;
- after the composition has completely dried, it is polished;
- The restored mirror is installed in the frame.
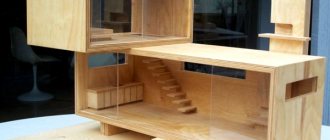
Decoration
If the frame in which the mirror is located has lost its presentable appearance, then it can be updated:
- sand and paint;
- decorate with shells;
- cover it with a mosaic made from broken dishes and so on.
How, with a little imagination, you can get an updated piece of furniture of the required design.
Materials and tools required for mirror restoration
For major damage:
- glue for metal and glass;
- brush;
- soft fabric;
- glass cleaner;
- gasoline or alcohol-containing product;
- foil;
- brush;
- scissors;
- sponge.
But you can repair minor damage with your own hands.
Polishing, as a separate method of mirror restoration, is also performed in case of clouding of the reflective surface.
In modern interiors, mirrors often play an important role.
For small scratches and chips:
But over time and improper care, the appearance loses its reflective ability.
If abrasion or a shallow scratch appears, the mirror can be ground, and the top layer is removed from the reflective plane using coarse abrasives.
Mirrors not only have a utilitarian meaning, but also serve to decorate the interior and visually enlarge the space.
How to remove scratches from glass
Removing scratches from car glass, window glass, and aquarium glass is much more difficult. In this case, you cannot sand the surfaces, as you will not be able to remove an even layer. Even if the glass looks normal, grinding will distort and obstruct vision, resulting in poor vision. Polishing is used to remove scratches from glass.
Polishing removes the minimum thickness of the surface layer, while removing small scratches and making the glass more transparent. Choose the finest polishing pastes with grains up to 0.5 microns. For stains and even the smallest scratches, finishing or diamond paste is suitable. By the way, if necessary, it also removes stains.
For thick glass, large scratches and a lot of damage, you can use hand grinding with sandpaper. Choose medium to coarse grit sheets ranging from 200-800. After processing, the glass must be polished.
Step-by-step instruction
How to restore a mirror with large amalgam damage?
You need to carefully remove the mirror from the frame and place it on a table covered with a soft cloth. Thoroughly clean the damaged surface with a brush. Then wash with glass cleaner and dry. Now degrease the damaged area with gasoline or alcohol and dry again. Using scissors, cut a piece of foil slightly larger than the size of the damaged area. Apply glue to the treated area of the mirror, apply the foil with the shiny side down and press. Use a napkin to smooth the surface of the foil from the center to the edges. Carefully remove excess glue with a sponge and dry the mirror for several hours. Place the restored mirror back into the frame.
Procedure
When restoring a mirror, it is recommended to follow step-by-step instructions. Following the exact procedure will help you avoid mistakes and get the job done efficiently.
Scratches and chips
To eliminate detected cracks and chips, you can resort to different methods, using improvised and specialized tools. The most common options are the following:
- Toothpaste. A small amount of paste is applied to the product and lightly rubbed with a flannel cloth, making rotational movements. After the toothpaste has dried, the surface is thoroughly polished, as a result of which all minor defects become invisible.
- Mustard powder. Dry mustard powder and vinegar essence with a concentration of 9% are mixed in a container, maintaining equal proportions. The components are mixed and the resulting mass is applied to the damage. Excess mixture is carefully removed and the product is polished with a soft cloth until shiny.
- Cerium oxide. A specialized chemical allows you to visually hide chips and scratches. The product is often called jewelry blush due to its property of optically smoothing the mirror surface. In powder form, cerium oxide is dissolved in liquid and applied to the product. Then polishing with a damp cloth is required. If necessary, the procedure can be performed several times in a row.
- Nail polish. Deeper chips and scratches must first be filled with a substance and then polished. Due to its special consistency, transparent varnish is excellent for this purpose. First, a layer of varnish is applied to the damage, the excess is removed and wait until it dries. After this, wipe the surface until shiny with a soft cloth.
- Paste GOI. The substance is crushed to a powdery state, applied to a piece of cotton wool and spread in a thick layer over all defects. After waiting 1.5 minutes, rub the product into the surface and wipe with a clean, dry cloth. After completing the procedure a second time, the duration of polishing is increased to 15 minutes. To prevent the paste from becoming dull, you should not rub it intensively into the product to repair the surface.
See also
Which linoleum is better to choose for the kitchen by type of material, texture and color
DIY decoration
Large cracks in the mirror can be repaired using decorative elements. The advantages of decorating yourself are the ability to not only hide defects, but also transform the appearance of the product, showing your imagination. The easiest method is to use transparent stones. Having chosen the stones you like, they are glued to the surface by dropping a drop of silicone sealant onto the back side. The design of a mirror looks most original when using transparent and translucent stones, which can be monotonous or colored.
You can also decorate the defect with painting. This requires special materials, including:
- Glass outline. It is a colored or transparent composition in a container with a pointed spout. The substance is applied to the mirror in a thin strip and the contours of the invented design are drawn. The circuit can be with or without firing, but in everyday conditions it is easier to use the second option.
- Stained glass paints. This type of paint differs from simple ones in that after drying they become transparent. Paint is applied with brushes or squeezed out of a tube and distributed over the mirror with cotton swabs.
- Glitters. Small shiny elements can take the form of different geometric shapes - stripes, circles, polyhedrons. Glitters are added to paints and varnishes, which gives them an original shine. A substance with glitter is applied to the crack, drawing a pattern.
Tarnished surface
As a result of exposure to high humidity and sunlight, characteristic stains and tarnishing appear on mirrors over time. You can restore the natural shine of a tarnished product using a mixture of water, vinegar essence and crushed chalk.
To make a surface treatment solution, first add a tablespoon of essence to a glass, and then a similar amount of chalk.
Before use, the solution is heated and allowed to brew, and then a few drops are added to a fluffy rag and wiped over the mirror. It is important to consider that this method is only suitable for mirrors with an aluminum reflective layer. To remove tarnished stains and ensure the original shine with a hint of blue, you can clean the products with a solution containing blue. In case of strong darkening of the mirror, treatment with a mixture of water, magnesia or ammonia mixed with gasoline is required.
See also
TOP 7 products that can be used to lubricate the front door lock and processing rules
Amalgam restoration
If defects appear on the amalgam on the back side of the product, you can visually hide them and restore the condition of the surface by gluing foil. To do this, carefully remove the mirror from the frame or other structure and place it on a flat, soft surface with the front side down. Then a piece of foil of suitable dimensions, which should be slightly larger than the defect, is smoothed out and glued to the surface of the amalgam.
How to restore a mirror with scratches and chips
Using a solution of water and alcohol, thoroughly rinse the damaged surface of the mirror and dry with napkins. Now carefully fill the scratch with sealant and let it dry. Remove excess from the surface and place the mirror in the frame.
As you can see, restoring a mirror at home is not a labor-intensive task and does not require much expense or time.
Small damages are easier to repair at home using improvised means.
But it should be noted that there are cases so serious that restoring a mirror costs more than buying a new mirror.
Drawing
You can also cover a crack or scratches on a mirror using a drawing. You can depict anything: a tree, birds, flowers, or even a whole plot. To create a unique creation, you will need stained glass paints designed specifically for glass painting. They create a transparent film on its surface that shines effectively, emphasizing the texture of the product.
If you use the cracks on the mirror as outlines of the image and outline them with contour paste, then the defect will be completely invisible.
Cracks and chips on the mirror are not yet a reason to get rid of this significant piece of furniture. It is quite possible to hide problem areas on your own. At the same time, the result can pleasantly surprise and even bring some novelty to the design of the room.
Decorating a mirror
If the frame of the mirror is wooden and has lost its shine, you can update it by applying varnish of the required color. Or change the look of the mirror by decorating it with jewelry, shells, bamboo sticks or broken dishes. It all depends on the owner’s imagination.
Restoring mirrors is a rather painstaking task, the result of which should be the preservation of the original surface, especially if the mirror is antique.
Depending on the damage to the amalgam, different methods and materials for restoration will be used.
For minor damage, silicone sealant is used, and large areas are restored using foil and glue.
Removing scratches from a mirror
Before removing scratches, you need to carefully remove the mirror and pull it out of the frame.
If the scratches are not very deep, they can be masked as follows.
Using foil:
- Cut a small piece of foil. It should cover the scratch and be perfectly smooth.
- Glue it with tape to the back of the mirror.
Cerium oxide
If you have shallow hairline scratches, then cerium oxide will come to your aid - a fine, odorless powder that can be of different colors, ranging from shades of white to brown.
It is used for polishing and grinding glass as follows:
- Dilute it in water in a ratio of 1 to 20.
- Use for polishing mirrors in tandem with a felt wheel. This will allow you to complete the polishing process to perfection.
Using silicone sealant
This method can mask a deep scratch. Before filling the scratch with sealant, you need to pre-treat the surface with glass cleaner:
- Apply your product to the surface and wipe thoroughly with a lint-free cloth. The surface must be dry and clean.
- Apply silicone sealant directly to the scratch and spread evenly using a toothpick.
- Wait for the mixture to dry completely, then remove the excess with a knife, holding it at a 45-degree angle.
Paste GOI
If you are willing to spend a little more money, purchase GOI paste. This universal product will help you not only remove scratches from a mirror, but also from the screen of a mobile phone or other touch device, clean jewelry and a collection of expensive old coins.
Application:
- Crumble the paste.
- Use a cotton swab to pick up the product.
- Apply a thick layer to the damaged area.
- Polish the surface for a minute, then wipe the area with clean cotton wool.
- Repeat the polishing cycle again. But this time polish for 10-15 minutes.
As a result of your careful actions, clearly visible scratches will become almost invisible to the naked eye.
Epoxy glue plus plus GOI paste
To improve the effect, you can combine epoxy glue with GOI paste. How it's done?
- First you need to treat the scratch with alcohol.
- Then you need to apply clear epoxy glue to it with your finger. You need to rub it in so that no air bubbles form.
- Excess resin must be removed with a solvent.
- The next stage of work will be possible only after 4 days, when the glue has completely crystallized.
- Then we take a piece of felt or other soft fabric, apply GOI paste and carefully polish the surface.
As a result of this treatment, the spider web from the scratch will be almost invisible. A light trace in the form of a transparent strip may remain.
Every home has mirrors. They are used not only to clean themselves up, but also to decorate the interior of their home. However, over time, scratches may appear on the mirror. They can occur due to improper care or mechanical damage. You can seek help from specialists or try to remove scratches from the mirror yourself.
I really need advice
We bought a long-awaited shoe cabinet. and during assembly, I tightened the screw and the mirror (second from the bottom) cracked from top to bottom, almost in the center. It’s impossible to change the mirror, it’s glued tightly(((I can’t order it yet(((The maximum that can be done is to move it to the very bottom. Maybe someone has ideas on how to decorate the crack. Please help. I’m so upset that my thoughts don't come to mind((((
I also had this problem, I ended up replacing the front because there was a door from the cabinet. But the options were: paste it with rhinestones in the form of a pattern, or paint over it with stained glass. Maybe something will do
OOOOOOO. great idea with rhinestones))))) Thank you)))
I'm glad you liked the idea, we'll look forward to its implementation)))
Too bad the locker! I would move the door down and decorate it - what a great idea with rhinestones. My daughter-in-law covered all the mirrors in the bedroom with wallpaper - she says - the mirror in the bedroom is not according to Feng Shui
I'll probably do that. Yesterday I collected the remaining three boxes with tears in my eyes.
It seems to me that if you move it down and draw a tree with stained glass, 3 shelves, then you can just lay a tree trunk along the crack. In general, play it in a similar style, and it will look as if it should be so.
I was thinking about stained glass. I was also thinking about matting it with some kind of pattern. I can’t find anything yet. The interior in the corridor looks like a medieval castle, i.e. stones and wood, weapons hanging on the walls.
Thanks for the help)))
You can also use a glue gun to apply some pattern that matches the style of the hallway and paint it with acrylic paint from a spray can that matches the color of the interior, carefully remove the excess with a napkin. Don’t worry, everything will work out.
Interesting idea))) Thank you, I'll take note)))
Mine also burst, but I tore it off and glued a new one)
It doesn’t come off for me((((
buy mirror self-adhesive and apply a pattern along the entire height of the cabinet - the effect of a mirror on a mirror, it looks beautiful!
Great idea. Tomorrow I’ll go look for self-adhesive)))) and maybe I can somehow combine it with rhinestones
What if this facade (which has burst) is decoupaged with some large pattern? Since there are 5 cabinets, you can decoupage two of them and place them next to each other, placing elements of the same decoupage pattern throughout the cabinet and it will look as if it was intended. The main thing is to choose a suitable drawing.
Glass, crack
Today I accidentally hit the mirror in the door with a vacuum cleaner, a crack appeared, about 15 centimeters, the mirror built into the closet was about two meters long, there was a crack at the very bottom. How to decorate a crack? And in general what to do. I will not change the cabinet, since it is completely new and very expensive. Tell
Draw something like a sakura branch. The crack is like a stem
Draw something like a sakura branch. The crack is like a stem
Tell me, there’s nothing wrong with it, if it’s just a crack, they talk about some signs, but it’s a crack? Just really worried about this
it will gradually increase.
Why change the closet? Replace the mirror. Well, either buy a sticker from Ikea, sakura, as they advise, or another flower. About the sign. If you believe in them so much, then change the entire mirror.
You need to call a handy guy to drill a hole at the end of the crack, because... This way the crack won't go any further. Like they do on the windshield of a car. Otherwise you will lose the entire glass
There is a special UF glue for glass. I use it to glue bevels and bevels onto glass. For example, you can stick round small multi-colored glass droplets onto the crack.
You need to call a handy guy to drill a hole at the end of the crack, because... This way the crack won't go any further. Like they do on the windshield of a car. Otherwise you will lose the entire glass
Method number 1. Large vinyl sticker
Vinyl decorative stickers for wardrobes, as a rule, are produced on a single-color German Oracal film, which greatly simplifies color matching. Outwardly, they look like a stylish pattern applied with paint. At the same time, you will be able to care for the cabinet in the usual way. Unless you resort to strong friction. And most importantly, when you get tired of one design on the door of a closet, you can literally remove the sticker in a minute without any traces and apply a new one.
This method is universal and can be used for doors made of any materials. You can safely apply stickers to glass and mirrors of sliding wardrobes. They hold up well and look very impressive. At the same time, you get rid of the obsessive reflection, and fingerprints that constantly appear on the glass surface will no longer be too noticeable.
The procedure for applying a large sticker on the wardrobe door:
- Preparation . Clean the surface from dust, fingerprints and other contaminants;
- Smoothing. Place the sticker on a flat surface and smooth it with a squeegee (smoothing spatula), which our store always sends in the kit;
- Fitting. Attach the drawing to the door and mark the position of the corners with a pencil or erasable felt-tip pen. For accuracy, we recommend sticking the sticker with a backing onto masking tape and seeing from a distance how the drawing will look.
- Removing the substrate and applying . Since the sticker is large, remove the backing directly from the canvas attached to the tape from top to bottom in small pieces. Immediately apply the freed pattern to the surface and smooth it carefully with a squeegee without unnecessary pressure. And so on to the very bottom. At the same time, remove the transparent mounting film from top to bottom. The work should be done slowly and carefully. Carefully smooth out everything, even the smallest bubbles. It is most convenient to apply non-adhesive adhesives to closet doors with two people. If bubbles still remain, pierce them with a needle closer to the edge and remove the air with a squeegee.
- Examination. After removing the backing and mounting film, take the time to carefully look at how each element is stuck. Even for a small flower, all edges should be level on the surface.
This video will show you how to apply large vinyl stickers on surfaces:
Helpful tip: when applying a sticker to a mirror or glass of a wardrobe, spray the surface with water. The sticker will be easier to smooth out.
Method No. 3 Wardrobe decor with full-color posters
Wardrobe doors with photo printing are not a cheap pleasure. Color posters based on vinyl film are much more affordable and often look much better. This is achieved through high quality printing. You can paste a poster on one of the doors or make a composition on all panels of the wardrobe.
Drawings on color posters can be very diverse: from abstract figures to your own photographs of memorable places. They should be applied like regular vinyl stickers.
Method No. 4 Sliding wardrobe with stained glass windows - economical option
Only very wealthy people have the opportunity to decorate wardrobe doors with stained glass windows. We offer a decoration method that will allow you to experience all the delights of stained glass decoration without significant costs.
The technology is extremely simple. A translucent stained glass film with an adhesive surface is applied to the mirrored door of a sliding wardrobe. The film transmits light, which returns to us through reflection. The result is a glowing effect similar to reflection from colored glass. Applying stained glass to a wardrobe mirror is as easy as a regular vinyl sticker. Check out the decorative effect.
Stained glass films from the Crystal Frost series are perfect for decorating wardrobe mirrors, glass doors and partitions, and shower stalls. An exquisite translucent pattern will make the glass surface attractive and open up space zoning possibilities. Several surface patterns are available to order