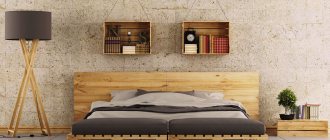
Bunk beds are not only comfort and space saving, but also a stylish element of the bedroom. Children are delighted with such a bed and often argue about who will sleep on the second floor. The room becomes very original and comfortable.
Of course, children's furniture is not cheap, and it is not always made only from harmless environmental materials. Therefore, in order to be completely confident in all stages of making a crib, you need to follow this, or better yet, do it yourself!
If you have never picked up tools, then you may not be able to create such a design the first time, but in general it is not difficult. However, it is better to first practice on simpler designs: for example, make a children's table with your own hands.
The important qualities of any bunk bed are environmentally friendly manufacturing, safe and sustainable construction and an attractive design. Children can suggest colors for you and even choose materials together, so you teach them the value of homemade things.
The bed was not always designed for two children. There are bunk loft beds and castle beds, when the sleeping place is located on top, and below there is a desk and wardrobes. This is a stable model; there is no need to worry about the child, especially if he is over 6 years old. In addition, some models combine two tiers and a roll-out mechanism - for example, beds for three children.
Why is it beneficial to use bunk beds?
The obvious advantage of these beds is their spaciousness and the ability to rest comfortably for both children and adults:
The feasibility of assembling bunk beds for children is determined by the small area of the room.
The need for additional sleeping places is ensured, taking into account individual sizes. Possibility of creating sleeping places for adults, below, and for children, on the second shelf.
Expansion of the living area for spending free time. Rational use makes it possible to save on the quantity and cost of furniture, as well as on cleaning the room.
A unique look will help create a unique interior with a harmonious and cozy atmosphere, which is so important for a sleeping area and for a healthy, sound sleep. Stylish examples can be ordered from the catalog of finished products, or you can make a bunk bed with your own hands according to the provided drawings.
Using beds not only as a place to relax, but also for storing things and clothes, writing instruments. Some types can combine a desk, a folding desk, a built-in wardrobe, retractable drawers, and a small exercise machine.
How to ensure safety for those who operate two-tier structures
The numerous advantages of compact structures do not exclude some of the disadvantages of such beds. The main factor that must be taken into account when installing furniture is the issue of safety . Cases of falls from the upper tiers or injuries when moving up the stairs are quite common. What is important to pay special attention to?
- Correctly calculate the size of the ladder, allowing you to move comfortably along it.
- Install railings around the perimeter of the bed (it is recommended to equip the stairs with them as well).
It is also better to equip the stairs with railings
- Provide anti-slip linings on handrails and steps.
- All components must be made in such a way that connecting parts or parts of the structure cannot cause damage to children and adults.
High-quality grinding of materials, elimination of sharp areas and rounding of edges will significantly increase the safety of structures. Classic bed on two floors
Features of the bed
Considering the obvious advantages, it is necessary to note the existing disadvantages, among which are:
Safety must come first. For a small child, there should be sides on the top shelf; on the bottom they will also protect against falling.
When choosing a bed design, carefully inspect the stairs. A simple, vertical one is suitable for older children.
For kids, it is better to choose an inclined option, with comfortable wide steps and handrails. The space under the steps can be used for spacious drawers for clothes, toys, and household items.
Ladder
Any children's two-story structure requires the installation of a ladder. A three-step staircase is considered traditional, but depending on the height of the bed there may be more steps. The drawings will tell you the dimensions, height of the stairs, step width and methods of fastening.
Drawing of a bunk bed with stairs
Depending on the type of ladder fastening, there are:
- vertical - tightly attached to the frame;
- inclined - located at an angle.
Staircase manufacturing process:
Preparation for future stages
- two beams are installed, which will be the bases of the stairs - guides;
- then the steps are fixed. The bottom step is connected to the backrest post, and the rest are located exactly one above the other. The steps are inserted into the bars.
Ways to connect steps:
- external;
- into the recess;
- on metal corners.
Please note that any fastening must be closed. This will ensure the child’s use of the bed and protect the entire structure. If the furniture includes a sofa, it is better to make the stairs with wider steps. Then a wide beam is taken, and the steps are cut from the inside. If the steps are secured with bolts, then the longest bolts are selected for the top step.
The stairs need a handrail for the baby to hold on to. Railing drawings are always given along with a description of the staircase installation. The railing is an ordinary board, designed to fit a child’s hand, with a recess for fastening to the frame.
The ends act as stairs
Types of multi-tiered furniture
A DIY children's bunk bed can be one of the following types:
A standard option for two identical beds, where there are bunks on the bottom and top according to the selected sizes. Experts advise: if your child is 6 years old or older, use adult bed dimensions, 90x190 cm, to make them. The ladder in this form is located on the side and is not removable. For greater stability, the structure is attached to the wall.
Model with a double bed below, which can be transformed into a sofa. The staircase is located on the side, which is not always convenient in order to save space. But due to the lower sofa, which comfortably accommodates several people during wakefulness, there is no need to purchase additional furniture.
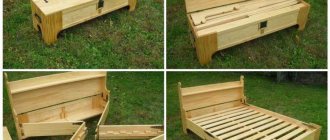
Design with an extra bed and a side staircase with built-in drawers. The design provides a third lying place, which is hidden under the bottom of the lower bed and pulled out if necessary.
Savings on furniture occur due to spacious drawers; no additional chests of drawers or wardrobes are required. This model is very large, reliable, and stable.
Note!
- Do-it-yourself screen: a step-by-step master class for creating it yourself. Types of screens, manufacturing materials + design ideas
- Do-it-yourself installation of interior doors - preparation of the structure, selection of doors, installation step by step + instructions from professionals
DIY shoe rack - types of designs, manufacturing materials, step-by-step master class with simple diagrams and drawings
Non-standard options when several people need to stay in one room. The upper bed is equipped for children's needs, the lower double bed is for parents. The design requires massive parts and fits organically into any interior.
Dimensional designs for large families, with a minimum number of seats designed for four people. The bed is located along the wall with a ladder in the middle.
Such a do-it-yourself bunk bed will require more raw material, additional fastening, and preliminary calculations for installation.
Combined attic structures. On the top floor there is a sleeping place with a side, vertical staircase; below, if necessary, there is a children's corner, a closet, a sports complex, a desk, a computer desk. To assemble bunk beds of the design you like, you can use drawings and diagrams from our website.
Constructions
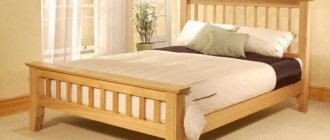
Most choose the classic version of a wooden bed, when the beds are located one above the other and connected by a ladder.
For children
A bunk bed allows you to accommodate two children in one room. Thanks to it, there is enough space for games and activities.
Practical model options:
- corner - sleeping places are located to each other at an angle of 90 degrees;
- attic type - designed for one child who can sleep upstairs and study at the desk downstairs;
- retractable tier - the lower bed extends, increasing the area;
- staircase made of drawers - the floors are connected by steps that extend and serve as drawers for storing small items.
Whatever wooden furniture you choose, it is important to take care of safety. It is better that the bunk bed stands against the wall, and all sides of the top have a secure fence
Expert opinion Ekaterina Anatolyevna Smirnova has been engaged in interior design for 7 years, a professional architect
If a child under 3 years old sleeps on the lower floor, a fence will also not hurt. Children often turn over in their sleep, so partitions will protect them from falls.
When the baby grows up, the fence from the bottom can be removed.
https://youtube.com/watch?v=hsw0ztO-R_I
For adults
The difference between the adult model and the children's model is only in size. A length of 160–170 cm is suitable for children; for older people, it is better to make a bed 190–200 cm. The width depends on the preferences of the individual and the available space. In order not to spend money on additionally ordering a mattress in individual sizes, it is better to choose the standard option – 70–90 cm.
Usually you make a bunk bed from chipboard with your own hands for a country house with limited living space. It allows you to accommodate overnight guests.
In one-room apartments, such furniture will be an ideal solution if the family has added a child. He will be able to sleep on the top tier, and his parents on the bottom.
In this case, the first floor should be designed for two.
An attic option made of timber will also save space. You can set up a full-fledged workplace below and sleep under the ceiling.
If the housewife does not like people to sit on her bed, and the area of the apartment allows for either a sofa or a bed, you can install a two-tier model. The upper part will be a bed, and the lower part will be made in the form of a regular sofa.
The stores have a fairly wide selection of classic models, but they are not always suitable for a specific apartment. If you make a wooden bed yourself, you can solve several problems at once.
Material selection
After selecting a suitable design, taking into account the number of beds and the location of the bed in a room with convenient access to the stairs, consumables, their quantity, quality are determined, and tools are prepared.
Frame
Making the frame begins with measuring the mattress. The base and its shape correspond to the selected size of the child's bed. If the design is with a sofa, the lower part of the seat is measured.
Frame manufacturing process:
- the box connects to the sofa at the bottom;
- boards are prepared (long and end), which are assembled into a rectangle. They can be compared to a box. There will be two such boxes according to the number of tiers;
Making a frame for the first and second floors
- the sofa fits into a box;
- To connect the box to the sofa, side supports are prepared. These are two bars standing vertically. They are held together by smaller bars. There should also be two supports. One rectangle for one side wall, another for the second;
This way the frame is attached to the supports
- the assembled frame is pulled together and secured.
Fastening bars to support the frame during assembly Fastening spacer blocks Fastening
the boards is done in a convenient way: eyes, tenons. Before fastening, they are lubricated with wood glue. The elements are connected firmly so that there is no possibility of any part of the frame weakening during operation. The resulting structure is dried. A photo of a bunk bed with a sofa is presented below.
If the tenon connection is difficult for the master, then self-tapping screws can be used. The main thing is to consider closing them from the outside so that there is no possibility of getting abrasions and scratches. The fastening is reinforced with metal corners.
The most durable is metal
Metal products have the greatest strength and reliability.
Note!
Do-it-yourself sliding wardrobe - manufacturing manual with a full description of the stages, types of structures, choice of manufacturing materials (photo + video)Do-it-yourself carriage screed: step-by-step instructions for creating it yourself, diagrams and drawings for beginners, selection of materials and tools (photo + video)
DIY stool - types of stools, manufacturing materials, step-by-step master class with simple diagrams and drawings for beginners
A frame made of any type of metal profile, round, square, rectangular or flat, looks stylish, ensures structural reliability, withstands significant loads, is not subject to mechanical damage, is easy to wipe clean, and has a service life of several decades.
Compared to other materials, metal will be more expensive, but with welding skills you can save on the services of a welder.
Economical option
The use of MDF, furniture panels, chipboards for furniture assembly simplifies the work and makes it more cost-effective. It is enough to cut out the necessary parts from the sheet and connect them together. Cutting into parts can be ordered in construction stores and construction markets.
Multi-storey structures involve the use of additional materials, metal, wood to impart stability, ensure reliability and strength.
Furniture panels are mainly intended for covering the finished frame. What is the advantage of mastering such material, its ready-made appearance, wide range of “wood-like” colors. It is already covered with a smooth, laminated sheet with a water-repellent surface and does not require additional impregnation.
The disadvantages of operation include the release of the adhesive composition used in the production of shields. To reduce the effect, all edges are securely insulated.
Self-assembly of furniture
Recently, more and more often furniture is made to order or craftsmen assemble the structures with their own hands. This is due to a more precise fit “in place”, taking into account the individual characteristics of the child, his leisure time, and hobbies.
Making it yourself will cost less and you will be confident in the reliability and strength of the design; if necessary, you can always add or replace individual parts.
Experts advise you to carefully read the instructions before work, adhere to safety rules, and do not skip important manufacturing stages.
Step-by-step assembly of the crib
Essentially, making a crib consists of stages, that is, first the various components are made, and then they are assembled. However, factory assembly occurs in the same way.
Material sizes
Part marking
- A – 4 legs 1730x76x38;
- B – pads for legs 1730x76x38;
- C – 2030x140x38;
- D – 1850x44x32;
- E – 914x140x20;
- F – 914x90x20;
- G – 1000x76x20;
- H – 1510x90x20;
- I – 482x64x20;
- J – 1800x90x20.
In addition to these details, stock up on such things as:
- grinder (belt or disk);
- clamps for fastening parts.
Backrests
Here you need to make planks from the bars
The backs are hammered onto the dowels
The back at the head and the back at the feet are the same, you can just diversify them for beauty, for example, make an almost continuous crate at the head, and a smaller one at the feet. Instead of lathing, you can use laminated chipboard
Please note that assembly is done with dowels and wood glue or PVA - they must fit tightly and are hammered in
There is one more nuance for the legs - if someone does not like to rest their feet on the crossbars, then the middle board should not be installed, although for children this is not so important
How to make side walls
Side wall image
Focus your attention on the bars that run horizontally along the stack - they are made using the block method. This device allows you to fix the bottom slats
Therefore, you should consider the strength of the bars when purchasing them - there should be no cracks, rot and/or wane, so that an accident does not happen (the bottom does not fall out). You can even use a 50x70 mm board instead of a block - it will be more reliable.
Make the wall itself from edged polished boards 50x200 mm and again look at the quality so that there are no cracks, fungus or wane. You will need to paint the walls for production, but do not use nitro varnishes - it is best to buy water-based preparations such as Aqua. You can also paint the walls with oil wax, but this will be much more expensive.
Frame
Crib frame
The slats on the frame rest on the bars on the sides, but they should be secured with self-tapping screws so that they do not move out of place. As for laying, it should not be too tight, that is, the batten should be inserted by hand and not hammered in, because otherwise the lumber will creak from friction. They should not be treated with varnish - the bottom will still be made of chipboard, MDF or OSB.
Making a staircase
Making a staircase
Let's start with the fact that the ladder is generally a separate part of the structure, which should be easily removed and just as easily installed in place
It is important here not to attach it permanently - the ladder can be easily detached, but at the same time hold on so that the child cannot fall from it
Stair parts
It’s not difficult to make a staircase, just correctly calculate the slope and pitch of the steps. If we talk about the optimal slope, then this is 29-33⁰, although this is not a critical indicator (you can make it much steeper), and steps for a child can be placed at 30-35 cm. Do not forget that the varnish itself is slippery, so There is no need to apply several layers - one will be enough. Below you can watch a video - this is one of the options for manufacturing products.
Video: Making your own crib
Consumables
Required tools and materials:
- Solid wood;
- A set of power tools for woodworking: saw, jigsaw, drill;
- Brushes for material processing, painting, impregnation;
- Paint, impregnation. You can use combined mixtures that include varnish and toner or impregnation and color;
- Set of connecting and fastening parts;
- Varnish.
Detailed master class on manufacturing
Step 1: Determining the bed design. Calculation of consumables. Sleeping place 190x90 cm. You can independently adjust the dimensions of the structure with the transfer of changing the size of the necessary parts. Construction of a drawing (you can download ready-made diagrams from the Internet with attached cutting and dimensions).
Step 2. Processing, drying, impregnation of wood. The material must be dry to avoid deformation later.
Step 3. Cut into parts. For assembly you will need 4 longitudinal posts, staircase parts with transverse footrests, boards for a berth with holes for ventilation - 2 pieces, fencing sides made of timber - at least 5 pieces (for double boards or decorative decorations, parts are added locally, based on their drawing designs).
Step 4. Assembling the structure. It is better to connect the parts of the bed in the room where it will stand, so as not to run into the problem of a large product drifting with its significant weight.
Step 5. Finishing. Painting, varnishing. Experts recommend applying several layers, allowing each layer to dry thoroughly.
Modifications for large families
How to properly assemble a bunk bed in which the lower floor is a double bed? This design is suitable for a one-room apartment, in which the first tier is allocated to the parents, and the top floor to the child. The bed is made in the form of a trapezoid, its manufacture is no more difficult than the traditional version. Not so many materials will be required, and stability will be more reliable due to the massive and expanded lower tier when unfolded.
Another option is a bunk bed with four drawers. This design is perfect for large families. This option is more difficult to manufacture than all the others. Despite the labor intensity and cost of material, it will be possible to preserve as much usable space in the room as possible. Essentially, these are two or three classic bunk beds assembled into one set. The device can be modified by creating drawers.