Interior fashion balances between rapidly changing new trends and time-tested classics. But if there are things in your home that you yourself had a hand in creating, it will always be relevant and valuable. Furniture painting is one such design opportunity that even a beginner can master. Read on to learn about what is needed to transform furniture, about possible painting styles, and the stages of decoration.
A bonus for you will be 2 detailed master classes on painting furniture - in the first you will learn how to transform a bedside table, in the second, how to make a stylish product in boho style from standard furniture.
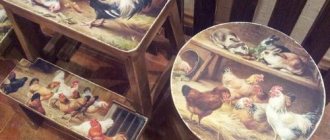
DIY furniture painting
Uniqueness is the main goal of any artistic work. When an old and already tatty closet changes its face, a renovation takes place in the house. The entire interior begins to look different.
In addition, painting on furniture allows a person to show their creativity, which is also a natural need for many people. Finally, sometimes one detail is missing to fully match the chosen interior style - and the painted front of a chest of drawers, for example, can cope with this task.
Furniture painting allows a person to reveal their creativity
Frequently asked questions from those who decide to paint furniture with their own hands:
- What kind of furniture is best to paint? Old wooden furniture is the most suitable option. But modern products made from fiberboard and chipboard in this sense are significantly inferior to wooden objects. Therefore, restoration and subsequent painting of grandma’s closet may well be the best idea.
- Is furniture covered with natural veneer suitable for painting? Yes, this is also a good option. For example, an old wardrobe or chest of drawers made of veneered multi-layer plywood lends itself perfectly to processing. After removing the paint or varnish from it, the surface is primed, repainted, and then the design is perfectly applied to it.
- What should those who really want to paint furniture do, but don’t know how to draw? Take advantage of the wonderful opportunity of stencil painting - even those who last held a brush in their hands back in school can handle it.
- If at home there is only modern furniture with MDF fronts, is it suitable for painting? Suitable, but only after certain preparation. It is necessary to follow all stages of technology, and then the furniture will change its appearance.
Popular styles for updating furniture with painting
If you’re going to be creative and decorate, then do it with a serious, thoughtful approach. It is necessary not only to transform a closet or cabinet, but to do it in such a way that the new type of furniture becomes harmonious with the interior of the space.
What painting styles are most in demand:
- Boho. Eclectic style, the translation of the name from French means “gypsy”. Many pillows, textiles, and mismatched pieces of furniture are inherent in this interior. Furniture classics in this style are vintage. If you decide to paint your grandmother's trellis, this is a good idea. It will be bright, elegant, plant patterns in this direction can be ideally combined with floral motifs.
- Provence. The style is gentle, summer, country. This can be furniture with a touch of antiquity, invariably light natural shades. You can give it a worn effect and artificially age it. The main thing that is required from such furniture is to create a calm, warm environment in the house that harmonizes the entire space. Painting motifs - plants, birds and insects, fruits, bird cages.
Provence style - Shabby chic. The fine distressed style has gained incredible popularity in the last decade. Contrary to stereotypes, not only white color is used, but also bleached mint, cornflower blue, and lemon. The painting motifs are mainly floral.
Shabby chic chest of drawers - Russian style. This is the most interesting and voluminous direction. There are several dozen types of wood painting in Russia alone. You can choose Khokhloma, Gzhel, Mezen painting or, for example, Gorodets. Of course, such a choice should be determined by the interior environment.
Interiors in the Russian style look incredibly modern. Our article is devoted to this: “Kitchen interior in the Gzhel style: photos, design ideas and design tips.”
Whether you decide to paint furniture in the boho style, or are looking at various variations of vintage styles, the technological transformation process will be the same. And first you need to stock up on all the necessary materials and tools.
Painted furniture in a modern interior
Hand-painted wooden furniture harmonizes perfectly with the modern decoration of the home. It gives richness, charm and extraordinary creativity to the home environment. Let's look at this with a specific example.
Often, young mothers want to please their child with something special. This also applies to the design of a children's room. If you are interested in painting furniture and interior items as an additional income, you can start painting children's chairs or toy cabinets. Choose stories from your children’s favorite fairy tales or cartoons as a sample. Kids and their mothers will be delighted!
Necessary materials
A furniture painting master has a whole arsenal of the necessary paints, primers, brushes and rollers. If you are just trying your hand at painting, you will have to buy almost everything from scratch.
Paint, varnish, primer
Acrylic paints are considered the most versatile option for painting furniture. Such compositions lay perfectly on the surface, in an even layer, without lumps or transitions. They are odorless and dry quickly.
Before painting, furniture is treated with a primer. If you decide to artificially age the furniture, you need to choose a special primer that will create small cracks on the surface. However, you can make a similar remedy yourself. To do this, you need to mix PVA glue, egg white, varnish and gelatin.
Varnishing is not always mandatory, but a popular way to fix the painting. The choice of varnish today does not create much of a problem. More often, water-based products are chosen: one-component, two-component or acrylic. Acrylic varnish, by the way, is used to coat furniture for kindergartens and the social sphere.
Brushes, roller
It’s great if you can purchase a whole set of flat and round brushes. They should be of different sizes so that the artist does not feel constrained in his actions. Brushes with both natural bristles and synthetic composition may be required.
A roller will also be needed for the job, because in most cases you first have to apply a background to the tree, and only then start painting. Arm yourself with a ruler and simple pencils - the sketch and markings play an important role in the formation of the ornament.
Sandpaper
You will need fine grit paper and coarse grit paper. The coarse one will be needed before applying the primer, and the fine one will be needed for finishing. Sometimes using fine sandpaper you can create additional effects on the surface.
Other
As already mentioned, a stencil can become your assistant in painting. Today there are a lot of them - they are sold in art supply stores, ordered on Asian websites, and made independently. Using a stencil speeds up work and makes the result more predictable, accurate, and harmonious.
In addition, try to decide on the place where the furniture will be painted. If you have to do this at home, you need to create such conditions so that nothing is damaged during the paintwork. As always, old newspapers, plastic wrap and rags help out for quickly cleaning up paint stains.
Design options
The way you decorate furniture depends on your professional skills and the time you are willing to spend on creating a masterpiece. For beginners who do not know the art of artistic drawing, it is better to start by using simple stencils. More complex and interesting painting is obtained by mastering the decoupage technique. The main composition can later be supplemented with small details made independently.
For craftsmen who are skilled with a brush, it is better to try painting furniture using acrylic paints. It will take more time to work, but the freedom of creativity here is not limited to a specific composition. For the first experiments, small pieces of furniture are suitable - a stool, chair or shoe shelf. After honing your painting skills, you can move on to larger objects - chests of drawers, cabinets.
Comment! Furniture made of natural wood is suitable for painting; products based on chipboard or MDF will have to be set aside. The exception is the design of surfaces using decoupage.
Motives for beginners
Beginners, of course, should not take on serious, complex work. But you can play with simple, unpretentious patterns and ornaments. The most correct starting option is geometric motifs. To transfer them to the surface to be decorated, artistic skills are not needed. You just need to understand the algorithm and follow it technically accurately and patiently.
Actually, in this situation, stencils come to the rescue. Once you get the hang of working with them, you will definitely want to do “live” painting. But you need to train your hand, and ornamental stencils cope with this mission perfectly.
Stages of painting furniture
It doesn’t matter what you are painting, a wardrobe or a bedside table, a stool or a sideboard, the process of work is always the same.
Preparing the drawing and base
You decide what will be depicted on the furniture, choose a sketch or the desired stencil blank. The surface itself should be prepared using coarse-grain paper. It will create the necessary roughness, the paint will fill them, which will make the future image more durable.
Next, the surface is primed, because the paint should lie flat and without cracking. If necessary, background paint is applied to the furniture. It is better to make such a coating in two layers, each layer needs to be thoroughly dried.
painting
The sketch is applied to a dry, prepared surface with a simple pencil. Next, you can begin the painting itself. If you use several shades, you need to dry each color and each layer. The process can take a couple of hours or a couple of weeks. If you work with stencils, everything will be quite fast. When you need a very quick and beautiful painting, aerosol cans of paint along with a stencil are used.
Consolidation
A mandatory step that makes the decorative coating durable. Basically, the image of the master is fixed with colorless acrylic varnish. The composition is applied to the furniture with a brush in an even layer. You need to make sure that there are no smudges or drops left on the surface.
Textile decor
This type of furniture decoupage is perfect for a child’s bedroom to create a chest of drawers for things or toys. To do this, you can take fabric in bold colors and make a fancy chair for your child, for example.
Re-upholstering upholstered furniture also refers to a creative approach. Old chairs are turned into designer ones, just as good as any store-bought ones. You can radically change the style of furniture just by changing the material and its color, adding colors and patterns.
A chair cover is an idea for festive decoration of chairs, for weddings and anniversaries. But even at home, such covers add softness to the interior; it almost looks like an armchair. If you don’t want to sew a whole cover or having one doesn’t fit into your style, a seat cushion is a useful decorative option. It will be easier to sew it.
Photos of decorative elements:
Master class on painting a bedside table
You can even revive an old bedside table made of chipboard.
You will need:
- alkyd primer;
- acrylic paints;
- roller and brushes;
- palette;
- sandpaper;
- acrylic lacquer;
- dry pastel.
Work progress:
- Sand the surface, remove varnish, and remove the gloss. Apply alkyd primer to the cleaned surface with a roller. Wait for it to dry.
- Mix the desired color and cover the surface several times. Let each layer dry.
- On a dry surface, use a pencil to mark a sketch of the image - in this case, the Eiffel Tower and a lady in a vintage outfit. This picture will be on the front of the bedside table. It will be flanked by a mannequin and an antique clock.
- Paint the picture according to the sketch with acrylic paints. Draw the elements carefully, checking the sample. In the corner of the cabinet you can draw a small delicious cake. You can age the image slightly with a dry brush.
- You need to fix the result with acrylic varnish. It will take several layers to dry each one.
All is ready! For those who are not sure that they can master these drawings right away on furniture, you can first practice on paper.
What furniture will you need?
Old or new unpainted furniture is ideal for painting:
- cabinets;
- cabinets;
- buffets;
- chests of drawers;
- benches;
- benches;
- chairs;
- stools;
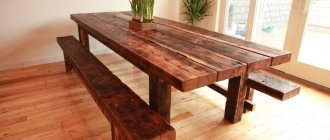
- massive tables;
- coffee tables;
- countertops;
- children's furniture (chairs, cabinets, etc.).
Important! The furniture chosen for processing should be made from real wood, and not from chipboard, etc.